

Why Multi-Location Businesses Need More Than Just a Homepage
I learned this lesson the hard way when I first started helping multi-location businesses with their local search engine optimization. A single homepage simply cannot rank effectively in multiple cities at the same time. Google isn’t confused by this limitation. Google is just doing exactly what it’s designed to do.
Think about it from a searcher’s perspective. Someone in Denver searching for ‘plumber in Denver’ wants a result specific to Denver. Someone in Boulder wants a Boulder result. Your homepage might mention both cities somewhere in the text, but it will never compete with a dedicated location-specific page that is entirely focused on serving that one community.
I’ve watched business owners spend thousands of dollars optimizing their homepage for five or six different cities. Every time, the result is the same. The homepage gets diluted signals, Google doesn’t know which location to prioritize in local search results, and the business ends up ranking poorly everywhere instead of ranking well somewhere. Learning how to improve their local search presence requires a fundamentally different approach than a single homepage can provide.
That’s exactly why Yoast Local SEO multiple locations exists. This WordPress local SEO plugin creates individual pages for each of your business locations, giving Google clear and unambiguous signals about where you operate and who you serve.
In 2026, this matters even more than it did a few years ago. Google’s AI Overview features pull structured local business data directly from well-organized location pages. When you set up Yoast Local SEO for multiple locations correctly, you’re not just optimizing for traditional search results. You’re positioning your business to appear in the AI-generated answers that more and more people are seeing at the top of their search results.
This guide covers the complete setup process, the content mistakes that kill rankings even after perfect configuration, and the off-page strategies that separate businesses ranking on page one from those stuck on page three.
What is Yoast Local SEO Multiple Locations Feature?
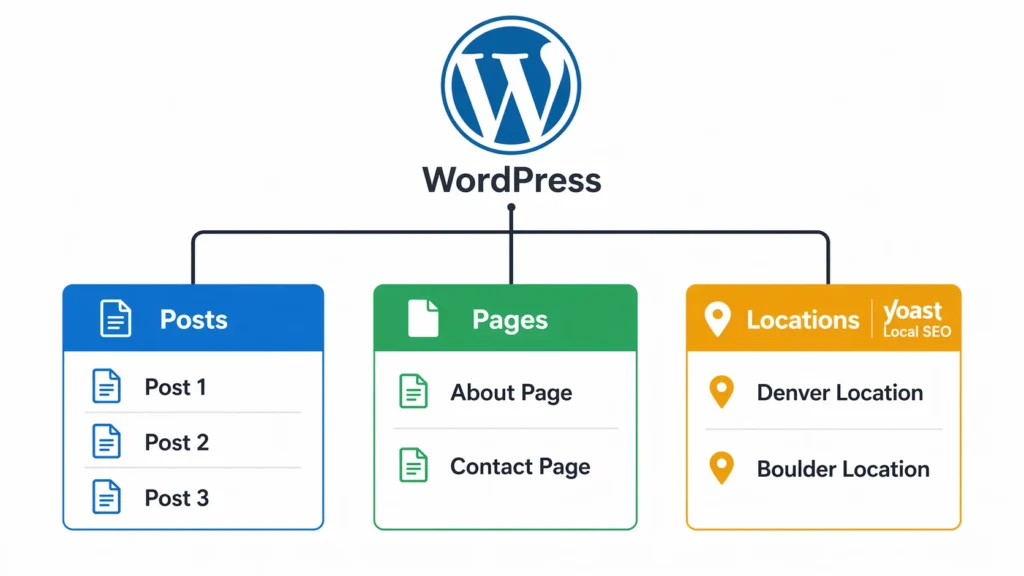
Yoast Local SEO multiple locations is a premium plugin feature that changes how WordPress manages businesses with more than one physical address. When you flip the multiple locations toggle to Yes, WordPress gains an entirely new content structure built specifically for location management.
The plugin creates a custom post type called Locations. Think of this like your blog post system but dedicated entirely to business branches. Each location you add gets its own page, its own URL, and its own set of SEO settings. The custom post type locations structure is what separates Yoast Local SEO from just manually creating pages yourself.
The biggest difference between doing this manually and using Yoast Local SEO is the automatic schema generation. Every location page gets proper local business schema markup added behind the scenes without you writing a single line of code. That structured data markup tells Google the exact address, phone number, opening hours, and geographic coordinates for each individual location.
Before I go further, I want to be clear about something that trips people up. The multiple locations feature requires the premium Yoast Local SEO plugin. This is a separate product from the standard free Yoast SEO plugin most WordPress users already have. I’ve used the free version to add local context to blog posts by including city and state in titles and headings, and it works well for that purpose. But if you need the location post type and automatic schema generation for multiple branches, you need the paid Local SEO add-on specifically.
What Gets Created When You Enable Multiple Locations
When you flip that toggle to Yes and click Save, five things happen automatically in your WordPress site:
A Locations menu appears in your admin sidebar. This works just like your existing Posts or Pages menu. Every branch you add from this point will live here, separate from your regular pages.
WordPress registers the custom post type in your database. Each location becomes its own post within this location-specific pages system, with its own edit screen, publish status, and metadata.
A default permalink structure is created. Your location pages will live at yoursite.com/locations/location-name by default. You can change the ‘locations’ part of that URL later in the business location settings if you want something more branded.
LocalBusiness schema generation activates. From this moment on, every location page you publish gets structured data markup automatically. You don’t configure this separately. Yoast handles it based on the business information you enter per location.
A locations archive page goes live. Visit yoursite.com/locations and you’ll see a page that lists all your locations, similar to how your blog archive lists all your posts.
Who Actually Needs This Feature (And Who Doesn’t)
Not every business needs to enable multiple locations in Yoast Local SEO. I’ve seen people set this up incorrectly, creating fake location pages just to rank in more cities. Google catches this, and it damages your credibility more than it helps your rankings.
If you have physical storefronts, offices, or warehouses where customers can actually visit, you need this feature. Retail stores, restaurant chains, dental offices with multiple branches, law firms with offices in different cities, and franchise locations all fit this category. Each physical location should get its own dedicated page with accurate address information.
What took me a while to understand is that you don’t need a physical office in a city to rank there organically. Google understands that service area businesses like plumbers, electricians, cleaning services, and digital marketing agencies serve regions well beyond their registered address. For these businesses, the multiple locations setup is often the wrong tool entirely.
If you operate from one address but serve customers in several surrounding cities, you don’t need this feature. Location-targeted blog content and service pages optimized with the free Yoast SEO plugin will serve you better than creating location pages for addresses you don’t actually have.
The question I ask every client before touching any settings is this: do you have staff permanently based at multiple physical addresses where a customer could actually show up? If yes, use Yoast Local SEO multiple locations. If no, skip this feature and look at the alternative approaches I cover later in this guide.
What You Need Before Starting (Prerequisites Checklist)
always tell people to gather everything before touching any plugin settings. Starting midway through the configuration and then stopping to hunt for a phone number or API key creates mistakes that take twice as long to undo.
Here’s what you need ready before you begin:
Yoast Local SEO premium plugin installed and activated. This is a separate purchase from regular Yoast SEO. Once installed, you should see a Local SEO option appear under the SEO menu in your WordPress dashboard. If you don’t see it, the plugin isn’t activated properly.
Full WordPress administrator access. Some of the settings in this configuration require admin-level permissions. If you’re working on a client site, confirm your access level before starting. Discovering halfway through that you can’t save certain settings is a frustrating way to lose progress.
Complete business information for every location. I mean complete. Exact physical address formatted the same way you want it to appear everywhere online, a direct phone number for each branch, the official business name as it appears on registration documents, and opening hours for every day of the week including any days you’re closed.
A decision on your primary location. Yoast Local SEO uses a primary location in the organization schema to identify your main headquarters. Even if every branch is equally important, you need to pick one. I usually recommend choosing the location that’s been open longest or the one that processes the most volume.
A Google Maps API key. Without this, the Google Maps integration won’t work and maps won’t display on any location page. You can generate a free key through Google Cloud Console. The free tier covers more than enough usage for most small and medium-sized business websites.
A clear sense of what information your locations share. Does every branch use the same corporate email? The same general business description? Decide this before you start. Knowing what’s shared versus what’s unique to each location will save you significant time when you reach the shared business info step.
How to Configure Yoast Local SEO for Multiple Locations (Step-by-Step)
This is the part most tutorials rush through or skip entirely. I’m going to walk you through each setting in the exact order you should configure it, because the sequence matters more than most people realize. Configure these out of order and you’ll hit dependency issues that send you backtracking.
Step 1: Enable Multiple Locations Mode
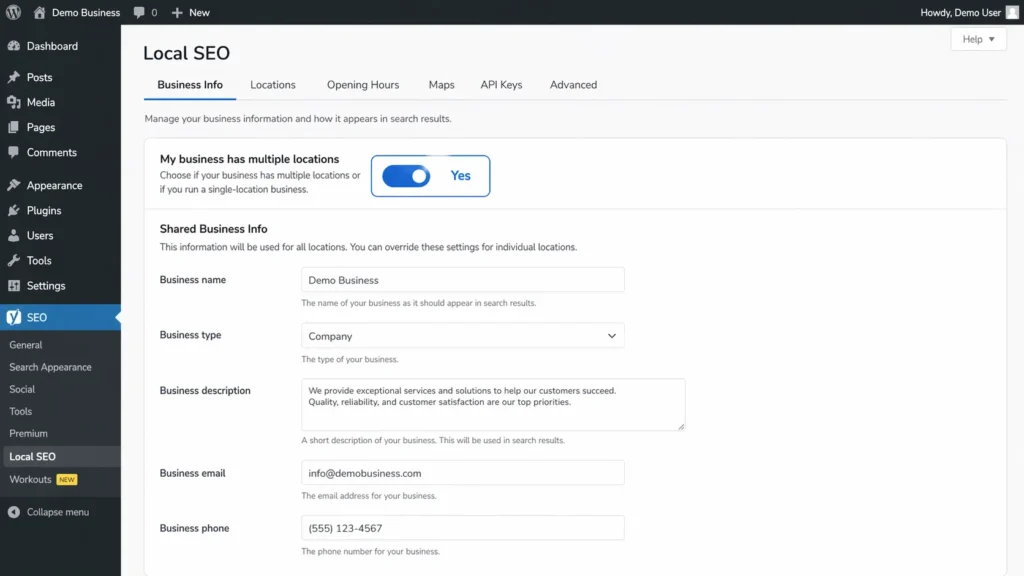
Log into your WordPress dashboard and go to SEO in the left sidebar. Click Local SEO, then select the Business Info tab at the top of the screen.
Scroll down until you see a toggle labeled ‘My business has multiple locations.’ Switch it to Yes. When you do, the interface expands immediately and new options appear below the toggle.
One of those new options asks ‘All locations are part of the same business.’ For most multi-location businesses, set this to Yes. This matters because it tells Google that your Denver branch and your Boulder branch belong to the same parent company rather than being two unrelated businesses that happen to share a name.
The most important thing about this step is saving. I’ve seen people change these settings, navigate away, and wonder why nothing happened. Scroll to the bottom of the page and click the blue Save Changes button before doing anything else. WordPress only creates the custom post type structure in your database after you save. The toggle means nothing until you hit Save.
After saving, refresh your browser. A new Locations menu item should appear in your WordPress admin sidebar. If it doesn’t show up, the save likely didn’t complete. Try again.
Step 2: Set Your Primary Location
Just below where you enabled multiple business locations, you’ll see a dropdown labeled Primary Location. When you first open this page, the dropdown is empty because you haven’t created any locations yet. Come back to this setting after you complete Step 4 and publish your first location.
The primary location represents your headquarters or main office in the organization schema. Google uses this to understand the parent-child relationship between your overall business entity and each individual branch. Think of it as telling Google which location is the one in charge.
If all your locations are equal in terms of importance, I recommend picking whichever location you opened first or the one with the highest volume. One thing I want to clarify because I see this misconception constantly: the primary location does not get better rankings than your other locations. It’s a schema structure setting, not a ranking preference. Choosing your primary location correctly helps Google understand your business. It doesn’t help one branch outrank another.
Step 3: Configure Shared Business Info
Right after the primary location setting, you’ll see a toggle that says ‘Locations inherit shared business info.’ I recommend setting this to Yes for almost every multi-location business.
When you enable shared business info, you enter common details once and they automatically apply to every location page you create. For businesses with five, ten, or twenty locations, this single setting saves hours of repetitive data entry and prevents the inconsistencies that hurt local SEO.
What belongs in shared business info: your organization type, your main corporate email address, your website URL, and your general business description that applies to all branches.
What should stay unique per location: the specific street address, a direct phone number that rings to that branch, and opening hours if they vary between locations.
I set this up for a dental office chain I worked with, and the shared section included their organization type as Dentist, their corporate email, their website, and a general description of their services. Each individual location had its own address, its own direct office phone number, and its own opening hours because some offices were open Saturdays and others weren’t. That mix of shared and unique data is exactly how the feature is designed to work.
The practical payoff of this setup shows up when you need to make updates. Change the shared email address once, and every location page reflects that change automatically. Without this feature, updating contact information across 10 location pages would mean 10 separate edits with 10 opportunities to make a mistake.
After you set up what’s shared and what’s unique, click Save. The business information fields you marked as shared will auto-populate every time you create a new location going forward.
Step 4: Add Your First Location
Go to Locations in your WordPress admin sidebar and click Add New. This opens the standard WordPress editor, so if you’ve ever written a blog post or created a page, the interface will feel familiar immediately.
Give the location a title first. I use the format ‘City Name Location’ or ‘Neighborhood Name Branch’ rather than just a city name on its own. For example, ‘Denver Downtown Location’ or ‘Boulder Pearl Street Store.’ The title becomes part of the URL and shows up in search results, so make it descriptive.
Scroll below the main editor and you’ll see metaboxes specific to Yoast Local SEO. The first is Location Details. This is where the real work happens.
Enter the complete street address exactly as you want it to appear everywhere online. If you write ‘123 Main Street,’ use that same format on Google Business Profile, Yelp, and every other directory listing. Consistency in formatting is what makes your NAP citations count.
The city, state, ZIP code, and country each have their own fields. They’re not combined into one address line. Fill in each field separately.
Enter a direct phone number for this specific location, not your corporate call center unless that’s genuinely the number customers would use to reach this branch.
One field most people overlook is geo coordinates. Yoast Local SEO usually auto-fills the latitude and longitude based on your address, but I always verify these manually. Incorrect coordinates can place your business in the wrong location on maps, which is worse than having no map at all. Check them before publishing.
You can also add unique content for this location in the main editor area above the metaboxes. I’ll cover content strategy in detail in the next section. For now, just know that this editor area is where location-specific descriptions, photos, and videos go.
When everything is filled in, click Publish. Then go back to SEO > Local SEO > Business Info and select this location from the Primary Location dropdown if it’s your main branch. Save again.
Step 5: Set Opening Hours for Each Location
Opening hours are worth spending a few extra minutes on because the data goes directly into your opening hours schema. This is the information that appears in Google search results showing customers whether you’re currently open or closed.
The approach depends on your situation. If all your locations run identical hours, set them globally through SEO > Local SEO > Opening hours tab. With shared business info enabled, those hours push to every location automatically.
If your branches have different hours, which is far more common in my experience, set them individually. Edit each location through Locations > All Locations, scroll to the Opening Hours metabox, and enter the specific hours for that branch. These branch-level hours override whatever you set globally.
Be as precise as possible. If you close at 5:30 PM, enter 5:30 PM. If you open at 9:15 AM, enter 9:15 AM. Google serves these hours directly to searchers, and ‘approximately 9’ isn’t information you want Google handing to someone who’s trying to decide whether to leave now or wait until tomorrow.
Check whether your version of Yoast Local SEO includes an option to set holiday closures or special hours. Newer versions of the plugin include this. If yours supports it, use it. Nothing frustrates customers more than showing up to a location that Google says is open when it’s actually closed for a holiday.
Step 6: Configure Google Maps Settings and API Key
Go to SEO > Local SEO and click the Maps tab. You’ll see a single important field: Google Maps API Key.
Without a valid API key entered here, every location page will show broken placeholders instead of maps. Getting the key takes about five minutes. Go to Google Cloud Console, create a project, enable the Maps JavaScript API for that project, generate a key, and paste it into this field.
One thing that catches people off guard: Google requires a valid payment method on file in Cloud Console even to use the free tier. The free tier is genuinely free for most small and medium business websites. Standard map usage on a typical local business site falls well within the monthly quota. But if you haven’t added billing information, the API key won’t work regardless of how correctly you set everything else up.
After pasting the key, save the settings and then visit one of your published location pages on the front end of your site. A working map should load within a few seconds. If it shows an error instead, the troubleshooting section later in this guide covers the most common fixes.
Embedded Google Maps on location pages do more than help customers get directions. They serve as a local relevance signal that helps Google verify the physical connection between a page and a real geographic location. I’ve consistently seen better local search optimization results on pages with properly embedded maps compared to identical pages without them.
Step 7: Customize Location Page URLs (Permalink Settings)
By default, Yoast Local SEO creates location page URLs in the format yoursite.com/locations/location-name. That default structure is perfectly functional, but I always recommend customizing it to match how your specific type of business talks about its branches.
Go to SEO > Local SEO and find the Advanced tab or look for a Permalink settings or Location slug option. The exact placement varies slightly between plugin versions.
Change the slug to something that fits your industry. A law firm might use yoursite.com/offices/denver. A restaurant group might prefer yoursite.com/restaurants/downtown-boulder. A retail chain might go with yoursite.com/stores/austin-north. All of these communicate more clearly to users than the generic ‘locations’ default.
URL structure has a minor direct impact on SEO rankings compared to content and schema quality. Where branded URLs genuinely matter is user clarity and click-through rate. Someone scanning search results is more likely to click yoursite.com/offices/denver than yoursite.com/locations/denver if they know they’re looking for an office.
After changing the slug, go to Settings > Permalinks in WordPress and click Save Changes without modifying anything else. This flushes WordPress’s URL rewrite rules. If you skip this step, your newly customized location URLs will return 404 errors.
Creating Location Pages That Actually Rank (Not Just Exist)
This is where most people fail with Yoast Local SEO multiple locations. They configure the plugin perfectly, create all their location pages, and then wait for rankings that never come. The problem isn’t the technical setup. It’s the content. A technically perfect page with thin or duplicate content will not rank, and no plugin can change that.
The Cookie-Cutter Content Mistake (And How to Avoid It)
I see this constantly. Someone creates a location page for Denver and writes something like: ‘Welcome to our Denver location. We provide excellent service to the Denver community. Contact our Denver office today.’
Then they build a Boulder page and swap every instance of ‘Denver’ for ‘Boulder.’ Same structure. Same sentences. Same paragraphs. Just a different city name.
Google identifies this pattern quickly. These pages offer no meaningful differentiation, and Google has no reason to rank a templated page that says nothing specific about the actual location when a competitor’s page genuinely describes their Boulder store with local details, team information, and neighborhood references.
I rewrote 12 pages exactly like this for one client. Every single page had identical content except the city name, and every single one ranked nowhere. After rewriting all 12 with genuinely unique content for each location, 9 of the 12 were showing up on page one for their service plus city name searches within two months.
Compare these two examples:
The template version: “Our Springfield location offers the same great service you’ve come to expect from our company. We’re proud to serve the Springfield area with professional expertise. Visit our Springfield office today.”
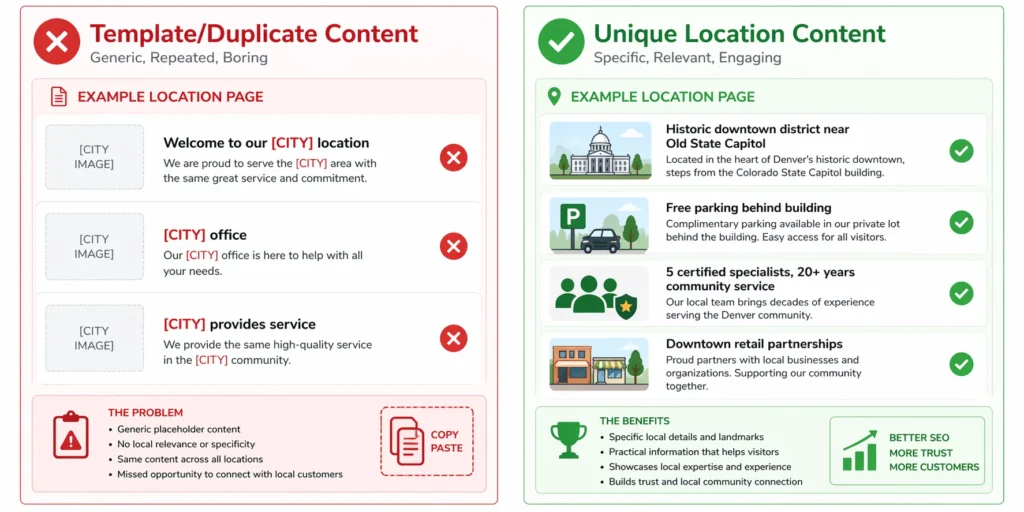
The location-specific version: “Our Springfield location sits right in the historic downtown district, two blocks from the Old State Capitol. When you visit our office at 123 Main Street, you’ll find free parking in the lot behind our building. Our Springfield team includes five certified specialists who’ve served this community for over 20 years. We’re particularly proud of our work with local businesses in the downtown retail corridor.”
The second version has specific geography, a real address, team information tied to this particular location, and a reference to an actual landmark. That’s content Google can distinguish from every other location page on your site. The template version is content Google has no reason to rank.
7 Ways to Make Each Location Page Genuinely Unique
Here are the seven elements I include on location pages that actually get indexed, ranked, and clicked.
1. Real photos of the team at that specific location. Not stock photos. Not the same corporate headshots appearing on every branch page. Actual photographs of the people who work at that Denver store, different from the ones at your Boulder store, with names and brief bios attached. This creates content that literally cannot be duplicated across your other location pages.
2. A description of the neighborhood, not just the address. What neighborhood is this location in? What’s nearby that people would recognize? What’s the closest highway exit? I’ve found that including one or two real local references makes location pages feel like they were written by someone who actually knows that area, because they were.
3. A service area map specific to that branch. If your Denver branch covers North Denver, Thornton, and Westminster, show that visually on the page. If your Boulder location handles Boulder, Louisville, and Lafayette, make that clear with a dedicated map. This visual element is unique to each location and directly addresses the question every visitor has: do you serve my area?
4. Customer testimonials from people who visited that specific branch. When you collect reviews, encourage customers to mention which location they visited. Then feature those testimonials on the page for that branch. A review that says ‘the Boulder team was fantastic’ belongs on the Boulder page, not the Denver page.
5. Local data that’s relevant to your service. A tutoring center can mention the specific school districts nearby. A real estate office can include recent market data for that neighborhood. A plumber might reference the age of the housing stock in that area and what issues that typically means. This kind of locally relevant information cannot be copied from one location page to another.
6. Video content showing the actual location. A 60-second video of the storefront, a quick team introduction, or a brief walkthrough of the office creates content that is by definition unique to that location. Beyond the uniqueness factor, video increases time-on-page, which is a behavioral signal Google pays attention to. I’ve seen location pages with even simple phone-recorded videos significantly outperform identical pages without them.
How Many Keywords Should You Target Per Location Page?
This is the question I get more than any other when working with multi-location clients. Everyone wants to rank for every service in every city. The instinct makes sense, but understanding proper keyword strategy shows why the math doesn’t work when you spread your focus too thin. This is the question I get more than any other when working with multi-location clients. Everyone wants to rank for every service in every city. The instinct makes sense, but the math doesn’t work.
The practical limit I’ve found through actual campaign work is two targeted keywords per location page, and no more than two close locations on one page. In highly competitive markets like New York, Los Angeles, or Chicago, I push that further to two keywords and a single neighborhood rather than the whole city.
A dental office Denver location page works well optimized for ‘dentist in Denver’ and ‘teeth cleaning Denver.’ Two specific targets. One city. That’s focused enough for Google to understand exactly what this page is about.
The moment you try to add ‘dental implants Denver,’ ‘cosmetic dentistry Denver,’ and ’emergency dentist Denver’ to that same page, the focus dissolves. Google can’t identify a clear primary intent. You stop ranking well for any of those terms instead of ranking well for two.
The other services aren’t wasted. Put them on dedicated service pages on your main site, and then link from your location pages to those service pages. This structure builds topical authority across your site without creating keyword cannibalization between location pages.
Two targeted keywords per location page isn’t a rigid formula. I’ve seen some highly authoritative sites rank well with more. But for most local businesses that are building their local search presence from scratch, focused beats broad every time.
Understanding Schema Markup for Multiple Locations
When I first started using Yoast Local SEO, I was essentially operating on faith. I knew the plugin made location pages perform better in local search, but I had no clear idea why. It wasn’t until I started digging into schema markup that I understood what the plugin was actually doing in the background and why getting it right mattered so much.
What Schema Markup Does for Your Multiple Locations
Schema markup is structured data code that helps search engines understand your business information. Think of it as a translation layer between what humans read on your website and what Google’s systems need to read to make sense of your business.
When you publish a location page with Yoast Local SEO, the plugin automatically generates local business schema markup in JSON-LD format. This code lives in the background of your page and tells Google specific details about that location: your business name, complete physical address, phone number, opening hours, geographic coordinates, business type, and the URL of that specific page. The format follows the Schema.org standard, which all major search engines recognize.
I’ve tested this directly. Location pages with valid schema consistently outperform pages without it in local search optimization results, even when the visible content on both pages is nearly identical. The schema layer matters more than most people expect.
The most visible benefit is rich results. You know when you search for a local business and see their phone number, hours, and address appear right in the search results without clicking? That’s schema working as intended. For multi-location businesses, Yoast Local SEO makes this happen for every location separately. Your Denver location page shows Denver-specific schema data. Your Boulder page shows Boulder-specific data. Google understands they belong to the same business but treats each location’s information distinctly.
Schema also powers voice search. When someone asks their phone ‘What time does the Denver location close?’ the answer comes from the opening hours schema on your Denver location page. The same is true for AI-generated search responses that pull structured business data rather than crawling page content.
Organization Schema vs. LocalBusiness Schema
This was the part that confused me most when I first dug into Yoast Local SEO schema. The plugin actually creates two different types of schema simultaneously, and understanding why both exist makes the whole system make more sense.
Organization schema represents your business as a complete entity. This covers your company name, your primary location set back in Step 2, your corporate logo, your website, and your overall business category. Google uses this organization-level data to build its understanding of your brand.
Local Business schema represents each individual branch. Every location page gets its own LocalBusiness markup with that specific location’s address, phone number, hours, and coordinates. Each of these individual schemas references back to the parent organization schema, creating a linked hierarchy.
Take a simple example. If you run Mountain Coffee Roasters with cafes in Denver, Boulder, and Fort Collins, your organization schema identifies Mountain Coffee Roasters as a coffee company headquartered in Denver. Then you have three separate LocalBusiness schemas: one for the Denver cafe, one for Boulder, one for Fort Collins. Each one signals to Google that it belongs to the Mountain Coffee Roasters organization.
That parent-child relationship is what tells Google these aren’t three separate coffee shops that happen to have similar names. They’re three locations of one business. That distinction matters for how Google attributes reviews, builds knowledge panels, and displays business information in search results.
Yoast Local SEO creates all of this automatically when you’ve set your primary location and configured shared business info correctly. No code required. The plugin generates both schema types based on what you entered in the settings.
How to Verify Your Schema is Working (Testing & Validation)
Getting the plugin configured is only half the job. I learned this when a client called me confused about why their location pages weren’t showing rich results in Google. They’d done everything correctly in the plugin settings. The problem was schema errors they had no idea existed because they’d never checked. I now make schema validation part of my standard process for every location page I publish.
Testing Individual Location Pages with Google Rich Results Test
Google provides a free schema validation tool called the Rich Results Test, and I run every new location page through it before considering the setup complete. Search for ‘Google Rich Results Test’ or go directly to search.google.com/test/rich-results.
Paste the full URL of your location page into the tool and click Test URL. It takes about 10 to 20 seconds. When it finishes, you’ll see one of three outcomes: valid rich results detected, issues detected, or no rich results detected.
If LocalBusiness appears under detected items, click on it to expand the details. What you should see is all your location data properly formatted: business name, address with each component separated (street, city, state, ZIP), phone number, geo coordinates, and opening hours showing the correct days and times.
The most common errors I run into are missing postal codes, phone numbers in an unrecognized format, and geo coordinates stuck at 0,0. That last one sounds technical, but what it actually means is that Google thinks your location is in the middle of the Atlantic Ocean. I’ve seen it happen more than once on sites where the address auto-fill failed silently. If you see coordinates showing 0,0, go back to that location’s edit screen and verify or re-enter the address.
One thing worth understanding about the Rich Results Test: it shows you what Google can read from your page. It doesn’t guarantee Google will actually show rich results for that page in search. Competitive factors and search query type affect whether rich results appear. But valid schema is the only path to getting there. Invalid or missing schema means rich results are impossible regardless of everything else.
Checking Schema Status in Google Search Console
Once your location pages have been live for a few weeks and Google has had time to crawl them, check Google Search Console for schema status.
Log into Search Console and look in the left sidebar under Enhancements or Experience, depending on which version of the interface you’re using. You may see entries for Unparsed structured data, Rich results, or both.
Click on any enhancement entry that appears. If your LocalBusiness schema is working correctly, your location pages will be listed there. Google breaks them into three categories: valid, warnings, and errors.
Warnings don’t necessarily need immediate action. They typically flag optional fields you didn’t fill in, like priceRange or areaServed. Errors, on the other hand, require a fix. An error means required data is missing or formatted incorrectly, and that error is preventing Google from fully reading your schema.
If you don’t see LocalBusiness schema appearing in Search Console after a full month of the pages being live, something is wrong. Either Google hasn’t crawled those pages yet, or a technical issue is blocking schema recognition. Use the URL Inspection tool in Search Console to check whether specific location pages have been indexed. If they haven’t been crawled, click Request Indexing to push them into the queue.
I do a monthly schema check for every client site with multiple locations. Plugin updates occasionally change how schema is generated, and staff updating location information sometimes removes required fields without realizing it. Monthly checks catch these issues before they quietly hurt rankings for weeks.
Troubleshooting: When Yoast Local SEO Multiple Locations Isn’t Working
Even after a clean configuration, things break. I’ve run into every problem in this section across various client sites, usually at inconvenient times. Here’s what actually fixes each one.
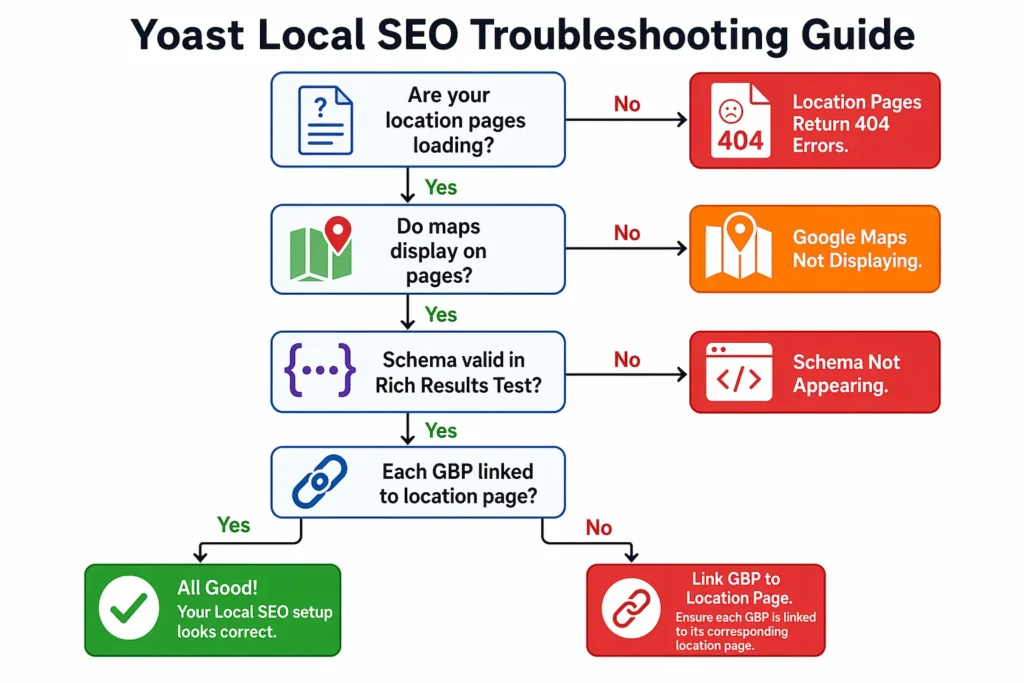
Fix: Location Pages Return 404 Errors
This is the most common problem I see immediately after enabling multiple locations. Someone creates location pages, clicks publish, visits the page on the front end, and gets a 404 Page Not Found error.
The cause is almost always that WordPress permalinks weren’t flushed after creating the custom post type locations. When Yoast Local SEO creates the Locations custom post type, WordPress needs to update its rewrite rules to recognize the new URL structure. This doesn’t happen automatically.
The fix is simple. Go to Settings > Permalinks in your WordPress admin. Don’t change any settings. Just scroll to the bottom and click the “Save Changes” button. This forces WordPress to flush the rewrite rules and regenerate them including your new location URLs.
Go back to your location page and refresh. It should now load correctly. If it still shows a 404, try the following: make sure the location is actually published, not saved as a draft. Check that you’re using the correct URL format based on your permalink slug. Clear your browser cache and try in a private/incognito window.
I’ve seen cases where aggressive caching plugins prevent the permalink flush from working properly. If you’re running a caching plugin like WP Super Cache or W3 Total Cache, clear all caches after flushing permalinks.
Fix: Google Maps Not Displaying on Location Pages
You visit your location page and where the map should be, you see either nothing, a gray box, or an error message saying “This page can’t load Google Maps correctly.”
The most common cause is a missing or invalid Google Maps integration API key. Go back to SEO > Local SEO > Maps and check that you entered the API key correctly with no extra spaces or missing characters.
Next, log into your Google Cloud Console and verify the API key is enabled for the Maps JavaScript API specifically. Google has multiple map-related APIs, and you need the JavaScript one for embedded maps on websites.
Check if your API key has any restrictions. If you set domain restrictions, make sure your website’s domain is listed in the allowed domains. If you set IP address restrictions, that can prevent maps from loading for visitors.
Another common issue is billing. Even though Google offers a free tier, you must have a valid payment method on file in Google Cloud Console for the API to work. Google doesn’t charge you until you exceed the free monthly quota, but they require payment info for verification.
If the API key is definitely correct and properly configured, check for JavaScript conflicts. Sometimes other plugins load JavaScript that conflicts with Google Maps. Try temporarily deactivating other plugins to see if that resolves the map display issue.
Fix: Schema Not Appearing in Rich Results Test
You run your location page through Google Rich Results Test and it comes back with “No rich results detected” or the LocalBusiness schema is missing important data.
First, check for plugin conflicts with other schema plugins. If you’re running another SEO plugin like Rank Math or All in One SEO that also generates schema, you’re creating duplicate or conflicting structured data. Yoast Local SEO should be your only source of LocalBusiness schema. Disable schema generation in other plugins or deactivate them entirely.
Caching can cause the Rich Results Test to see an old version of your page without the updated schema. If you recently made changes, clear all caches. This includes your WordPress caching plugin, server-level caching if you have it, and CDN caches if you use a service like Cloudflare.
Verify that all required business information fields are completely filled in. Go to the location’s edit screen and check that you have address, city, state, postal code, country, and phone number all entered. Missing any of these can cause schema errors.
Check your theme. Some poorly coded themes strip out the schema markup that plugins generate. To test this, temporarily switch to a default WordPress theme like Twenty Twenty-Four and run the Rich Results Test again. If schema appears with the default theme but not your custom theme, the theme is the problem.
Fix: Shared Business Info Not Overriding on Individual Locations
You set shared business info globally, but when you try to override specific fields for individual locations, the override doesn’t work. The location keeps showing the shared data instead of the location-specific data you entered.
This usually happens because of how you’re entering the override data. In most versions of Yoast Local SEO, you need to explicitly clear the shared field first, then enter the location-specific data.
For example, if the shared phone number is 555-1000 but your Denver location has a direct line of 555-2000, you might need to delete the 555-1000 from the Denver location’s phone field completely, save, then go back in and enter 555-2000.
Some versions of the plugin have a checkbox or toggle that says something like “Use shared value” or “Override shared value” next to each field. Make sure that toggle is set correctly to allow the override.
If the override still doesn’t work, it might be a caching issue. The front-end page is showing cached content with the old shared value. Clear all caches and check again.
In rare cases, I’ve seen custom code in a theme’s functions.php file that forces shared values and prevents overrides. If you or a developer added custom code related to Yoast Local SEO, that might be interfering. Comment out that custom code temporarily to test.
Beyond Plugin Configuration: Local SEO Best Practices
Configuring Yoast Local SEO correctly gets your technical foundation right. But the businesses I’ve seen dominate local search results don’t stop at plugin settings. They pair proper technical setup with off-page strategies that most competitors ignore entirely. In fact, understanding the full picture of what drives search rankings shows that technical configuration is just one component of local SEO success.
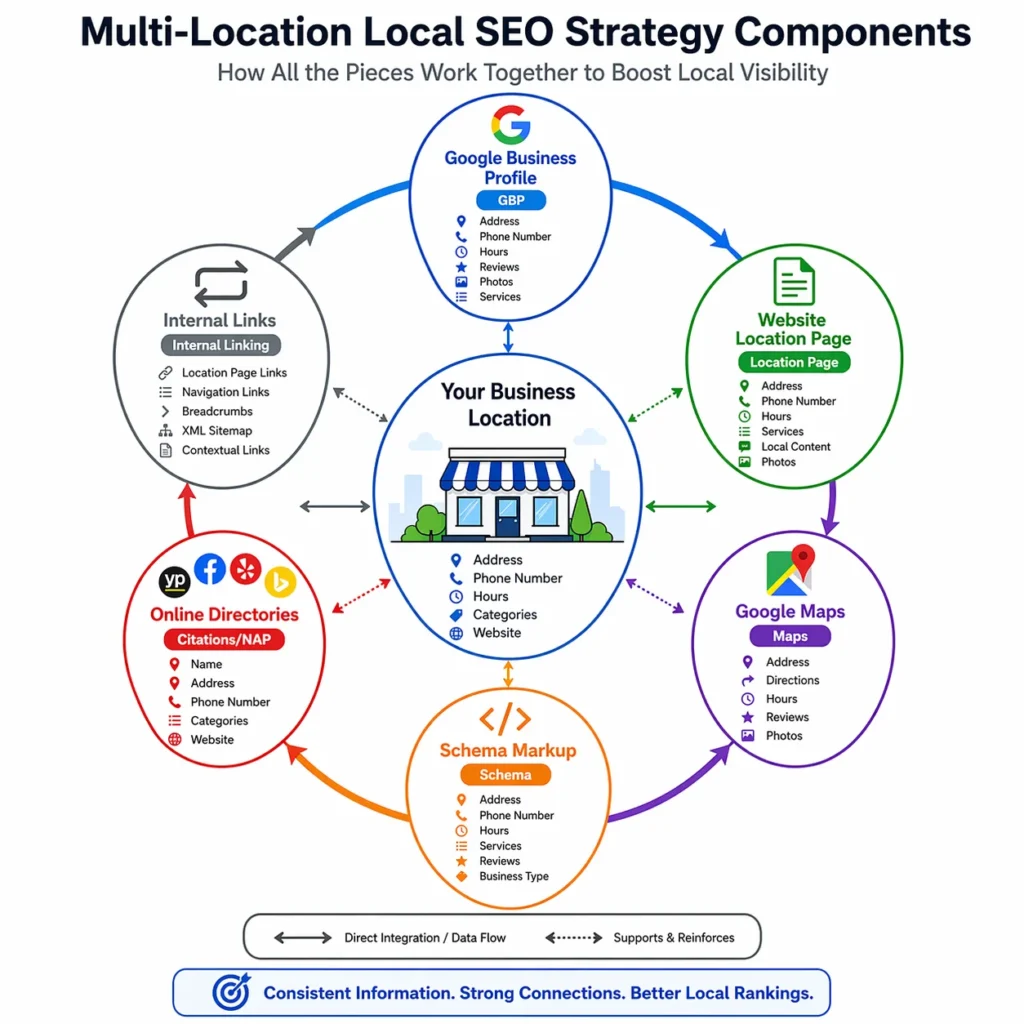
Link Your Google Business Profiles to Location Pages (Not Your Homepage)
This is a mistake I see constantly, and it’s costing businesses rankings. They set up Yoast Local SEO, create beautiful location pages, but then link all their Google Business Profile listings to their homepage.
Here’s why that’s wrong. When you link your Denver location’s Google Business Profile to your homepage instead of your Denver location page, you’re sending all the authority and traffic from that profile to a generic page. Your homepage tries to serve all locations and ends up not ranking well for any specific city.
Instead, each Google Business Profile should link directly to its corresponding location page. Your Denver GBP should link to yoursite.com/locations/denver. Your Boulder GBP should link to yoursite.com/locations/boulder.
This creates a powerful connection. When someone finds your business in the local pack rankings or Google Maps, they click through to a page specifically about that location. The behavioral signals are better because visitors find exactly what they expected. The page authority builds for location-specific searches because you’re concentrating link equity on the right page.
To update this, log into Google Business Profile for each location. Go to the Info section and find the Website field. Replace your homepage URL with the full URL of that location’s specific page. Save the changes for each profile.
I’ve seen this single change improve organic rankings for location pages dramatically within weeks. The location-specific page starts getting direct traffic from Google Maps, which Google notices. The page becomes more relevant for that city’s search queries.
Why NAP Consistency Matters (And How to Maintain It)
NAP stands for Name, Address, Phone number. NAP consistency means your business information appears exactly the same way across your website, Google Business Profile, and every online directory where you’re listed.
Why does this matter? Google uses NAP data as a trust signal and to verify that listings across the web refer to the same business location. When Google finds your Denver location listed as “123 Main Street” on your website, “123 Main St.” on Yelp, and “123 Main Street, Suite A” on another directory, it creates confusion. Google isn’t sure these all refer to the same location.
Inconsistent NAP formatting dilutes the value of your business listings citations. Each variation counts as less authoritative than if they all matched perfectly.
Here’s how I maintain NAP consistency. First, I create a simple document that lists the exact official formatting for each location. For the address, I write it exactly once: “123 Main Street, Denver, CO 80202” including spacing, punctuation, and abbreviations.
Then I use that exact format everywhere. Not sometimes “Street” and sometimes “St.” Not sometimes the ZIP code and sometimes not. Exact same formatting across your website’s contact page, your Yoast Local SEO location pages, your Google Business Profile, Facebook business page, and every directory listing.
For phone numbers, pick a format and stick with it. If you use (555) 123-4567 on your website, use that everywhere. Don’t switch to 555-123-4567 or 555.123.4567 on different platforms.
When you update your NAP information, update it everywhere simultaneously. If your Denver location moves to a new address, don’t just update your website and Google Business Profile. Update every directory listing where that location appears. Tools like Moz Local or BrightLocal can help you track where your business is listed and audit for inconsistencies.
Building Citations for Each Location (Without Wasting Money)
Citations are online mentions of your business information on directories, review sites, local blogs, and other websites. For multi-location businesses, each location needs its own citations.
Focus on authoritative, relevant directories rather than spamming hundreds of low-quality sites. The directories that matter most are the big ones like Google Business Profile, Yelp, Facebook, and Apple Maps. Industry-specific directories are valuable too. If you run dental offices, get listed on health directories. If you run law offices, get listed on legal directories.
Local directories for each city matter. If you have a Denver location, get listed on Denver-specific business directories or Chamber of Commerce listings. If you have a Boulder location, pursue Boulder local citations.
I stay away from what I think of as ‘trash’ directories: sites that exist purely to collect business listings and serve ads to people who never actually use them for business discovery. These provide minimal SEO value. If a directory has no real user base and exists just as an SEO link farm, skip it.
Many directories will try to sell you premium upgrades or featured listings. From a pure local SEO best practices perspective, these paid upgrades rarely deliver ROI. The basic free listing provides the same NAP citation value as a paid listing. Where paid listings help is with visibility to actual users browsing that directory, not with Google rankings.
Spend your time getting high-quality free citations rather than paying for upgrades on marginal directories. A link from a local news website or university website is worth more than 50 paid directory listings.
Internal Linking Strategy for Location Pages
Internal linking for location pages is one of the easiest authority-building moves most businesses never make. I make sure every location page receives links from high-authority pages on the main site.
Start by linking to all your location pages from your main navigation or footer. This ensures every location page is accessible from every other page on your site. It also passes authority from your homepage, which is typically your highest-authority page.
Create a locations overview page if you don’t have one. This page lists all your locations with brief descriptions and links to each individual location page. Link to this overview page from your main navigation.
Link location pages to each other where it makes sense. If your Denver location serves some overlapping areas with your Boulder location, mention the Boulder location in the Denver page content with a natural link. This creates a hub of interconnected location pages that helps search engines understand your geographic coverage.
When you create blog content, link to relevant location pages. If you write a blog post about a local event or partnership in Denver, link to your Denver location page. If you create a case study about work done for a Boulder client, link to your Boulder location page.
This internal linking strategy serves two purposes. It helps distribute page authority across your location pages, improving their ability to rank. It also creates topical relevance between your content and your locations, strengthening local search optimization signals.
Map Pack vs. Organic Results: Why You Need Both
When I first started doing local SEO, I didn’t understand why some businesses showed up in the map box at the top of search results while others appeared in the regular results below. I thought it was the same ranking system. It’s not.
The Map Pack is the box of three business listings that appears at the top of local search results, each with a red pin on a map. These listings come from Google Business Profile, not from your website. The rankings are determined by your GBP optimization, the number and quality of your Google reviews, your business categories, and NAP consistency across the web.
Organic results are the traditional blue link search results that appear below the Map Pack. These rankings come from your website’s SEO, including your location pages, content quality, backlinks, and on-page optimization.
What most local business owners don’t realize is that the Map Pack and organic results are completely separate ranking systems with entirely different optimization requirements. You can rank in one without ranking in the other.
I’ve seen businesses rank in the organic results with beautiful location pages optimized through Yoast Local SEO but nowhere in the Map Pack because they never claimed or optimized their Google Business Profile. I’ve also seen businesses dominate the Map Pack but not appear in organic results because they don’t have proper location pages on their website.
The winning strategy uses both. Optimize your Google Business Profile for each location to target the Map Pack. Build out proper location pages with Yoast Local SEO to target organic results. When you dominate both, you take up more real estate in search results and capture more total visibility.
High review counts and positive ratings improve your Map Pack rankings. When users click your listing from the Map Pack, that click-through rate becomes a ranking signal. More reviews lead to more clicks, which leads to better local pack rankings, creating a positive cycle.
This is why Google’s AI Overview features pull from the Map Pack. The structured data from Google Business Profiles feeds directly into AI-generated search results. When you optimize both your GBP and your website location pages, you’re covering traditional search and AI-powered search simultaneously.
The investment in Yoast Local SEO handles the organic website side. The investment in Google Business Profile optimization handles the Map Pack side. You need both working together for maximum search visibility in your service areas.
When to Use Alternative Approaches Instead of Multiple Locations
Not every business should use the Yoast Local SEO multiple locations feature. I’ve spent time convincing clients not to enable it when their setup didn’t actually call for multiple location pages, because setting it up incorrectly or unnecessarily creates more problems than it solves.
Single Location Serving Multiple Cities
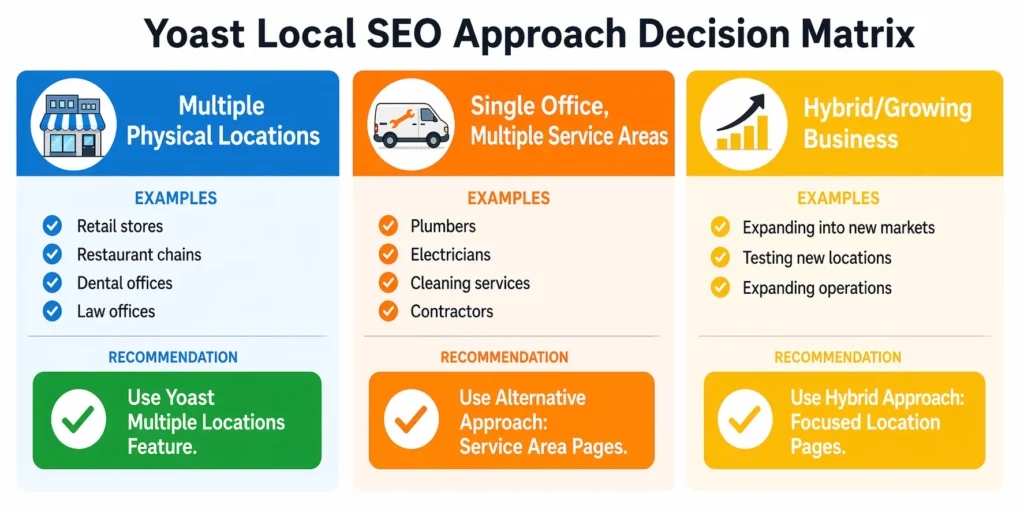
If you operate from one office but serve customers in several surrounding cities, you probably don’t need multiple location pages. Creating fake location pages for cities where you don’t actually have an office is risky and violates Google’s guidelines.
Instead, use location-targeted content on your main website. Write blog posts about the cities you serve. Create service pages that mention specific neighborhoods or areas. Use the free Yoast SEO plugin to optimize those pages with location keywords in titles, headings, and content.
For example, if you’re a Denver-based plumber serving Denver, Aurora, Lakewood, and Arvada, create a services page optimized for “plumber in Aurora” that explains you serve Aurora from your Denver base. Write blog posts about plumbing issues specific to older homes in Lakewood. Create neighborhood-focused content without pretending you have physical offices in those cities.
This approach is honest and effective for service area businesses. You’ll rank in organic results for those cities without creating misleading location pages.
Service Area Businesses (No Physical Storefront)
Mobile businesses like plumbers, electricians, cleaning services, landscapers, and contractors typically don’t need Yoast Local SEO multiple locations unless they have actual dispatch offices or warehouses in multiple cities.
For these businesses, the better approach is optimizing your single Google Business Profile with proper service area settings. In your GBP, you can specify that you serve customers in multiple cities without listing a specific physical address in each one.
On your website, use a single strong location page for your actual business address if you have one, or focus on service pages optimized for each city you serve. The WordPress local SEO plugin helps you create one great location page rather than multiple unnecessary ones.
The exception is if you genuinely have multiple dispatch centers or offices where staff is based. If you have a main office in Denver and a secondary office with staff in Colorado Springs, then yes, create two location pages. But if you just have one office and your technicians drive to various cities, stick with a single location and service area optimization.
The Hybrid Approach for Growing Businesses
Some businesses sit in the middle. They have one established location where they offer everything, and they’re expanding into new areas but don’t have full operations there yet.
For these situations, I recommend hybrid optimization. Fully optimize your main location page for all your services using Yoast Local SEO. This page targets your primary city for all keyword combinations.
For your expansion areas, create location pages that focus on just your top two services. Don’t try to rank for everything everywhere. Target your most profitable or most requested services in the new areas.
As each expansion location grows and you add more staff or open a full branch, you can expand that location page’s content to cover more services. This hybrid approach lets you establish presence in new markets without spreading your optimization too thin.
I’ve used this strategy with clients who were testing new markets. They created focused location pages for the new cities, drove some initial traffic and leads, validated the market demand, and then decided whether to invest in a full location there. It’s a smart way to grow systematically rather than trying to be everything everywhere immediately.
Frequently Asked Questions
Do I need Yoast SEO Premium or just the Local SEO add-on?
You only need the Yoast Local SEO add-on, not Yoast SEO Premium. The free Yoast SEO plugin handles basic optimization, but the Local SEO add-on is what creates location pages and schema markup for multiple locations.
Can I rank in a city without having a physical office there?
Yes. You can rank in organic results by creating genuine, location-specific landing pages. Just know that without a physical address in that city, you won’t appear in the Google Maps Pack. Organic rankings are still very much achievable.
What’s the difference between Yoast Local SEO and adding schema manually?
Yoast Local SEO handles everything automatically. It generates LocalBusiness schema for every location, updates it when details change, and requires zero coding. Manual schema needs technical knowledge, breaks easily, and must be updated by hand every time something changes.
Should I link my Google Business Profile to my homepage or to individual location pages?
Always link each Google Business Profile to its specific location page, not your homepage. This builds authority for that page directly and gives users exactly what they are looking for when they click through from Google Maps.
How do I make sure each location page has unique content?
Never just swap city names. Add real details specific to that location such as team photos, local landmarks, customer reviews from that branch, a service area map, and an embedded Google Map. Unique content is what gets location pages to actually rank.
Why aren’t my location pages showing up in Google?
Check these five things in order:
Flush permalinks at Settings > Permalinks > Save Changes
Make sure pages are not set to noindex in Yoast settings
Test schema at Google Rich Results Test
Submit your sitemap in Google Search Console
Check that content is not thin or duplicate
New pages generally take two to four weeks to appear.
How many location pages should I create?
One page per real physical location. Do not create pages for cities where you have no actual presence. Google can detect fake locations and may penalize your site. If you serve multiple cities from one office, use service area settings in Google Business Profile instead.
Can I group multiple nearby cities on one location page?
Only if the cities are very close geographically, like two neighboring suburbs. Grouping distant cities on one page dilutes your optimization and the page will struggle to rank for either location. When in doubt, give each location its own dedicated page.


