
")
Moving a WordPress blog to a new domain sounds technical, but I have handled dozens of these migrations for my own sites, for clients, and for complete beginners following the same steps I am about to show you. With the right method, you can complete the entire move in under two hours without breaking your site or losing your search rankings.
People migrate WordPress blogs for all kinds of reasons. You might be rebranding your business and want a domain that reflects your new direction. Maybe you started building on a temporary URL and now need to switch to your permanent one. Or you are a developer transferring a finished client project to their own hosting account.
Whichever situation applies to you, the method you choose matters more than most people realize. A wrong approach can corrupt your database, break every page on your site, or hand your hard-earned SEO rankings over to a dead URL. This guide covers three proven methods, a full wordpress migration checklist, and a troubleshooting section for the issues that come up most often.
Over the past fifteen years, I have handled migrations for small personal blogs with a few dozen posts and for content sites generating 100,000+ monthly visitors. The method that works for a 50-post blog does not always work cleanly on a 3,000-post site with complex custom fields, which is why this guide covers multiple approaches rather than one.
This guide covers three battle-tested methods for moving a WordPress blog to a new domain. The plugin method is fastest and requires no technical background. The manual database method gives you complete control and works even when plugins fail. The hybrid approach combines both for complex sites with large databases or custom configurations.
Before you touch either site, I will walk you through the exact pre-migration checklist I run on every project. I will also clarify an important distinction that trips up most beginners: the difference between a simple URL update and a full WordPress migration. Getting this wrong wastes hours.
Simple URL Update vs Full WordPress Migration: Which Do You Need?
Most migration mistakes happen before anyone touches a file or database. They happen because someone runs a full migration when all they needed was a two-minute settings change — or they make a settings-only update when their situation actually requires moving the entire site.
There are three distinct processes people confuse: updating WordPress URL settings, running a complete site migration, and transferring domain registration. Each one solves a different problem. Using the wrong one wastes hours at best and destroys your site at worst. Here is how to identify which one you actually need.
If you need a simple URL update (2 minutes): Your WordPress installation stays on the same hosting server and you are only pointing a different domain to it. Go to Settings then General in your WordPress dashboard, update both your WordPress Address URL and Site Address URL to the new domain, and save. Done.
If you need a full WordPress site migration (1 to 3 hours): You are migrating to a new hosting provider, switching from a temporary development domain to your permanent one, or transferring a completed site to a client’s account.. This means moving all WordPress files, exporting and importing the database, and updating all internal URL references. That is what the rest of this guide covers.
If you are confusing registrar transfers with site migration: Your domain registrar is the company where you purchased your domain name. GoDaddy, Namecheap, and Porkbun are common examples. Transferring between registrars only changes who manages your registration and DNS settings. It has no effect on your website files.
Moving your WordPress site means copying files and a database from one hosting server to another. The two processes are independent. You can migrate your site without ever touching your domain registration, and you can switch registrars without moving a single file.
For this guide, I am focusing on moving your WordPress site itself. If you also want to transfer domain registration, handle that separately through your registrars after the site migration is complete.
Pre-Migration Checklist: What to Prepare Before You Start
Three migrations in, I stopped skipping preparation. Before that, I spent more time fixing broken sites than actually migrating them. Now I run through this checklist before touching anything — on client sites, on my own projects, on migrations I have done a hundred times before. It genuinely cuts your troubleshooting time in half.
Create a Complete WordPress Backup Before Migration
Before touching anything, create a full backup of your existing WordPress site. This means backing up both your WordPress files and your database.
I recommend using a plugin like UpdraftPlus or BackWPup for this. These tools create complete backups you can restore if something goes wrong during migration. A small blog might back up in minutes, while a large site with thousands of images could take an hour.
Download your backup files off the server entirely — to your local machine and a cloud storage service like Google Drive or Dropbox.
If you prefer manual backups, download all your WordPress files via FTP and export your database through phpMyAdmin. This gives you complete control but takes more technical knowledge.
No migration guide can guarantee nothing will go wrong. Server outages, connection timeouts, and incomplete transfers happen even when you follow every step correctly. A verified backup is your safety net, not an optional precaution.
Update WordPress Core, Themes, and Plugins First
Update everything to the latest versions before you start the migration process. This includes WordPress core, all your active themes, and every plugin.
Running updates first reduces compatibility issues on your new domain. Outdated software can cause conflicts during migration or create security vulnerabilities on your new hosting environment. Pay special attention to specialized plugins that connect to external services, as these may require additional configuration steps after migration.
Go to Dashboard then Updates in WordPress and run all available updates. Test your site afterward to make sure everything still works correctly before proceeding with the migration. If you encounter any issues after updating, troubleshoot any plugin issues before moving forward.
Clean Up Your WordPress Site (Optional but Recommended)
Cleaning up your site before migration makes the process faster and reduces what you need to transfer.
Delete any themes you are not using. Remove deactivated plugins you do not need anymore. Clear out spam comments and trash. Consider removing old post revisions if you have thousands stored.
This cleanup step is optional, but I find it worthwhile. A smaller site migrates faster and starts fresh on your new domain without carrying over outdated or unused data. Plus, you will have better performance from the beginning.
Prepare Your New Domain and Hosting Environment
New WordPress domain setup comes before migration begins not during or after. Get your hosting account active, your domain pointed to it, and your credentials documented before touching your existing site.
If you are using a plugin-based migration method (Method 1), install a fresh WordPress instance on the new domain first the plugin needs WordPress running to import your backup. If you are using manual migration (Method 2), a fresh WordPress install makes it easier to locate your file directories, though it is not strictly required.
You will need certain credentials for the migration process, so gather these now. Get your FTP access details including hostname, username, and password. Note your database name, database username, and database password for the new hosting environment.
If you are using cPanel or another hosting control panel, familiarise yourself with where to find phpMyAdmin for database access. Locate your File Manager or note your FTP connection details.
Verify that SSL certificate options are available for your new domain. Most hosts offer free SSL certificates through Let’s Encrypt, which you will want to activate after migration completes. While setting up your new hosting environment, familiarize yourself with WordPress security best practices to ensure your site is properly protected from the start.
Many hosts provide a temporary URL for accessing your site before DNS changes effectively a WordPress staging site environment. Write this URL down because you will use it to verify the migration is complete before pointing your real domain.
Plan Your Migration Timing to Minimise Downtime
Choose a low traffic time for your migration to minimise the impact on your visitors. I typically plan migrations for Friday evening or early Saturday morning traffic is usually lower and I have the weekend available if troubleshooting runs long.
That said, check your own analytics first. Food blogs, entertainment sites, and lifestyle content often peak on weekends, so a Tuesday night might be smarter for those.
Before updating nameservers, lower your DNS TTL value to 300 seconds (5 minutes) at your current registrar. Wait 24 hours for this change to propagate, then make your nameserver switch. This dramatically reduces propagation time and shrinks your window of mixed-traffic inconsistency during the cutover.
Accept that some downtime may occur and plan your migration window accordingly. Most migrations complete quickly, but having a realistic timeframe prevents panic if something takes longer than expected.
Method 1: Move WordPress Blog to New Domain Using Plugins (Easiest for Beginners)
Using a migration plugin is the simplest way to move a WordPress blog to a new domain. The plugin packages your entire site into one file, transfers it, and handles URL updates automatically — no database knowledge or FTP access required.
Migration plugins work by packaging your entire WordPress site into a single file, then unpacking it on your new domain. They automatically handle the database changes needed to update all your URLs from the old domain to the new one.
The main advantage is simplicity. The disadvantage is that free plugins usually have file size limitations, and many migration plugins fail on complex sites or shared hosting environments with restricted resources.
I will walk you through using All-in-One WP Migration as the primary example because it is reliable and beginner-friendly. I will also show you the WPvivid migration key method, which offers a different approach for larger sites.
Best Free WordPress Migration Plugins Compared
All-in-One WP Migration is one of the most widely used free migration plugins. It offers an incredibly simple interface with export and import functions. The free version has an import size limit check the plugin’s official page before assuming the current threshold, as these limits update periodically. Larger sites need the premium unlimited extension.
WPvivid Backup Plugin provides both backup and migration features. Its unique migration key system lets you transfer directly between servers without downloading files to your computer. This works great for larger sites since you are not limited by your internet connection speed. The free version is quite generous.
Duplicator is another solid option that creates a package file and installer script. It gives you more control over the process but requires a few more technical steps. The free version works well for most sites, though very large databases might need the pro version.
UpdraftPlus is primarily a backup plugin, but its migration and cloning features work excellently. You can back up to cloud storage and restore to a new domain. The learning curve is slightly steeper than All-in-One WP Migration.
I have used all of these successfully. For pure simplicity, I point beginners to All-in-One WP Migration. For larger sites, I prefer WPvivid’s migration key method. While you’re evaluating plugins, you might also want to compare SEO options like All-in-One SEO versus Yoast for optimizing your migrated site.
Step-by-Step: Using All-in-One WP Migration Plugin
Install the All-in-One WP Migration plugin on both your old domain and your new domain. Go to Plugins, click Add New, search for All-in-One WP Migration, and install it. Activate the plugin on both sites.
Start on your old domain. Go to All-in-One WP Migration in your WordPress menu, then click Export. Choose where to export to. For most users, File works perfectly. The plugin will create a complete package of your site.
Click the green Export button and wait while the plugin packages everything. You will see a progress bar. When it completes, you will get a download button. Download this file to your computer. Export file size depends on your total content a small blog with minimal images typically exports to 30 to 50MB.
Now switch to your new domain where you installed fresh WordPress. Go to All-in-One WP Migration, then click Import. Drag and drop the file you just downloaded, or click to browse and select it.
The plugin will upload and import everything. This replaces your fresh WordPress installation with your complete site from the old domain, including all posts, pages, media, themes, plugins, and settings.
Wait for the import to complete. You will see a success message when it is done. The plugin will prompt you to save your permalinks.
Critical: Which Login Credentials to Use After Import
After plugin migration, log in using your old site’s username and password not the credentials you created for the fresh WordPress installation on the new domain. The import overwrites the user database entirely, replacing any new accounts with your original ones. Write down your old site’s admin username and password before starting the migration and keep this information somewhere accessible.
Then go to Settings, then Permalinks, and click Save Changes without changing anything. This refreshes your permalink structure. I recommend clicking Save Changes twice sometimes the first save does not fully flush the rewrite rules on certain server configurations.
Alternative: Using WPvivid Migration Key Method (No Download Required)
The WPvivid migration key method transfers your site directly from server to server without downloading anything to your computer. This is faster for large sites and does not depend on your internet connection speed.
Install WPvivid Backup Plugin on both your old domain and new domain. Activate it on both sites.
On your new domain, go to WPvivid Backup in your WordPress menu, then find the Migration section. You will see an option to generate a migration key. Click it and copy the key that appears. This key is like a secure password that allows the transfer.
Switch to your old domain. Go to WPvivid Backup, then Migration. Paste the migration key you copied into the provided field. Click the button to connect the two sites.
Once connected, you can choose what to transfer. Usually you want everything, so keep all options checked. Click the button to start the migration.
WPvivid will transfer your entire WordPress site directly from your old hosting to your new hosting. You can watch the progress, and the time depends on your site size and server speeds. The transfer happens in the background between the two servers.
When it completes, log into your new domain using your old site credentials. Check that everything transferred correctly before making your new domain live.
This method performs best when both hosting environments have decent server resources and reliable connections between them.
When to Upgrade to Premium Migration Plugins
Free migration plugins handle most small to medium WordPress blogs without issues. The main limitation is file size once your site exceeds the free tier’s import limit, you will need a premium upgrade or a different method.
Check the current limits on each plugin’s official page before starting, as these thresholds update periodically. All-in-One WP Migration’s paid extension is a one-time purchase rather than a recurring subscription, which makes it a reasonable investment for occasional migrations.
Premium versions also offer priority support, which becomes valuable if you run into migration issues. Advanced features like scheduled migrations, cloud storage integration, and multisite support usually require premium versions. For a one-time domain migration, these features probably are not necessary.
I recommend trying the free version first. If you hit the size limit or need features the free version does not offer, then consider upgrading. I have no affiliate relationship with any of the plugins mentioned in this guide. Recommendations are based on personal use across client projects.
Method 2: Manual WordPress Domain Migration (No Plugin Required)
Manual migration means handling every step yourself file downloads, database exports, uploads, imports, and URL updates without relying on a plugin. You need FTP access to both hosting accounts and basic comfort with phpMyAdmin.
I have run manual migrations on complex configurations that broke every plugin I tried first. The process takes 30 to 60 minutes longer, but once you have done it manually, you understand every moving part of a WordPress installation deeply enough to troubleshoot anything.
Unlike plugins, manual migration does not depend on server resource limits, plugin compatibility, or timeout restrictions. It is the method I reach for when hosting environments are restrictive or when a plugin migration produces incomplete results.
For developers comfortable with command line tools, WP-CLI migration offers an even faster alternative. WP-CLI (the WordPress Command Line Interface) lets you export, search-replace, and import databases in seconds without touching phpMyAdmin. This guide covers the GUI-based approach that works for all skill levels, but if you are already comfortable with SSH access, WP-CLI migration is worth researching as a faster option.
I break manual migrations into three phases: tasks on the old host, tasks on the new host, and configuration updates. Keeping phases separate prevents the most common mistake — trying to configure the new site before all your files and database are fully transferred.
Phase 1: Tasks on Your OLD Hosting Account
Start by logging into your old hosting control panel. The first task is downloading your wp-content folder, which contains all your themes, plugins, and uploaded media files.
Download only the wp-content folder — not the entire WordPress directory. The core files (wp-admin, wp-includes) are identical across all WordPress installations. You will install fresh copies on the new server, which ensures you are running a clean, up-to-date version.
Before downloading, compress your wp-content folder into a zip file. This makes the download much faster and ensures file permissions are preserved. Most cPanel file managers have a compress option when you right-click the folder.
Next, open your wp-config.php file using the file manager or FTP access. You need to copy several pieces of information from this file. Look for the database name, database username, database password, and the table prefix line that looks like $table_prefix = ‘wp_’.
Write down both the database name and the table prefix. Many people forget to note the table prefix and run into errors later. I keep this information in a text file during migration so I can reference it easily.
Now for the WordPress database migration part. Open phpMyAdmin from your hosting control panel. Select your WordPress database from the left sidebar and click the Export tab at the top.
Choose the Quick export method and SQL format, then click Go. Your database will download as a .sql file. This file contains all your posts, pages, settings, and user data. Keep this .sql file safe. It is literally your entire website’s content and configuration stored in one file.
Phase 2: Tasks on Your NEW Hosting Account
Log into your new hosting control panel and install a fresh WordPress installation on your new domain. Most hosts offer one-click WordPress installers that make this step simple.
Once WordPress installs, use FTP access or your file manager to navigate to the WordPress root directory. You will see a wp-content folder that was created during the fresh installation.
Delete the new wp-content folder completely. Then upload the wp-content folder you downloaded from your old site. This replaces the default themes and plugins with your actual site content.
The file upload time depends entirely on how much media you have. A site with thousands of high-resolution images can take 20 to 40 minutes over standard FTP. Start the upload, then move on to creating your database while it runs.
Now create a new MySQL database and database user. In cPanel, this happens through the MySQL Database Wizard. Create the database first, then create a user with a strong password.
Grant all privileges to your new database user. In cPanel, check the MySQL databases section and verify your user is assigned to the database with full permissions enabled. The WordPress database prefix requires complete permissions to function properly.
For the MySQL database migration step, open phpMyAdmin and select your newly created database. Click the Import tab and choose your .sql file from Phase 1. The default settings usually work fine, so just click Go to start the import.
Watch for any error messages during import. A successful import shows a green success message and you will see all your WordPress tables appear in the database.
Phase 3: Configuration and URL Updates
Open the wp-config.php file in your new WordPress installation. You need to update it with your new database credentials.
Replace the database name, username, and password with the new values you created in Phase 2.
Find the $table_prefix line in wp-config.php and verify it matches your old site exactly. If your old database tables use the wp_ prefix, this line must say wp_ do not change it, even if the new database was created with a different default prefix. One wrong value here produces the database connection error which I cover in the troubleshooting section if you hit it.
The WordPress URL migration step updating all database references from your old domain to your new one happens here in Phase 3. Open phpMyAdmin and select your new database. Find the wp_options table and click Browse. Look for two rows named siteurl and home.
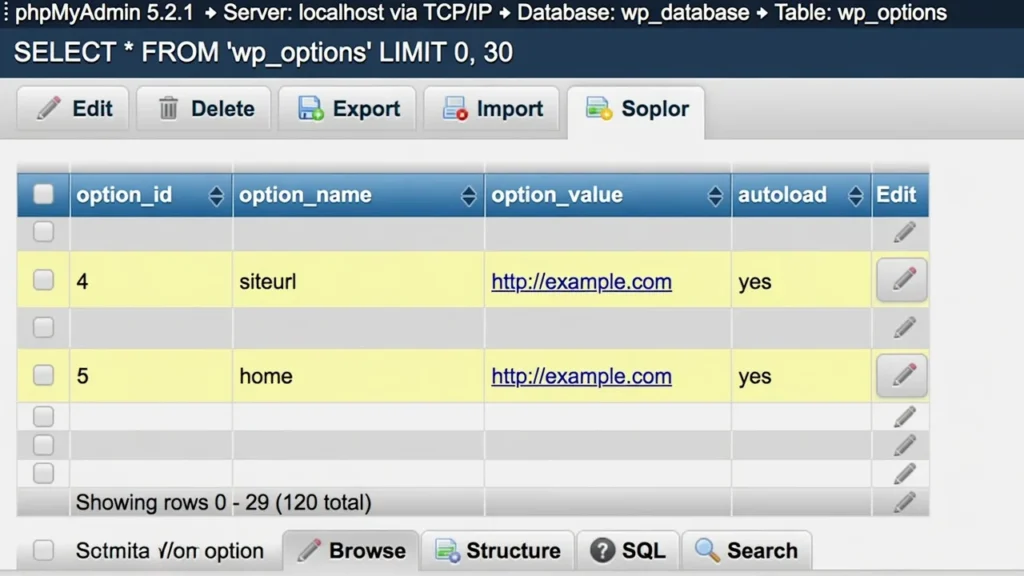
Edit both of these rows to show your new domain name. Change the old domain to your new domain in both fields, then save.
Your site should now load on the new domain. However, you might notice some links and images still point to the old domain. This happens because WordPress stores URLs in multiple database locations.
If your site uses page builders like Elementor or Divi, or has complex widget configurations, use the hybrid approach in Method 3 for the URL replacement step it handles serialized data safely. For straightforward WordPress installations, see the “Edit SQL File Before Importing” section below.
If you see unexpected behaviour after migration slow loading, stale content, or minor display glitches — WordPress transients from the migration may be causing temporary caching issues. Transients are auto-cleared when they expire, but you can speed this up by installing the Transients Manager plugin briefly, deleting all transients, then uninstalling it.
Alternative: Edit SQL File Before Importing (Advanced)
Instead of replacing URLs after importing the database, you can edit the .sql file before importing it. This works well for straightforward WordPress installations without complex widget or page builder configurations.
Open your exported .sql file in a text editor capable of handling large files Notepad++ on Windows, VS Code, or Sublime Text on any platform work well. Standard Notepad or TextEdit may crash on large databases.
Use the Find and Replace function to change every instance of your old domain to your new domain. Make sure you search for the exact URL format including http or https.
Important limitation: This method works cleanly for straightforward WordPress installations. If your site uses page builders like Elementor or Divi, or has complex widget configurations, the simple find-and-replace may corrupt serialized data. In those cases, use the hybrid approach in Method 3 instead.
Save the edited .sql file and then import it to your new database. When you update wp-config.php with the new credentials, your site loads immediately with all URLs already updated.
Method 3: Hybrid Approach (Manual Migration + Plugin Assistance)
The hybrid approach combines the control of manual migration with the safety of plugin assistance for URL updates. I use this method when I want hands-on control of file and database transfers but need reliable handling of complex URL replacements.
Here is how it works. You manually transfer your files and database just like Method 2, but instead of manually updating URLs in the database, you install a specialised plugin to handle that final step.
URL replacement is where most manual migrations break down and it is the one step where a specialised plugin genuinely outperforms manual work. I started using this approach after spending two hours debugging a broken widgets section. My manual find-and-replace had corrupted the serialized widget data. A plugin handled it correctly in two minutes.
The hybrid method gives you the best of both worlds. You maintain complete control over your files and database while avoiding the most error-prone part of manual migration.
After completing the manual file transfer and database import from Method 2, install either Better Search Replace or Migrate DB plugin on your new domain. Run the URL replacement, verify everything works, then delete the plugin.
Why Serialized Data Makes Simple Find and Replace Risky
WordPress stores complex settings like widget configurations and theme options as serialized arrays in the database. Serialized data includes character counts that must match the actual string length exactly.
For example, WordPress might store your old domain as: s:22:”http://olddomain.com”; — the number 22 counts the characters in that string. Change the domain without updating the count and WordPress throws an error.
When you do a simple find and replace in the database, you change the URL string but not the character count. This mismatch breaks the serialized data and WordPress cannot read it anymore.
I have seen this cause missing widgets, broken theme settings, and corrupted plugin configurations. The site loads fine but specific features just stop working with no clear error message.
Manual find and replace works fine for simple text fields, but WordPress serialized data needs special handling that recalculates character counts after replacement.
Using Better Search Replace Plugin Post-Migration
Better Search Replace is a free plugin specifically designed for safe database URL updates. Install it from your WordPress plugin directory after completing your manual migration.
The plugin interface is straightforward. Enter your old domain in the search field and your new domain in the replace field. Select all tables or choose specific ones, then run the search first without replacing.

This dry run shows you exactly what will change. Review the results to make sure nothing unexpected appears. If everything looks good, run the actual replacement.
Better Search Replace automatically handles WordPress serialized data by updating character counts as it replaces URLs. This prevents the corruption that happens with simple find and replace methods.
After the replacement completes, test your site thoroughly. Check widgets, theme settings, and plugin configurations. Once you verify everything works correctly, deactivate and delete the plugin.
Using Search Replace DB Standalone Script (Advanced)
Search Replace DB (by interconnectit, available on GitHub) is a standalone PHP script that connects directly to your MySQL database without requiring WordPress to be running. It is the tool I reach for when WordPress will not load at all due to URL mismatches, or when dealing with a very large database that strains plugin-based tools.
Upload the script to your web root, run it via browser, perform your replacement, then immediately delete it from the server. This is not optional the script provides direct, unauthenticated database access. Leaving it on a live server is a critical security risk. For comprehensive protection beyond this specific concern, review security best practices for WordPress.
This tool also handles serialized data correctly, making it safe for WordPress database migration tasks.
When to Update DNS and Point Your Domain to the New Server
DNS records tell the internet where to find your website. When you update nameservers or DNS records, you are redirecting traffic from your old server to your new server.
I always complete the entire migration and test everything before touching DNS settings. The critical point many people miss is that DNS changes are not instant. Domain propagation can take 24 to 48 hours, during which some visitors see your old site while others see your new site.
Think of DNS updates as the final step, not the first step. Build and test your entire site on the new server using temporary access methods, then update your nameservers only when everything works perfectly.
Your domain registrar controls your DNS settings, not your hosting provider. This means you update DNS where you purchased your domain name, regardless of where your site is hosted.
Test Your Migration on Temporary URL First
Every hosting provider gives you a way to access your site before DNS points to it. Some provide temporary URLs like yoursite.tempurl.com, while others let you use the server IP address.
I always test migrations thoroughly using these temporary access methods. This lets me verify the WordPress site migration succeeded before any real visitors see the new site.
Load your temporary URL and test as a real visitor would click every navigation link, submit a test form entry, and try to find something using site search. If something does not work on the temporary URL, it will not work on your real domain either. Fix all issues while you are still on temporary access and your old site continues serving visitors normally.
Another testing method is editing your computer’s hosts file to point your domain to the new server IP. This lets you see exactly what your site will look like after DNS updates without actually updating DNS.
How to Update Nameservers at Your Domain Registrar
When your new site tests perfectly, it is time to update DNS. Log into your domain registrar account where you originally purchased your domain name. This might be GoDaddy, Namecheap, Porkbun, or dozens of other companies.
Find the DNS settings or nameserver management section. Every registrar organises this differently, but it is usually under domain management or DNS configuration.
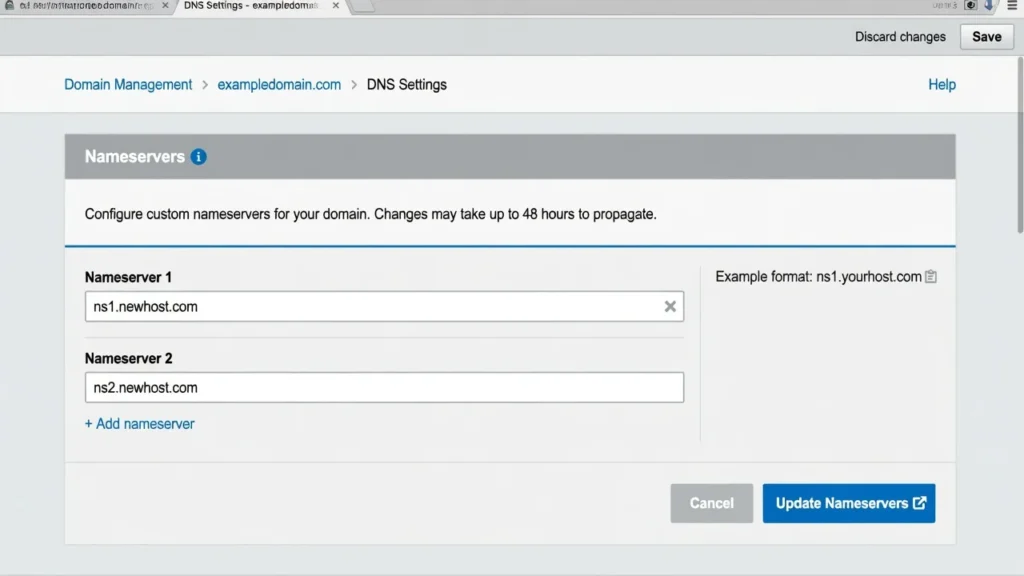
Your new host will provide nameserver addresses when you sign up typically two addresses in the format ns1.hostname.com and ns2.hostname.com, though managed hosting platforms like Kinsta or WP Engine may use different DNS management systems. Check your welcome email or hosting dashboard for the exact values.
Replace the old nameservers with the new ones provided by your new host. Save your changes. Many registrars show a warning that DNS changes can take up to 48 hours to propagate. This is normal and expected.
Write down the time you update nameservers if issues arise during propagation, knowing your exact change time helps you assess whether a problem is propagation-related or a configuration error.
Understanding DNS Propagation Time (24 to 48 Hours)
Domain propagation is the time it takes for DNS changes to spread across the entire internet. DNS information is cached at multiple levels including your internet provider, your router, and your browser.
In practice, most domains propagate within 4 to 6 hours sometimes faster if the previous TTL (Time to Live) on your DNS records was set low. The official window of 24 to 48 hours exists because some ISPs and DNS servers cache records for extended periods regardless of TTL. This is why lowering your TTL to 300 seconds at least 24 hours before migration can significantly speed up propagation.
During propagation, some visitors see your old site while others see your new site depending on which DNS server their request hits. This is why testing beforehand matters so much.
You can check propagation status using online tools that query DNS servers in different countries. This shows you how the update is spreading globally.
Post-Migration Checklist: Verify Everything Works Correctly
Post-migration testing is where most people rush and where most problems go undiscovered until a visitor finds them for you. I follow a fixed checklist regardless of which migration method I used. These checks take about 20 minutes and have caught broken forms, missing images, and expired SSL certificates on sites that otherwise looked fine at first glance.
Some issues only appear after migration due to different server configurations, PHP versions, or WordPress plugins that behave differently in the new environment. Thorough testing reveals these issues before your visitors encounter them.
Log In and Reset Permalinks (Critical First Step)
The very first action after migration is logging into your WordPress admin dashboard. Use your original username and password from the old site because those credentials transferred with your database.
Immediately go to Settings, then Permalinks. Do not change anything, just click the Save Changes button at the bottom of the page.
This simple action refreshes WordPress’s rewrite rules. Without this step, every page except your homepage will show 404 errors even though the pages exist in your database.
I recommend clicking Save Changes twice on the permalink page. Sometimes the first save does not fully flush the rewrite rules, especially on certain server configurations. The second save ensures everything registers correctly.
This permalink reset takes five seconds but solves the most common post-migration problem.
Test All Site Functionality
Open your site in a private browsing window and test every major function. Start with your homepage, then navigate through your main menu to verify all pages load.
Click through to individual blog posts. Test your search function by searching for a post you know exists. Test any contact forms by submitting a test message. Verify the form submission works and you receive the email. Forms often break during migration due to mail server configuration differences.
If you run an online store, test your entire checkout process. Add a product to cart, proceed through checkout, and verify payment processing works.
Check that your WordPress plugins function correctly. Some plugins store absolute URLs or server paths that need updating after migration. Test any plugins critical to your site functionality.
Verify your WordPress theme displays correctly. Check your header, footer, sidebar widgets, and any custom theme features. Theme settings sometimes reset during migration.
Verify SSL Certificate Works on New Domain
Type your domain into the browser with https:// at the beginning. Your site should load with a padlock icon in the address bar indicating a secure connection.
If you see a warning about an invalid certificate or your site loads with http instead of https, you need to configure SSL on your new server.
Most modern hosts provide free SSL certificates through Let’s Encrypt. Check your hosting control panel for an SSL section where you can install or activate a certificate. After activating SSL, you may need to update your WordPress site URL to use https instead of http under Settings then General.
For a more thorough check, run your domain through SSL Labs at ssllabs.com/ssltest — it tests your certificate validity, chain completeness, and protocol configuration. This catches issues that a browser padlock alone will not reveal.
Check for Broken Links and Images
Browse through several pages and posts looking for broken images or links that do not work. Plugin-based migration usually handles all URL updates automatically, but manual migrations sometimes miss embedded URLs.
If you find broken image links, they probably still reference your old domain. Use the Better Search Replace plugin to find and fix any remaining old URLs in your database.
Install the Broken Link Checker plugin to scan your entire site for broken internal and external links. Note: Broken Link Checker runs continuously in the background and can significantly slow your site if left active. Use it for your post-migration scan, then deactivate and delete it once the check is complete.
Pay special attention to images in your content. Check that featured images, inline images, and gallery images all display correctly.
Clear All Caches (WordPress, Plugin, Browser, CDN)
Clear your WordPress cache if you use a caching plugin. Most caching plugins have a clear cache button in the WordPress admin bar or under their settings.
If you use a CDN like Cloudflare, log in and purge the cache. CDN caches can serve old content for hours after migration if not cleared.
Clear your browser cache and test in a different browser you have not used. Browsers cache aggressively and might show you old versions of pages.
Some WordPress themes have built-in caching. Check your theme settings and clear any theme caches you find.
After clearing all caches, your site should display the current version from your new server with all updates visible.
Preserve Your SEO: WordPress 301 Redirects and Search Engine Updates After Domain Change
Moving to a new domain without proper SEO migration can destroy years of search engine rankings. Setting up proper WordPress 301 redirects and notifying search engines maintains your SEO value during the transition. For comprehensive coverage of all SEO considerations, refer to this SEO migration checklist.
I have seen sites lose 60 to 70 percent of their organic traffic within two weeks of a domain migration that skipped 301 redirects. I have also seen sites maintain 95 percent or more of their rankings through the transition when redirects and Search Console updates were completed on the same day.
Google’s own documentation for site moves, published in Search Central, confirms that properly configured 301 redirects pass PageRank to the new domain. Google also provides the Change of Address tool specifically to assist with domain migrations using it is the closest thing to an official notification you can give to the world’s largest search engine.
The key is signalling to search engines that your content has permanently moved to the new domain. This happens through 301 redirects from the old domain and official change of address notifications in Search Console.
Set Up 301 Redirects from Old Domain to New Domain
A 301 redirect is a permanent redirect that tells search engines and browsers that a page has moved permanently to a new location. Setting these up from your old domain to your new domain passes your SEO value to the new site.
This step only works if you still control your old domain and hosting. The WordPress 301 redirects must be set up on the old domain to catch visitors and search engines trying to access the old URLs.
Open your .htaccess file on your old domain’s hosting. This file lives in the WordPress root directory. Add this code at the top of the file:
RewriteEngine On
RewriteCond %{HTTP_HOST} ^(www\.)?olddomain\.com$ [NC]
RewriteRule ^(.*)$ https://newdomain.com/$1 [R=301,L]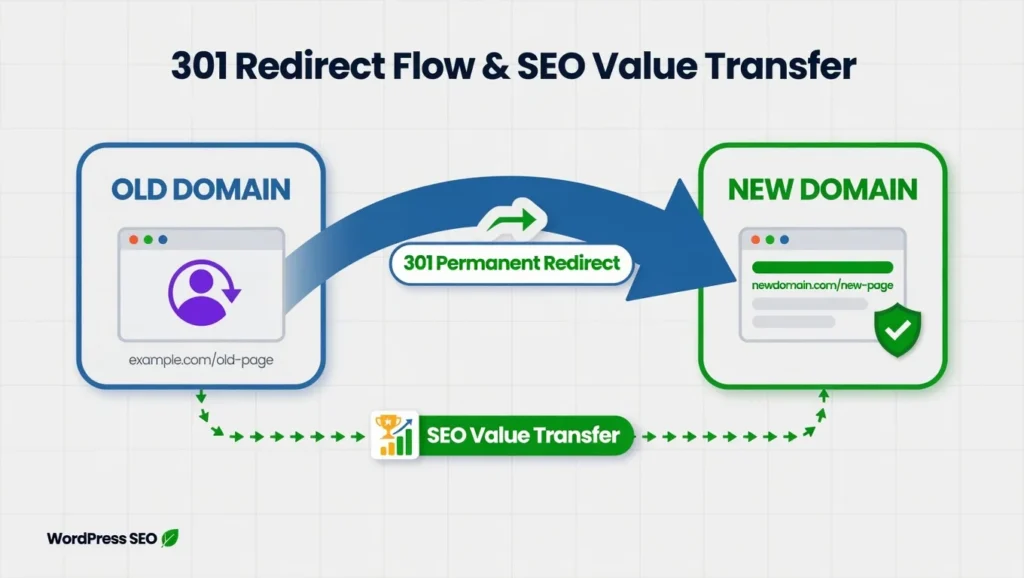
Replace olddomain.com with your actual old domain and newdomain.com with your actual new domain. This single rule catches both www and non-www versions of your old domain and redirects all traffic to the matching URL path on your new domain. The dot before “com” is escaped with a backslash this is intentional and prevents the pattern from accidentally matching other URLs.
To verify your 301 redirects are working, use your browser’s developer tools open the Network tab, visit an old URL, and confirm the status code shows 301 (not 302, not 200). A 302 is a temporary redirect that does not pass SEO value.
If your host uses cPanel, you can set up redirects through the cPanel redirect manager instead of editing .htaccess manually.
Test your redirects by visiting several old URLs. They should instantly redirect to the new domain with the same page path. Check that both www and non-www versions of the old domain redirect correctly.
Update Google Search Console for Domain Change
Google Search Console includes a specific tool designed for domain changes that preserves your search rankings. This tool officially notifies Google about your move and asks them to transfer ranking signals to the new domain.
First, add your new domain as a new property in Google Search Console. Verify ownership using one of the verification methods Google provides. I usually use the DNS verification method because it is permanent.
Once verified, submit your sitemap for the new domain. This helps Google discover and index all your content at the new location quickly.
Now log into your old domain’s Search Console property. Under Settings, find the Change of Address tool. Select your verified new domain from the dropdown and submit the change.
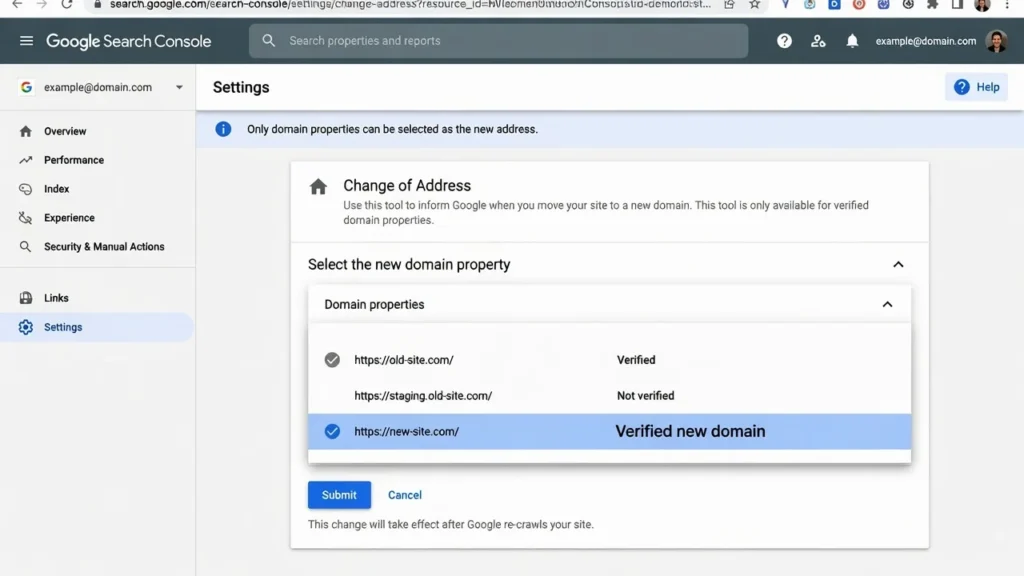
This official notification triggers Google’s domain move processing and, combined with your 301 redirects, signals to Google exactly what happened and preserves your SEO value based on key ranking factors.
Note that the Change of Address tool is only active for 180 days after that, your 301 redirects become the sole signal for older links and cached search engine references. This is why maintaining those redirects long-term matters.
Monitor both properties in Search Console over the following weeks. You will see impressions and clicks gradually shift from the old property to the new property as Google reindexes your content.
Update Google Analytics and Other Tools
If you use Google Analytics 4, go to your GA4 property settings and update the website URL to your new domain. Check your tracking code some older themes hardcode the tracking snippet directly in functions.php or header.php. If yours does, update the domain reference manually.
For a plugin-based approach, tools like Site Kit by Google (free) or MonsterInsights handle tracking code automatically and make future domain changes easier. Site Kit connects directly to your Google account, which many site owners prefer.
Update any other SEO tools connected to your site. If you use Ahrefs, SEMrush, or Moz, add your new domain and remove or pause tracking on the old domain.
Update your Google Business Profile if you have one. Change the website URL to point to your new domain so customers find the right site.
Do not forget email marketing platforms. Update your website URL in services like Mailchimp or ConvertKit. This ensures links in future emails point to the correct domain.
WordPress Domain Change Problems and How to Fix Them
Even when following migration steps carefully, certain issues pop up frequently. These are the six issues I resolve most often across client and personal site migrations.
Most post-migration errors fall into three categories: the site will not connect to its database, URLs still point to the old domain, or media files did not transfer completely. The error message you are seeing will tell you which category you are in.
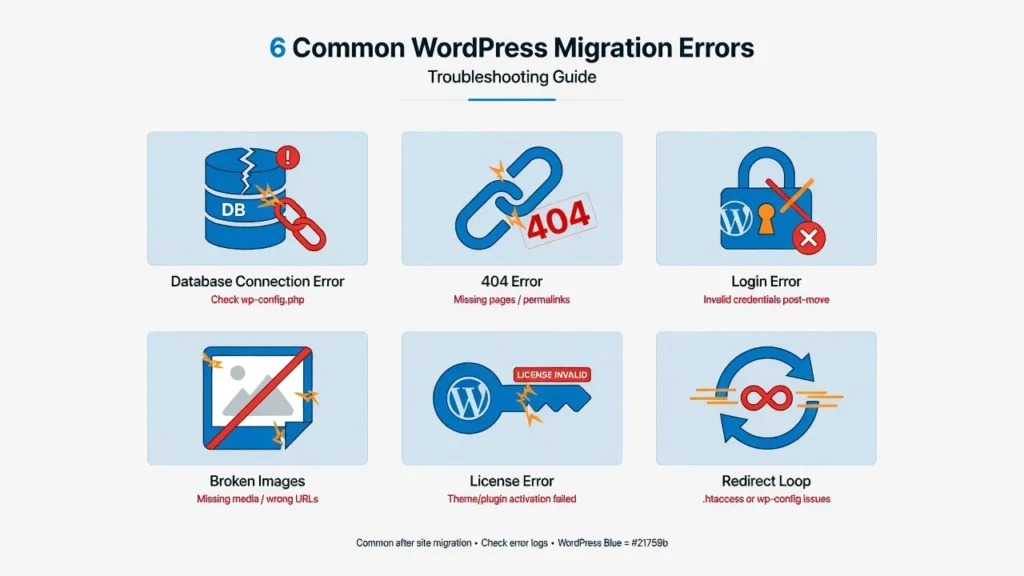
Error Establishing Database Connection After Migration
This error means WordPress cannot connect to your database. It is the most common post-migration error and usually points to incorrect information in your wp-config file.
Open your wp-config.php file and verify the database name, username, and password exactly match what you created on the new server. One wrong character breaks the connection.
Check your WordPress database prefix carefully. The $table_prefix line in wp-config must match exactly what your database tables use. If your tables start with wp_ but your wp-config says wp2_, WordPress cannot find your data.
Verify your database actually imported successfully. Log into phpMyAdmin and confirm you see all your WordPress tables in the database. If the database is empty, you need to import your .sql file again.
Check the DB_HOST value in wp-config. Most servers use localhost, but some require a specific hostname. Your hosting provider documentation tells you the correct DB_HOST value.
Make sure your database user has all privileges on the database. In cPanel, check the MySQL databases section and verify your user is assigned to the database with all privileges enabled.
All Pages Show 404 Errors Except Homepage
When your homepage loads fine but every other page shows a 404 error, the problem is permalink settings. WordPress needs to refresh its URL rewrite rules after migration.
Log into your WordPress admin dashboard and go to Settings, then Permalinks. Do not change anything, just click Save Changes at the bottom of the page. This single action regenerates the rewrite rules and fixes 404 errors in most cases. Click Save Changes twice to fully clear the rules.
If resaving permalinks does not fix it, your .htaccess file might not be writable. Check file permissions on .htaccess and set it to 644.
Some servers do not have mod_rewrite enabled, which WordPress needs for pretty permalinks. To verify whether mod_rewrite is active on your server, create a PHP file with <?php phpinfo(); ?> in your web root and look for “mod_rewrite” in the browser output. Alternatively, ask your hosting provider directly.
Cannot Log In to WordPress Admin on New Domain
After plugin-based migration, the import process replaces the new domain’s entire database — including the admin account you just created. Your old credentials are the ones that work. If you have genuinely forgotten them, use the Lost Password feature WordPress will send a reset link to the email address on your original account.
If you do not have access to that email address, you can reset the password directly in the database. In phpMyAdmin, find the wp_users table, locate your user record, and use the MD5 function to set a new password directly in the user_pass field.
For manual migrations, your login credentials should be exactly the same as the old site. You are using the same database with the same user table.
Images and Media Files Do Not Display
Broken images after migration usually mean your wp-content/uploads folder did not transfer completely or URLs were not updated in the database.
Check that your uploads folder exists at wp-content/uploads and contains all your media files. Compare the folder size on the old and new servers to verify everything transferred.
If files are missing, transfer the wp-content/uploads folder again using FTP access. Make sure the transfer completes without errors.
If files exist but do not display, the database still references the old domain URL for images. Use the Better Search Replace plugin to find all instances of the old domain and replace them with the new domain.
Check file permissions on the uploads folder. It should be set to 755 for folders and 644 for files. Incorrect permissions prevent images from displaying.
Paid Theme or Plugin Shows Please Purchase Message
Premium WordPress themes and plugins tie licenses to specific domains. When you migrate to a new domain, the license thinks you are using the product on an unauthorised site.
The solution is deactivating the license on your old domain and activating it on the new domain. Most premium products include license management in their settings panel.
For Elementor Pro, go to Elementor settings and disconnect your license on the old site. Then enter your license key on the new site to activate it. Yoast SEO Premium, WPForms, and most other premium WordPress plugins follow similar processes.
If you cannot access the old site anymore, log into your account on the product vendor’s website. Most vendors let you manage license activations from your account dashboard. If you hit the activation limit, contact their support team and explain it is a domain migration, not an additional installation. Most vendors will reset your activation count.
Site Redirects Back to Old Domain
If your new domain immediately redirects to your old domain, WordPress has the wrong URL stored in the database. Open phpMyAdmin and select your WordPress database. Find the wp_options table and click Browse.
Look for the option_name values of siteurl and home. Edit each row and change the option_value to your new domain including http or https. Save the changes and try loading your site again.
An alternative method is adding these lines to wp-config.php directly above the line that reads /* That’s all, stop editing! Happy publishing. */:
define('WP_HOME', 'https://yournewdomain.com');
define('WP_SITEURL', 'https://yournewdomain.com');
These constants override whatever the database says and force WordPress to use the specified URLs. Once your site loads correctly and you have fixed the siteurl and home values in the wp_options table, remove these lines from wp-config.php. Leaving them permanently can prevent you from changing your URL through the WordPress dashboard later.
Special Scenarios: Different Migration Situations Explained
The migration approach changes depending on which combination of domain and hosting you are actually changing. Here are the four most common scenarios I have handled.
Scenario 1: Same Host, New Domain Only
This is the most straightforward scenario. Your files stay exactly where they are — there is nothing to download or upload. The work happens in two places: your hosting control panel (to assign the new domain to the existing file directory) and your WordPress database (to update the stored URL values).
A search and replace operation handles most of the database work. Your hosting provider can often change the primary domain in cPanel or their control panel. You still need to update your WordPress Address and Site Address settings, but you skip all the file transfer steps that make other migrations more complex.
Scenario 2: Same Domain, New Host Only
WordPress host migration moving your site to a new server while keeping your domain — focuses entirely on the file and database transfer. Your URLs stay the same, which eliminates the URL replacement step that makes other migrations more complex.
Transfer your wp-content folder and your database to the new hosting account. After the migration is complete, you update your nameservers at your domain registrar to point to your new hosting provider. Your domain stays the same, but it now loads content from the new server.
Scenario 3: New Domain AND New Host Simultaneously
This is the most complex migration scenario because you are changing everything at once. You need to follow the complete migration process: transfer all your WordPress files to the new hosting account, export and import your database, then run search and replace to update your old domain to your new domain throughout the database.
This approach works well when you are rebranding completely or moving from shared hosting to a managed WordPress host like Kinsta or WP Engine as part of the same project. You complete everything in one migration instead of two separate moves.
Scenario 4: WordPress.com to Self-Hosted with Domain Change
WordPress.com’s export tool creates an XML file containing your posts, pages, comments, and categories but not your theme customisations, widgets, or plugin configurations. Those need to be rebuilt manually on your self-hosted installation.
Import this XML file into your new WordPress installation using the WordPress Importer plugin. Your images require extra attention: WordPress.com hosts media on its own servers, so ensure the importer pulls those files across during import. Check the “Download and import file attachments” option in the importer this is the step most people miss.
Self-hosted WordPress gives you full control over plugins, themes, and server configuration though it also means you are responsible for security, backups, and updates that WordPress.com previously handled for you. If you’re still weighing your options, you might want to evaluate different CMS platforms for SEO before committing to the migration. Factor that into your decision.
Note: WordPress multisite migration is a separate and significantly more complex process not covered in this guide. It requires moving the entire network structure and database tables simultaneously. If you are running a multisite network, treat this guide as background knowledge only and research multisite-specific procedures before proceeding.
Conclusion: Your WordPress Domain Migration Is Complete
Your migration is done. The hardest part for most people is not the technical steps it is working up the confidence to start. Now that you have been through it once, any future migration will take a fraction of the time.
Whether you used a plugin or went fully manual, you have successfully transferred your WordPress site to a new domain with your posts, images, comments, and settings intact. The three methods in this guide cover every common scenario for moving a WordPress blog to a new domain come back to it any time you need to move another site.
Keep your old domain active with 301 redirects in place for at least six to twelve months. Those 301 redirects are the only thing standing between your current search rankings and a complete loss of visibility on the old URLs old backlinks, cached search results, and bookmarked pages all depend on them.
Monitor your Google Analytics and Search Console over the next few weeks. Most sites experience minor fluctuations during the first two to four weeks while search engines reindex the new domain this is normal. Once your site has stabilized, conduct a WordPress SEO audit to ensure everything is properly optimized on your new domain. Major problems are rare if you followed the migration steps and set up your redirects correctly.
Clean up your server when you are done: delete backup files, remove migration plugins you no longer need, and keep your WordPress installation lean.
If you ran into an issue this guide did not cover, drop it in the comments. Real edge cases help improve this resource for the next person tackling the same migration.
Frequently Asked Questions
Q: Will my paid themes and plugins still work after moving my WordPress blog to a new domain?
Yes, your themes and plugins will transfer with your site and continue functioning. However, most premium plugins and themes use domain-based licensing. Your license is tied to your old domain name, so after migration these products will still appear on your site but will not receive updates until you update the license.
Go to the plugin or theme settings on your old domain and deactivate the license first. Then activate the same license key on your new domain. Keep your purchase confirmation emails handy because you will need those license keys. Do this immediately after migration running premium plugins without active licenses means missing important security updates.
Q: How long does it take to move a WordPress blog to a new domain?
Plugin-based migrations typically take 5 to 20 minutes for small to medium sites under 1GB. Larger sites with extensive media libraries might take 30 to 60 minutes using automated migration tools. Manual migration takes 1 to 3 hours depending on your comfort with the technical steps and site size. Always add 15 to 30 minutes for post-migration testing, regardless of how smoothly the migration went.
Q: When should I update my DNS nameservers during WordPress migration?
Update your nameservers only after you have completed the full migration and tested everything on your host’s temporary URL. Complete all file transfers, import your database, update your WordPress configuration, and verify every aspect of your site before touching DNS. DNS propagation takes 24 to 48 hours to complete worldwide. Finishing all migration work first ensures that whenever someone reaches your new server, they see a fully functional site.
Q: What login credentials do I use after migrating WordPress with a plugin?
Use your original site’s username and password. Migration plugins copy your entire database, which includes all user accounts. When you restore your migration package on the new domain, it overwrites everything including the fresh admin account you set up. Your old credentials are what work. If you have forgotten them, use the Lost Password link on the login screen.
Q: Do I need to migrate my entire WordPress installation or just certain files?
For manual migration, you only need to transfer your wp-content folder and your database. Install a fresh copy of WordPress on the new domain, replace its wp-content folder with the one from your old site, and import your database. The core WordPress files are identical across all installations. Plugin-based migrations transfer everything automatically in one package, which is simpler for beginners even though it moves more data.
Q: Will I lose my Google search rankings when I move my blog to a new domain?
You can preserve most of your SEO rankings with proper planning. Set up 301 redirects from every old URL to its corresponding new URL and use Google Search Console’s Change of Address tool. Together, these signal to Google that your content has permanently moved and pass ranking authority to the new domain. Expect some fluctuation during the first two to four weeks as Google processes the change. Most sites recover previous rankings within one to two months. Some see improvements if the new domain has stronger topical relevance or a cleaner backlink profile than the old one.
Q: Can I test my WordPress migration before making it live?
Yes, and you absolutely should. Use your host’s temporary URL to browse your migrated site exactly as it will appear on the new domain before you update DNS. Test your main navigation, contact forms, blog posts, images, and WordPress dashboard login. Another option is editing your computer’s hosts file to point your domain to the new server IP this lets you preview the new domain on your machine while the rest of the world still sees your old site. Fix everything you find before updating your nameservers. Thirty minutes of testing can save hours of emergency troubleshooting after the site goes live.


