

I recall the first time when I discovered that I had no WordPress site backup. I was about to upgrade a new set of plugins, and I was in the process of doing it when my site just went blank. No error message. Just white. That gut-clenching panic is not something that any web site owner is supposed to have to contend with unless such a web site owner has a safety net in place.
In case you have not been taught how to back up your wordpress site in the past, this guide will provide you with everything that you require. I will take you through all the methods that I am personally familiar with, starting with the simplest free method of the latter, of simply putting a free local storage disk in your directory (note that this method has certain drawbacks, which I will discuss later).
Why Your WordPress Site Can Vanish Overnight (And How Backups Rescue You).
A WordPress backup is a full saved copy of your entire web site that you can use to restore your web site to its exact previous state in case something goes wrong. In their absence, a single malicious update of the plugins may destroy all the hard work you have done.
The majority of the population believes that site catastrophes are something that can happen to other people. I had thought so, too. But WordPress issues come out of the blue, and are much more frequent than most site owners care to acknowledge.
WordPress is the most popular, as well as the most targeted, platform in the world, serving more than 43 percent of all the sites on the internet. Security experts are estimated to have passed over 90, 000 WordPress websites that are attacked within a minute.
The scenarios that can bring your site to its knees on a typical Tuesday include: the update of a plugin that breaks your layout instantly, a hacker that injects malware into your core files, a hosting payment that fails and triggers account deletion or a problem in the data center that takes your server offline without warning. These can all strike any location, large or small, old or new.
I have personally witnessed site owners losing months of content after they had believed that the built-in backups offered by their hosting company would be able to save their content, only to realize that the backups they had previously relied upon were either incomplete or missing entirely. I have observed others do a live update with no copy saved and spend three days hand-assembling pages out of screenshot caches.
The security of WordPress sites and WordPress disaster recovery begin with a single step, which is to make a backup before the disaster happens.
Malware attacks, failed updates, and sudden crashes are merely a portion of the truth of having a website. The time when you can no longer have something to fall back on is the time when a recoverable problem turns into a catastrophe.
When you are familiar with the procedure, you can produce a complete backup in less than five minutes. And repairing to it in the event of a malfunction is just as time consuming. It may be days or weeks to rebuild, without one, starting anew.
What You Really Saving By Backing up WordPress.
When the word backup is mentioned by the majority of the population, they would imagine copying some files into a folder and labeling it as complete. However a WordPress site consists of two entirely distinct parts, and both of them are really necessary to get your site back to its former state after a hitch.
I imagine it to be so. Your WordPress Web site is a house. The files are the actual building itself – the walls, the roof, the furniture, the decor. The database is all that transpired in that house – all conversations recorded, all documentation filed, all information stored. When you preserve the building and destroy all the contents within it, you have a building that appears well, but does not work.
The two parts are crucial. Supporting one of them makes you think that you are secure which is not true at all and you will ultimately fail at the very time when you need it the most.
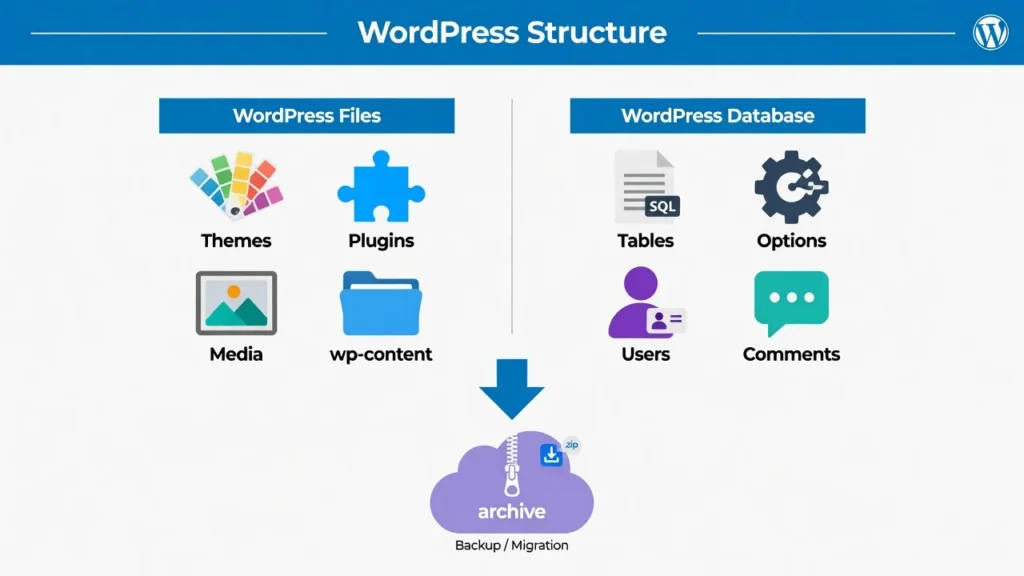
WordPress Files: Themes, Plugins and Media.
Included in your WordPress site files are all the files in your site on the server that are in the folder of the site. The most crucial folder is the wp-content folder which has your active theme, all installed plugins, and all the images and media files you have ever uploaded. The files of your core WordPress platform also contain files that make the whole system run. In case these are corrupted or deleted, your site will cease to load at all.
The full WordPress backup should always contain your site files, as well as, your database. Without either of the two, you cannot entirely repair your site.
By making copies of your files, you are copying the visual design of your site, all installed functionality, and all of your media library. These are the literal building blocks of your web site.
WordPress Database: Your Content and Settings.
WordPress stores all the dynamism in your database that enables your site to be of actual use. This is all the blog posts you have written, all your published pages, all your visitor comments, all your user accounts, all your categories and all your site settings that give your title, tagline, permalink structure, and more.
By support/supporting up your WordPress database, I am referring to exporting this MySQL database as a .sql file. In the absence of that file, a restored site will be totally blank. Your theme and plugins can be loaded, but they do not contain any content.
A combination of your WordPress files and database creates a complete snapshot of your site at a certain point in time. Fail in either of them, and your restoration will either not succeed at all, or will supply an unsatisfying piece of work. That is the reason why all the trustworthy backup method application or document stores both parts of it. Whenever a backup plugin requests you to verify what to include, make sure that both are selected before you can click anything.
Backup Your WordPress Site (Free) (using Plugins).
The simplest method of securing a free backup of your WordPress site is by installing a dedicated WordPress backup solution such as UpdraftPlus directly into your WordPress dashboard.
I would recommend this technique to all beginners as it requires no technical expertise, it is fully constructed within your WordPress administration panel and can be installed in less than five minutes. The most popular WordPress backup-plugin in the marketplace with more than three million active installations, and the free version really does everything the majority of site owners require.
Installing UpdraftPlus (Step-by-Step)
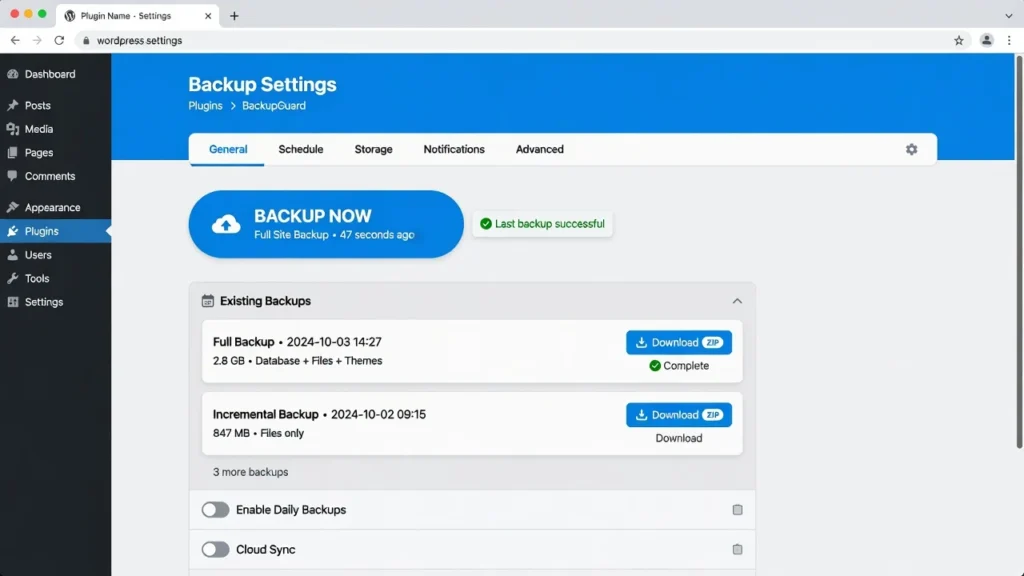
The blue Backup Now button in UpdraftPlus starts an immediate backup of your entire WordPress site.
It only takes us a little under two minutes to get UpdraftPlus on your site. Do the following steps one by one:
Step 1: Log in your WordPress dashboard and in the sidebar on the left, go to Plugins. Click on Add New Plugin.
Step 2: To search in the top right corner, enter UpdraftPlus. The first result will be the UpdraftPlus WordPress Backup Plugin.
Step 3: Clicking on the Install Now button and wait several seconds. After it is completed, select Activate.
That is all the installation. UpdraftPlus is currently operational and can be utilized on your site.
In order to install the plugin, you need to go to Settings in your left sidebar, and then click UpdraftPlus Backups. This becomes your backup control panel henceforth.
How to make a backup using UpdraftPlus.
As soon as you are on the UpdraftPlus settings page, you can create your first backup in less than two minutes.
On the page, just below the top, click on the blue Backup Now button. It will give you a dialog box in which you will be required to confirm what to include.
Be very sure that you have a check in both of the following:
Database option stores all your posts, pages, settings and user accounts.
The files option stores your theme, plugins and uploaded media.
The two need to be chosen. When either of those are not deselected, you will have an incomplete backup that may fail to restore properly when you actually need it.
To start, click the blue Backup Now button in the dialog box. UpdraftPlus uses a progress bar as it processes your files and database. It can be accomplished in as little as thirty seconds or as much as a few minutes depending on the size of your site.
Once the backup finishes it appears in the Existing Backups section at the bottom of the page and has separate download buttons against each component.
On your computer, You can download Your Backup Files.
When your backup is shown in the Existing Backups area, I highly recommend that you immediately download all of the five files to your personal computer.
UpdraftPlus divides your overall site backup into five different files: Database, Plugins, Themes, Uploads and Others (miscellaneous WordPress files). To the right of each of them, there is a download arrow that you can use to download them all to a distinctly labeled folder in your computer.
This is one of the steps that most people never take into consideration. In case of a failure of your hosting server, any backup that you have saved on that same server will vanish along with it. A copy that is on your personal computer is absolutely independent of whatever occurs to your hosting account. It cannot be bothered by any server crash, account suspension, or problem on the part of the provider.
How to configure Automated WordPress Backups (Step-by-Step)
Manual backups are not as bad a thing as having no backups, but the plain truth is that most people simply forget to do their manual backups. Life has been hectic, weeks have gone by and then you find yourself with the last backup being three months old. Then a patch is broken and that three-month gap is costing you.
The answer is to automate WordPress backup schedule. When you set up a schedule within UpdraftPlus, you will automatically make your backups in the background without you even having to think about logging in or anything at all.
It only takes about two minutes to set up your WordPress backup schedule within UpdraftPlus.
Step 1: Visit the Settings and select UpdraftPlus Backups. Then, at the top of the page, you will see the Settings tab.
Step 2: You will be presented with two dropdown menus one of your Files backup schedule and the other of your Database backup schedule. Both default to Manual, i.e. backups are only run when you manually specify Backup Now. Change both the dropdowns to Weekly.
Step 3: Next to the schedule dropdowns, there are number boxes representing the number of backups to store. Set both to 4. This will make your four latest weekly backups always available to you, providing you with about one full month of restore points. Should an error occur this week, you can undo to last week, two weeks ago or one month ago.
Click Save Changes at the bottom. Automated backup has been started.
Connection to Cloud storage (Google Drive, Dropbox).
One of the best things you can do with UpdraftPlus is to make it integrated with a cloud storage service so that your automated backups are directed to go straight off of your server and into a secure offsite location. This is what you do to save your WordPress site to cloud storage rather than having the files languish in the same server that your live site is housed.
On the Settings tab, scroll down to the Remote Storage section. You will find the Google Drive, dropbox, Amazon S3 and many other cloud providers.
To the majority of the beginners, I would recommend Google Drive as it is free up to 15GB, it is easy to authorize, and it is accessible on all devices. To choose the Google Drive, click on the Google drive icon.
UpdraftPlus will create a link to authorize. Click on it, enter your Google account and click Allow to give permission. Go back to UpdraftPlus and save your settings.
Henceforth, all automated backup will be automatically placed in a folder named UpdraftPlus in your Google Drive. Now your offsite safety net is your cloud storage, which is totally independent of your host server.
Free vs Paid: What You Should Know.
All WordPress backup guides are silent about what I am about to tell you, and it counts.
I am also not a client of UpdraftPlus or any other hosting company listed in this guide. My recommendations are all personal use based and regular feedbacks of site owners who have used these tools.
Automatic scheduling is well supported with the free version of UpdraftPlus, but by default, the backups are stored on your hosting server. This is precisely why the integration of Google Drive or Dropbox is not a choice. It is imperative to render the free version, indeed, safe.
The premium version also includes such features as direct backups to other storage services, incremental backups of WordPress websites which are large or high-traffic (that is, the back up only what has changed since the last time, not the entire site) and advanced migration tools and priority support. The free version with Google drive linked works is indeed adequate and I have used it in that manner myself.
The paid version is worth considering in case you update your site on a daily basis or you are handling a site that requires high stakes. Otherwise, then begin with free and then upgrade only when you need it.
Safely Store Your WordPress Backups.
WordPress backup storage is one of the most neglected features of site protection, and it is easy to get it wrong, rendering your backup utterly useless at the time when it is needed the most.
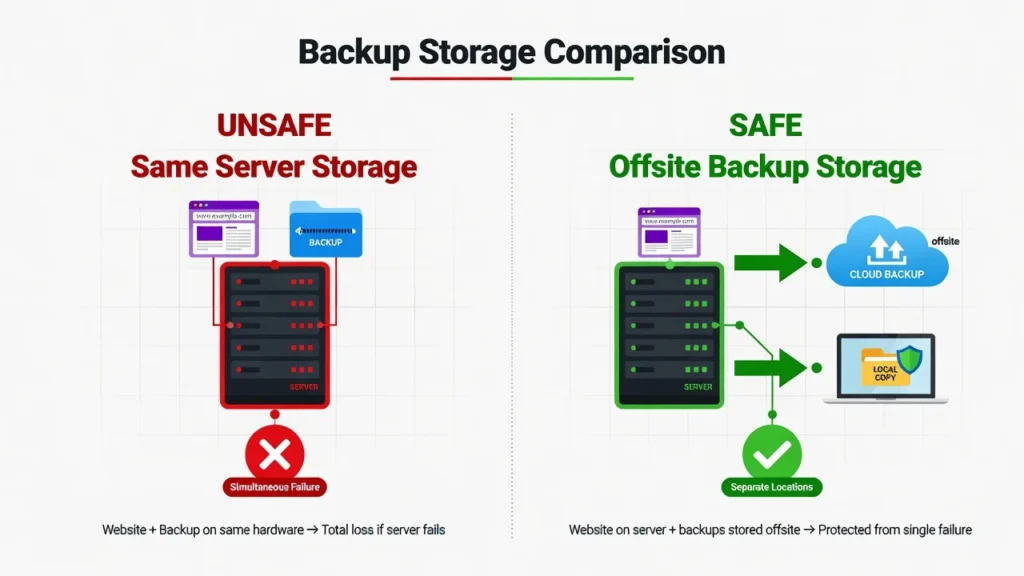
My rule which I could not break: a backup that is only stored in the same server as your live site is not a real backup. It is a bogus safety net.
When your hosting server goes down, your site files, as well as your backup files, all crash simultaneously. If your hosting account gets suspended or deleted, you lose both at the same time. A backup will only save you in case it is in a different place entirely out of your site, and out of your control.
By placing your backup on the same server as your site, you are putting your two eggs in one basket and one failure can wipe both out. A minimum of one offsite storage should always be used.
WordPress Backup Cloud Storage Options.
Keep your backups in at least one cloud storage. By uploading your WordPress backups to the cloud, you physically have the files stored on a different server, in a different location and on completely different server than your web host.
Google Drive will offer you 15GBs free, directly connects with UpdraftPlus, and can be accessed on any device. In the majority of small to medium WordPress, 15GB with ease will store a number of complete backups.
Dropbox provides 2GB free space on the larger sites, though, enough space on the small blogs. Another built-in bonus of Dropbox is the fact that it will give you the best file version history.
OneDrive is one that would be a logical choice in case you already have a Microsoft account.
pCloud provides up to 10GB of free storage with more than acceptable privacy controls should that be of importance to you.
Google drive is my personal set up with UpdraftPlus as the primary destination and a downloaded copy on my local computer as a secondary layer. Two separate locations. Two different failure points, which would have both to fail at the same time, in order that I should lose everything.
Why It Matters to Download to Your Computer.
Saving your backup files on your personal computer may seem unnecessary when your cloud storage has been linked. It does not overlap. It is the last line of defense.
The actual risk here is that on the same day that your hosting server crashes, your cloud storage has a temporary access issue. It happens. The offsite WordPress backup, which is on your own computer, is totally independent of both of those failures. You open the folder, you have your files.
The additional ten minutes your system will need to download five backup files will save you days of reconstructing your system in the event of two systems collapsing simultaneously. Keep them in a well marked folder. Bring them up to date with each manual backup. Other site owners will even copy the folder into an external hard drive, which is I think worth doing to any site that you really care about.
How to recover your WordPress backup (Simple and Crashed Site situations)
Learning on how to backup your site is not the whole picture. The other half the part most backup manuals hurry through or omit altogether is how to restore a WordPress backup when something actually goes wrong. Knowing about the restoration process prior to your need of it is what will make the difference between a recoverable crisis and a catastrophic loss.
I will discuss two different situations since they will need two entirely different strategies.
Simple Restore (When You Can Still Access WordPress)
In the case that your WordPress dashboard is still active but something has gone amiss a conflict with a particular plugin has messed up your layout, or you have accidentally deleted pages, or a theme update has changed your design restoration is easy.
Step 1: Enter into your WordPress dashboard and reach out to Settings → UpdraftPlus Backups. Go downwards to the Existing Backups area.
Step 2: Locate the back-up which was taken prior to the occurrence of the problem. Click the Restore button next to it.
Step 3: Updraft Plus will enquire about which parts of the system it will restore. You will find checkboxes, Plugins, Themes, Uploads, Others, and Database. Choose the parts required and press Restore. The restoration will be performed by Updraft Plus and once it is finished, the restoration will be confirmed.
What to Restore (All Components vs. Selective)
You may be tempted to only repair the part that appears to be broken. In case the issue was caused by a plugin, it would be reasonable to revert only Plugins.
My advice: never leave out anything collectively. By replacing only certain elements, you run the risk of creating mismatch between your database and your files that no longer contain any contact form entries, broken settings or configuration conflicts which are difficult to diagnose even after you think the problem is resolved.
Toggle all the checkboxes and revert to full WordPress backup on said date. A full restore provides a clean and uniform appearance in all sections of your site.
Critical: You will use your Login Credentials After Restoration.
This fact surprises many and results in a literal panic following a successful restoration.
When your restore is complete, the credentials you used to log in to your WordPress dashboard will be those that you were using on the date of the restore. In case you have changed your password after that date and today, then your new password will not work.
The original username and password will be used when the backup was made. In case you have forgotten them, click the WordPress login screen, on the list, the Lost your password? button to reset access.
Being made aware of this before you need it means that there is no such thing as a successful restore.
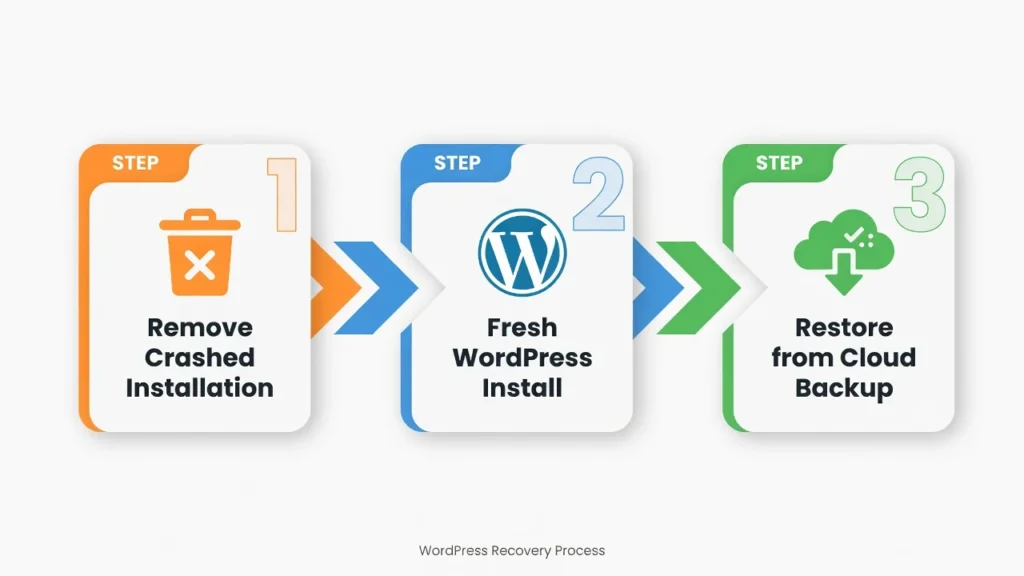
How to restore a totally crashed WordPress website.
Even a completely crashed WordPress site is recoverable in three steps as long as your backup is stored in cloud storage.
This is where most people jump before it until they are at the computer, staring at an entirely blank screen, panicking. WordPress disaster recovery when your site is totally inaccessible is yet another challenge that is not to be confused with a standard restore, and I would like you to know the process before you have ever required it.
A total crash would imply that your WordPress dashboard is inaccessible. When you visit your domain, you may see a white screen, a critical error message, or nothing at all. Assuming you are looking at the critical error in particular, that error can have its own fix without a complete reinstall. It is a stressful event, however, when the site is stored in cloud storage, the site can be completely restored.
These are the specific steps that I would undertake.
Step 1: Delete the WordPress Installation that crashed.
Log in to the control panel of your host, usually cPanel, Hostinger hPanel, or whatever control panel your host is using.
Locate the WordPress installation manager and erase or remove the crashed WordPress installation altogether. By so doing, you are not losing your site. The site is already faulty and not functioning. You are just sweeping out the area to begin afresh.
This is a drastic step. It is also required. The restoration process can be interfered by a corrupted installation. The right place to start is a clean slate.
Step 2: Install a New WordPress.
Once you have removed the broken install, use the one-click WordPress installer of your hosting provider to install a fresh clean copy of WordPress on the same domain name.
This provides you with a blank WordPress site with default settings. Still do not personalize it, do not install any themes or any other kinds of extensions. You are setting up a working WordPress environment that you will immediately switch to your backup content.
Use the username and password that you entered when creating this new WordPress install to log into this new WordPress dashboard.
Step 3 : Restore from Your Cloud Backup
To install UpdraftPlus on your new WordPress site, visit Plugins Add New, search UpdraftPlus and then activate it as instructed earlier.
After activation, visit Settings UpdraftPlus Backups, and in the Settings tab, reconnect to the same Google Drive account where your backups were stored. Authorize the connection.
Go back to main UpdraftPlus tab and click Rescan Remote Storage. UpdraftPlus will automatically scan your connected Google Drive and automatically find all your prior backup files.
When your backups are shown in the Existing Backups list, click Restore on the backup that you want to restore. Choose all elements and verify.
UpdraftPlus will fetch your backup on Google Drive and re-install your entire site on the new installation. At the time it is finished, your web site will be exactly the way it was on the backup date. This is the way to recover a WordPress backup in the event of a complete site meltdown.
Note: to access the restored site, you should use your original user name and password as of the day of the backup.
How to Backup WordPress Site manually (No Plugins)
Other WordPress users choose to perform backups themselves, by accessing their hosting control panel or file transfer software. It is also possible that a plugin cannot be installed into a highly restricted hosting environment, a local development environment or due to a general preference not to use third-party software at all.
When you have to backup a WordPress localhost setup, the two methods described below using FTP and phpMyAdmin work exactly the same way with local environments.
Manual backup of WordPress is more technical than a backup performed using a WordPress backup plugin, but it also provides you with full direct control over what you save, and where you save it. No plugins. No dependencies. Your files and your hands.
Manual Backup through cPanel Backup Wizard.
To make a complete manual copy of your WordPress site, Find the Backup Wizard under the Files section in your cPanel dashboard.
The most readily available guide backup option to shared hosting accounts is the cPanel Backup Wizard. The rest of the providers such as Bluehost, SiteGround, and Hostinger include cPanel access in their plan.
Step 1: Log in to your cPanel account via your hosting dashboard. Clicking on the Backup Wizard icon, scroll down to the Files section and then click the icon of the Backup Wizard.
Step 2: Click Backup, and then choose Full Backup as your type of backup. Change the destination to Home Directory this will save the backup file to the main folder of your hosting account.
Step 3: Type in your email address in the space provided. cPanel will send you an email when the backup is completed. Start by clicking on Generate Backup. Big sites can require a few minutes.
Step 4: When you get the email confirmation, revert to cPanel. This time, you will see the plain Backup icon (not Backup Wizard). Go to the Backups Available for Download section and press the file to download it to your computer.
My cPanel backup usage is when I need to archive site snapshot prior to a major server transition. In case of restorations, I highly suggest that you refer to the support team of your hosting company. The procedure is to pull vast archive files at server level and your host can go through it safely.
How to Do an FTP Backup of Your WordPress Files.
FTP backup is a downloaded back-up of all your WordPress files directly to your computer using an FTP client application. The most used free version is fileZilla which works on both Windows and Mac.
Download and install FileZilla from filezilla-project.org. Find your FTP credentials in your hosting control panel you will need your FTP host address, username, password and port number. In the case of large sites, remember that an FTP download can be between 30 minutes and several hours depending on the amount of content you have.
Step 1: In FileZilla, you have to enter your FTP credentials and press Quickconnect. The files on your hosting server are displayed on the right side of the screen and the folders of your computer on the left.
Step 2: In the right side, navigate to your WordPress folder that is normally referred to as public-html. Choose all the files and folders within it.
Step 3: Drag the chosen files to one of the folders on your computer on the left hand side. FileZilla sets to downloading everything automatically.
This migrates your entire WordPress file set themes, plugins, uploaded media and core files. Note that this FTP backup will only back up your files. You must yet export your database separately, which is discussed in the following section.
Backup Your Database using phpMyadmin.
The downloaded FTP above will only store your WordPress files. You also have to export your database into phpMyAdmin in order to complete a full manual backup.
Enter cPanel and in the Databases section is the phpMyAdmin icon. Assuming that your host has a different control panel, you can find a phpMyAdmin link somewhere in the database management section most hosts provide it somewhere.
Go to open phpMyadmin and in the left sidebar, you will have a list of databases. Click on your WordPress database it typically includes your username and the letters “wp” in the name.
A personal experience hint: in case you are not sure which of the databases is the right one, you can simply click on it and see what is inside the tables. Tables such as wp posts, wp users, and wp options will be found in a WordPress database. That proves you have the correct one.
Export Tab at the top: Click on it. Keep the method of export on Quick and format on SQL. Click Go.
A.sql file will be downloaded to your computer by your browser. This files will include all of your WordPress data all of your posts, pages, comments, user accounts, and site settings. This is your database export and it is as important as your files.
Copy this.sql file into the same directory as the files you have downloaded of WordPress. The two things combined, your files, and your database export make up your full manual WordPress backup.
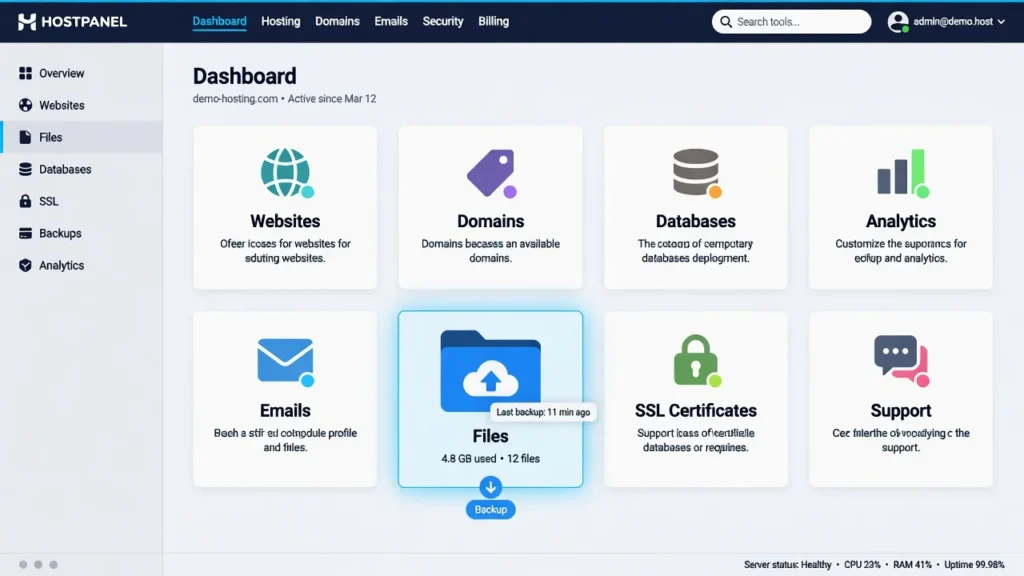
Backing up with the Backup Tools of Your Hosting Provider.
The majority of the modern hosting services have built-in backup systems that are directly in their dashboard. All of the companies (Hostinger, SiteGround, and WP Engine) include automatic daily backups with one-click restoration.
To access your WordPress hosting backup tools, log in to your hosting dashboard and find a Backups or Site Backups menu. Most hosts have a calendar or list of dates of available restore points. Depending on your plan, you can usually browse back 14 to 30 days.
To restore, you must select the date of your choice and then press the Restore button. This is a replacement of your current live site with the chosen backup version so instead of confirming the date before you confirm, you should first check the date before you confirm.
With this said, your host provider backups should in no way be the sole backup system. I have talked to site owners who lost their data due to a data center failure by their host, a change in policy that wiped out old back-ups or a breach of terms that led to the termination of the account with all of the stored back-ups. You should always have your personal independent backups either through UpdraftPlus or a manual process. Only when you control your backup can you be sure that it is safe.
Backup vs Migration: Moving Your WordPress Site to a New Host.
This is the most confusing topic to most WordPress users than any other subject and what you are trying to do will entirely determine the method you use.
The difference between restoring a backup and migrating a WordPress site to a new host is important. Confusion with them results in ruined websites and time wasted.
Migration vs. Backup/Restore: What is the Difference?
The backup restore implies transferring your site to another hosting company but keeping the very same domain name. The URLs within your database will remain unchanged since the domain is not changing. UpdraftPlus which is free of charge accomplishes this flawlessly with no additional procedures.
A WordPress migration refers to the process of moving your site to an entirely new domain name. All URLs you had in your database page links, all image URLs, settings references still point to your old domain and will not work until updated.
The key difference: same domain = backup restore. New domain = migration in case of replacement of database URL.
Where You Require Quality Migration Features.
When it comes to a same-domain restoration to a new host, the free edition of UpdraftPlus or Duplicator can be used without any issues. Install the new host with the new host installing the plugin and then uploading the backup files and restoring everything just as it was described earlier in this guide.
In a new-domain migration, most WordPress backup plugins are free and cannot automatically update the URLs across your database. You must have an excellent instrument. The Migrator addon is included with UpdraftPlus Premium and it auto-replaces database URLs. Duplicator Pro possesses the identical ability as inbuilt.
When migrating with a premium migration or URL replacement checkbox, make sure that the database migration or URL replacement checkbox is checked before confirmation. This instructs the plugin to look at your entire database and update every occurrence of your old domain to your new domain.
Critical: Before Migrating, SSL Certificate is to be installed.
You should always first install and enable an SSL certificate in the new hosting account before you can start any restoration or migration of data to a new server. In case you are planning a complete site migration, going through an adequate migration checklist will help you prevent the most common mistakes, not just with regard to SSL.
In case the original server was using HTTPS which it should and the new server at the time of restoration is not using the same protocol, you will get protocol mismatch errors. Your site can load with broken images and styling, browser warnings, or can fail to load entirely.
The majority of hosting companies nowadays provide free SSL using Let’s Encrypt. Turn it on in your hosting account prior to you touching the restoration process. After enabling the use of the SSL, you would be able to view a green padlock when you visit your new domain. That assurance implies that you can safely go on with the restoration.
Most of the WordPress back up errors (and how to prevent them)
I have personally made some of these mistakes and have stood by and watched others make the rest. These are the mistakes that can result in a real, lasting damage to WordPress sites that can be saved in minutes with an appropriate backup.
Storing backups, simply because they belong to the same server as your live site. In case your server goes down, your web site and your backups will be lost together. Always forward a copy to Google Drive, Dropbox or other offsite destination. It is not an option that is an offsite backup is the whole point.
Saving files and forgetting database. Your WordPress files without the database provide you with a blank shell. All the posts, pages and settings exist in the database. Always make sure that both are checked and then click on Backup Now.
Updating WordPress without a backup. Each major WordPress core update, theme update or plugin update has some risk associated with it. The right sequence of actions: perform a backup, and install the update. When something breaks, you can roll back in a few minutes.
Not testing the effectiveness of your backups. The most common is an automated back-up system set up by many site owners who assume that everything is all right and find out weeks later that everything has gone wrong. It is important to test your backup by restoring to a staging environment at least once every few months. Checking of WordPress backup is not a choice.
Removing files off the backups to free disk space. This makes sense up to the point a restore fails due to a missing key component. Always do complete backups and include everything.
Failure to ensure that automated backups are still functioning. Periodically log into UpdraftPlus and have a look at the Existing Backups section. When the latest backup is three months old, then something has gone wrong without your notice and you must find out what has happened right now.
The free version of the plug-in without integrating cloud storage. The UpdraftPlus free version will default to backing up on your server. Connect Google Drive or dropbox or manually download your backup files after each run. Always keep a backup that is not on the server alone.
The reinstatement of only the chosen parts. The combination of a restored database with newer files of the plugins or the reverse can cause some inconsistency to appear which leads to new issues. It is always good to put everything back together to achieve a clean and consistent finish.
All these errors are not complex to prevent. The only thing they need is the habit of doing the right thing at all times, not just when something is going wrong.
WordPress Backup Best Practices (How Often, Testing, and Monitoring)
The establishment of your first backup is a good place to begin. Maintaining, scheduling, testing and monitoring your backup system is what will keep the site owners recovering in minutes and those who lose days of work.
All You Need to Know about Backing Up Your WordPress Site.
The frequency of your WordPress backup will be based solely on how frequently you update your site.
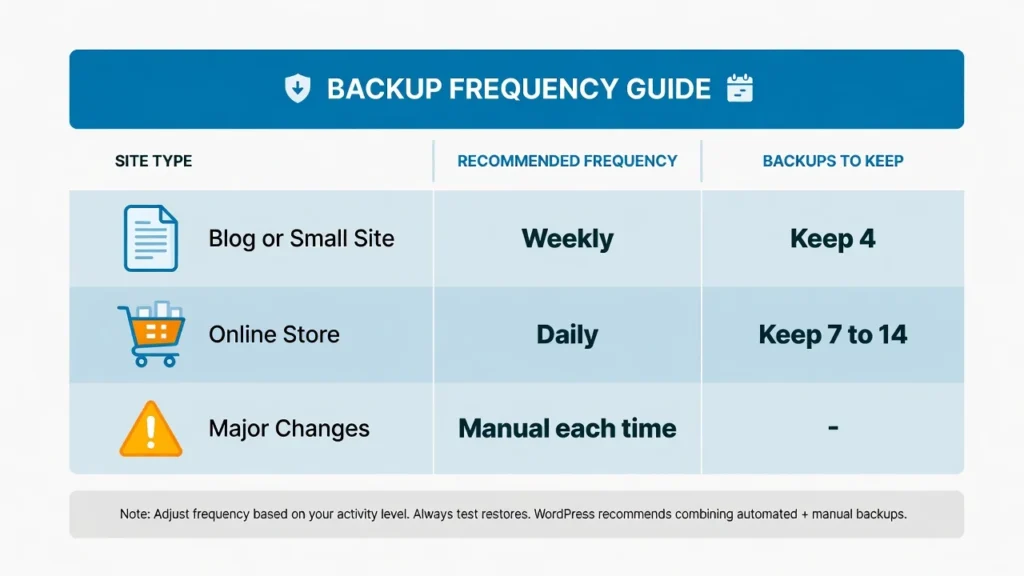
The appropriate minimum is weekly automated backups, which is suitable to personal blogs and small business sites that publish a few times per week. You can always have a month full of restore points available with a four-backup retention setting.
Daily backups are the standard that should be adopted in cases of sites that publish daily content, those that run active online stores, or those that handle regular customer transactions. The frequency of your backup should correspond to the highest number of new content or data that you are prepared to lose in the worst case scenario.
When you operate a WooCommerce store, you should show your backup frequency an additional level of care. Each and every order placed generates new records in the database. In the case of active stores that have to handle multiple orders on a daily basis, daily backups are the bare minimum, rather than a preference. Any order data lost between weekly backup times are unrecoverable and have a direct impact on your customers.
No matter how big or how active your site is, it is always a good idea to run a manual backup before every major change that installs a major plugin, updates the WordPress core, switches your active theme or modifies your code in any significant way.
A previous week backup of an average day is really useful. Even more valuable is a backup of five minutes ago made just before a dangerous update. The greater the risk you are about to inject, the more up-to-date your backup should be.
This quick reference will help you select the appropriate frequency of backups to use on your WordPress site type and level of activity.
Checking Backups to make sure they work.
One of the most vital things you can do to ensure that your backup system is functioning correctly is WordPress backup verification.
The untested backup is merely a file lying somewhere on a server. You are not sure whether it is complete or not. You are not sure whether it will come back right. You learn when you are in dire need of it, the last thing you want to know is that you have a problem.
Once to three months, attempt to restore a backup to a staging or test environment. A lot of hosting companies provide staging environments, which allow you to test a complete restoration without viewing your live site at all. Test the process: ensure the site loads, confirm that your content exists, and ensure your plugins and settings are intact.
This lasts perhaps half an hour. The assurance it has that you know your safety net really has is worth each minute.
Setting Up Backup Notifications
When your automated backups are silently failing to work in the background, you will not know until a crisis makes you find out. The easiest method of keeping updated without necessarily checking manually is through the backup notifications.
Within UpdraftPlus, go to the Settings tab and under the Email section, you can find the top section. Enter email address and save. UpdraftPlus will then send you a mail every time a backup is successful or not.
When you are constantly receiving notifications, you can be sure that your system is functioning. When they cease, there must be something that you are supposed to attend to. It is among the least utilized features of UpdraftPlus and among the most useful.
To do a manual backup of cPanel, type in your email in the backup configuration screen and the system will email you when the backup file is ready to download.
How Many Backups do you have?
The number of copies of a backup retained before the oldest of the copies begin to be automatically deleted is determined by your backup retention policy.
I would recommend four backups as my minimum recommended number of backups on any WordPress site. This, together with weekly automated backups, will provide you with a complete month of restore history. Even this day, when you find out that a certain problem began three weeks ago, you still have a back up of what it used to be three weeks ago.
On the one hand, it is quite reasonable to have eight backups of more on the sites that have more actively moving content or may be subject to frequent configuration modification. The trade-off is storage space. The amount of data your backup file contains depends on the size of your site in total content four full backups may be as little as a few hundred megabytes of data in a simple blog or as much as several gigabytes of data in a site with a lot of content and a lot of media.
The 15GB free storage that comes with Google Drive is sufficient to store the history of backups of most small to medium sized WordPress sites. Monitor your storage capacity after a few months and decrease the number of retention items in the event that you begin to run out.
Common WordPress Backup Problems Troubleshooting.
Despite having a well-built backup system, things, at times, go awry. The following are the most frequent issues that WordPress users have to deal with and what exactly to do about each of them.
Backup times run out and fail to complete. Big sites that have a lot of media and numerous plugins can overload server memory or execution time constraints. Attempts: Attempt to raise the execution time limit in your hosting environment or ask your host. Instead, migrate to an incremental backup WordPress plug-in which processes your site in smaller chunks, over multiple runs, rather than in one run.
Backup failed without any obvious error message. The first thing is to verify is available disk space on your server. SILENT backups fail more frequently than most people would guess due to a full disk. In case disk space is fine, it may be best to deactivate the resource-intensive plugins and then run the backup again to get the server memory free.
Backup is complete yet there are missing files. This nearly always is a file permission problem. Some folders can be limited in such a manner that the backup plugin is unable to read them. Ensure permission to your wp-content folder and its subdirectories with your hosting file manager. Contact hosting support, in case you do not know how to change the permissions safely.
is unable to access WordPress when restoring a backup. The most common cause is a database connection error. There is a possibility that your backup has database credentials of your previous host environment. Use your hosting file manager to open wp-config.php and ensure the database name, username, password and host are all correct according to your current database settings.
Restoration errors in databases. This typically occurs when there are already tables in the database that are due to a conflicting WordPress installation. Before restoring, make sure that you do away with the previous installation of WordPress wholly. Most restoration conflicts can be avoided by having a clean database on an unmodified WordPress install.
Out of disk space error. Backup files are generated with time. See what is being used in your disk space in your hosting control panel, delete old backup files that you no longer need, and verify that your settings on UpdraftPlus retention are correct. Another thing to do is to check your cloud storage to see old backup sets taking up space.
In the case of a backup problem related to a plugin, and you cannot diagnose the problem, you can switch off your other plugins one at a time to isolate the conflict. The WordPress Site Health tool as found in Tools in your dashboard can also reveal the existence of server configuration issues that may be contributing to the un-reliability of back-ups.
Checklist Final: WordPress Backup System is ready.
Now you possess all you require to properly and confidently back up your WordPress site.
In summary: the free UpdraftPlus plug in manages your files, as well as your database in a couple of clicks. Automated weekly backups are automatically run in the background so that you never have to remember. The Google Drive will keep your backups safely out of your server. And in case the worst occurs, and your site collapses in free fall, now you know the exact step-by-step process to follow, to restore everything that you had stored in your cloud backup.
Installation of UpdraftPlus, your first backup, and linking Google Drive as your remote storage destination are the most important things that you can do at this very moment. It only takes less than ten minutes and instantly provides your site with an all-round safety net.
Knowing how to backup your WordPress site is one thing. To actually have a working, tested backup in cloud storage is another thing altogether.
In case you have been avoiding this due to some assumptions that it was a complex task, I trust that this guide has shown you that it is not. There is no technical know-how to protect your data on the internet. It involves acting today, before something causes you to feel that you will have to deal with the effects tomorrow.
You have created something to defend. Now it is insured. That is quite a good feeling.
Frequently Asked Questions
What is the free method of backing up my whole WordPress website?
The simplest free option is to utilize the Updraft Plus plugin. Install it in your WordPress dashboard, and click Backup Now before you begin, making sure that both the database and files options are selected. Google Drive as your remote storage so that your backups are safely stored offsite. The whole procedure will take a maximum of ten minutes.
What number of times should I be able to save my WordPress site?
In the case of most blogs and small business websites, weekly automated backups will suffice. Daily backups are the appropriate criterion in the case of WooCommerce stores or sites that upload daily content. It is always important to perform a manual backup immediately prior to any major update, or switching of theme or loading of a new or updated plugin, no matter how often you do it.
Will I be able to recover my WordPress site in case it goes down?
Yes. Assuming you have a backup in Google drive via UpdraftPlus, then you can restore an entire crashed site. Clean up your hosting account by deleting the broken WordPress installation, installing a new copy of WordPress, reinstalling UpdraftPlus, reconnecting to Google Drive, and restoring your saved backup. The site will be an exact copy of the one on the backup date.
What is the difference between a WordPress backup and a migration?
A backup restore will transfer your site to a new host and will retain the same domain name no URL updates are required. A migration is the process of moving your site to a totally new domain name, which involves changing all the URLs in your database. The free edition of UpdraftPlus deals with backup restores. A new domain is a new domain that needs a high-quality migration tool, which is capable of automatically replacing database URLs.
Is the free version of UpdraftPlus enough?
Yes, to most beginners and small and medium sites. The free version supports full backups of your files and database, automated scheduling, and integrates with Google Drive and Dropbox to back up your files and database offsite. Backups are automatically stored on your server by default, which is counterproductive, and connect cloud storage as soon as it is set up or it will not work.
What do I do with my WordPress backups?
Do not keep backups just on your hosting server. Take any of the following cloud storage services Google Drive is the most appropriate free option with 15GB. I am personally using Google drive via Updraft Plus and a downloaded version on my personal computer. Having two separate places would imply that I would need to have two systems fail at the same time in order to lose all.
But how do I know that my automated backups are in fact successful?
Configure email notifications within the UpdraftPlus under Settings → Email. When a backup is successful or unsuccessful, you will be sent an email to confirm the success or failure of the backup. You should also log into UpdraftPlus a few times a month and visit the Existing Backups section. When the latest backup is not as recent as your scheduling, then something has broken and is in need of repair.
Would I test my WordPress backups?
Absolutely. An untested backup is simply just a file that you have no idea whether it will be restored properly until you test it. After every one to three months, you will restore a backup to a staging environment and walk through the output. Check that the site loads, there is some content, and the settings are not changed. That is the sole manner of being truly sure your safety net is functioning.


