

Adding calendly to wordpress website using elementor is one of the fastest ways to turn website visitors into booked clients. Instead of sending people to an external scheduling page where they might get distracted or leave, your calendar lives right on your site exactly where they are already engaged with your content.
I learned this the hard way. I watched potential clients leave my website to book through a separate Calendly link, then get pulled into emails or other tabs and never return. Once I embedded Calendly directly on my WordPress site using Elementor, the difference was immediate visitors stayed on my page, saw my full offer, and completed their bookings without dropping off.
This works for almost any service business coaching, consulting, freelancing, agencies, or anything built around scheduled calls. Your appointment booking experience becomes part of your website, not a separate scheduling tool they have to hunt down.
You also don’t need a developer or any coding knowledge. Follow this WordPress Elementor tutorial step by step and the whole setup takes about five minutes. Whether you’re on the free Calendly plan or a paid tier, this integration works the same way.
I’ve set up Calendly integrations on dozens of WordPress sites across coaching, consulting, and agency niches. This guide reflects what actually works not just what the documentation says.
Prerequisites: Do You Have Everything You Need?
Before jumping into the steps, let’s confirm you have everything in place. This quick checklist takes two minutes and prevents the most common setup headaches.
None of these requirements cost money or need technical knowledge. You probably have most of them already.
You’ll Need a WordPress Site (Self-Hosted)
This guide works specifically for self-hosted WordPress sites meaning you’re running WordPress.org, not WordPress.com. If you don’t have WordPress set up yet or need to move to proper hosting, our self-hosted WordPress setup guide covers that process.
Self-hosted WordPress gives you full control, including the ability to install plugins and use page builders like Elementor.
Quick check: Can you access your admin dashboard at yoursite.com/wp-admin? If yes, you’re set. If you’re unsure which version of WordPress you have, look at your URL. WordPress.com sites usually look like yourname.wordpress.com unless you’ve bought a custom domain. Self-hosted sites run on your own domain yourdomainname.com.
As long as you have admin access and can install plugins, you’re ready for the next step.
Elementor Installed (Free Version Works Fine)
You need Elementor installed and activated on your WordPress site. The elementor free version is completely sufficient for embedding Calendly you don’t need Elementor Pro for this to work. This page builder plugin does everything you need.
Quick check: Log into your WordPress dashboard and look for “Elementor” in the left sidebar menu. If it’s there, you’re set.
If not, search for it in the WordPress plugin marketplace and install it for free takes under a minute. If you encounter any issues with the plugin installation or activation, our guide on fixing plugin problems in WordPress walks through common solutions.
Once installed, you should be able to click “Edit with Elementor” on any page and see the visual editing interface with widgets on the left side.
A Calendly Account (Free or Paid)
You need a Calendly account and the free Calendly plan works perfectly for this entire integration. The free tier lets you create one event type and receive unlimited bookings, which is more than enough to get started.
Your Calendly account setup takes about two minutes if you use Google sign-in. Click “Continue with Google,” and Calendly automatically syncs with your Google Calendar your busy blocks carry over immediately, preventing double bookings from day one.
Quick check: Can you log into Calendly and see your dashboard? Do you have at least one event type created? If yes, you have everything you need.
No Coding Skills Needed
No coding skills required at all. You won’t write code, learn programming, or do anything technical. The entire process is copy paste code from Calendly and place it into WordPress. Even if you’ve never seen HTML in your life, this guide shows you every step clearly.
You’re taking a small snippet from Calendly and placing it inside WordPress. That’s the whole technical side of this.
Choose Your Embed Method: Inline, Popup, or Text Link
Before jumping into the steps, it’s worth knowing your options. Calendly gives you three ways to embed your calendar on your WordPress site, and the right one depends on how you want visitors to experience it.
I recommend the Calendly inline embed method for most people and that’s what this guide covers in detail. But knowing all three upfront helps you make the right call for your situation.
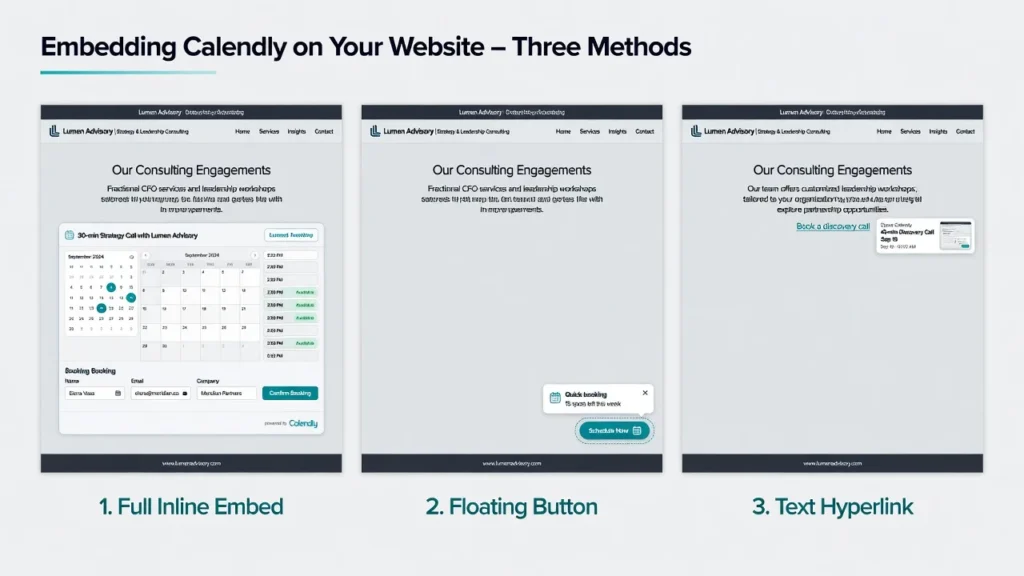
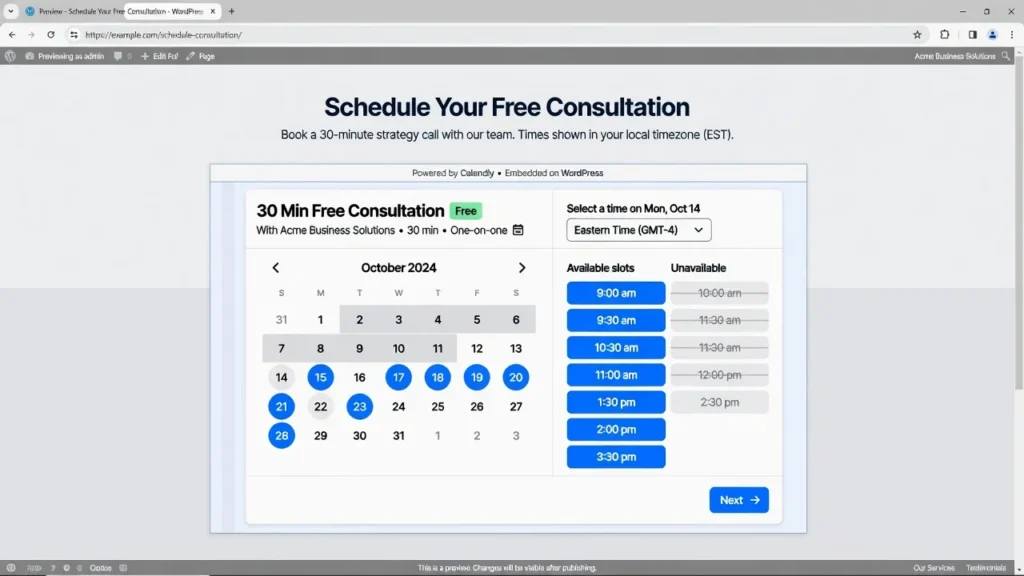
Method 1: Inline Embed (Recommended for Most Users)
Inline embed means your calendar displays directly on the page inside a dedicated section. As visitors scroll down, they see your available times right there no popup, no redirect, no leaving your website.
This is the most professional way to add a booking calendar to your website. It looks like the calendar was built into your site, not dropped in from a third-party tool. Your visitors get the full scheduling experience without ever knowing they’re on Calendly’s system.
Best for: Dedicated booking pages, consultation landing pages, service pages, or any page where booking is the primary action.
Pros: Most professional appearance, visitors never leave your site, highest conversion rate, full calendar visible immediately, responsive on mobile devices.
Cons: Takes up vertical space on your page, not ideal if you want a minimal visual footprint.
Visual experience: Someone visits your page, scrolls down, and sees your calendar with available time slots. They click a time, fill in their name and email, and the booking is confirmed all without leaving your website.
This is the method we walk through step by step below.
Method 2: Popup Widget (Best for Floating Button)
The Calendly popup widget places a small floating button on your page that stays visible as visitors scroll. You can customize the button text with something like “Book a Call” or your company name. When they click it, the calendar opens in a popup modal clean, non-intrusive, and always accessible.
Best for: All pages on your website, pages where you want a subtle booking option, businesses that want booking available but not as the main focus.
Pros: Takes up no page space, always accessible as visitor scrolls, customizable button text, doesn’t interrupt reading flow.
Cons: Opens in a popup modal, so technically visitors leave the page experience for a moment, though they return to your page after booking.
Visual experience: Your visitor is reading your services page and sees a floating button at the bottom right that says “Schedule Now.” They click it, book in the popup, and return to reading your page.
Method 3: Popup Text Link (Simplest Visual)
The popup text link is the most minimal option. You drop a simple hyperlink like “Schedule a consultation” directly into your page content. When visitors click it, the calendar opens in a popup. Nothing appears on the page until they click, which keeps things visually clean.
Best for: Inline within service descriptions, footer areas, call-to-action sections, or when you want scheduling as a secondary option.
Pros: Most minimal appearance, fits naturally within text, takes up almost no visual space.
Cons: Requires visitors to click to see anything, lowest conversion rate compared to inline.
Visual experience: Within your service description, you have text that reads “Ready to get started? Schedule your free consultation here.” That link opens a popup calendar when clicked.
Quick Comparison
Here’s a side-by-side look at how all three methods compare:
| Embed Method | Visual Impact | Professional Look | Conversion Rate | Best For |
|---|---|---|---|---|
| Inline Embed | High | Most Professional | Highest | Dedicated booking pages |
| Popup Widget | Low (floating button) | Professional | Medium-High | All pages, subtle option |
| Popup Text | Very Low (text only) | Minimal | Medium | Within body content |
For this guide, we’re walking through Method 1 the Calendly inline embed because it gives you the best combination of professional appearance and conversion rate. If you want a popup widget or text link instead, the steps are nearly identical; just choose differently in Calendly’s Share menu.
Configure Your Calendly Events Before Embedding
Most people rush straight to WordPress and wonder why their calendar shows nothing. The real setup happens inside Calendly first. Before you touch Elementor, you need to configure your Calendly event type properly otherwise your embed will display but show zero available times.
I’ve seen people set up the WordPress integration perfectly only to wonder why visitors can’t actually book anything. Every single time, the issue was missing configuration in Calendly itself.
Elementor is just the display window Calendly is the actual calendar behind it. If Calendly isn’t configured right, nothing you do in WordPress will make the booking work.
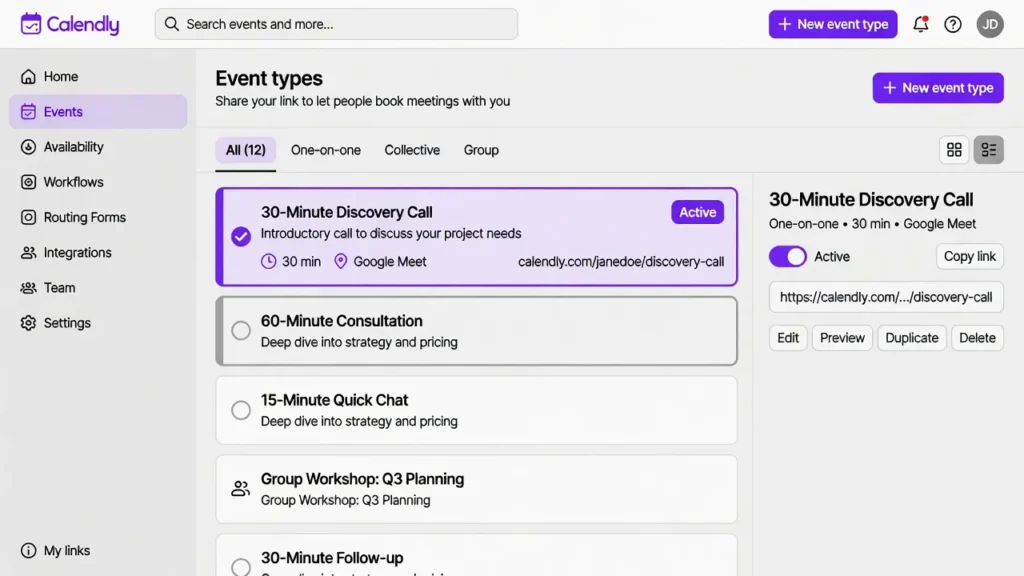
Step 1: Create or Select Your Event Type
Log into your Calendly account and go to your dashboard. You’ll see your event types listed there if this is your first time, create one before continuing.
Click on the event you want to embed. This is the meeting type visitors will see when they land on your WordPress booking page. Each event type generates its own Calendly scheduling link and its own embed code, so you can embed different meetings on different pages.
If you have multiple event types like a “30-minute discovery call” and a “90-minute strategy session” pick the one you want to embed first. You can always embed additional events on different pages later.
Step 2: Set Your Event Name and Duration
Inside your event, you’ll see a field for the event name what visitors read before they book. Make this specific enough that they know exactly what they’re signing up for.
Instead of a vague label like “Meeting,” write something like “30-Minute Discovery Call” or “Free Consultation.” People are far more likely to book when they know the duration and format upfront.
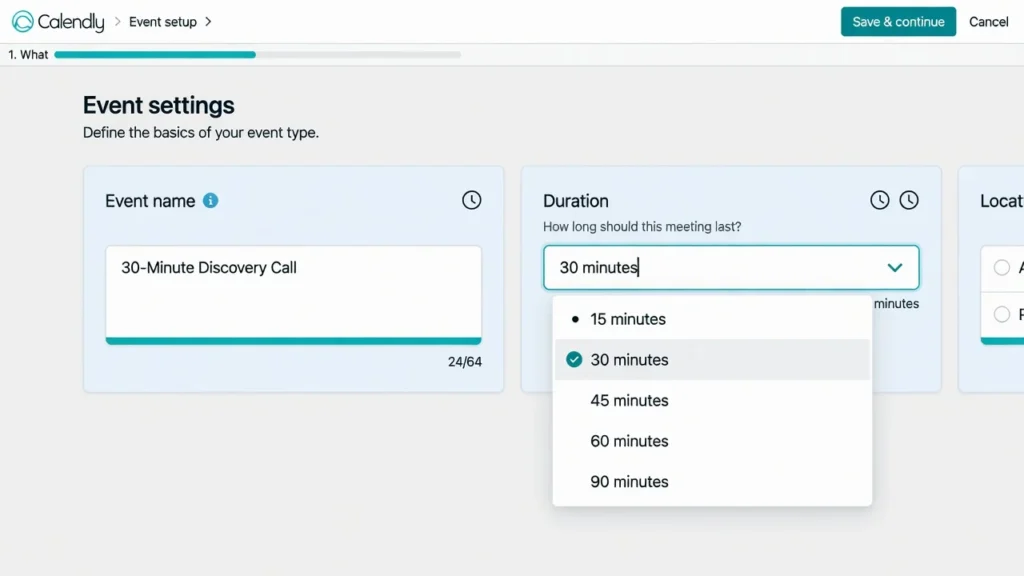
Set the duration in the dropdown. Common options are 15, 30, 45, or 60 minutes. Choose whatever matches your typical call length. You can always create multiple events for different lengths later.
Step 3: Choose Your Meeting Location or Platform
As your meeting scheduler, Calendly needs to know where or how each meeting happens before it can send confirmation details automatically. Your options include Zoom, Google Meet, Microsoft Teams, Webex, phone call, or in-person.
If you select Zoom or Google Meet, Calendly can automatically generate a meeting link and include it in the confirmation email. Your visitor doesn’t have to ask where to join they get the link automatically.
If you select phone call or in-person, add custom instructions. For example: “I’ll call you at the number you provide” or “Meeting location: 123 Main Street, Suite 200.”
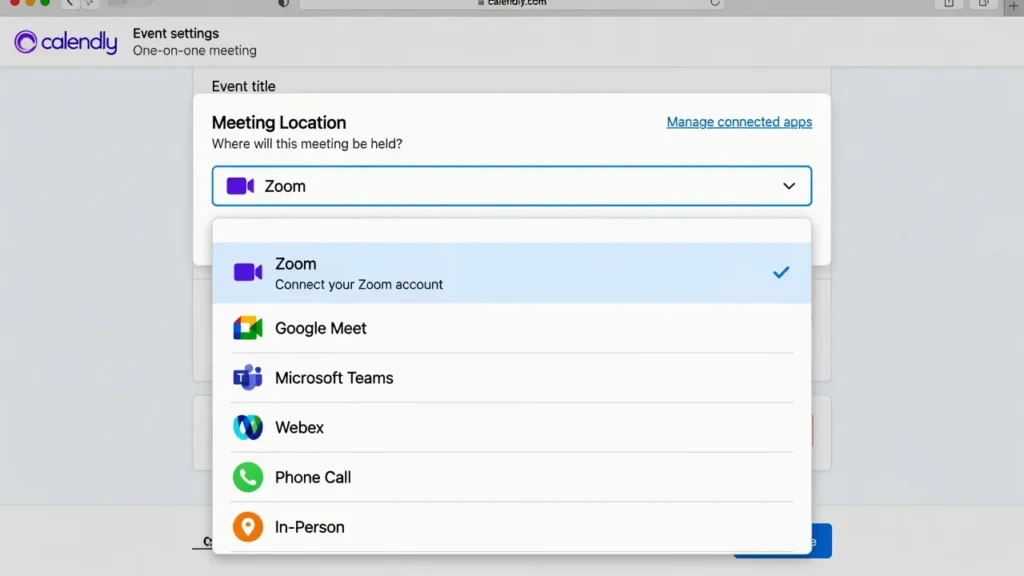
This removes confusion before it starts. Your visitor knows exactly where and how to meet you before they even book.
Step 4: Set Your Availability and Working Hours
In your scheduling settings usually labeled “Settings” or “Scheduling” you tell Calendly exactly when you’re available.
Set your working days. If you’re off Sundays, say so. If you only work Monday through Thursday, reflect that. Then set your hours. If you work 9am to 5pm with a lunch break from 1pm to 2pm, enter both windows. Calendly will never show times outside these hours as bookable.
You can also set a date range for bookings. For instance, “allow bookings up to 60 days in advance” prevents people from scheduling six months out when your schedule is too uncertain.
This protects your calendar automatically. Visitors simply can’t book outside your availability.
Step 5: Set Meeting Buffers (Protect Your Time)
Buffers are one of those settings most beginners skip and then immediately regret. Find the “Buffers” option in your scheduling settings.
Set a buffer before meetings 15 minutes is a good starting point so you have time to pull up notes or mentally shift gears. Set a buffer after meetings too, so you can decompress and wrap up before the next call starts.
I once took nine back-to-back calls in one day before I discovered buffers. Now I never publish a calendar without them set. Without buffers, you end up with back-to-back bookings that are genuinely exhausting.
Step 6: Set Event Limits and Cancellation Policy
You can set a maximum number of meetings per day. Maybe you only want to do three consultations daily because that’s all you can handle and still do quality work. Set that limit.
You can also require a minimum notice for cancellations something like “minimum 4 hours notice to cancel” so people think before booking and then canceling last minute. These settings protect your schedule from one of the worst scheduling nightmares: someone books, doesn’t show up, and that time slot goes to waste.
Step 7: Customize Your Booking Form (Optional but Recommended)
When someone clicks to book a time, they provide their name and email at minimum. But you can ask for much more through custom form questions.
In your booking form settings, add questions using single-line text fields, multi-line text fields, radio buttons, checkboxes, dropdown menus, or phone number fields.
For example, if you’re a consultant, you might ask “What’s your current budget for this project?” with options like “$0–5k,” “$5–10k,” “$10k+.” This qualifies leads before you even get on the call.
All of this works within the iframe embed that Calendly generates meaning the form your visitor fills out is hosted securely on Calendly’s servers, not on yours. Your clients’ data stays protected.
Step 8: Set Up Email Reminders and Follow-ups
People forget about scheduled meetings. Research from appointment scheduling platforms consistently shows that reminder emails reduce no-shows significantly often cited in the range of 20 to 30 percent. The first time I turned on reminders, my no-show rate dropped noticeably within two weeks. It’s now the first thing I enable on any new Calendly setup.
In your communications settings, enable reminder emails sent to your visitors. A common setup is sending a reminder one hour before the meeting. Your visitor gets an email, sees it, and shows up.
You can also set up automated follow-up emails after the meeting. This keeps momentum going and can lead to continued work or sales.
Step 9: Create a Custom Thank You Page (Optional)
After someone books, Calendly shows a confirmation screen. You can use Calendly’s default, or you can direct them to a custom “Thank You” page on your website.
This keeps your brand visible and can provide next steps links to your best content, a quick welcome video, or prep instructions before the call. It’s optional, but it feels significantly more polished than sending people to a generic Calendly confirmation page.
Optional: Enable Payments
If you charge for consultations, Calendly can collect payment before the meeting is confirmed. Connect Stripe or PayPal in your account settings, set your fee, and Calendly holds the booking until payment goes through.
Note: this requires a paid Calendly plan. But it solves a real problem you stop chasing payments after the call because the client already paid to book.
Copy Your Calendly Embed Code (It’s Easier Than You Think)
With your event configured, it’s time to grab your Calendly embed code. This is the snippet that tells WordPress exactly which calendar to display and how to show it.
The embed code snippet is a short block of HTML and JavaScript that Calendly writes for you automatically. You don’t write it, edit it, or need to understand it you copy it exactly as given, then paste it into WordPress.
Think of it like a mailing address Calendly generates the code that tells WordPress exactly where to find your calendar and how to display it.
From Your Calendly Dashboard: Find the Share Button
Log into Calendly and go to your dashboard. Find the event you configured and click into it.
Look for the “Share” button usually at the top right of the event screen. This is how you embed your scheduling widget into WordPress. Click it and you’ll see a menu of sharing options appear.
Don’t worry if your screen looks slightly different — Calendly updates its interface occasionally, but the Share button is always there.
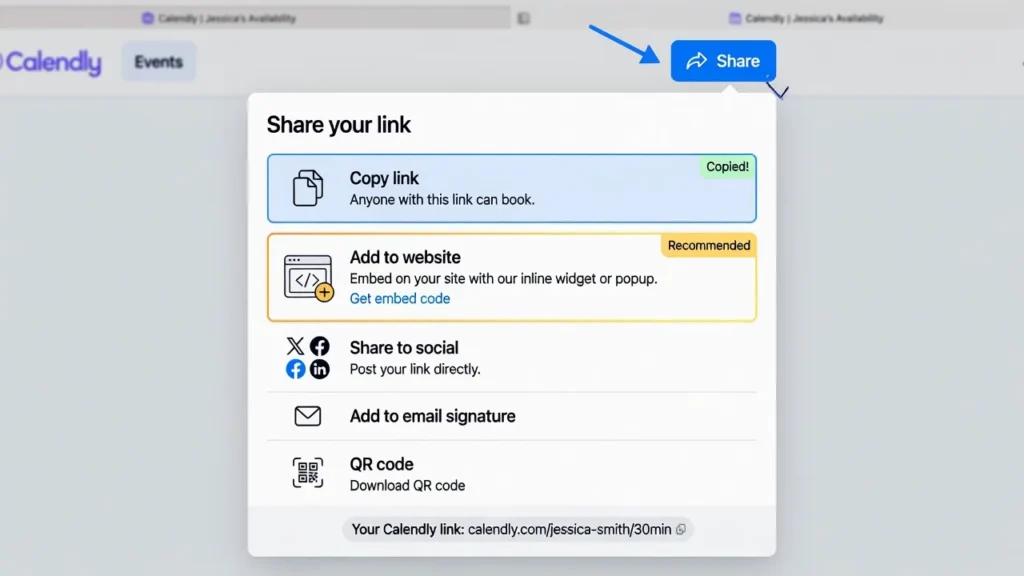
Click “Add to Website”
When the Share menu appears, you’ll see several options. One says “Copy link” that’s NOT what you want. The one that says “Add to website” is exactly what you want.
“Copy link” gives you a URL to your Calendly page useful for emails, not for embedding. “Add to website” gives you the embed code that makes the calendar appear directly on your WordPress page.
Click “Add to website” and Calendly will show you your embedding options.
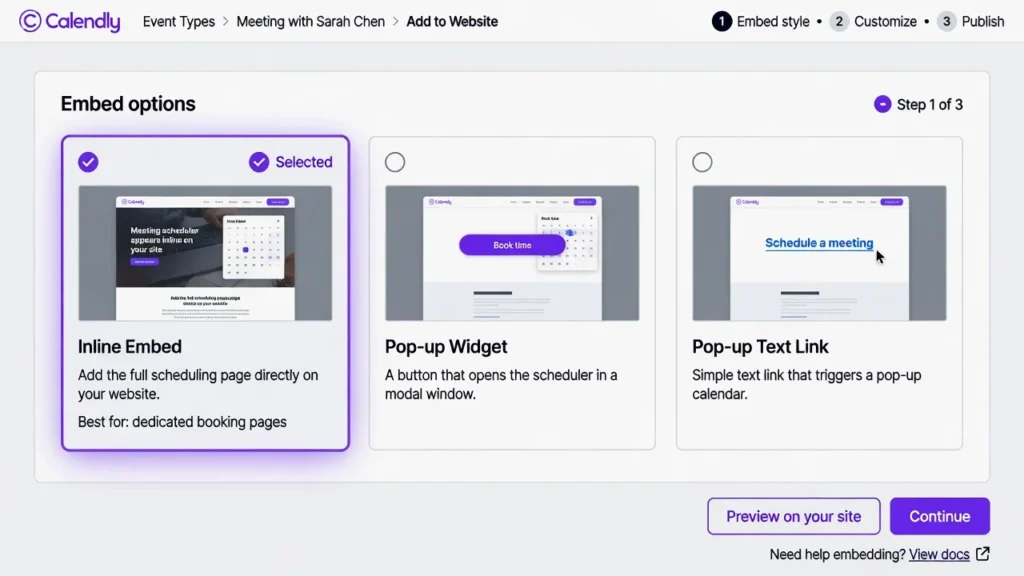
Choose “Inline Embed” as Your Style
Calendly will now show you different embed styles Inline Embed, Pop-up Widget, and Pop-up Text Link.
Since we’re following the Calendly inline embed method, select “Inline Embed” here. This tells Calendly you want the calendar to display directly on your WordPress page, not as a floating button or simple link.
Optional: Customize Embed Colors
Calendly shows you color customization options at this step. You can set background colors, text colors, and button colors to match your brand.
You can customize here if you prefer, or skip it for now. We’ll show you how to frame the calendar visually inside Elementor, which is often easier because you see your changes in the context of your actual page.
Click “Copy Code”
Calendly displays the embed code snippet. This looks like a block of HTML and JavaScript text that might seem unfamiliar if you haven’t seen code before. Don’t worry about understanding it.
Look for the “Copy Code” button sometimes labeled “Copy” or shown with a copy icon. Click it. The code is now in your clipboard, ready to paste into WordPress.
What This Code Does (Optional Explanation)
If you’re curious what that code actually does: the embed code snippet is a small script that tells WordPress three things.
First, it connects to Calendly’s servers and finds your specific calendar. Second, it displays that calendar here as a responsive Calendly embed it automatically adjusts to fit any screen width, from desktop monitors down to phone displays. Third, it handles all the booking logic through an iframe embed when someone clicks a time, it communicates back to Calendly’s servers to record the booking securely.
This website integration between Calendly and your Google Calendar syncs automatically no manual configuration needed after setup. If you have a meeting blocked on your Google Calendar, Calendly knows that time is busy and won’t show it as available.
Critical mistakes to avoid: Don’t modify, trim, or edit the code. Don’t add extra spaces or line breaks around it. Just copy the entire thing exactly as Calendly gives it to you and paste it into WordPress.
Now Switch to WordPress
Minimize or close the Calendly tab (or keep it open in another tab). Now go to your WordPress admin dashboard at yoursite.com/wp-admin.
Your Calendly embed code is in your clipboard, copied and ready. We’re about to paste it into WordPress.
How to Add Calendly to Your WordPress Page Using Elementor
Before embedding Calendly, you need a dedicated WordPress page to work with your dedicated booking page. This is where your calendar will live, and where visitors will land when they’re ready to schedule.
Create a New Page or Edit an Existing One
Head to your WordPress dashboard and go to Pages. You have two options: create a fresh page, edit one you already have, or duplicate an existing page to save time if you’re creating multiple booking pages.
If you’re creating new, click Add New and give it a clear, specific name. Something like “Schedule with Me,” “Book a Call,” or “Free Consultation” works well it tells both visitors and search engines exactly what the page is for. Skip featured images and other settings for now. Save it as a draft, not published, because we’ll add the calendar before it goes live.
Open the Page in Elementor
Once your page is created and saved, look for the “Edit with Elementor” button at the top of the page. Click it.
Elementor will load its visual editor. You’ll see your blank canvas in the middle with a panel of tools on the left side. Give Elementor a few seconds to fully load it’s pulling in everything it needs. The left panel has your widgets and design tools. The canvas in the middle is where your page design takes shape.
Choose Where the Calendar Will Go
Now that Elementor is open, decide where on your page the calendar should appear. For a dedicated booking page, create a new section just for the calendar.
Look for the “+” icon on your canvas. Click it to add a new section. A section is a container that holds your content. By creating a fresh section, you’re giving your calendar its own dedicated space on the page, which looks cleaner and more organized.
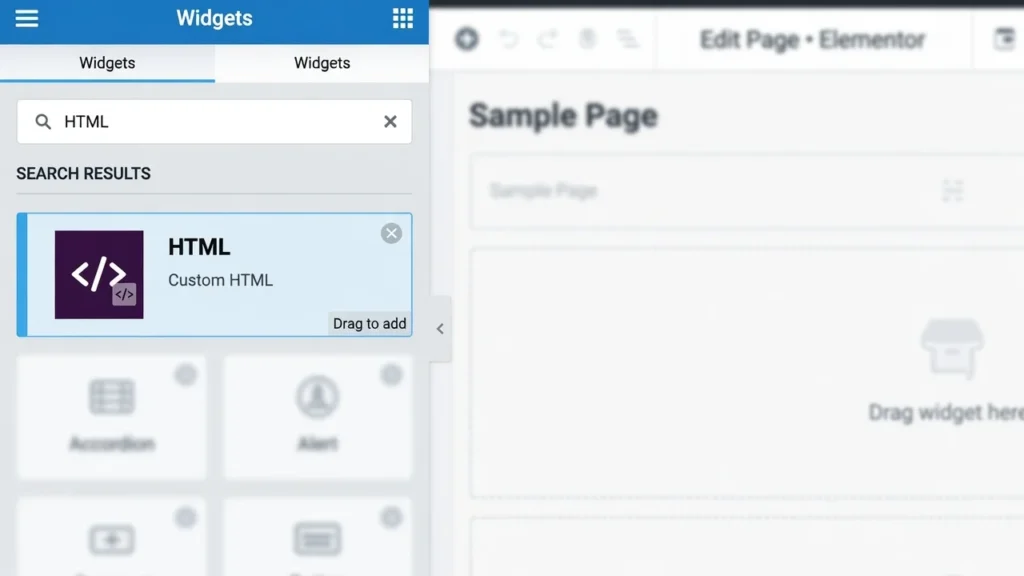
The Elementor HTML Widget Is Where the Code Goes
Before pasting your Calendly code, you need to know exactly where it goes in Elementor. In the left panel, you’ll see a library of widgets text boxes, images, buttons, forms, and more.
The one you need is the Elementor HTML widget, sometimes labeled “Custom HTML” depending on your version. Think of this as an HTML block designed to hold raw code without modifying or interpreting it. You drop it onto your page and paste your Calendly code inside. That’s the only widget you need for this step.
Paste Your Calendly Code Into Elementor: The Core Step
Your page is open in Elementor and your embed code is in your clipboard. Here’s exactly how to put it all together.
Step 1: Search for the HTML Widget
In the left Elementor panel, find the search box at the top. Click in it and type “HTML.” Within seconds, you’ll see the HTML widget appear as an option.
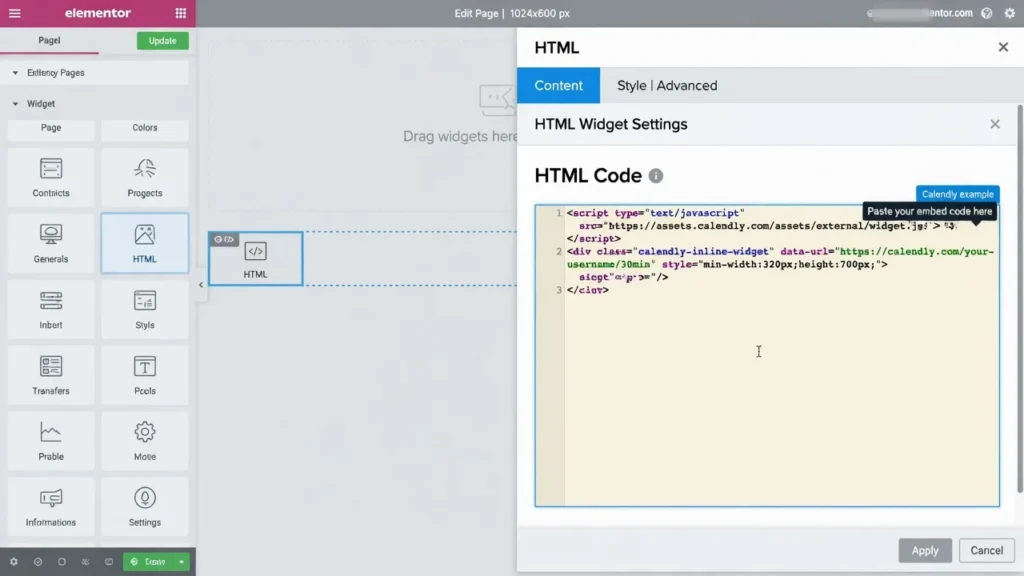
Step 2: Drag the HTML Widget Into Your Page Section
Click and hold on the HTML widget option, then drag it into the section you created on your canvas. When you release it, the HTML widget appears as a labeled box on your page. Don’t worry if it looks small or plain right now it expands once you add your code.
Step 3: Click the HTML Widget to Open Settings
Click directly on the HTML widget box. The right panel will change to show the settings specific to that widget. Look for a field labeled “HTML Code” or something similar a large text area where you can paste code. That’s exactly where your Calendly code goes.
Step 4: Paste Your Calendly Embed Code
Click inside the code input field to position your cursor. Now paste your Calendly embed code using Ctrl+V (or Cmd+V on Mac). The entire code snippet you copied from Calendly should appear in the field.
Take a quick look to make sure something actually appeared. You should see text and code characters fill the field. Don’t worry if it looks unfamiliar that’s exactly what code should look like.
Critical: Verify You Pasted the ENTIRE Code
Make sure you pasted the complete code this is the most common reason calendars don’t appear.
Scan through the code in the field. The very beginning should start with <script. The very end should finish with </script>. These are the bookends of Calendly’s embed code.
Don’t try to edit it, remove parts, or clean it up. If something looks wrong missing lines, strange characters delete everything and copy the code fresh from Calendly. Paste it again. It’s better to start over than try to fix a partial paste.
Step 5: Click Update or Publish to Save
At the bottom right of your Elementor screen, click either “Update” or “Publish” to save your changes. This step is essential without saving, your changes disappear. You’ll see a brief loading animation, and then you’re done with this step.
Preview Your Calendar to Confirm It Works
Before you share this page with anyone, test that your calendar actually appears and works. I always test fully before sharing a booking page with anyone. I’ve been burned before by setups that looked perfect in Elementor and then fell apart the moment a real client tried to book.
Where Is the Preview Button?
Look at the top of your Elementor editor for the “Preview” button. Click it and Elementor opens your page in a new browser tab showing exactly what your visitors will see.
What Should You See?
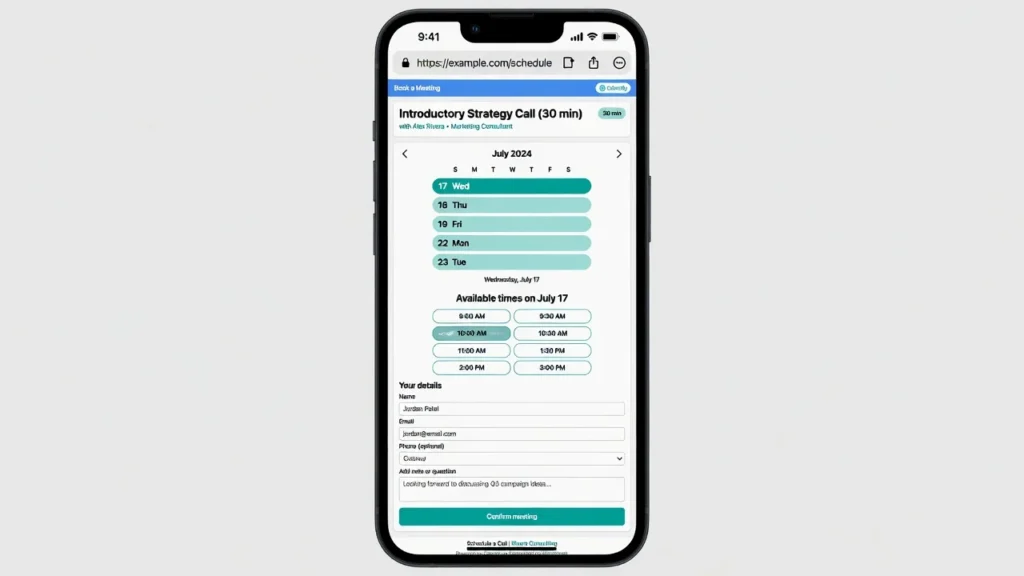
The new tab opens and shows your page. You should immediately see your Calendly calendar embedded directly on the page not in a popup, not in a separate area, but right there inline.
The calendar should display your event name clearly at the top. Below that, you should see available dates and times that people can click. If you configured your availability to specific hours and days, those are the times that appear as clickable options.
If you see all of this, you’re in great shape.
Try Making a Test Booking
Don’t just look at the calendar actually use it. Click on an available date or time slot. A booking form should appear asking for a name, email, and any other questions you configured.
Fill out the form with test information using a real email address you can check. Click Confirm. You should see a confirmation message on the page.
More importantly, check your email inbox and spam folder for a confirmation email from Calendly. This email proves the booking was actually recorded in your account. If you don’t receive it, something in the integration isn’t working correctly go to the troubleshooting section below.
Check on Mobile (Very Important)
This step gets skipped constantly, and it shouldn’t. According to multiple scheduling platform reports, mobile devices account for roughly half of all online appointment bookings which is why testing on an actual phone isn’t optional.
From the preview tab, open the URL on a real phone or tablet. The responsive Calendly embed should automatically shrink and reformat for smaller screens but always verify on a real device rather than just your browser’s mobile view, which isn’t always accurate.
Can you scroll through dates? Can you tap on a time and complete a booking? If yes on both, you’re good.
Calendar Not Appearing? Quick Check
If your preview shows a blank space where the calendar should be, go back to Elementor and click on your HTML widget. Check the code field make sure the entire code is there from start to finish. Click Update again to resave. Then refresh your preview tab and wait a few seconds.
Is the calendar visible but looks stretched or cramped? Don’t worry we’ll fix the layout in the next section.
Everything Looks Good? Ready to Publish
If your preview shows a working calendar on both desktop and mobile and your test booking went through, go back to Elementor and click “Publish.” Your booking page is now live.
Customize Colors, Layout, and Appearance to Match Your Brand
Most of the time, you’ll want your Calendly calendar to match your website’s design. A calendar that clashes with your brand looks disconnected and unprofessional. Here’s how to customize it in Elementor so everything feels cohesive.
Adjust Widget Width and Spacing
If your calendar looked cramped during preview, click on your HTML widget to select it.
In the right panel, look for sections labeled “Layout” or “Size.” Set the width to 100% so the calendar stretches across the full width of its container, giving it room to breathe. You can also adjust padding and margin to add spacing around your calendar. A little breathing room around the edges makes everything look more polished.
Calendly calendars need horizontal space to display properly. If squeezed into a narrow width, dates become hard to click and form fields look cramped.
Use Full-Width Page Section (Recommended)
If adjusting the widget width still leaves your calendar looking squeezed, select the entire section containing your calendar — not just the widget, but the whole section.
In the right Elementor panel, find “Content Width” or “Layout Width” and change it to Full Width. This removes any column constraints and gives your calendar the maximum horizontal space available.
Customize Button and Text Colors
You have two options for colors. The simpler approach: go back into Calendly before embedding. When you go through the “Add to Website” process, you can set button colors, text colors, and accent colors to match your brand.
Since this is a live Calendly WordPress integration, any color changes you make in Calendly update your embedded calendar automatically you don’t need to re-paste the code. Changes usually reflect within 5 to 15 minutes.
Alternatively, adjust the section’s background color in Elementor to complement your calendar. This frames the calendar nicely within your page’s color scheme without touching Calendly directly.
Add a Header Section Above Your Calendar
People appreciate clarity. Many successful booking pages have a headline above the calendar that says something like “Schedule Your Free Consultation” or “Book a Meeting With Me.”
In Elementor, add a text widget specifically the Elementor text editor widget above your HTML widget. Type your headline, and below it, add a brief description like “Pick a time that works best for you no back-and-forth emails needed.” This clarifies the page’s purpose immediately and reduces hesitation.
Add a Footer Section Below Your Calendar
Optionally, add a footer below your calendar with supporting information. Something like “Questions? Reach out to us here” with a contact link works well. Or “Looking for team training instead? Check out our packages.”
This creates a complete user journey around your calendar. Visitors come to book, see the calendar, and if it’s not quite right, they have clear next steps.
Test the Customized Version
After making customization changes, click Preview again. Does your calendar still display correctly? Does the layout look good on mobile?
If your customization broke something the calendar disappeared or looks worse undo the change in Elementor and test again. Most customizations enhance the experience without breaking functionality, but always verify before calling it final.
Mobile Display Considerations
On mobile devices, your calendar may stack vertically or adjust its layout. This is normal. Make sure dates are still tappable and form fields are still fillable on a small screen.
If your calendar looks too small on mobile, increase the font size directly in Calendly’s settings under Settings → Appearance. For more advanced styling customization beyond these basic options, learn more about CSS customization in WordPress, which opens up additional design possibilities. If it looks too cramped horizontally, verify that your page width is set to responsive in Elementor rather than fixed to a desktop width.
Test Your Setup Completely Before Going Live
Here’s the full checklist I use before sharing any booking page. This is not optional it’s the quality control step that separates implementations that work from ones that break when a real person tries to book.
Desktop Testing Checklist
Open your published page on a computer or laptop and go through each of these:
- Page loads without errors : no error messages, no broken layout
- Calendar displays inline on the page : embedded right where you put it
- Calendar shows your event name clearly at the top
- Available dates and times are displayed : not blank or grayed out
- Can click on an available date and move to the next step
- Booking form appears for name, email, and any custom questions
- Can submit a test booking without errors
- Receive confirmation email with meeting details within a few minutes
If all eight of these pass, your desktop implementation is solid.
Mobile Testing Checklist
Pull out your phone or tablet and visit your booking page. A real device is more reliable than browser resize mode:
- Page loads properly with no layout breaks
- Calendar text is readable without zooming in
- Dates are large enough to tap accurately
- Form fields are appropriately sized for phone use
- Can scroll through the calendar to see all dates
- Form submission works from start to finish on mobile
- Receive confirmation email on your mobile device
This matters because half of your bookings may come from mobile. If your calendar works great on desktop but breaks on mobile, you’re losing half your potential appointments.
Complete Booking Workflow Test
This is different from just checking if things appear. Complete an entire booking from start to finish.
Use your phone or ask a friend. From outside your network or in incognito mode visit your booking page. Select a date and time. Fill out the form with test information. Click confirm.
Verify: Does the confirmation message appear on the page? Does the confirmation email arrive? Does the meeting show up in your Calendly dashboard? Does it appear in your personal Google Calendar or Outlook?
If all of that happens, your full integration is working end to end.
Calendar Sync Test
Make a test booking through your website. Wait five minutes. Check your Google Calendar or Outlook to see if that meeting automatically appeared.
Then create a busy block in your Google Calendar and wait a few minutes. Check your Calendly to see if that time is now blocked as unavailable.
This confirms that your Calendly WordPress integration and your personal calendar are properly talking to each other.
Availability Test
Does your calendar correctly reflect your availability? If you set working hours as 9am–5pm Monday through Friday, are only those times bookable? If you set a buffer between meetings, does the calendar enforce it?
Form Questions Test
If you created custom booking form questions, are they displaying correctly? Can you enter answers, select radio buttons, type in text fields? Are required fields marked as required?
Security Check
Look at your browser’s address bar you should see https:// at the beginning, not just http. The HTTPS confirms your page is encrypted and your clients’ booking information stays safe. For a comprehensive guide to all WordPress security measures beyond HTTPS, review our WordPress security best practices.
If Anything Failed
Don’t worry this is exactly why you test before sharing with real clients. Note specifically what failed, go to the troubleshooting section below, find your issue, and follow the solution. Once it passes, you’re ready to share.
Troubleshooting: Calendly Not Showing in WordPress and Other Common Issues
When embeds break, it’s easy to feel stuck especially when you’ve followed every step carefully. I’ve run into most of these issues myself at some point. Here’s how to fix them.
Calendly Not Showing in WordPress at All
If your preview shows a blank space where the calendar should be, work through this checklist:
First check: Did you click Publish or Update?
This is the most common mistake. If you added the HTML widget and pasted the code but didn’t save, nothing will show. Go back to Elementor, click Update at the bottom right, wait 10 seconds, and refresh your preview page.
Second check: Is the HTML code completely pasted?
Go back to your Elementor editor. Click your HTML widget and look at the code field. It should start with <script at the very beginning and end with </script> at the very end.
If anything looks incomplete, copy the entire Calendly embed code fresh from Calendly. Delete everything in the HTML field. Paste the new code.
Third check: Is your Calendly event published?
Go to your Calendly account and find the event you’re embedding. Is it in “draft” status or “published” status? If it’s still in draft, it won’t appear on your website. Look for a Publish or Enable button and turn it on. Then refresh your website preview.

Fourth check: Clear your browser cache.
Do a hard refresh using Ctrl+F5 (Windows) or Cmd+Shift+R (Mac). Or open your preview link in a private or incognito window.
Fifth check: Is a security plugin blocking the code?
If you have a security plugin installed like Wordfence or iThemes Security it might be blocking Calendly’s code from running. Check your security plugin settings for rules blocking iframes or external scripts.
Try temporarily disabling the security plugin to test. If the calendar appears when it’s disabled, the plugin is blocking it. You’ll need to whitelist Calendly or allow iframes from Calendly’s domain.
Still not showing: Right-click on your page and select “Inspect” (Chrome/Edge) or “Inspect Element” (Firefox/Safari). Click on the Console tab. Look for red error messages mentioning “Calendly” or “embed.” If you see WordPress error messages like HTTP errors or PHP notices, consult our troubleshooting guides before contacting support. Screenshot those errors and contact Calendly support at help.calendly.com with the error text.
Calendar Shows But Looks Cramped or Stretched
Solution 1: Click on the section containing your calendar. In the right Elementor panel, find “Content Width” or “Layout Width.” Change it to Full Width.
Solution 2: Click on your HTML widget. In the right panel, set the width to 100% instead of a fixed pixel width. Add padding or margin to create breathing room.
Solution 3: If your page has a sidebar, your main content area is automatically narrower. Try hiding the sidebar or moving the calendar to a full-width section.
Calendar Shows on Desktop But Not on Mobile
The most common cause is a fixed pixel width that’s too narrow for mobile. Click the widget and the section and verify their width settings are set to 100% or responsive not a fixed value like “400px.”
Test on an actual mobile device, not just a resized browser window. Mobile browsers can behave differently than responsive browser views.
If still broken on mobile, try using the Calendly popup widget instead of inline embed it often displays better on smaller screens.
Calendar Shows But Booking Doesn’t Work
Solution 1: Hard refresh with Ctrl+F5 or Cmd+Shift+R. Try again.
Solution 2: Go to your Calendly account and check your event settings. Verify that bookings are enabled, that you have availability set, and that your booking window hasn’t expired. Check whether you’ve hit a daily booking limit.
Solution 3: Some browsers block popups or iframes by default. Go to your browser settings and allow popups for your domain. Or try a different browser Chrome, Firefox, or Safari to see if the issue is browser-specific.
I Don’t Receive Confirmation Email
Check your spam folder first : confirmation emails sometimes land there.
In Calendly, go to Settings → Calendar Invitations. Make sure “Send invite to invitee” is enabled and your email address is correct.
If you also don’t receive password reset emails from WordPress, your site has an email delivery problem contact your hosting provider.
Calendar Shows Incorrect Times or Availability
Go to Calendly → Event → Scheduling Settings. Verify your working hours, days, date range, and timezone. If you use Google Calendar integration, make sure it’s synced and up to date. Create a test busy block in Google Calendar, wait a few minutes, and check if Calendly reflects it as unavailable.
Payment Collection Not Working
Payment collection requires a paid Calendly plan. If you’re on the free version, this feature isn’t available. Verify that Stripe or PayPal is properly connected in your Calendly account settings and that the payment amount is set correctly. Test with a small amount first. If nothing processes, contact Calendly support — there may be an issue with your payment gateway connection.
Security Plugin Is Blocking Calendly
- Wordfence: Go to Settings → Firewall Rules. Look for blocked requests mentioning Calendly. Whitelist Calendly’s domain.
- iThemes Security: Go to Settings → Advanced. Look for an iframe allow-list or trusted domains. Add Calendly.
- Other plugins: Search “[your plugin name] block iframe” on Google to find the specific fix. If you’re still stuck with a security plugin conflict, our guide on advanced plugin troubleshooting covers deeper solutions for plugin compatibility issues.
Elementor Shows Error When I Paste Code
Delete everything currently in the HTML field. Go back to Calendly and copy the code again using the official Copy Code button don’t manually select text. Paste fresh into Elementor.
If you still see errors, try pasting into a plain text editor first, then copy from there and paste into Elementor. Formatting issues sometimes cause problems.
I Still Can’t Fix It : Where Do I Get Help?
- Calendly Support: Visit help.calendly.com or submit a ticket from inside your account
- Elementor Support: elementor.com/support
- WordPress Support: wordpress.org/support
- Your hosting provider: For email delivery and security plugin issues
- Hire a specialist: A WordPress or Elementor freelancer can typically fix embedding issues within an hour
Alternative Methods: WordPress Scheduling Plugin, Shortcodes, and Button Links
The HTML widget is the recommended method, but it’s not your only option. If that approach isn’t working for your setup or if you just want something simpler here are three alternatives worth knowing. One of them includes a WordPress scheduling plugin alternative that removes all code from the equation entirely.
Method 2: Using Shortcode (Alternative If HTML Widget Doesn’t Work)
The WordPress shortcode Calendly method lets you add a booking calendar to your WordPress page using a single short line instead of the full embed code block. It’s simpler to type and works well inside Elementor’s Shortcode widget.
For an inline embed that shows the full calendar directly on your page, use:
[calendly url="https://calendly.com/your-url"]
For a popup widget with a floating button:
[calendly url="https://calendly.com/your-url" type="pop-up-widget"]
For a simple text link:
[calendly url="https://calendly.com/your-url" type="text" text="Schedule time with me"]
To use this in Elementor: drag in a Shortcode widget, paste your shortcode, and publish. If you’re using WordPress blocks, paste it into a Custom HTML block.
When to use this method: If your HTML widget isn’t working for some reason, or if you prefer the simpler syntax.
Method 3: Using a Plugin (For Non-Technical Users)
This is also the easiest answer to the question “how to add Calendly to Elementor” without touching any code at all. If you want zero code involvement, install a plugin that handles everything for you.
The plugin I recommend is called Simple Calendly Embed. It does exactly what the name says and removes all the guesswork.
How to install it: Go to your WordPress dashboard, hover over Plugins, click Add New, search for “Simple Calendly Embed,” install, and activate. The plugin automatically adds a new widget to your Elementor toolbar.
Open your page in Elementor, find the new “Simple Calendly” widget in the panel, and drag it onto your page. A settings box appears asking for your Calendly URL. Paste your URL there, save, and you’re done.
When to use this method: If the idea of pasting code makes you nervous, or if you plan to embed Calendly on multiple pages and want consistency. This is the best path for non-technical users.
Method 4: Using a Button Link (Simplest But Least Recommended)
The button link is the no-frills option and the least recommended for serious service businesses. Instead of embedding the full calendar, you create a button that links out to your Calendly scheduling link directly. When someone clicks it, your calendar opens in a new browser tab.
How to do it: In Elementor, add a Button widget. Paste your Calendly URL as the link. Save and publish.
Why this works: Incredibly simple, zero code, works on any website platform.
The reality: Your visitor leaves your website to access Calendly. You lose the branded experience, and conversion rate drops because people tend to drop off when redirected. For most service providers serious about bookings, skip this one.
Only use the button link if you need something live today with no complexity whatsoever. It’s not a permanent solution for any serious service business.
Which Method Is Best for You?
| Method | Ease | Professional Look | Best For |
|---|---|---|---|
| HTML Widget | Medium | High | Most users |
| Shortcode | Medium | High | Comfortable with shortcodes |
| Plugin | Easy | High | Non-technical users |
| Button Link | Very Easy | Low | Quick setups only |
My recommendation: Start with the HTML widget method. If that doesn’t work, try shortcode next.
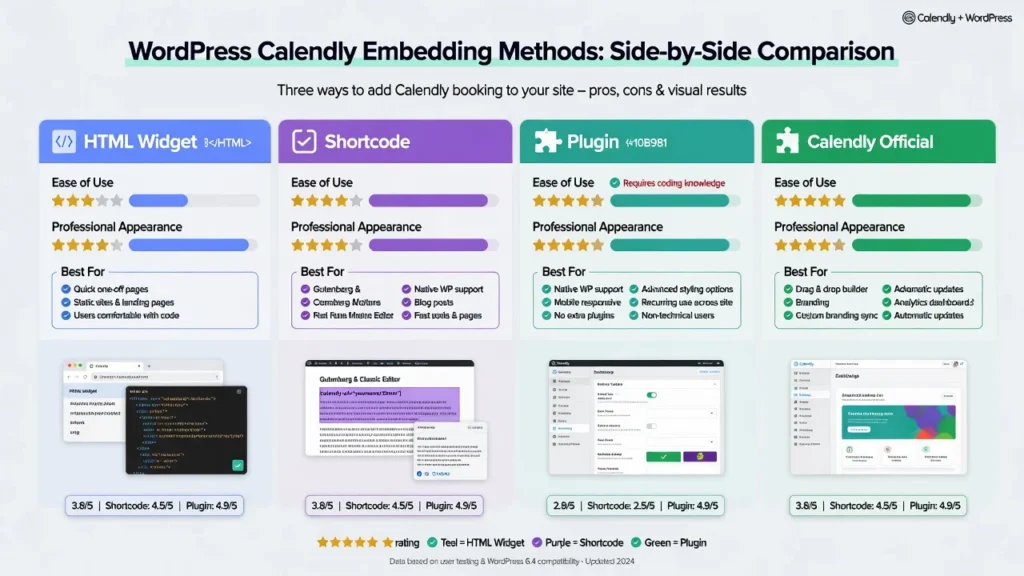
Still stuck? Go straight to the plugin there’s no shame in using a tool that simplifies your life. And if you want to embed Calendly in WordPress with the absolute least friction possible, the plugin is your answer.
What to Do After Your Calendly Is Live
Getting the calendar embedded is one piece. What you set up around it reminders, follow-ups, confirmation pages is what actually converts booked calls into clients. Here’s what I configure after every new calendar goes live.
Enable Email Reminders to Reduce No-Shows
No-shows are painful. You block out time and someone simply doesn’t appear. The first time I turned on reminders, my no-show rate dropped noticeably within two weeks. It’s now the first thing I enable on any new Calendly setup.
In your Calendly account, go to Settings and find the Communications section. Enable “Send reminder to invitee” and set it for one hour before the meeting or whatever timing works for your business.
If SMS texting is enabled on your Calendly account, text reminders can also be sent. Text messages get opened more reliably than emails, so this is worth enabling if available on your plan.
Set Up Post-Booking Follow-Up Emails
Right after someone books, I send them a follow-up email automatically. This keeps you top-of-mind and opens the door for additional value before the call even starts.
In the Communications section, enable the follow-up email option and customize your message. You might thank them for booking, share a helpful resource, or outline what to prepare before your call. This one email noticeably increases the perceived value of your service.
Create a Custom Confirmation Page
After someone books, they see a confirmation screen. Most people leave this as the Calendly default. I customize mine.
Go to the Confirmation Page section in your Calendly settings and build something unique — a thank you message, your Zoom link or meeting instructions, preparation materials if relevant, and a clear outline of what happens next. A custom confirmation page reduces confusion and looks far more professional than the generic Calendly screen.
Set Up Zapier Automations (Optional)
Zapier connects Calendly to almost every other app you use. When someone books a meeting, you can automatically trigger actions in other platforms adding the booking to a Google Sheet, sending a Slack notification, adding the attendee to an email list, or creating a task in your project management tool.
To get started, go to Zapier.com, create a new “Zap” (that’s Zapier’s term for an automation workflow), select Calendly as your trigger, and choose the action you want to follow.
Instead of manually copying booking information into different apps, Zapier does it instantly. This keeps everything in sync and eliminates manual data entry across your tools.
Monitor Booking Analytics
Your Calendly dashboard shows useful booking metrics total invitations sent, actual bookings completed, and no-show rate. I check mine every week or two. If I’m getting overbooked on certain days, I adjust my availability. If a particular time slot never fills, I remove it.
This data tells you whether your booking page is actually converting visitors or whether something needs to change.
Share Your Booking Link Everywhere That Makes Sense
Once your calendar is live, people need to actually find it. Get your shareable Calendly scheduling link and put it in your email signature, social media bio, website footer, automated email sequences, and anywhere else your ideal clients spend time.
If you’re running ads or email campaigns, link directly to your booking page. The easier you make it to book, the more meetings you’ll actually have.
FAQ: Quick Answers to Common Questions
Do I Need to Pay for Calendly to Embed It?
No. The free Calendly plan includes all embedding options inline, popup widget, and text link. You can embed the exact same calendar whether you’re on the free plan or a paid plan.
Paid plans add extra features like payment collection, advanced analytics, and team management. But for embedding purposes, the free plan works perfectly.
Will Embedding Calendly Slow Down My Website?
Calendly is lightweight and won’t significantly impact your page speed. Most users won’t notice any difference.
If speed is a concern, test your page before and after embedding using Google PageSpeed Insights at pagespeed.web.dev it’s free and takes 30 seconds. For extra caution, use the popup widget method instead of inline embedding. That way the calendar only loads when someone actually clicks to open it.
Can I Embed Multiple Calendly Calendars on the Same Page?
Yes. You can add multiple HTML widgets with different Calendly events, letting visitors choose from different meeting types. Each event type has its own embed code and its own Calendly scheduling link.
This works well if you offer a “30-minute consultation,” a “60-minute strategy session,” and a “group workshop” each on the same page or on different pages.
What If I Want to Change My Calendly Settings After Embedding?
Any changes you make in Calendly automatically update your embedded calendar. You don’t need to re-paste code or update anything in WordPress.
If you change your availability, add custom questions, or update pricing, those changes typically show up in your embed within 5 to 15 minutes.
Can I Embed Calendly on WordPress.com?
This depends on your WordPress plan. WordPress.org (self-hosted) works with any plan and is what this guide covers.
On WordPress.com, you need at least a Business plan to add custom HTML or plugins. On the free or personal plan, you can upgrade to Business or simply link to your Calendly booking page instead of embedding it.
Does Calendly Work With All Time Zones?
Yes. When someone books with you, they automatically see times in their local timezone and you see bookings in yours. A visitor in London sees London times. A visitor in Los Angeles sees Los Angeles times. Calendly handles all timezone conversion automatically there’s zero conflict.
What If Someone Books a Time When I’m on Vacation?
Go to Event Settings, find Availability, and block the dates you’re unavailable. Blocked dates won’t show as available for booking. Alternatively, create a temporary pause on your availability during your time off so no bookings can be made at all until you’re back.
Is Calendly Secure? Will My Clients’ Data Be Protected?
Calendly is a widely used scheduling service trusted by businesses and professionals worldwide. All data is encrypted both in transit and at rest. Calendly is GDPR and CCPA compliant, meeting international privacy standards.
Calendly’s privacy policy and security certifications are published at calendly.com/security — worth bookmarking if your clients ask about data handling.
Your WordPress site should use HTTPS (verify the padlock in your browser’s address bar), which further protects all communication between your site and your visitors.
After Embedding Calendly: How to Maximize Your Booking Page
Your Calendly calendar is now embedded on your WordPress website using Elementor and ready to accept real bookings. That’s the full process from account setup to live booking page done.
Now make sure people can actually find it and use it.
Ways to Drive Traffic to Your Booking Page
- Add your booking link to your email signature every professional email becomes a booking opportunity
- Put the link in your social media bio and mention it regularly in posts when relevant
- Add your booking link to the footer of every page on your website so it’s accessible from anywhere
- Include it in your automated email sequences so leads can book at the right moment
- Run paid ads that drive directly to your booking page people who click ads are often ready to book
- Share your link in communities, forums, or groups where your ideal clients spend time be helpful first, mention your calendar naturally
Optimize for Higher Conversion
Write a compelling headline above your calendar. Don’t just say “Book a call.” Say something like “Schedule your free 30-minute strategy session” specific, time-bounded, value-focused.
Show social proof near your calendar if you have it. A short testimonial above or below the booking form helps people feel confident booking with you.
Use action-oriented button text. “Book your time now” converts better than “Click here.”
Monitor your actual booking rate. If people visit your booking page but don’t book, something about your offer or page needs adjustment. The data is in your Calendly dashboard.
Final Thoughts
Respond promptly to anyone who books, show up on time, and deliver real value on every call. Collect feedback afterward even a one-question follow-up email tells you a lot about what’s working.
This system saves enormous amounts of time that previously went to scheduling back-and-forths over email. That time now goes toward doing actual work that grows your business.
If you haven’t already set up WordPress for your site, check out our guide on how to install WordPress on your hosting account. For a deeper look at what Elementor can do beyond calendar embedding, see our Elementor beginner’s guide. And if you’re comparing booking solutions, our roundup of the best WordPress booking plugins covers the full landscape.


