

I can sympathize with the frustration of editing your WordPress site and changes don’t appear.
You add or edit a paragraph, modify your logo, or reshape your layout. You click on publish, refresh your page and nothing happens, the old version remains as it was when you published it. I’ve gone there more times than I can count. I’ve spent 20 minutes to move a sidebar from left to right, once. I published the change and refreshed and the sidebar stubbornly remained.
I began to doubt myself and if I saved anything. The fix? I spent some time figuring out how to clear WordPress cache and when I figured it out, it only took about 30 seconds. It just happened, that it was not me the problem. It was a thing known as WordPress Cache. WordPress caching serves as the “short term memory” of your website. This saves copies of your pages for quicker loading on visitors.
This is very helpful for speed, but not so helpful if you’re trying to update your site your server will continue to serve the old cached version instead of your new content. This is even more complicated if the changes are only present in some situations.
If there are updates, some will appear when you log into wp-admin, but not when you log out. At other times, you may have the new version of your phone and the old version of your laptop. If it sounds familiar, the answer is typically very similar:
There are a number of ways to clear WordPress cache and I’ll show you how to do each one step-by-step, regardless of your setup. This tutorial covers all the ways to clear WordPress cache (from plugins, hosting panels, browser cache, CDN layers and page builders).
I’ll also show you a little diagnostic test before you clear anything, so you will not waste your time fixing a wrong layer.
What Is WordPress Caching and How Does It Work?
WordPress caching is a way for your website to store the results of its work, rather than having to recreate pages each time.
It’s easy to understand as follows.
If somebody asked you to divide 3,744 by 4, you would have to stop and figure it out, the answer is 936. If you ask you the same question 5 minutes later, you’ll not need to re-calculate. You’d just remember. WordPress caching is similar with your pages – generate it once, serve it always on the subsequent visit.
Upon the first visit to your site, your Web server executes PHP scripts to retrieve data from your database and to populate the HTML page that is displayed. That process will take time and server space.
However, when the page is created, WordPress stores a copy of it for caching.
The next user who visits that same page has the saved copy, rather than causing a complete rebuild:faster load, lower server load, better user experience. This saved copy consists of cached files and cached pages: temporary copies, which are stored on the server, on your visitor’s machine or on both.
One thing that many people get confused about: WordPress core (the self-hosted WordPress.org software) does not have any caching enabled by default. Keep in mind that WordPress.com hosted websites also come with a built-in caching service, managed by Automattic (but this guide is geared towards installing WordPress.org on your own host).
If you are self-hosted, caching only occurs if you have installed a WordPress cache plugin, or your web hosting company is offering server level caching.
differently.
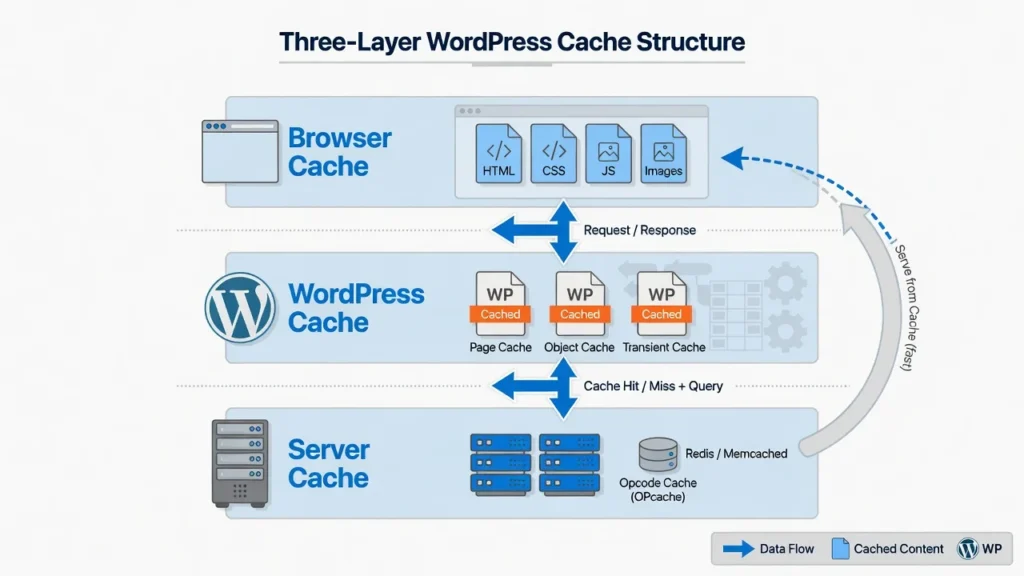
There are three different types of WordPress cache and each of them can impact your site separately:
Most WordPress cache plugins control page cache which is the complete HTML version of your pages. Images, stylesheets, and scripts are saved directly on the visitor’s system, which results in faster return visits.
Server cache contains back-end processes such as object cache and database cache where you don’t see any output but the server is loaded. In some more sophisticated hosting environments, Redis or Memcached are used as a server level object cache as well; these two are terms you could encounter in your hosting control panel.
They work at infrastructure level as opposed to plugin level, but work in the same manner, that is, by caching expensive data in memory to save database load.
All of this is done for one sole reason: to optimize the performance. Caching has a tremendous effect on website speed: The Google Core Web Vitals documentation states that page load time is directly contributing to user experience scores and search rankings.
Google’s research on PageSpeed finds that a 1 second delay on mobile site load times can cut conversions by up to 20%. However, when changes are being made, cache becomes an enemy because it retains the old version while you’re trying to make changes.
Browser Cache vs. Server Cache (What’s the Difference?)
This is where most WordPress diagnostics confusion starts and understanding the difference will save you half the diagnostic time.
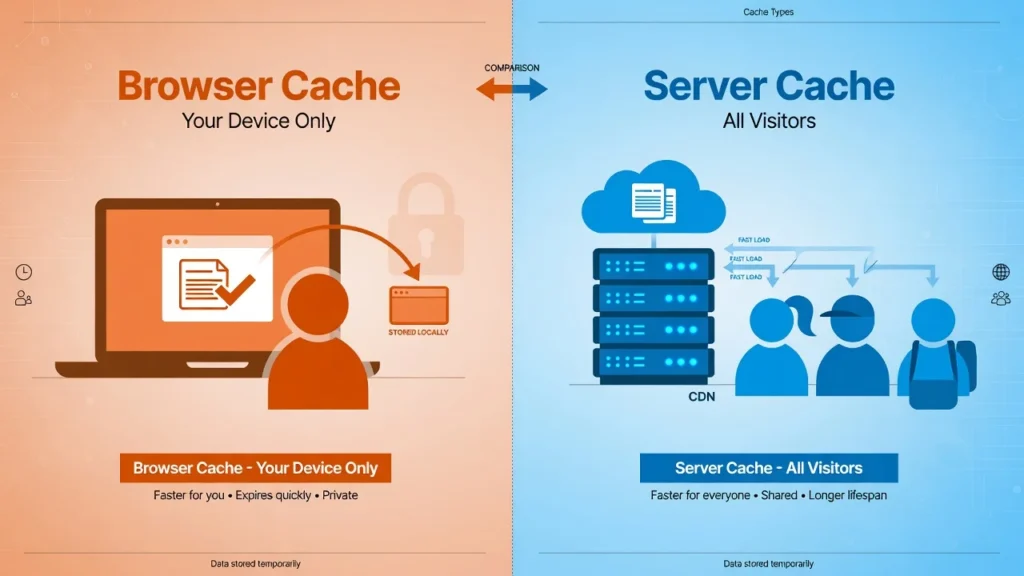
Browser cache is saved on your device – your computer or phone. Your web browser downloads images, fonts, stylesheets and other files when you visit a website and stores them locally in your browser so that they are not re-downloaded when you return. That’s why you may see the changes in your browser but your friend, who is also looking at this page, might still see the old version — your browser has updated its cache, but their one has not.
visitor to your site.
Server cache resides on the server of your website and it impacts all customers of your site, and not just you. In most cases, when you don’t see a change anywhere, even on a new browser or another person’s computer, it is because of WordPress website cache or server cache. Having an understanding of these two types can save a lot of troubleshooting time. Only the user’s computer needs to be fixed to resolve browser cache problems. Problems with server or site cache should be cleared from the source, as every visitor would get the updated version.
First Step: Test If It’s Actually a Cache Problem (Incognito Mode)
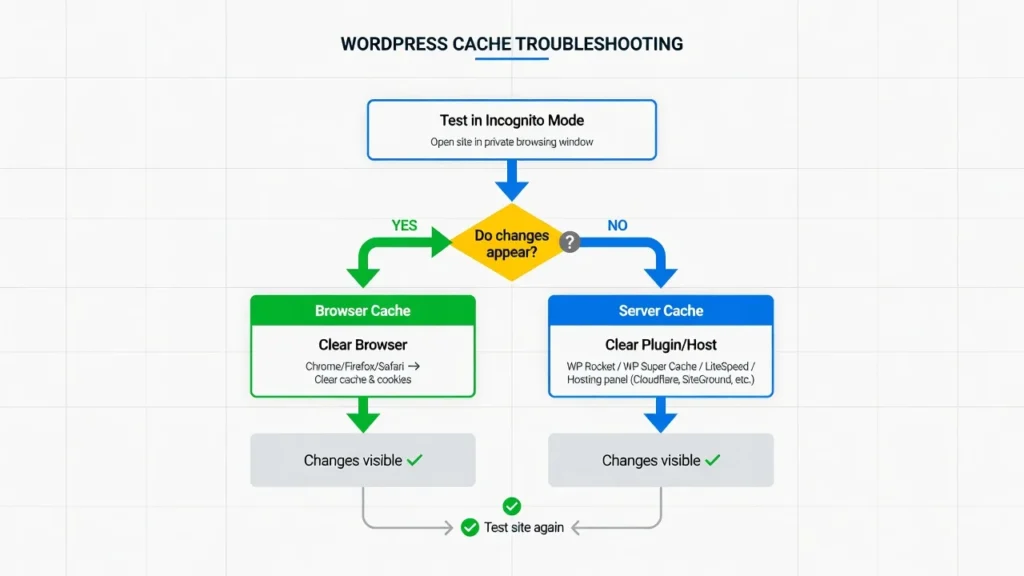
Run this quick test (about 10 seconds) and it will tell you which layer is causing the problem before clearing anything out. Open your website in the Incognito or Private mode. Incognito Mode clears all cookies and caches from your browser, bringing up the page as a first-time user would see it.
If your changes do not show up in your regular browser, but they do when you open it in Incognito, it is because of your browser cache, not WordPress website cache.
If you still cannot see your changes even in Incognito Mode, it is a server-side issue and you must clear cache at the server side.
How to Open Incognito Mode (All Browsers)
There are a few different ways of opening Incognito or Private browsing mode in each browser, but it’s pretty easy in all of them:
Firefox: Click on Ctrl + Shift + N on Windows/Linux or Cmd + Shift + N on Mac
Mozilla Firefox: Press Ctrl + Shift + P (Windows/Linux) or Cmd + Shift + P (Mac)
Firefox: Ctrl + Shift + N (Windows/Linux) or Cmd + Shift + N (Mac)
Firefox: Use File > Reload new private window.Chrome: Select File > New private window.
What the Results Tell You
If your changes are showing up in Incognito Mode, then the issue is likely due to the browser’s cache. You are viewing a cached copy of the previous page, while others are seeing the current page. You need to clear your browser cache; I will show you how in the next section.
causing your display issues.
If the changes aren’t showing up in the Incognito Mode, the problem lies on the server. You are facing a WordPress cache plugin, the caching used by your host or a CDN layer that stores the previous version. All of your visitors are viewing an old page, and not only you! You won’t find any relief from clearing your browser as the old version is served from the server before it ever makes it to your browser. The site cache or hosting cache needs to be cleared directly.
This diagnostic process is the one I use each time I get an issue on the display (WordPress) and instantly is able to tell me to work on my site or the server side of things.
How to Clear WordPress Cache Using Plugins (Easiest Method)
If you are using a WordPress caching plugin, this is the quickest method to clear the WordPress cache. Most plugins for caching include a typical quick access button straight inside your WordPress admin panel you don’t have to navigate through menus. Simply hover, click. If your cache plugin isn’t appearing in your admin bar or seems unresponsive, you may need help troubleshooting plugin issues before proceeding.
I’ll demonstrate the most popular plugins one by one. If you are not using the same then it is almost the same process. Search on the top admin bar or left sidebar for a menu item that includes your plugin’s name and click on one of the following options: Clear Cache, Purge All, Delete Cache, or Flush Cache. Various plugins have various names for the same actions.
Quick Method: Admin Bar Shortcut (Works for Most Plugins)
If you’re signed into WordPress, you’ll see the black bar at the very top of your screen, which is the admin bar. Most of the WordPress cache plugins will place a menu item on that exact same spot, normally displaying the plugin name or a small icon. Hover over it, select Clear Cache, Purge All Caches or Delete Cache and then click. All your cache data is erased in seconds while on the page that you are on.
This method I use approximately 90% of the time because it’s instant, visible and it works with almost every major caching plugin. After you’ve learned where your plugin appears in the admin bar, it takes just 2 seconds to clear the cache.
If you don’t find any in the admin bar, go to the left sidebar. There should be a menu section that contains the same option for your caching plugin.
How to Clear WP Rocket Cache
One of the most popular premium caching plugins is WP Rocket, and for them, it’s only a two-click process to clear cache. All cached pages and files are deleted as soon as you select Clear Cache from the dropdown menu, as you hover over the WP Rocket menu item that appears in the top admin bar. You’ll see a confirmation message at the top of your screen.
Or click here from your WordPress dashboard: Settings > WP Rocket and then Clear Cache on the WP Rocket dashboard page. The changes in your live site should be immediate after you make them.
How to Clear LiteSpeed Cache
LiteSpeed Cache is a free plugin that is used by more than 6 million active installs according to the WordPress.org plugin repository, and is one of the most widely deployed caching plugins available.One of my favourites as it supports multiple types of cache in one panel. On the top admin bar, search for the small LiteSpeed diamond logo.
Hover over it and a pop up menu will come up.
There are multiple choices available: Purge All removes all types of caches at once (the feature I use most frequently)
Eliminate advanced server side cache (Purge ESI).
Object Cache, Opcode Cache to clear backend server level caching layers
How to Clear WP Super Cache
WP Super Cache is another popular free caching plugin with millions of active installs. If you need to clear the cache, follow the steps of navigating to Settings > WP Super Cache in your WordPress Dashboard. Click the Easy tab at the top and then scroll down to the Delete Cached Pages section and click Delete Cache. All pages will be purged from your site by WP Super Cache.
If you want more control, the Contents tab lists the number of cached files that are stored, and offers two choices: Delete Expired will delete only outdated files, while Delete Cache will delete all files in the cache. I find that every time I need to do that I use the Easy tab as well as Delete Cache it does the job in seconds
How to Clear W3 Total Cache
W3 Total Cache will now provide an ‘Empty All Caches’ button in the admin bar. On the top admin bar, hover over Performance and then click on Empty All Caches. This removes all cached items for all types of caches handled by the plugin, in a single click.
If you don’t find this option on the admin bar, then you’ll need to navigate to Performance > General Settings in your WordPress admin. Move to the bottom and click on Save Settings & Purge Caches this will save your current settings and clear the cache at the same time. There are a lot of configuration options in W3 Total Cache that might be daunting at first, but these two are the only ones you will need whenever you have to clear the cache on a regular basis.
How to Clear WP Fastest Cache
WP Fastest Cache is a simple, easy-to-use plugin for cleaning out your cache. Once the plugin is activated you will see a new Delete Cache menu item in the top admin bar. Hover over it, click Clear All Cache and all the cached files are deleted.
You can also clear through settings by clicking WP Fastest Cache in the left sidebar, and then on Delete Cache tab, Clear All Cache.
Single page cache clearing is one feature that I really like. If you have changed only one post and don’t need to clear all your posts, log in and go to that page, hover over Delete Cache in the admin bar and click Clear Cache of this page. It is accurate, timely and does not affect other parts of your web site’s cache and performance.
How to Clear Hosting Cache (WP Engine, SiteGround, Hostinger & More)
This is a common mistake that many people make. Your WordPress cache plugin could be deleted, but your host company might also have some sort of separate level of caching going on entirely independently. This is because plugins do not have access to server level caching, which is included in managed WordPress hosting services such as WP Engine, SiteGround and Hostinger.
I had this happen to me. I got rid of my plugin cache and refreshed and still the old version was looking back at me. Until I went to my hosting panel and found my host was caching the site at the server level, I couldn’t make heads or tails of it. Changes were done in one click in the hosting panel and it was live immediately.
Most hosting companies will have this easy to remove – you simply have to know where to look.
How to Clear WP Engine Cache
WP Engine also includes its own cache clearing button in your WordPress admin. In the top admin bar or left admin sidebar, you will see the link: WP Engine. Click Purge All Caches. This flushes the hosting level cache and is in addition to any WordPress Cache Plugins you may be using.
You may also log into your WP Engine account, pick the install you want and then click Purge All Caches in the install dashboard located within my.wpengine.com
How to Clear SiteGround Cache
SiteGround provides two methods of cache clearing, both of which are easy. The first one is from within WordPress: If you have a SiteGround Optimizer plugin installed (SiteGround strongly suggests that all SiteGround customers install this plugin) you will have an SG Optimizer menu item in the admin bar. Hover over it and click Flush Cache.
The second is via SiteGround’s Site Tools panel. Login to your SiteGround site Tools and in the Speed section, select Dynamic Cache and hit the Flush Cache button. This will empty the server level cache that your hosting account stores without a plugin.
How to Clear Hostinger Cache
Hostinger’s control panel is called hPanel. Log in your Hostinger account, proceed to hPanel and select Advanced > Cache Manager. Click Purge Cache and Hostinger will remove the server level cache of your website.
What I like about Hostinger is that they additionally have URL specific cache purging. You can also specify a specific page in the website you wish to clear the cache for, rather than clearing all of them; if you’ve made some changes to a single post, this is useful to keep your cached website contents intact.
Other Popular Hosts (Bluehost, HostGator, etc.)
The majority of other managed WordPress internet hosting companies perform in much the same way. Depending on your hosting control panel, search for a Cache or Performance section in your hosting control panel (most use cPanel, but some have their own custom dashboards). This can usually be found in your browser under the “clear cache” or “purge cache” button.
In the WordPress admin bar, under the Bluehost menu, there are options to clear cache. Cache management provided by HostGator is done via their cPanel in the Caching section. This server level cache clearing is one of the more robust options since it will impact all levels of caching. If you have exhausted all other methods and the changes are not reflected, it is likely the hosting cache is your culprit
How to Clear Browser Cache (When Changes Show Only on Your Device)
If you already know that it’s a browser cache problem, as you discovered in Incognito, you can easily solve it by clearing the browser cache on the device running the old version.
Quick Method: Hard Refresh (Ctrl + F5)
On Windows & Linux press Ctrl + F5 to reload from the server as opposed to your browser cache. For Macs, hold down Cmd + Shift + R.
For most minor browser cache problems, a hard refresh will help. If these changes are still not there after a hard refresh, you’ll have to clear the entire browser cache.
Full Method: Clear All Browser Cache Data
If hard refresh doesn’t work, delete your browser’s entire cached history by following the procedure in your browser settings. The fastest way to open the cache clearing menu on Windows or Linux: press Ctrl + Shift + Delete. On Mac: use the History or Preferences menu of your browser. This shortcut is for opening the data clearing dialog in Chrome, Firefox, Edge and most major browsers.
Google Chrome: Click on the three dots (top right) and select More Tools and Clear Browsing Data. Select All time, and then check Cached images and files, then click Clear data.
In Mozilla Firefox: Click on Settings > Privacy and Security > Cookies and Site Data > Clear Data. View and clear cache.
Microsoft Edge: Go to Settings > Privacy, search, and services > Choose what to clear. Select Check Cached images and files and then click Clear now.
Safari (Mac): Clear History from Safari > History. To get even more exacting control, go to Develop > Empty Caches from the menu bar.
The important checkbox is the one that says Cached images and files; that’s the information that stores the previous version of your site in each browser. After it is cleared, and you return to the page, your browser automatically fetches new data straight from the server.
Why This Only Fixes It For You (Not Your Visitors)
The browser cache caches data on every device. Clearing yours only clears the display of your device. If they are still viewing the old version, then it’s a server side issue, and you need to empty the cache for your site or hosting provider at the source for everyone to be able to view the new version!
How to Clear CDN Cache (Cloudflare and Other CDNs)
One of the most frequent errors when clearing WordPress cache is forgetting to clear the CDN layer, which is what I did myself a few times. You clear out your plugin cache, your host cache, your browser cache and your site still displays the old version.
By this time, it is almost certain that a content delivery network (CDN) is serving a copy of your old site from one of its servers around the globe, without your involvement, and without you ever knowing.
What Is a CDN and Do You Use One?
A content delivery network (CDN) is a network of servers located around the world, each holding an “edge cache” of your site that allows visitors to load pages from a server that’s physically close to them, instead of your origin server. If a person visits from across the world, the CDN serves your web pages from the closest server.
Each CDN server will have its own local copy. If you have Cloudflare, StackPath, KeyCDN, BunnyCDN or any other CDN service hooked up to your site, then you are using a CDN service. Another many managed hosting plans have a built in CDN, too. If you are uncertain, go to your DNS or your hosting control panel, a CDN will be there.
How to Clear Cloudflare Cache
Go to the Caching tab and select the Configuration tab. You’ll see a Purge Cache section with two options: Purge Everything removes all the site’s data from Cloudflare’s cache.
Custom Purge allows you to type in any URLs to remove only those pages. Custom Purge is usually used when I have updated one or two pages only and don’t want to update everything at once, it takes less time and is more targeted.
If the whole site design is changed or if the template is updated, then Purge Everything is the right solution.
How to Clear Page Builder Cache (Elementor, Divi, Beaver Builder)
Elementor and Divi (like most page builders) create their own CSS and JavaScript files and those files will also have their own cache, independent from your WordPress cache plugin. That’s why you can delete your plugin cache, hosting cache, and browser cache, and still see the previous design on your live site. Cached files from the page builder still remain, and must be cleared separately.
This has happened to me many times, particularly after making changes to a section or template in Elementor. All other was removed but change still didn’t display. The page builder cache is always the page builder cache. Once you get the hang of it, each page builder does this easily.
How to Clear Elementor Cache
To use it, navigate to your WordPress dashboard and click on Elementor > Tools. The Regenerate Files and Data button is located on the General tab. Click it. This button clears all of the cached CSS and JavaScript files of Elementor and re-caches them again according to your current settings and design.
After the process completes, do a hard refresh on your site (Ctrl + F5 on Windows, Cmd + Shift + R on Mac) and your Elementor design changes should now appear on the live site.
How to Clear Divi Cache
The popular theme and builder Divi, creates static CSS files, which can store a previous version of your design. To clear Divi’s cache, go to Divi > Theme Options in your WordPress dashboard. Click on the Builder tab, and then scroll down to the Advanced part. The Static CSS File Generation option can be found there, simply click the button and make sure to have Divi regenerate those files again.
Alternatively, you can head to Divi > Theme Options > General > Performance and utilize the regeneration choices there. Remove any Divi caches, then hard refresh (press Ctrl+F5 on Windows or Cmd+Shift+R on Mac) and see if the design modifications are reflected on the live site.
Other Page Builders
Each of the top page builders, such as ver Builder, Oxygen, Bricks, and others store their own CSS and script caching.
Beaver Builder: Click on Beaver Builder Tools in the admin bar then hover over Clear Cache.
Oxygen: Click on Oxygen and then on Settings > Cache and press the Clear button.
Bricks: Goto Bricks > Settings > Performance and click regenerate or clear.
The cache/regenerate location varies depending on the builder, but the idea remains the same: look for the cache/regenerate option in the builder’s settings and execute. If you have cleared all the other caches, but the visual change still doesn’t show, then the likelihood is that the page builder has failed to clear its own cache settings.
Emergency Method: Clear WordPress Cache via FTP (No Dashboard Access)
When WordPress admin is unavailable, either because of plugin conflict, white screen or broken admin, you can remove the cache directly from your FTP server. While not the most intuitive of the approaches, it’s an effective, straightforward, and reliable way to accomplish a specific task when your dashboard is out of reach. I have used it twice, after plugin updates had me locked out of my dashboard and it worked both times.
When to Use This Method
Only use FTP if you are not able to access your WordPress admin dashboard. Before using the FTP method, back up your WordPress site if possible (you can do this through your hosting control panel even when WordPress dashboard is inaccessible).
Common scenarios where FTP cache clearing is necessary include:
Admin dashboard is loading, but the caching plugin is causing a redirect loop.
The plugin conflict has caused the dashboard layout to be broken.
Step by Step FTP Cache Clearing
Use the FTP client such as FileZilla to connect with your site. Use your hosting company’s FTP details (typically in your hosting control panel or welcome email). Important: Keep your FTP credentials secure and follow WordPress security best practices when accessing your server files.
Go to your site, via FTP, and move to your WordPress root folder (typically public_html or www).
Unzip the “wp-content” folder. Inside wp-content go to the cache folder.
Navigate to the cache folder and check all files and subfolders in it.
Empty the files from the cache folder. Note: Remove the files and folders within /wp-content/cache/; NOT the folder! There should be a folder at /wp-content/cache/ and it should remain. Only delete what’s inside it.
After deletion your server will rebuild the cache again when you visit each page next time. It’s a fresh view approach which is suitable for every caching plugin you have installed.
WordPress Cache Cleared But Changes Still Not Showing? Try This
appear after initial clearing.
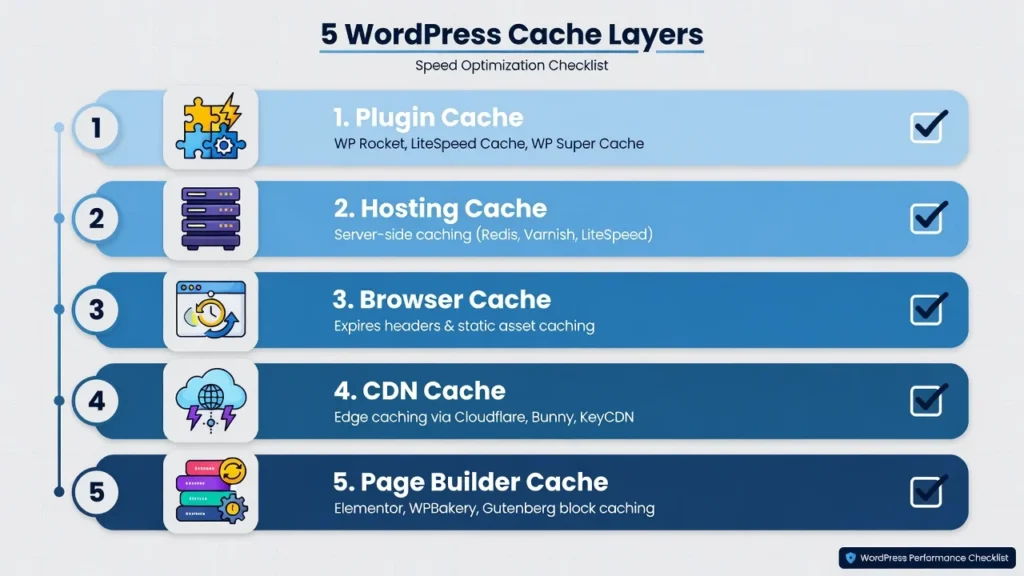
The 5-Layer Cache Checklist
If you have emptied your browser’s cache and you still don’t see your changes, it’s because there is another deeper layer of the cache that’s still holding on to the old version. If you’re familiar with the layers, it only takes a few minutes to go through the checklist below.
Layer 1: WordPress Cache Plugin — Clear cache from your caching plugin admin bar button or settings panel.
Layer 2: Hosting Cache — Sign into your hosting control panel and delete the caching on the server.
Layer 3: Browser Cache — Clear out the images and files stored in your browser cache, or try in Incognito.
Layer 4: CDN Cache — If you are using Cloudflare or other CDN, purge the CDN cache in your CDN dashboard. If you are using Elementor, Divi or another builder, regenerate or clear the builder’s CSS files for the page builder (Layer 5).
Make sure to rule out all 5 layers before deciding that it’s something else. I’ve dealt with this checklist and it helps to solve the problem in almost all instances.
Why Changes Show When Logged In But Not For Visitors
You log in to WordPress, everything looks great, but you log out or check another device and it looks back to the previous version. The majority of WordPress cache plugins do not cache the site for logged in users. WordPress provides the live, uncached version of your site when you’re logged in, allowing you to see the changes you make in real time. Your visitors, who aren’t logged in, still receive the cached version.
The solution: delete your site cache with the help of a WordPress cache plugin, or your hosting panel. Your visitors will get the new version on their next visit and will see the changes as you do, real-time.
How to Verify Cache Was Actually Cleared
Most plugins will show you a success message in the top of your WordPress Dashboard after the cache has been cleared, for example: ‘Cache cleared successfully’ or ‘All caches purged’. This is your First Confirmation class.
If success message doesn’t appear, verify the cache plugin’s dashboard for file count/size indicator. If the cache files are successfully deleted, the counter usually shows zero or a significant drop, indicating that the deletion was successful.
Lastly, repeat from the start of this guide, using Incognito: If your changes now show up there, they are live for all visitors.
Should You Clear Cache After Every Website Change? (Best Practices)
Getting the optimum benefit from caching, but at the same time ensuring that your site is still operating at its best, can only be achieved by knowing when to do it, and when to leave it alone.
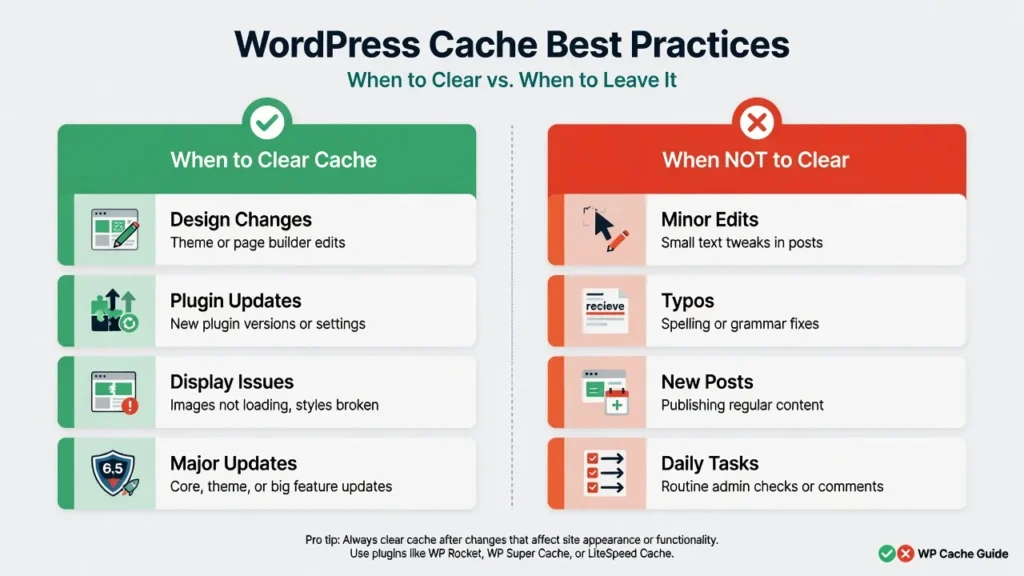
When You SHOULD Clear Cache
Changes in design or layout – this is basic cache management: if you change anything to your site’s appearance, the old version of your site that is cached needs to be removed so that your visitors can view the new version.
When a plugin or theme has been updated (updates frequently modify CSS, JavaScript and template files that must be updated and re-cached):
If you have a display problem, you can run Clear Cache to rule it out as a cause when troubleshooting.
When you have made a significant change to the content of your site, such as moving pages, changing menus or reorganizing navigation.
handle routine updates.
When You DON’T Need to Clear Cache
Minor text changes to existing posts – most caching plugins will recognize content changes, and will automatically update the cache of the affected page.
New posts are automatically cached fresh when they’re loaded for the first time, so no special effort is required to clear the cache.
Normal site maintenance, without touching on templates, CSS, and JavaScript.
Automated Cache Clearing (Set It and Forget It)
If you have to clear the cache regularly, it is better to automate the cache clearing process. When using plugins such as WP Rocket or LiteSpeed Cache, they will recognize that some content has been updated and only clear that portion of the page, without requiring any manual intervention. One of the most frustrating things for a WordPress site owner is when cache issues don’t clear up as expected it may be very easy to fix just by making a simple setting in your caching plugin.
Frequently Asked Questions
These are the most frequently asked questions about WordPress cache problems that I encounter on my own sites and for other people after years of troubleshooting myself and other WordPress sites.
Will clearing the Cache remove my content or posts from my site?
No, removing the cache will delete temporary copies of your pages, but it will not affect your posts, pages, images or content. Your database remains 100% intact. I have cleared cache hundreds of times, on dozens of sites, never lost a post or image. It is a totally safe process as cache is a copy of your content and not the content itself.
When do I need to clear WordPress cache?
Clear when making design or layout changes, updating plugins and themes, or troubleshooting a display problem. Most caching plugins automatically invalidate the cache when you add new content, such as blog posts. Do not clear the cache on a regular basis, but rather only when needed.
Is there a need for a WordPress Cache Plugin since WordPress does not cache by default?
Yes, for the majority of WordPress.org sites that you host yourself. With no caching, each page visit causes a complete PHP and database process which significantly slows down your site, particularly during traffic. A caching plugin is the quickest way to solve this issue with very little configuration. However, look into your hosting account, since it is possible that server caching is already built in to managed WordPress hosting accounts. You might not require a plugin on top if your host already offers it. There is one important thing to note: Don’t use two WordPress cache plugins in the same time. Disagreements between numerous caching plugins can lead to redirect loops, white screens as well as damaged web pages.
What are the difference between Clear, Purge, Flush and Delete cache?
There is no difference, they are all the same. Each WordPress cache plugin has its own terms used for the same thing. WP Rocket: ‘Clear Cache,’ LiteSpeed: ‘Purge,’ W3 Total Cache: ‘Flush,’ WP Super Cache: ‘Delete. Either way, the button that your plugin adds to your page, when clicked, will remove the previously stored cached versions of your pages, which will be then built again the next time you visit your site.
When you update your phone, and it does, why does it not show on my computer, or the other way round?
Its a browser Cache problem. They each have their own individual browser cache. As you refreshed the page, one device got the new version, but the other device was still using the old version that was cached. If there is a problem in Chrome, clear the browser cache from the device with the old version, or refresh hard (Cmd + Shift + R on Mac, Ctrl + F5 on Windows).
Is there a way to clear the cache for one page, rather than for multiple pages?
Yes, and, when you’ve only updated one post, it’s worth it. WP Rocket, LiteSpeed Cache and WP Fastest Cache are all plugins that have the option of single page cache clearing. When viewing the page, go into the cache plugin on the admin bar, and note the ‘Clear Cache for This Page’ option. This clears the cache for that page only, and leaves the rest of my site’s cache intact and performing efficiently.
The host says that they clear cache. Do I still need a plugin?
It depends. Managed hosting plans (such as WP Engine, SiteGround, and Hostinger) will automatically provide server level caching, which means you might not need a caching plugin. But, there are other optimization layers that a caching plugin can add on top of the hosting cache – minification, browser cache headers, lazy loading etc. The two of them can share. If you are on a budget shared hosting with no caching then it is strongly recommended to install a caching plugin.
So what if I’m unable to locate a Clear Cache button anywhere?
Review the top admin bar in WordPress – hover on any WordPress plugin menus. Then look at the left side of the screen and search the left side for your caching plugins name. Thirdly, select Settings and find your plugin. If you still haven’t found it, you can use the FTP method listed above to manually delete the contents of /wp-content/cache/. If you are still unable to clear the cache, reach out to your hosting provider as they can clear out the server level cache.
Now that you’ve finished this article, you know how to keep your WordPress site fresh and fast.
One of these WordPress skills can save you money the first time you need to use it: How to Clear WordPress Cache. WordPress website cache can be present in several different layers; understanding which one to clear and when is the difference between a confident site owner and one who is simply blindly guessing their way through it.
Firstly, run the diagnostic test in Incognito Mode. Then uncache, starting from the WordPress cache plugin, to the hosting cache, CDN cache and page builder cache. The majority of problems are addressed by Layer 2 or 3.
If it is possible with your caching plugin, configure automated cache clearing. Plugins such as WP Rocket and LiteSpeed Cache automatically remove the content from just the affected pages when it changes, without requiring manual intervention.
Cache is used for performance optimization. It makes your website faster, server resources more efficient and provides a better user experience for all visitors when functioning correctly. Those advantages come at a cost: the occasional manual clear.
With the knowledge of how to clear cache at each layer, displaying problems are solved. Don’t work against your cache, work for it!


