

Plugin Not Working in WordPress? Here Are 9 Proven Fixes
I know how frustrating it is when a plugin not working in WordPress suddenly breaks part of your site. One day everything’s running fine. The next, a form stops submitting, a widget disappears, or your checkout page throws errors. The good news: plugin problems almost always trace back to one of five specific causes, and every single one of them is fixable with a clear, step-by-step process.
In this guide, I’m walking you through how to troubleshoot WordPress plugin issues systematically — starting with the most common culprits and moving through less obvious ones. By the end, you’ll either have your plugin working again or know exactly what to tell your hosting support team.
5 Reasons a WordPress Plugin Stops Working (And How to Fix Each One)
Most WordPress plugin issues fall into one of five root causes. Identifying which one applies to your situation is the fastest path to a fix so before you start clicking around, spend 60 seconds reading through these. The rest of this guide maps directly to each cause.
The #1 Culprit: Other Plugins Interfering
Plugin conflicts often triggered by WordPress plugin load order differences across servers are responsible for the majority of WordPress plugin problems. When two plugins compete for control of the same WordPress plugin hook, filter, or JavaScript resource, one of them loses.
I watched this happen last year on a client’s site: activating a new caching plugin instantly broke a form builder that had worked fine for months. They weren’t permanently incompatible they were just fighting for control of the same JavaScript resource.
This happens so often because plugins can have undocumented WordPress plugin dependencies they rely on specific functions or libraries that another plugin might override or remove. WordPress allows hundreds of plugins to run simultaneously, and developers can’t anticipate every possible combination. A WordPress plugin conflict typically shows up as missing features, error messages, or functionality that silently disappears. The broken plugin isn’t faulty on its own. Another plugin is simply interfering with how it loads.
PHP Version Incompatibility (Why Your Plugin Silently Fails)
Plugins are written for specific PHP versions. If your hosting server runs an older PHP version than a plugin requires, you’ll hit PHP Version Incompatibility and the plugin will either refuse to activate or throw cryptic errors with no obvious cause.
I’ve seen sites running PHP 7.2 where a plugin flat-out needed PHP 8.0. The symptom is usually a blank page, a fatal error notice, or a plugin that activates but does nothing. Check your current version under Tools > Site Health in WordPress admin. WordPress plugin activation requires at least PHP 7.4 for most modern plugins, with many newer ones requiring PHP 8.1 or higher for full WordPress plugin compatibility.
WordPress Theme Conflict (The Sneaky Issue)
Your WordPress theme including Child Theme Conflicts from custom code overrides can interfere with how plugins load and function. A WordPress theme conflict is sneakier than a plugin-to-plugin conflict because you don’t immediately think to blame the theme.
I ran into this on my own site: a contact form plugin worked perfectly for six months, then a theme update broke it completely. The theme’s custom JavaScript was overriding the plugin’s scripts and preventing them from loading. Neither the plugin nor the theme was broken in isolation — they just stopped being compatible after the update.
File Permission Problems
Your WordPress files live on a server with permission settings that control what can read, write, or execute. If those settings are too restrictive, a plugin can’t access what it needs and it fails silently or throws WordPress plugin permissions errors.
This typically shows up as the plugin refusing to save settings, failing to create upload directories, or displaying a message like “Could not create directory.” File Permission Problems often require your hosting provider to fix from the server side, but knowing the cause means you can ask for the right thing.
Faulty Plugin Update
A WordPress Core Update or individual plugin update can introduce a breaking change one that causes the plugin to malfunction with your specific server configuration or theme. You update, and suddenly it stops working. This isn’t always the developer’s fault. Some changes work fine for most users but break specific setups.
Check the plugin’s changelog or release notes first. If a faulty plugin update is the cause, you’ll often find reports in the WordPress.org support forums from others experiencing the same issue after the same version. A WordPress plugin rollback to the previous version through your hosting backup is your cleanest recovery option when this is confirmed.
What to Do Before You Start Troubleshooting (3 Safety Steps)
Before you touch anything, take three quick safety steps. They each take under two minutes, but they’re the difference between a stressful mistake and a one-click recovery especially if you’re dealing with a live site.
Step 1: Back Up Your Site
Create a WordPress plugin backup and full site restore point before making any changes. Following WordPress security best practices, if your host offers automated backups (most do), check that today’s backup exists and know where to restore from. If not, install UpdraftPlus or BackWPup both make backup and restore a two-click process.
Log into your hosting dashboard and look for “Backups” or “Restore.” Can’t find it? Contact support and ask them to create a restore point before you begin. Two minutes now can save hours of rebuilding later.
Step 2: Set Up a Staging Site (Optional but Recommended)
A staging site is a private copy of your live site a safe development environment where you can test fixes without touching anything your visitors see. Most managed hosting providers include staging tools in their control panel. If yours does, use it. It’s one of the best habits you can build.
If staging isn’t available, you can test on your live site just work through the steps methodically and only change one thing at a time.
Step 3: Document Your Current Setup
Before deactivating anything, screenshot your list of active plugins, write down the exact error message you’re seeing, and note what changed right before the problem started a WordPress update, a new plugin install, a theme change.
This record saves time during troubleshooting and gives you the specific details you’ll need if you escalate to hosting support or a plugin developer.
How to Test for Plugin Conflicts (The Most Reliable First Step)
Plugin conflicts are the leading cause of WordPress plugin problems and they’re also the fastest to identify. This is your first troubleshooting step. In most cases, using a basic WordPress plugin conflict checker approach, you can isolate the problem within five minutes.
Method 1: WordPress Plugin Safe Mode Testing (My Recommended Approach)
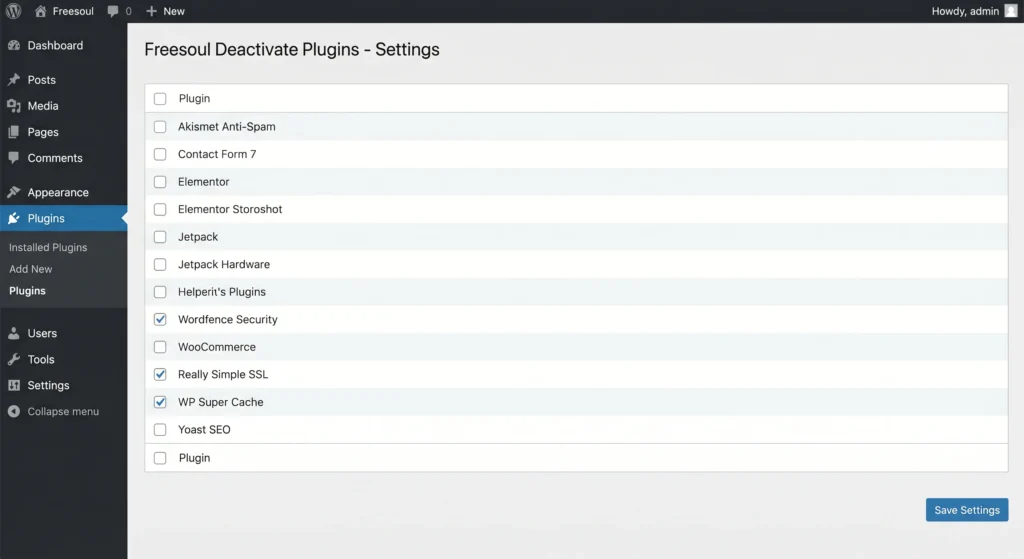
The Freesoul Deactivate Plugins method is essentially a WordPress plugin safe mode you can test with plugins disabled in your session only, without affecting visitors. Here’s the exact process.
Install a free plugin called “Freesoul Deactivate Plugins” from the WordPress plugin directory 30 seconds to install, 30 seconds to activate.
Once active, open its settings. You’ll see all your installed plugins with checkboxes. Uncheck everything except critical plugins (your security plugin, SSL plugin, and any caching plugin your host requires). Save your changes.
Open your website in a new tab and check if the problem is gone. If it is, you have a plugin conflict. If it persists, you’re dealing with a different issue.
Now comes the important part: use WordPress plugin deactivate testing one at a time. Reactivate each plugin individually. After each one, reload your site and test. When the problem comes back, you’ve found your culprit. Write down that plugin name before moving on.
What makes this approach valuable: your visitors see the fully functioning version of your site the entire time. You’re testing in your own session only.
Method 2: Disable All Plugins in WordPress Admin (Traditional Approach)
The traditional approach: go to Plugins in your WordPress admin, select all plugins using the top checkbox, then choose “Deactivate” from the Bulk Actions dropdown and click Apply.
Warning: This will disable all plugins on your live site instantly visitors will see missing features until you reactivate. Use Method 1 if you have active traffic. This is the “disable all plugins WordPress” approach, which is faster but more disruptive.
After deactivating everything, check your site. Problem gone? You have a conflict. Problem still there? Move to the next troubleshooting step.
Method 3: Test for Theme Conflicts Too
Theme conflicts are easy to rule out while you’re here. Temporarily switch to a default WordPress theme Twenty Twenty-Three or Twenty Twenty-Four under Appearance > Themes.
Check your site with the default theme active. If the problem disappears, your theme is the culprit — not a plugin. If the problem persists, switch back to your theme and continue to the next step. You’ve now ruled out both plugin and theme conflicts.
What to Do If a Plugin Conflict Is Found
Once you’ve identified the conflicting plugin, you have three clear options listed here in order of preference.
Option 1 (Best): Contact the developer. Open the plugin’s support forum on WordPress.org or their dedicated support site. Explain exactly which two plugins conflict and what happens. Many developers will either patch the conflict or point you to a workaround in their WordPress plugin documentation.
Option 2: Find an alternative plugin that provides the same feature without the conflict. The WordPress plugin directory has over 59,000 plugins there’s almost always an equivalent option that works with your setup.
Option 3 (Last resort): If the conflicting plugin provides a non-essential feature, deactivate and delete it. Before doing so, export any data it stores most plugins have an export option in their settings.
Check Your PHP Version for Plugin Compatibility
Someone installs a plugin, hits Activate, and gets a cryptic error or nothing happens at all. More often than not, the cause is PHP Version Incompatibility between their server and the plugin’s requirements.
Every plugin lists a minimum PHP version it needs to run. If your server is running something older, the plugin simply doesn’t have access to the functions it needs like running modern software on a years-old operating system. WordPress plugin compatibility depends entirely on matching your server’s PHP version to what the plugin requires. Most plugins today need at least PHP 7.4, with many specifying PHP 8.1 for stable, secure operation.
How to Check Your Current PHP Version
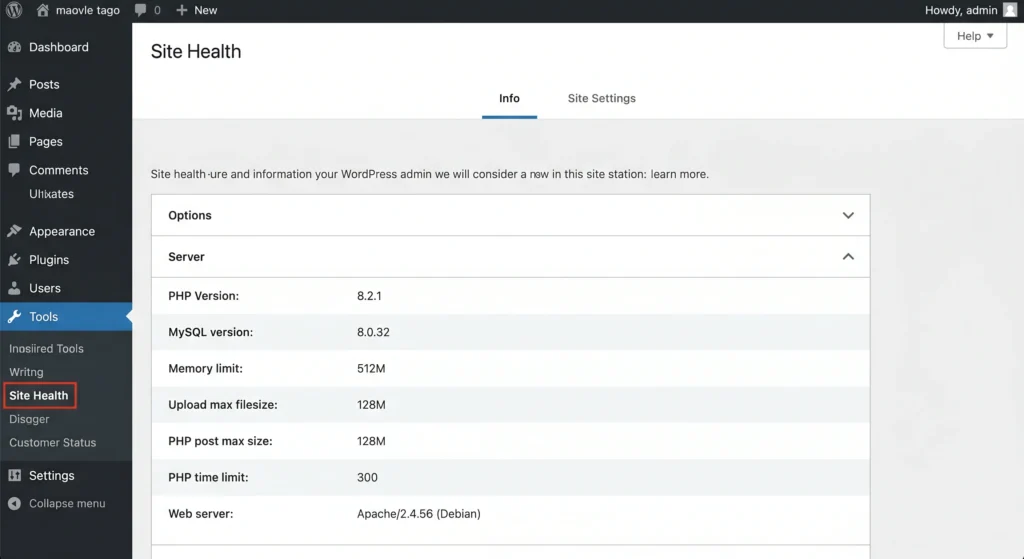
The fastest way to check is directly in WordPress: go to Tools > Site Health in your dashboard. You’ll see your current PHP version listed under the Info tab, along with other server details.
You can also check in your hosting control panel. In cPanel, look for “Select PHP Version” or “MultiPHP Manager” your current version is displayed at the top. Either method takes under 30 seconds.
Which PHP Version Should You Upgrade To?
PHP 7.4 is the absolute minimum if you’re running anything older, upgrade immediately. But if your host supports it, target PHP 8.2 or 8.3. These versions offer measurably faster execution speeds, improved error handling, and active security maintenance from the PHP team.
WordPress plugin compatibility improves significantly on PHP 8.x. You’ll experience fewer conflicts and dramatically better WordPress plugin performance across all the plugins you’re running. Check WordPress’s official requirements page for the current PHP recommendation, as this changes with major WordPress releases.
How to Upgrade PHP in cPanel (Step-by-Step)
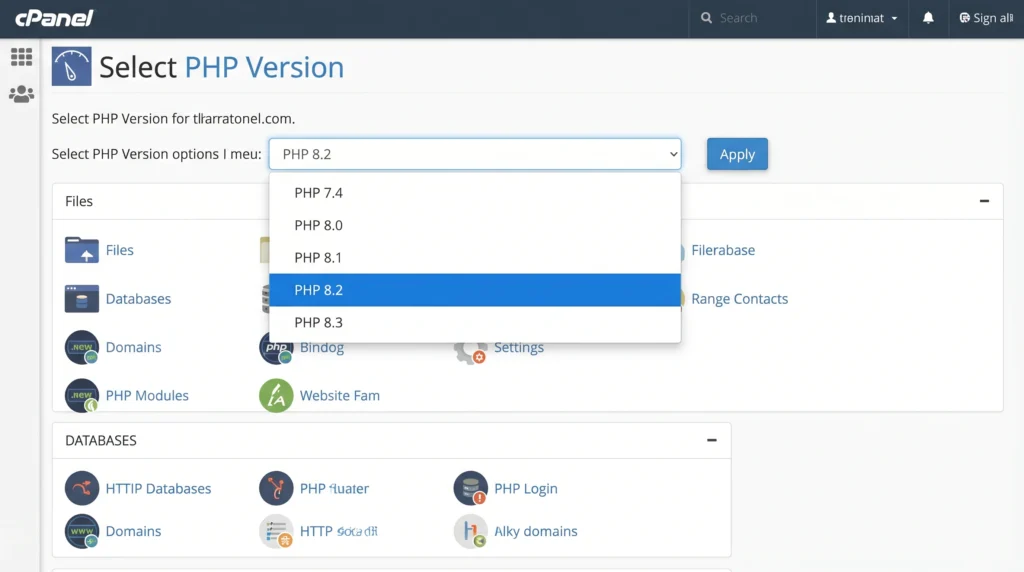
Upgrading PHP in cPanel is a straightforward process. Log into your cPanel account and search for “Select PHP Version” or “MultiPHP Manager” in the search bar at the top.
You’ll see your current PHP version in a dropdown. Click it to expand the list of available versions what appears depends on your hosting provider’s offerings.
Select PHP 8.2 or 8.3 if available. These are currently the most stable, actively supported versions. Click “Apply” or “Set as Current” to save.
Return to your WordPress dashboard and try activating the plugin again. In most cases, this resolves the issue immediately.
What If My Host Won’t Let Me Change PHP?
Some shared hosting plans restrict direct PHP version changes. If that’s the case, contact your host’s support team and ask them to upgrade your PHP version manually. Most support teams handle this routinely have the specific PHP version number ready when you contact them.
If your host refuses to upgrade PHP at all, that’s a sign of poor WordPress hosting compatibility with modern WordPress requirements. A host that limits both your WordPress plugin security baseline and the quality of plugins you can use is actively creating gaps on your site. At that point, migrating to a better hosting provider is worth serious consideration.
Clear Your Cache (Browser, WordPress, and CDN)
I once spent 45 minutes checking a client’s plugin installation only to realize their browser was caching a version from two days prior. Clearing browser cache fixed it in 10 seconds. Cache is supposed to make your site load faster, but it can freeze an old version of your site in place, making it look like a plugin isn’t working when it actually is.
Three separate cache layers can cause this: your browser cache, your WordPress caching plugin, and your Content Delivery Network (CDN). You need to clear all three.
Clear Your Browser Cache
Start with the simplest fix. Your browser caches files from every site to speed up repeat visits which means it might still be showing you the old, pre-plugin version of your site.
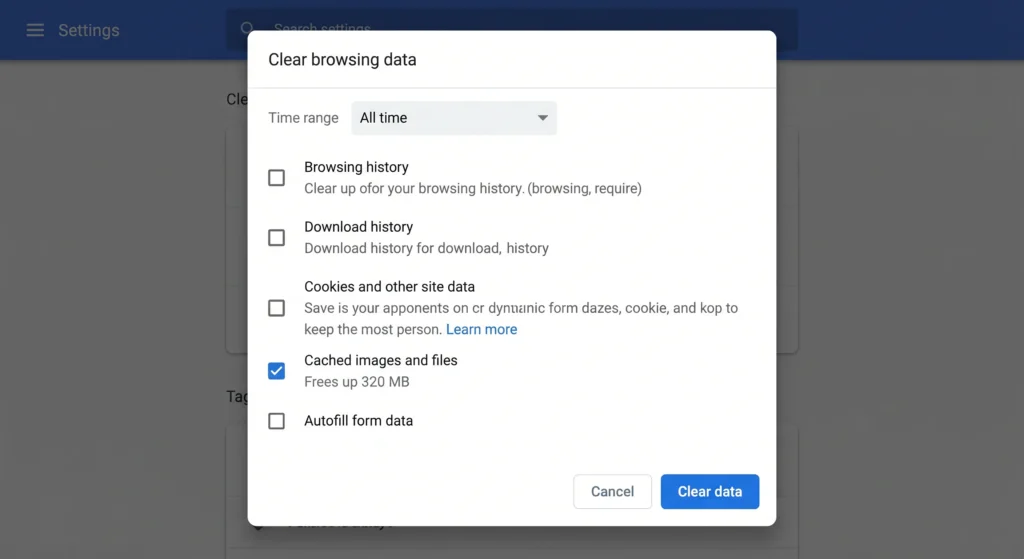
- Chrome: Settings > Privacy and Security > Delete Browsing Data > Cached images and files
- Firefox: Settings > Privacy and Security > Cookies and Site Data > Clear Data
- Safari: Develop menu > Empty Caches (if the Develop menu isn’t showing, enable it in Preferences > Advanced)
Clear the last 24 hours minimum, then reload your WordPress site.
Clear WordPress Caching Plugins
If you’re using a caching plugin like WP Rocket, W3 Total Cache, or LiteSpeed Cache, flush their cache separately browser cache and WordPress caching plugin cache are completely independent systems.
- WP Rocket: Click the “Purge Cache” button in the top admin bar
- W3 Total Cache: Go to Performance > Purge All Caches
- LiteSpeed Cache: Go to LiteSpeed Cache > Toolbox > Purge All
A caching plugin conflict can make a fully functional plugin look broken. Get in the habit of flushing cache immediately after activating or updating any plugin.
Clear CDN/Cloudflare Cache
If you’re using Cloudflare or another CDN, that’s a third cache layer sitting between your visitor and your server, caching content globally for faster load times.
Log into your Cloudflare dashboard and navigate to Caching > Configuration > Purge Everything. For non-Cloudflare CDNs, look for a “Purge” or “Invalidate Cache” button in your CDN dashboard.
Once you’ve cleared all three cache layers browser, WordPress plugin, and CDN your plugin changes will load fresh for everyone.
Update WordPress Core, Your Theme, and All Plugins
Outdated software causes more WordPress plugin errors than most people expect. I’ve resolved “broken” plugin reports dozens of times with a single click just updating WordPress core, the theme, or the plugin itself.
Every WordPress plugin update includes bug fixes, security patches, and compatibility adjustments. If a plugin won’t activate or behaves strangely, check for available updates before trying anything more complex. It’s the fastest fix to test.
Update WordPress Core: Go to Dashboard > Updates and click “Update Now” if a new version is available. WordPress handles the rest automatically. I treat core updates as non-negotiable on every site I manage they patch security vulnerabilities and often resolve plugin compatibility issues in one shot.
Update Your Theme: Theme updates are frequently skipped, but an outdated theme is a common source of plugin conflicts especially if the theme developer hasn’t pushed updates in months. Go to Appearance > Themes and apply any available updates to your active theme.
Update All Plugins: Go to Plugins > Installed Plugins, select all plugins showing update notifications, and use Bulk Actions > Update to apply them all at once. Run updates one at a time if you want to identify which specific update causes any new issues.
What If a Plugin Update Broke Something?
Updates occasionally introduce breaking changes. If a plugin update broke something, check the plugin’s changelog on WordPress.org first developers document breaking changes there, and sometimes publish a hotfix version within hours.
For a quick rollback without restoring a full backup, install the free WP Rollback plugin. It lets you revert any plugin to a previous version directly from your WordPress dashboard, without touching anything else on your site.
If the problem is serious and no rollback is available, contact your host’s support team to restore a previous backup of your site files. Check the changelog for any WordPress version compatibility notes developers often document which WordPress versions an update was tested against.
Fix WordPress Plugin Installation Errors (Upload Failed, Extraction Failed, and More)
When a WordPress plugin installation fails before it even activates, the error message is your roadmap. Match your exact error to the fixes below.
Most WordPress plugin installation errors come from three places: server configuration limits, file permission settings, or corrupted download files not from anything wrong with the plugin itself.
“Internal Server Error” During Installation
An internal server error during plugin installation almost always means PHP timed out before it could finish extracting and installing the files. Shared hosting plans often cap PHP execution time at 30–60 seconds to limit resource use.
The fix: increase max_execution_time in your PHP configuration. The most reliable way to do this on shared hosting is through your host’s PHP settings panel in cPanel (look for “PHP Options” or “Select PHP Version” > Options), or by adding this line to your site’s .htaccess file:
php_value max_execution_time 300If you have access to php.ini, add or edit:
max_execution_time = 300
If neither option is available, contact your hosting support and ask them to increase max_execution_time to at least 300 seconds. Once changed, retry the installation.
Note: Always test server configuration changes on a staging site before applying to production.
“Maximum Memory Size Exceeded” (Memory Exhaustion)
This error means WordPress hit its memory limit a form of Memory Exhaustion while trying to process the installation. Complex plugins with many files or large assets push past the allocated RAM.
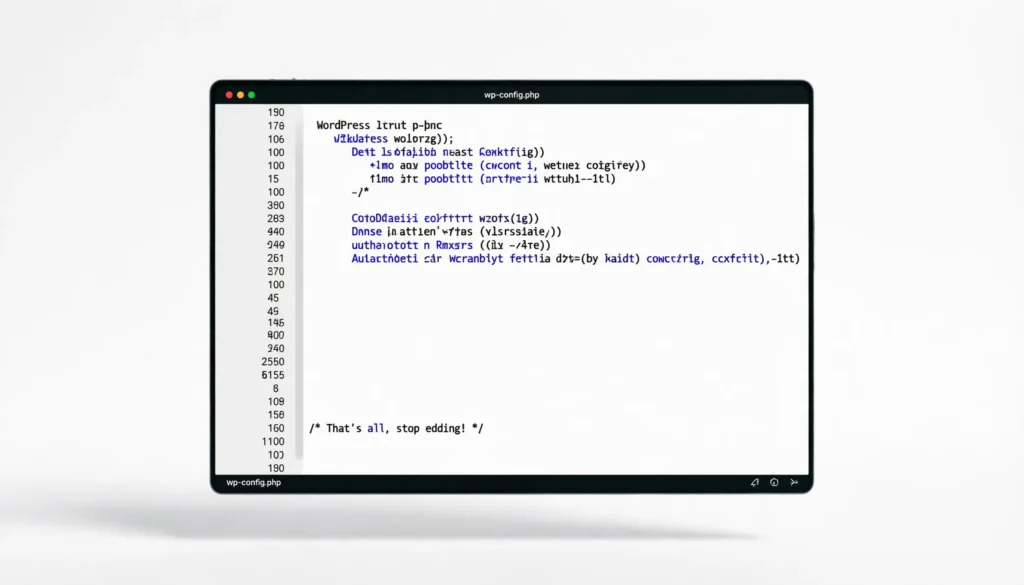
Edit your wp-config.php file and add this line before the line that says /* That's all, stop editing! */:
define('WP_MEMORY_LIMIT', '256M');
This raises WordPress’s internal memory limit to 256MB. Note: if your host’s PHP memory limit is set lower than 256MB, this won’t work contact your host and ask them to increase memory_limit in your PHP configuration to at least 256M. Save the file and retry the installation.
“File Size Exceeds Limit”
If the plugin’s ZIP file is larger than your host’s upload size limit, the upload fails before installation even starts. The fix is increasing upload_max_filesize.
You can adjust this in three ways:
- Through cPanel: Look for “PHP Options” or “Select PHP Version” > Options and raise
upload_max_filesizeto 128M - Via .htaccess: Add
php_value upload_max_filesize 128Mto your.htaccessfile - Contact hosting support directly and ask them to increase it most can do this in under a minute
Corrupted or Double-Zipped File
Corrupted plugin files happen when a download is interrupted mid-transfer. Double-zipped files a ZIP nested inside another ZIP are common when plugin ZIP files are created incorrectly on the source server, and WordPress can’t extract them.
Before uploading, open the ZIP on your computer and confirm it contains a plugin folder with files inside, not another ZIP. If the structure looks wrong, download a fresh copy from WordPress.org or the plugin’s official site. Extract it locally, verify the contents, and rezip only if necessary.
“Add New Plugin” Button Is Missing
If the “Add New Plugin” button has vanished from your dashboard, a security constant in wp-config.php is blocking it. Open wp-config.php via your host’s File Manager or FTP and look for this line:
define('DISALLOW_FILE_MODS', true);
Change true to false and save. The button will reappear.
⚠️ Before making this change: Understand why the restriction was enabled. On high-security sites, this setting prevents unauthorized plugin installations. If you’re on managed hosting, contact your host before modifying it. You may also encounter DISALLOW_FILE_EDITS nearby that’s a separate constant that only blocks the theme/plugin code editor, not plugin installation.
WordPress Dashboard Won’t Load? Emergency Access Methods
When your WordPress dashboard refuses to load—whether it’s a blank white screen or a WordPress 500 error a plugin has almost certainly crashed the site or triggered what’s called the White Screen of Death.
Or in some cases, you may be dealing with a Database Connection Error each has a different fix.
The instinct is to panic, but there’s nothing to panic about you don’t need your dashboard to fix this. You can access and fix WordPress files directly through your hosting control panel’s File Manager, no FTP client required. From there, you can disable the problematic plugin at the file level and get your site back within minutes.
The White Screen of Death (WSOD) : What It Means
The White Screen of Death (WSOD) appears when WordPress encounters a Fatal PHP Error severe enough to stop the entire site from loading. You get a completely blank white page no error message, no WordPress interface, nothing at all. Unsettling, but fixable.
This typically happens when a plugin conflicts with your theme, your PHP version doesn’t support a plugin’s requirements, or a plugin update introduced a breaking bug. WordPress hit a wall it couldn’t recover from on its own, so the page goes white instead of showing you a helpful error.
Plugins are by far the most common cause. They’re third-party code running inside your WordPress environment, which makes them the most likely source of Fatal PHP Errors that trigger the WSOD.
Access Files via Hosting File Manager
You don’t need FTP experience to fix this. Your hosting provider gives you a File Manager tool right in your control panel, usually cPanel. File Manager is a web-based file browser that feels like Windows Explorer or Mac Finder, but it lives inside your hosting account.
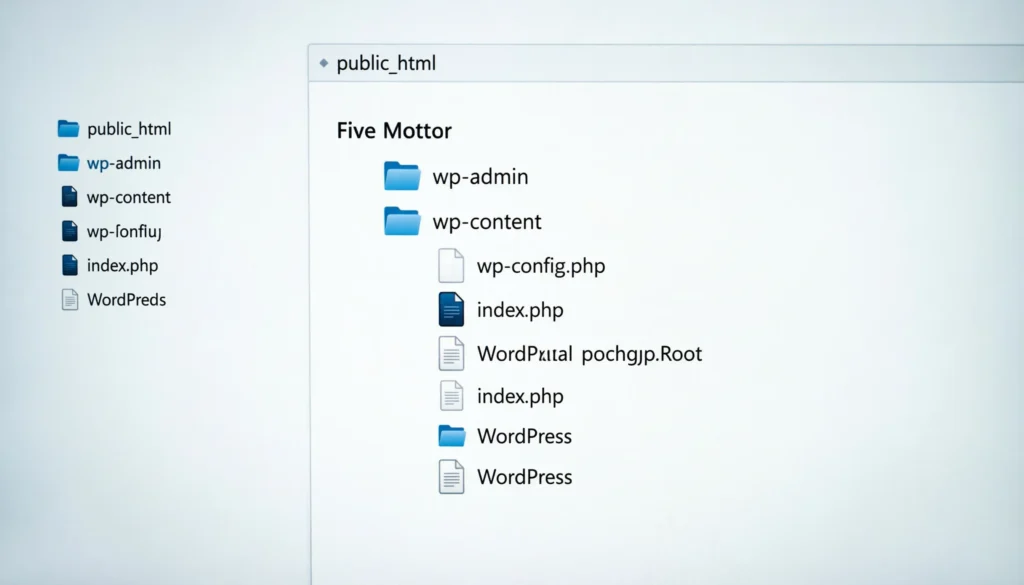
Log into your hosting control panel and look for “File Manager” in the main menu. Once inside, navigate to your WordPress installation folder usually public_html or a subfolder with your domain name.
Force-Deactivate the Problematic Plugin
Once you’re in File Manager, navigate to wp-content > plugins. You’ll see a folder for every plugin installed on your site.
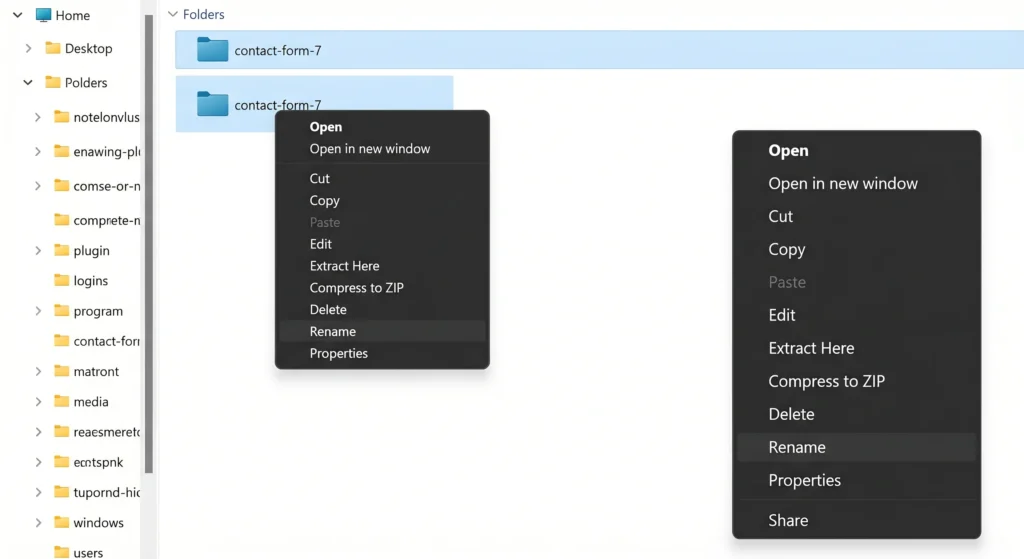
Find the folder of the plugin you suspect is causing the problem. Right-click on it and choose “Rename.” Add -disabled to the end of the folder name (for example, contact-form-7 becomes contact-form-7-disabled).
WordPress can no longer find the plugin’s files, so it automatically deactivates it. Try loading your site now if it works, you’ve found your culprit.
Advanced method (WP-CLI): If you’re comfortable with command line access, WP-CLI offers an even faster method: wp plugin deactivate --all disables every plugin in seconds without touching your file system. This is the fastest emergency deactivation method available.
Last resort (database): If File Manager access isn’t available and FTP isn’t set up, you can deactivate plugins via your database. In phpMyAdmin, open your WordPress database, find the wp_options table, and edit the active_plugins row set the value to a:0:{} to deactivate all plugins at once.
Enable WordPress Debug Mode
If force-deactivating didn’t immediately reveal the problem, enable debug mode to see the actual errors WordPress is generating.
Open wp-config.php in File Manager and find this line:
define('WP_DEBUG', false);
Change it to:
define('WP_DEBUG', true);
define('WP_DEBUG_LOG', true);
define('WP_DEBUG_DISPLAY', false);
Setting WP_DEBUG_DISPLAY to false keeps errors out of your public-facing pages while logging them privately. Save the file and reload your site.
Check the debug.log File
After enabling debug mode, WordPress creates a debug.log file inside your wp-content folder. This is your direct line to what’s actually breaking your site.
Navigate to wp-content in File Manager. Right-click debug.log and select “View.” The file lists PHP errors, warnings, and notices chronologically newest errors appear at the bottom.
Look for errors that reference the plugin folder you renamed. A WordPress syntax error typically points to the exact file and line number in the plugin’s PHP code. Even if the message looks technical, you now have specific information to share with the plugin developer rather than just “it doesn’t work.”
Fix File Permissions & Server Issues (Why Your Plugin Can’t Access Files)
What Are File Permissions?
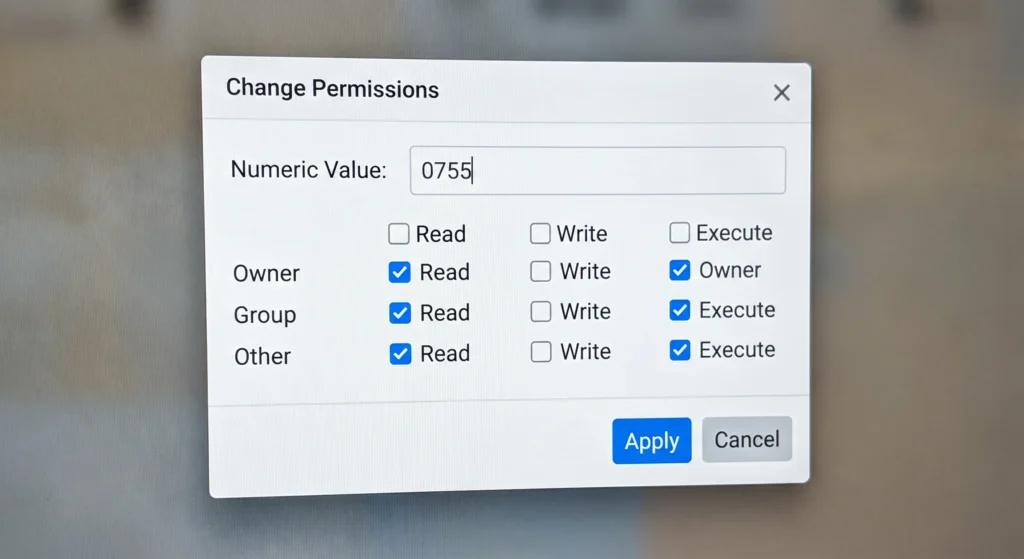
File permissions control who can read, write, and execute files on your server. They’re expressed as three-digit numbers like 0755 or 0644, representing what the file owner, the server group, and other users can each do.
For WordPress, the two numbers you’ll use are:
- 0755 for folders : the server can read and execute; no one can overwrite
- 0644 for PHP files : the server can read; no one else can modify
That’s all you need to know to fix permission issues on a WordPress site.
The strangest permission case I ever encountered: a plugin that installed perfectly but refused to create its cache folder. The fix was setting wp-content/uploads to 0755 the hosting provider had silently dropped it to 0644 during a server migration.
Set Correct Permissions for WordPress Folders
File permissions in File Manager are changed with a menu called “Change Permissions.” Right-click on a folder, select “Change Permissions,” and a small window appears where you enter the three-digit number.
Here are the correct permissions for WordPress:
wp-contentfolder: 0755wp-content/pluginsfolder: 0755wp-content/uploadsfolder: 0755wp-content/themesfolder: 0755- All individual PHP files: 0644
wp-config.phpspecifically: 0600 this restricts access to the owner only and is a recommended WordPress security hardening step
If You Can’t Change Permissions
If File Manager won’t let you change permissions, contact your hosting provider and explain which folders need which permission settings. This is a standard request that any support team should handle within minutes.
SSL Certificate Not Found : Why Plugin Installation Fails
How SSL Certificate Issues Block Plugin Installation
SSL Certificate Issues can interfere with plugin installation in less obvious ways. When your site URL is set to HTTPS in WordPress settings but your SSL certificate isn’t properly configured, WordPress can’t complete the internal requests it makes during installation leading to “Connection Timed Out” or silent installation failures.
This is most common on newly migrated sites where the SSL certificate hasn’t been activated on the new server yet. The certificate exists in theory, but WordPress and the server can’t verify it, so installation requests fail midway.
Install a Free SSL Certificate (Option 1)
Most modern hosting providers offer free SSL certificates through Let’s Encrypt. Log into your hosting control panel and look for “SSL/TLS,” “Let’s Encrypt,” or “SSL Certificates” in the menu.
Follow your host’s process to issue and install a free SSL certificate for your domain. Once installed, return to your WordPress settings under Settings > General and make sure both the WordPress Address and Site Address begin with https://.
Use Really Simple SSL Plugin (Option 2 — Easier)
Really Simple SSL is developed and maintained by Rogier Lankhorst and the Really Simple Plugins team — the plugin has over 5 million active installs and a near-perfect rating on WordPress.org. It automatically detects your SSL certificate, switches your site to HTTPS, and redirects all HTTP traffic without any manual configuration.
Install it from Plugins > Add New, search “Really Simple SSL,” install and activate. The plugin handles the rest automatically, including updating your WordPress and Site Address settings.
Manual Plugin Upload Workaround
If plugin installation still fails despite fixing your SSL, you can bypass the WordPress installer entirely by uploading the plugin manually.
Download the plugin’s ZIP file to your computer. Extract it to get the plugin folder. In your hosting File Manager, navigate to wp-content/plugins and upload the extracted plugin folder directly. Once uploaded, go to your WordPress dashboard > Plugins > Installed Plugins and activate it from there.
Plugin Installation Failing on Localhost? (XAMPP Users Read This)
If you’re running WordPress locally on XAMPP and plugins won’t install, the issue is almost always a PHP execution timeout or memory limit XAMPP’s default configuration is conservative.
Fix XAMPP PHP Execution Time
Open your XAMPP control panel and click “Config” next to Apache, then select “php.ini.” Find the line that reads max_execution_time and change the value:
max_execution_time = 600
If you want to be extra safe, set it to 600 for ten minutes of execution time. On a local development server, setting it to 0 (no limit) is also acceptable just don’t carry that setting to a production site.
Save the file, then restart Apache in XAMPP. Try installing the plugin again.
Fix XAMPP Memory Limit
In the same php.ini file, find memory_limit and increase it:
memory_limit = 512M
Restart Apache after saving. For local development, a generous memory limit prevents the majority of installation failures.
Quick note: These changes only affect your local XAMPP setup. Your live hosting has its own PHP settings that are already configured for production use.
Troubleshooting Specific Plugins (Real Examples)
Contact Form 7
Contact Form 7 is one of the most widely installed plugins on WordPress, which means it’s also one of the most commonly reported as “broken.” Most CF7 issues come down to JavaScript conflicts with other plugins or themes.
If your CF7 form submits but nothing happens, open your browser’s developer console (F12 in Chrome) and check for JavaScript errors. A conflict with a page builder or slider plugin is the most common cause. Deactivate other plugins one at a time using Method 1 until the form works again.
If CF7 isn’t sending emails, the issue is almost certainly your server’s mail configuration not CF7 itself. Install the WP Mail SMTP plugin and configure it to send through an SMTP service like Gmail, SendGrid, or Mailgun.
WooCommerce
WooCommerce conflicts are more impactful than most plugin conflicts because they affect your store’s revenue. Common symptoms: checkout page not loading, cart not updating, payment gateway errors.
When a WooCommerce plugin error appears, the first test is always switching to a default WordPress theme (Storefront, Twenty Twenty-Four) to rule out theme conflicts. WooCommerce is tested against Storefront and default themes if the issue disappears, your theme is the culprit.
For payment gateway issues specifically, verify your SSL certificate is valid and properly configured. Payment processors require HTTPS an SSL issue can silently break payment processing while everything else on your site looks fine.
Elementor
Elementor installs as a plugin, but it functions more like a theme system it takes over how WordPress displays content on the front end, which makes it more likely to conflict with other plugins or themes than a typical single-feature plugin.
If Elementor pages show as blank or broken, clear all cache layers first (browser, WordPress, CDN). Elementor has its own internal cache go to Elementor > Tools > Regenerate CSS & Data. Also confirm your server meets Elementor’s minimum requirements: PHP 7.4+, MySQL 5.6+ or MariaDB 10.1+, and WordPress memory limit of at least 128MB.
If Elementor’s editor won’t load, the most common cause is a JavaScript conflict. Switch to the default WordPress theme and test — if the editor loads, your theme is incompatible.
Yoast SEO
Yoast SEO rarely causes outright breakage, but it commonly conflicts with other SEO or schema plugins. If you see duplicate meta tags or schema markup errors, check for other active SEO plugins — running two SEO plugins simultaneously (Yoast + Rank Math, for example) creates direct conflicts.
For Yoast configuration issues, check Tools > Site Health and ensure your site is indexable (Settings > Reading confirm “Discourage search engines” is unchecked).
General Approach for Any Plugin
Note: if you’re running WordPress Multisite, you may also encounter network-level activation requirements — some plugins must be network-activated to function across all subsites.
Most plugin problems fall into the conflict or compatibility categories. The troubleshooting method is always the same regardless of which plugin is involved: rule out conflicts first, verify PHP compatibility, check for updates, clear cache, then escalate to the developer with specific debug information.
When to Contact Plugin Support (You’ve Done Everything Now What?)
Before contacting a developer, confirm you’ve completed these steps:
☐ Tested the plugin with all other plugins deactivated still broken
☐ Verified WordPress version, PHP version, and theme compatibility
☐ Checked file permissions and SSL configuration
☐ Enabled debug mode and reviewed the debug.log for errors
☐ Reinstalled the plugin from scratch
☐ Searched the plugin’s WordPress plugin support forum and WordPress plugin documentation for your specific error message or behavior
☐ Tried solutions listed in the plugin’s FAQ or known issues page
If all seven are checked, you’re dealing with either a genuine bug or a server-specific configuration issue. You’ve done your due diligence.
How to Find Plugin Support
For plugins on WordPress.org, the WordPress plugin support forum tab on the plugin’s page is your first contact point. Most developers monitor these forums and respond within a few days.
For premium plugins, look for a dedicated support portal usually linked in your purchase confirmation email or the plugin’s settings page. Premium plugin support is typically faster and more hands-on.
What Information to Include in Your Support Request
The WordPress plugin author can now run targeted tests rather than starting from scratch with basic questions if you provide the right information upfront.
Include these details in every support request:
- Your WordPress version (found in Dashboard > About WordPress)
- Your PHP version (found in Tools > Site Health)
- Your active theme name and version
- The list of all active plugins
- The exact error message (copy it from debug.log if possible)
- The exact steps that reproduce the problem
- What you’ve already tried
The developer can now run specific tests instead of asking you a dozen follow-up questions. Good information upfront typically cuts resolution time in half.
If the Plugin Is Abandoned
Check the plugin’s WordPress.org page for its “Last Updated” date and compatibility information. If a plugin hasn’t been updated in over a year and isn’t marked as compatible with the current WordPress version, it may be abandoned.
For abandoned plugins, find an actively maintained alternative in the WordPress plugin directory. Search for the same functionality and filter by “Last Updated” to ensure you’re choosing something that’s actively supported.
FAQ: Your Most Common Plugin Questions Answered
Q: Why did my WordPress plugin stop working after a WordPress update?
WordPress updates sometimes modify or remove functions that plugins relied on, causing WordPress plugin errors. Check the plugin’s WordPress.org page for a newer compatible version. If the plugin hasn’t been updated recently, find an actively maintained alternative.
Q: Can I have too many plugins installed?
There’s no hard limit, but each plugin adds code that runs on every page load. WordPress plugin performance degrades when many poorly coded plugins run simultaneously. Deactivate and delete any plugin you’re not actively using — inactive plugins still represent a security and maintenance overhead.
Q: Why does my plugin work on staging but not on my live site?
The most common cause is a difference in PHP version, server configuration, or memory limits between your staging and live environments. Check Tools > Site Health on both environments and compare the PHP version, memory limit, and active plugins.
Q: How do I know if a plugin is safe to install?
Check the plugin’s WordPress.org plugin directory listing for: number of active installs (more is generally better), star rating, last updated date (within the past year is ideal), and whether it’s been tested with your current WordPress version. Read the one-star reviews — they often reveal recurring issues.
Q: What’s the difference between deactivating and deleting a plugin?
Deactivating stops the plugin from running but keeps its files and database data intact — you can reactivate it later with no data loss. Deleting removes the plugin files and, for most plugins, its database tables too. Always deactivate first to confirm you don’t need the plugin before deleting.
Q: Why does my plugin keep deactivating itself?
This usually happens when WordPress detects a Fatal PHP Error during plugin initialization and automatically deactivates the plugin to protect the rest of the site. Enable debug mode and check debug.log for the specific error — it will point to the exact cause.
Q: How do I fix a plugin that breaks my site every time I activate it?
This is a direct conflict or compatibility issue. Test with only that plugin active (deactivate everything else first). If it still breaks with nothing else running, the issue is a server-level incompatibility — PHP version, memory limit, or missing PHP extension. Check the plugin’s system requirements against your Tools > Site Health report.
Q: Can I install a plugin without using the WordPress dashboard?
Yes. Download the plugin ZIP, extract the folder, and upload it via FTP or File Manager to wp-content/plugins/. Then activate it from your WordPress dashboard > Plugins > Installed Plugins. This is the standard workaround when dashboard plugin installation is blocked.
You’ve Got This
You’ve now covered every major reason a plugin not working in WordPress happens from conflicts and PHP incompatibility to file permissions, cache issues, SSL misconfigurations, and dashboard crashes. More importantly, you have a systematic method to diagnose any new problem that comes up, not just the ones we covered here.
The process is always the same: rule out conflicts first, check compatibility, verify server settings, enable debug mode if needed, and escalate to the plugin developer with specific information if nothing else works.
Prevention matters too. Update WordPress, your plugins, and your theme regularly. Use staging before making changes on live sites. Only keep plugins you actively use, and source them from reputable developers.
If any steps in this guide seem outside your comfort level, your hosting provider’s support team can walk you through them most managed WordPress hosts offer free troubleshooting assistance.
Plugin problems are fixable. Every single one. You have everything you need to handle them.


