

When I first built my WordPress website for my local business, I made a costly mistake. I chased global keyword rankings — going head-to-head with national companies that had full-time SEO teams and deep pockets. Six months of work, and barely a phone call to show for it. Then I discovered local SEO for WordPress, and the results were almost immediate.
Local SEO for WordPress is the practice of optimizing your WordPress website so it appears when people in your area search for the products or services you offer. Instead of competing with the entire world, you focus on being visible to people who can actually become your customers because they live or work near you.
Think about it this way. If you run a bakery in Seattle, you don’t need someone in Miami to find your website. You need the person standing two blocks away searching “fresh bread near me” on their phone to see your business first. That’s what local SEO does for you.
I run a small service business, and once I switched my focus to local SEO, my website started bringing in real customers. People who searched, found me, and called the same day. The traffic numbers looked smaller than before, but the quality was dramatically better.
Why Your Business Only Needs to Dominate a 5-Mile Radius
Here’s something that completely changed how I thought about online visibility.
Most physical businesses only need to be visible within their city or even just a 10 kilometer radius around their location. That’s it. Not statewide. Not nationwide. Definitely not global.
When I finally understood this, I stopped wasting time trying to rank everywhere and focused all my energy on my immediate area. The competition dropped from thousands of businesses to maybe 20 or 30 in my neighborhood. Suddenly, ranking at the top became achievable.
Your customers have a maximum distance they’ll travel to reach you. For a coffee shop, that might be 5 kilometers. For a specialized service like a wedding photographer, maybe 30 kilometers. For most local businesses, it falls somewhere in between.
I started asking my customers how they found me and how far they traveled. Almost all of them lived or worked within 8 kilometers of my location. That data told me exactly where to focus my local SEO efforts.
Location-based searches are how people find local businesses now. They pull out their phone, type what they need plus their city or “near me,” and pick from the results that appear. If you’re not showing up in those local search results, you’re invisible to nearby customers actively looking for what you sell.
Your WordPress website needs to send clear geographic signals to Google — your location, the areas you serve, and the neighborhoods where people know your name. I’ll walk you through exactly how to do that. But first, here’s why it matters so much right now in 2026.
The Map Pack Gets 44% of All Clicks : Here’s Why That Changes Everything
When someone does a local search on Google, the Map Pack, that box at the top showing three businesses with a map, captures 44% of all clicks. Nearly half of all clicks go to just those three businesses.
The first time I saw this data, I couldn’t believe it. The regular organic search results below the Map Pack, the traditional blue links we’re used to seeing, split the remaining 56% among ten or more websites.
Do the math. If 100 people search for your service in your city, 44 of them click on one of the three businesses in the Map Pack. The other 56 people are divided among all the other results, with most clicking the top few.
This is why appearing in the Map Pack is more valuable than ranking in position four or five in the organic results. Those three Map Pack spots get the lion’s share of attention and clicks.
I remember the first week my business appeared in the Map Pack for my main keyword. My phone started ringing consistently. People would say “I found you on Google Maps” or “You were the closest option that popped up.” The business impact was immediate and measurable.
The Map Pack prioritizes businesses close to the searcher with good reviews and complete information. It’s not about having the oldest business or the biggest marketing budget. It’s about optimization and reputation.
Your WordPress website plays a crucial role in getting into the Map Pack, even though the Map Pack itself pulls from your Google Business Profile. The two work together. Your website provides the foundation of trust and information that supports your profile.
Near me searches exploded in recent years, especially on mobile devices. When someone searches “plumber near me” or “coffee shop near me,” Google shows the Map Pack first. If you’re not optimized for these searches, you’re missing nearly half your potential customers.
I focus more energy on Map Pack optimization than traditional organic rankings now because the return is so much better. A Map Pack listing includes your business name, rating, address, phone number, and a direct link to call or get directions. It’s designed to convert searchers into customers immediately.
What Google’s Local Algorithm Is Actually Looking For (And How to Give It Exactly That)
Google’s goal is simple. Show people the best, most relevant result for their search.
When someone in your city searches for what you offer, Google wants to connect them with the perfect local business. They’re not trying to make this hard for you. They want to help you if you’re genuinely the right answer for that searcher.
I learned to think about local SEO from Google’s perspective. They need to figure out three things. What does this business do? Where are they located? Can they be trusted?
Your WordPress website answers these questions clearly. Every page tells Google what services you provide. Your location appears in multiple places. Customer testimonials and reviews build trust signals.
The businesses that succeed in local SEO are the ones that make Google’s job easy. Clear information. Consistent details. Genuine value for searchers. No tricks, no manipulation, just helpful content that matches what nearby customers need.
I stopped trying to game the system and started focusing on being genuinely useful. My content answers real questions my customers ask. My website loads fast and works perfectly on mobile phones because that’s how most local searches happen. My business information matches everywhere online.
Google rewards this approach with visibility. Not overnight, but consistently over time.
What This WordPress Local SEO Guide Will Help You Build
Everything in this guide comes from three years of testing local SEO on my own service business and a handful of client sites. Some of it surprised me. Some of it took months to figure out. All of it works in the real world, not just in theory.
You’ll learn how to set up your Google Business Profile without making the mistakes that get accounts suspended. I’ll show you which WordPress plugins actually matter for local SEO and which ones waste your time and slow down your site.
I’ll teach you the review strategy that improved my rankings more than any other single tactic. How to get customers to leave reviews that actually help your visibility, not just generic praise that doesn’t move the needle.
We’ll cover technical elements like schema markup, but I’ll explain everything in plain language. You don’t need to be a developer or hire an expensive agency. You just need to follow clear steps and be patient with the process.
By the end of this guide, your WordPress website will be fully optimized for local search. You’ll appear when nearby customers search for what you offer. You’ll have systems in place for ongoing visibility, not just a temporary boost.
The timeline I’m giving you is realistic based on what I’ve seen. With proper optimization, you can start appearing in the Map Pack within two to four weeks. Organic rankings in the regular search results take longer, usually three to six months, but the Map Pack is where most of your customers will find you anyway.
Local SEO isn’t as complicated as most guides make it seem. It’s just different from traditional SEO. You’re not trying to rank globally. You’re trying to dominate your local area for the searches that matter to your business.
I wasted months doing random optimization tasks before I understood the fundamentals. I don’t want you to make the same mistakes. This guide gives you a clear roadmap based on what actually works, not what sounds good in theory.
The goal is simple. When someone in your area needs what you offer and searches on Google, your business appears. They see your location is nearby. They see your good reviews. They click to call or visit. That’s successful local SEO.
Your WordPress website is the foundation. Combined with a properly optimized Google Business Profile and consistent effort over time, you’ll build visibility that brings in customers month after month.
Let’s get started with the fundamentals of how Google actually ranks local businesses. Once you understand the ranking factors, everything else makes perfect sense.
How Google Ranks Local Businesses: The 3 Factors That Actually Matter
I spent my first year doing local SEO completely wrong because I didn’t understand how Google decides which businesses to show in local search results.
I optimized random things. I changed my website colors. I posted on social media constantly. I even redesigned my logo thinking it might help rankings. None of it moved the needle because I was guessing instead of understanding the system.
Then I learned about the core SEO ranking factors Google uses — and specifically how relevance, proximity, and prominence apply to local search. Once I understood these, everything clicked. I finally knew exactly where to focus my time and energy.
Google evaluates every local business based on three main factors: relevance, proximity, and prominence. These aren’t my theories. This is how Google’s algorithm actually works for local search. Every single ranking decision comes down to these three elements.
Let me break down each one based on what I’ve learned from real experience, not just reading about it.
Relevance: Matching What People Search For
Relevance means how well your business matches what someone is searching for.
When a person types “emergency plumber” into Google, the algorithm scans all the plumbers in the area and asks: which ones actually do emergency plumbing work? If your business profile and website clearly indicate you handle emergencies 24/7, you’re relevant. If your information focuses mainly on bathroom remodels, you’re less relevant for that specific search.
I learned this the hard way with my own business. I offered multiple services but talked about all of them equally on my website and Google Business Profile. When someone searched for my main service, Google wasn’t sure if I was the best match because my messaging was diluted.
The moment I focused my content and profile on my core offering, my local relevancy improved dramatically. I started appearing for the searches that actually mattered to my business.
Your WordPress website plays a huge role in establishing relevance. The words you use in your headings, the services you describe in detail, the questions you answer in your content. All of this tells Google what you’re relevant for.
Your Google Business Profile matters just as much. The business category you choose, the services you list, the description you write. These elements must align with your website content. When Google sees consistency across both, it trusts your relevance signals.
I made the mistake of choosing too many categories on my Google Business Profile. I thought more categories meant more visibility. Wrong. It confused Google about my primary offering and hurt my rankings for my main service.
Now I choose one primary category that matches my biggest revenue source and maybe one or two secondary categories. My website content focuses heavily on that primary service. The relevance signals are crystal clear.
Proximity: Why Location Matters (And What to Do If You’re Mobile)
Proximity ranking measures how far your business is from the person searching.
Google heavily weights physical distance in local search results. A person searching “coffee shop” will see results closest to their current location first, assuming those businesses are also relevant and have decent prominence.
This proximity factor is something you cannot change if you have a fixed location. Your business is where it is. But understanding how it works helps you set realistic expectations and make smart decisions.
I have a physical office, so I show up strongly for searches happening near my location. People walking by my building searching on their phones see me at the top. That’s proximity working in my favor.
But what if you don’t have a storefront? What if you’re a service provider who goes to customers instead of having them come to you?
This is where service area optimization becomes critical. Google lets mobile businesses hide their address and instead specify the areas they serve. You can list cities, zip codes, or set a radius around a central point.
I worked with a cleaning service that operates across five neighboring cities. They set up service areas in their Google Business Profile for each city. Then they created dedicated pages on their WordPress website for each location.
This approach works, but you must create genuine unique content for each area. Talk about specific neighborhoods you serve. Mention local landmarks. Include testimonials from customers in that city. Google can detect when you just copy the same content and swap city names.
The proximity factor means you’ll naturally rank better in your immediate area. Don’t fight this. Instead, own your neighborhood. Become the dominant choice for searches happening within a few miles of your location.
How the Local Map Pack Works (And Why It Should Be Your First Priority)
Now let me explain how these three factors come together in the local pack and why this matters so much for your strategy.
The map pack is that box at the top of search results showing three businesses with a map. It appears before the regular organic search listings for most local queries.
To appear in the map pack, you need a Google Business Profile. Your WordPress website alone won’t get you there. But your website supports your profile by reinforcing relevance, building prominence through content and links, and providing detailed information Google uses to understand your business.
The organic search results below the map pack rely more heavily on traditional SEO factors like your WordPress website’s optimization, content quality, and backlink profile.
Here’s why the distinction matters. The map pack is geographically limited. Only businesses in or near the searcher’s area can appear. You’re competing against maybe 20 to 50 other businesses in your city, not thousands nationally.
I’ve helped new businesses appear in the map pack within three weeks of proper optimization. Those same businesses took six months to reach page one of organic search. The map pack is the faster win and generates better results for local businesses.
Your strategy should prioritize map pack visibility first. Perfect your Google Business Profile. Optimize your WordPress site to support it with strong relevance signals. Build reviews steadily to increase prominence. Once you dominate local pack rankings in your area, then invest more energy in climbing organic search positions.
Understanding relevance, proximity, and prominence gives you a clear roadmap. Every optimization task should improve at least one of these three factors. If a task doesn’t impact relevance, proximity strategy, or prominence, it’s probably not worth your time for local SEO.
I used to waste hours on activities that felt productive but didn’t move these core metrics. Now I evaluate every action through this lens. Does this make me more relevant for my target searches? Does it build my prominence? Does it optimize my proximity strategy if I’m a service area business?
That focus is what finally generated consistent results. And it’s what will work for your WordPress local SEO too.
Prominence: Building Your Reputation Online and Offline
Prominence is how Google measures your business’s overall reputation and visibility both online and in your community.
This ranking factor combines multiple signals into an assessment of how well known and trusted your business is. Unlike relevance, which you can fix quickly, prominence takes consistent effort over months to build.
Customer reviews are the single biggest prominence signal for local businesses. A business with 150 reviews has dramatically higher prominence than a business with 12 reviews, even if both have similar average ratings. The quantity, quality, and recency of reviews all matter.
I made review collection my top priority once I understood prominence. I asked every satisfied customer for a review. I made the process easy by sending them a direct link. I responded thoughtfully to every review, both positive and negative.
Getting my first 50 reviews took three months of consistent effort. But once I crossed that threshold, something shifted. I started appearing more frequently in the map pack. My phone rang more often. New customers mentioned they chose me partly because of my reviews.
The timing of reviews matters more than I initially realized. Fresh reviews carry more weight than old ones. A business with 30 reviews from the past two months will often outrank a business with 60 reviews from two years ago. I’ll cover exactly how to build a sustainable review system later in this guide.
Backlinks to your WordPress website contribute significantly to prominence. When other websites link to yours, Google interprets this as a vote of confidence. Local links matter most for local prominence. A link from your city’s chamber of commerce website or a local news article carries more weight than a link from a random national directory.
I built local prominence by getting involved in my community. I sponsored a local event and got a link from the organizer’s website. I wrote a guest article for a local business blog. I got listed in my industry association’s member directory. Each quality local link boosted my prominence.
Brand mentions without links still count. When people talk about your business online, even without linking to your website, Google picks up these signals. Social media mentions, forum discussions, local blog posts that name your business. All of this contributes to prominence.
Your offline reputation eventually shows up online through these prominence signals. Well known businesses in their community naturally accumulate reviews, links, and mentions. You can’t fake this. Real reputation leads to real prominence signals.
I track my prominence growth through review count, referring domains to my website, and brand mention alerts. These metrics move slowly compared to relevance fixes, but steady progress compounds over time.
The prominence factor is why new businesses struggle initially with local SEO. You can nail relevance and proximity immediately, but prominence requires time and genuine reputation building. There’s no shortcut. You need to deliver excellent service, collect reviews consistently, and gradually build your presence in the community.
Later sections of this guide will show you the specific tactics I use for systematic review collection and local link building. For now, understand that prominence is the long game of local SEO. Start early, stay consistent, and the results compound over time.
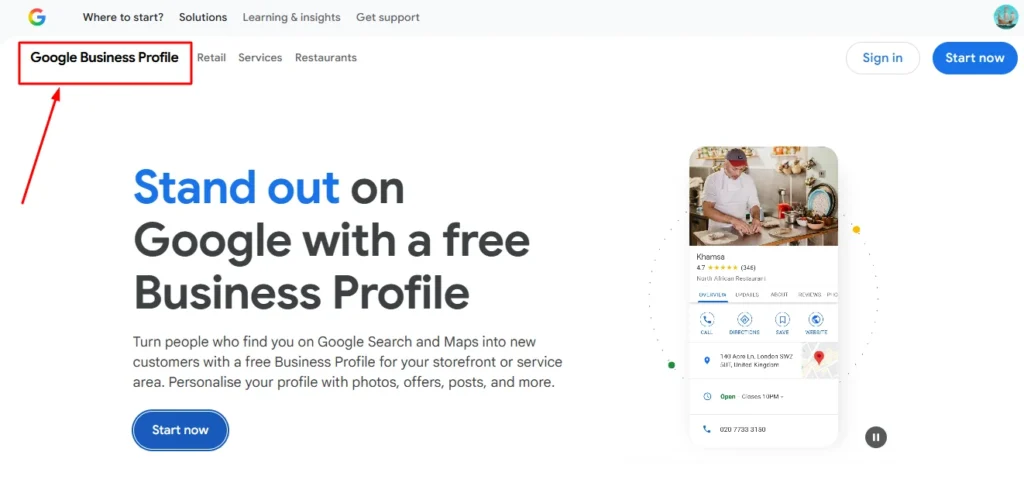
Up Your Google Business Profile (Without Getting Banned)
Your Google Business Profile is the foundation of your entire local SEO strategy. Without it, you cannot appear in the map pack. Without it, you miss out on that 44% of local search clicks I mentioned earlier.
I’m going to walk you through the complete setup process, but more importantly, I’m going to show you how to avoid the mistakes that get accounts suspended or banned. I’ve seen businesses lose months of work because they didn’t know about these traps.
Setting up your Google Business Profile correctly the first time saves you massive headaches later. Get it wrong, and you might find yourself locked out of your account or suspended without warning. I learned these lessons by watching others make mistakes and by making a few myself early on.
The goal here is simple. Create a complete, accurate, verified Google Business Profile that Google trusts and rewards with visibility. Every field filled out. Every piece of information matching your real business exactly. Every policy followed to the letter.
Let me show you exactly how I do this, step by step.
How to Create Your Google Business Profile (Step-by-Step)
The first decision you need to make is whether you’re creating a new profile or claiming an existing one.
Sometimes Google automatically creates a basic listing for your business based on information it finds online. Before you create a brand new profile, search for your business name and location on Google Maps. If a listing already exists, you need to claim it rather than create a duplicate.
Creating duplicate listings is a fast track to suspension. Google hates duplicates. If you find an existing listing for your business, click the “Claim this business” option and go through the ownership verification process.
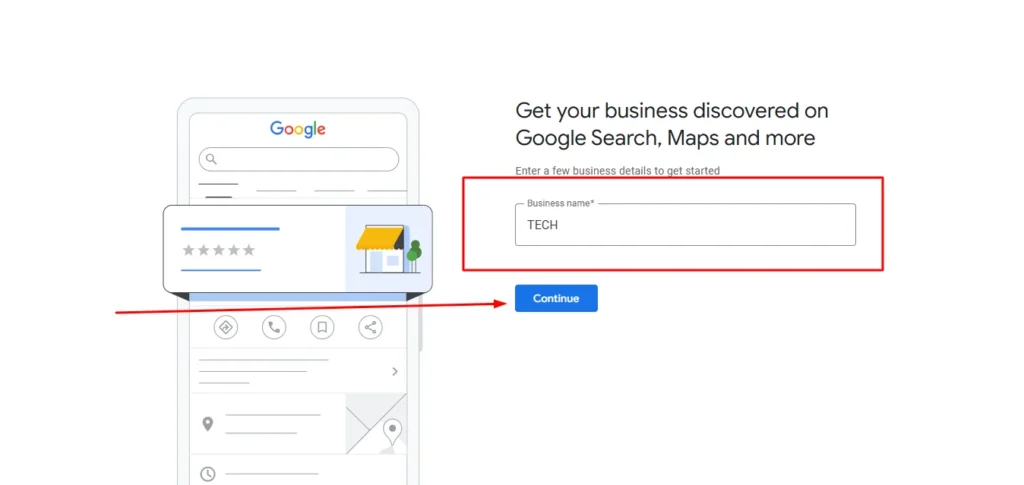
If no listing exists, you’ll create one from scratch. Go to google.com/business and sign in with the Google account you want to use for managing your business. Use a dedicated business email here, not a personal Gmail I’ll explain why when we cover account backup access below.
Click “Add your business to Google” and start filling out the information. The system will ask for your business name first. This is where many people make their first critical mistake.
Use your real, legal business name exactly as it appears on your business license and official documents. Do not add keywords to your business name. Do not write “Smith Plumbing Best Plumber in Austin.” Just write “Smith Plumbing” if that’s your legal name.
I know it’s tempting to stuff keywords into your business name because you see competitors doing it. Resist this temptation. Google suspends accounts for keyword stuffing in business names. I’ll show you the right place to use those keywords later, on your WordPress website where it’s allowed.
Next, you’ll select your business category. This is critically important and I’ll cover category selection in detail in its own section below. For now, choose the single most accurate category that describes your primary business.
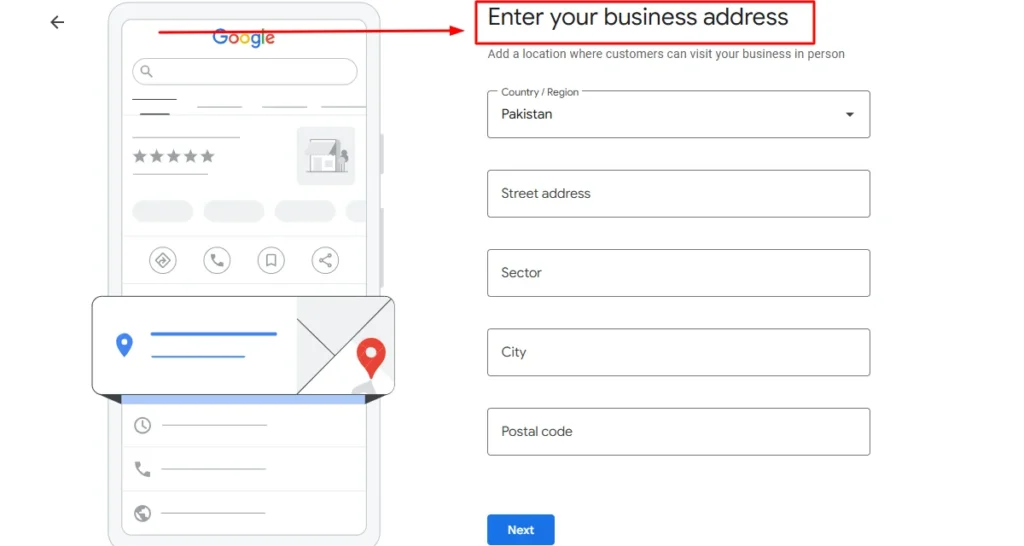
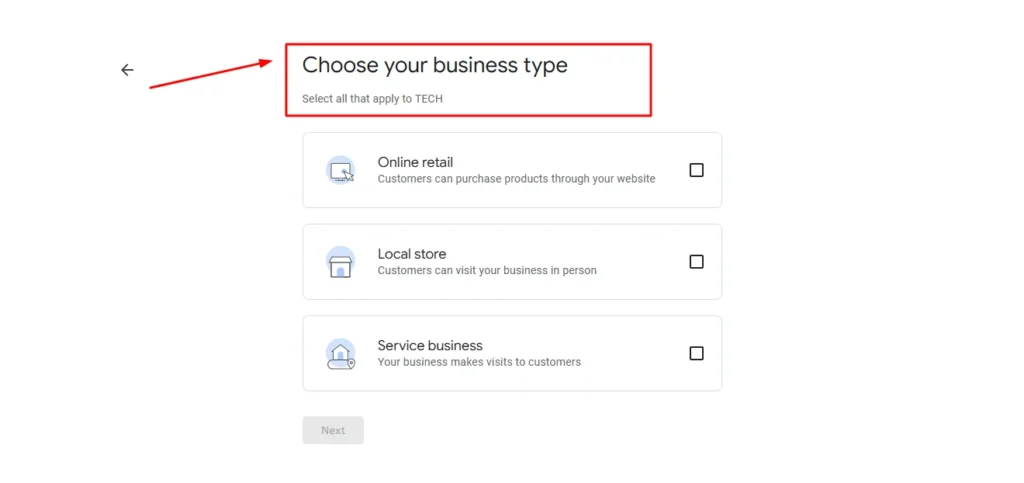
Then you’ll add your location. If customers visit your physical location, enter your street address. If you’re a service area business that goes to customers, you’ll select the service area option instead and hide your address.
Enter your phone number using the same format you use everywhere else online. If your website shows your number as (555) 123-4567, use that exact format in your Google Business Profile. Consistency matters.
Add your website URL. This creates the critical link between your Google Business Profile and your WordPress website. Make sure you enter the correct URL with the right protocol. If your site uses HTTPS, include the S.
The system will guide you through adding business hours, creating a description, and filling out other details. We’ll cover all of these in the completion section. For now, just get through the initial creation process.
The Verification Trap (And How to Avoid Suspension)
Here’s where many businesses crash and burn. The verification process.
After you create your Google Business Profile, Google needs to verify you actually own and operate this business at the location you claimed. They do this by sending a verification code, usually by mail to your business address, though some businesses qualify for immediate phone or email verification.
The trap happens when your verification information doesn’t match your digital footprint. I’ve seen dozens of businesses get suspended immediately after verification because of mismatches they didn’t know mattered.
Google cross-references everything. Your business name on the verification postcard must match your business name in public records. Your address must match your utility bills, business licenses, and tax documents. Even small differences can trigger suspension.
I helped a friend whose business got suspended because their Google Business Profile said “ABC Consulting LLC” but their business license said “ABC Consulting.” The LLC difference was enough. It took six weeks to get the suspension lifted.
Here’s what you need to verify before you even request verification:
Check that your business name on your Google Business Profile exactly matches your business license, incorporation documents, or DBA registration. Word for word. Letter for letter.
Verify your address matches your lease agreement, utility bills, and any official government records associated with your business. If your lease says “Suite 200” but your profile says “Ste 200,” fix it. These tiny differences matter.
Make sure your phone number is actually registered to your business and shows up in public business databases. A personal cell phone number with no business association can raise red flags.
Your business website should already be live and showing the same business name, address, and phone number that’s on your Google Business Profile. Google checks this.
I recommend gathering these documents before you start the verification process: your business license, a recent utility bill, your lease or property deed, and your business insurance documents. Have them ready in case Google asks for additional verification.
When the verification postcard arrives, enter the code exactly as shown. Don’t wait weeks to enter it. The code expires. Enter it within a few days of receiving the postcard.
If your verification gets rejected or your account gets suspended, don’t panic. You can appeal. But prevention is so much easier than appealing. Match your information exactly across all documents and you’ll avoid this trap entirely.
Protecting Your Account Access (The Backup Admin Trick)
I’m about to share something that saved a business owner I know from losing access to years of reviews and rankings.
Most people create their Google Business Profile, verify it, and never think about account security again. Then one day they can’t access the email account they used to set it up. Maybe they left their job and lost their work email. Maybe they forgot the password to an old Gmail account. Maybe their email got hacked.
Without access to that original email, recovering your Google Business Profile is incredibly difficult. It can take months of back and forth with Google support. During that time, you can’t update your hours, respond to reviews, or manage your listing at all.
The solution is simple but almost nobody does it. Add a second admin user to your Google Business Profile immediately after verification.
Here’s exactly how to do this. Log into your Google Business Profile and go to the Users section in the left menu. Click “Add users” and enter the email address of someone else you trust, or create a second business email account specifically as a backup.
Give this backup user “Owner” level access, not just Manager. Owner access means they can do everything, including adding or removing other users. This is important because if you lose access to your primary account, the backup owner can still manage everything and add you back in.
I use a dedicated backup Gmail account that I created just for this purpose. It’s not my personal email. It’s not an employee’s email that might change. It’s a backup account with its own secure password stored safely.
The recovery email and phone number for that backup account are different from my primary account. This way, if something compromises one account, the other remains secure.
Setting this up takes five minutes. Not doing it could cost you your entire local SEO presence if something goes wrong with your primary access.
I learned this the hard way when I helped a restaurant owner who had lost access to the email account that controlled their Google Business Profile. They had 280 reviews and appeared first in the map pack for their main keyword. But they couldn’t respond to a negative review because they were locked out.
It took seven weeks to regain access through Google’s recovery process. Seven weeks of not being able to manage their most important online asset. Don’t let this happen to you.
Choosing Your Primary Category (Your Most Important Decision)
Your primary business category is the single most important setting in your entire Google Business Profile.
This one selection influences which searches you appear in more than almost anything else you do. Choose wrong, and you’ll rank for searches that don’t bring you customers. Choose right, and you’ll appear for exactly the searches that matter to your business.
Google offers hundreds of business categories. You can choose one primary category and up to nine additional categories. But that primary category carries the most weight by far.
I made the mistake of choosing a broad category when I first set up my profile. I thought a broader category would help me appear in more searches. Wrong. It diluted my relevance and I ranked poorly for everything.
The moment I changed to a specific, narrow primary category that exactly matched my core service, my rankings improved within days. Suddenly I appeared in the map pack for searches that actually brought me customers.
Here’s how to choose your primary category strategically.
First, think about the single service or product that generates the most revenue for your business. Not what you wish people bought. What they actually buy most often.
Search for businesses like yours in other cities. Look at what primary categories the top ranking businesses use. This competitive research shows you what works.
Use the exact language your customers use when searching. If people search for “tax preparer” but the category options include both “tax preparer” and “accountant,” check which category your successful competitors use and which one Google seems to favor for your target searches.
You can test this by searching your main keyword plus your city and seeing which categories appear most often in the map pack results. Those are the categories Google associates with that search term.
Local keyword research helps validate your category choice. If you want to rank for “emergency dentist” searches, make sure your primary category is “emergency dental service” not just “dentist” if both options exist.
I’ve seen businesses with identical services rank completely differently based solely on primary category selection. One home cleaning business used “house cleaning service” as primary. Another used “commercial cleaning service.” They offered the same services, but the first one appeared for residential searches and the second one showed up for commercial searches.
Your primary category tells Google what you are. Make it as specific and accurate as possible for your main revenue source.
After you choose your primary category, you can add secondary categories for other services you offer. But don’t go crazy. I recommend two to four secondary categories maximum. Too many categories confuses Google about what you actually specialize in.
If you ever change your primary category, expect your rankings to fluctuate for a few weeks as Google reassesses your relevance for different search terms. Don’t change it frequently. Get it right the first time based on research.
Filling Out Every Field (100% Completion is a Ranking Signal)
Google cannot rank you properly if it doesn’t fully understand your business operations.
An incomplete Google Business Profile sends a signal of uncertainty. Google doesn’t know if you’re a legitimate business. It doesn’t know when you’re open. It doesn’t know what services you offer beyond the basic category.
Complete profiles consistently outrank incomplete profiles in local search results. I’ve tested this with multiple businesses and the pattern holds every time.
I treat my Google Business Profile like a job application. Every field gets filled out completely and accurately. Nothing left blank unless it genuinely doesn’t apply to my business.
Here’s the checklist I work through for every Google Business Profile I set up:
Business name is filled out with the legal name exactly as it appears on official documents.
Primary category is selected based on the strategic approach I explained above.
Address is complete with suite or unit number if applicable, matching exactly how it appears on official documents.
Service area is defined if I’m a mobile business, listing all cities or zip codes I genuinely serve.
Phone number is entered consistently with how it appears everywhere else online.
Website URL is correct and points to my WordPress homepage or a dedicated landing page.
Opening hours are set for every day of the week, including special hours for holidays. I update these whenever hours change.
Business description uses all available characters to explain what I do, what makes me different, and keywords I want to rank for, written naturally for humans.
Services are listed individually with descriptions. This section is gold for adding keyword-rich content that helps with relevance.
Attributes are selected for applicable features like “wheelchair accessible” or “free wifi” or “accepts credit cards.”
Opening date is added if I’m a new business, showing Google how established I am.
Photos are uploaded with at least 10 high quality images showing my business exterior, interior, team, products, or services. More photos is better.
Products or menu items are added if applicable to my business type. Restaurants should add menu items. Retail stores should add products.
The services section deserves special attention. Most businesses leave this blank or add one generic line. I add every specific service I offer with a detailed description for each one.
For example, instead of just listing “plumbing,” I add separate entries for “drain cleaning,” “water heater installation,” “emergency plumbing,” “bathroom remodeling,” and every other specific service. Each gets its own description using natural language that includes relevant keywords.
These service descriptions act like mini landing pages within your Google Business Profile. They help you rank for specific long tail searches that match those services.
The business description field gives you 750 characters. Use all of them. Explain what you do, who you serve, what areas you cover, and what makes you different. Write it for humans first, but naturally include your important keywords and location names.
Opening hours markup happens automatically when you set your hours in Google Business Profile. This structured data helps Google show your hours in search results and know when you’re available.
I update my hours immediately whenever they change. Holiday hours, special event hours, temporary closures. Keeping this current builds trust with both Google and potential customers.
Profile completion is not a one-time task. I check my Google Business Profile monthly to add new photos, update services, and make sure everything still reflects my current business accurately.
The integration between your Google Business Profile and WordPress website matters too. The information should match across both platforms. Your business name, address, phone number, and services should be consistent between your profile and your website.
I actually built a simple page on my WordPress site that mirrors my Google Business Profile information. This reinforces the connection between the two and provides another opportunity for Google to verify my business details.
A complete, accurate, well maintained Google Business Profile is your ticket to local visibility. Treat it with the care and attention it deserves. Fill out every applicable field. Keep information current. Follow Google’s guidelines exactly.
This foundation makes everything else in local SEO easier and more effective.
How to Choose the Best Local SEO Plugin for WordPress
Picking the right local SEO plugin for WordPress confused me for months when I first started. Every plugin claimed to be the best. Every comparison article seemed sponsored. I tried four different plugins before I finally understood what actually mattered.
Let me save you that trial and error process.
A local SEO for wordpress plugin helps automate the technical work of optimizing your site for local search. The main job these plugins do is adding structured data to your website so Google understands your business type, location, and operating details.
Structured data is code that sits in your website’s backend. You don’t see it when you visit the site, but search engines read it to understand what your business is and where you’re located. I’ll explain this more in the schema markup section, but for now, know that plugins make this much easier than coding it manually.
Here’s what surprised me. Most WordPress SEO plugins do roughly the same core tasks. The differences come down to interface design, specific features, and whether certain capabilities are free or paid.
I’m going to give you honest comparisons based on plugins I’ve actually used. Not marketing copy. Real pros and cons from hands-on experience.
Yoast Local SEO: Best for Beginners and Single Locations
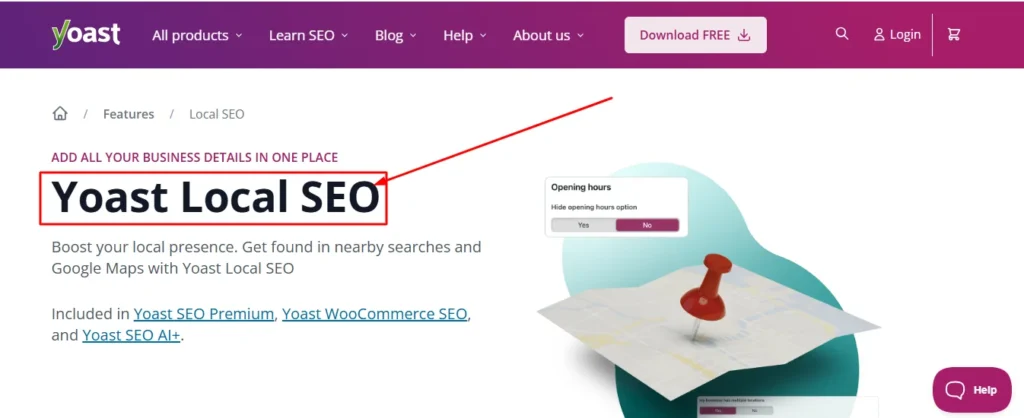
Yoast Local SEO is the plugin I started with, and for good reason. It’s designed specifically for local businesses and makes the setup process incredibly straightforward.
The interface walks you through every step. You enter your business name, address, and phone number in clearly labeled fields. You select your business type from a dropdown menu. You add your opening hours using a visual schedule builder. The plugin handles all the technical structured data implementation automatically.
I had my first local business site fully configured with Yoast Local SEO in under 30 minutes. The documentation is excellent. Every setting includes a help icon that explains exactly what it does and why it matters.
Yoast Local SEO creates a dedicated location page on your WordPress site automatically. This page displays your business information, a map, and your opening hours in a clean, professional layout. You can customize the design to match your site’s look.
For single location businesses, this plugin is perfect. Everything you need is included. The setup is beginner friendly. The ongoing maintenance is minimal.
The downsides? Yoast Local SEO is a premium plugin. You have to pay for it. The free version of Yoast SEO doesn’t include local features. You need the paid Local SEO extension.
For my single location business, the cost was worth it for the time it saved and the confidence it gave me that the technical implementation was correct. But if you’re on a tight budget, this might not be your first choice.
Another limitation is that Yoast Local SEO is somewhat overkill if you only need basic schema markup. It includes features like store locator functionality and multiple location management that single location businesses never use.
The plugin does slow down your site slightly because it adds functionality you may not need. I measured a small performance hit when I first installed it, though proper caching minimized the impact.
For beginners with a single physical location and budget for a premium plugin, Yoast Local SEO is my top recommendation. The ease of use alone justifies the cost if you value your time.
AIOSEO: Best for Multiple Locations and Scalability
All in One SEO, commonly called AIOSEO, is the plugin I switched to when I started managing multiple business locations.
AIOSEO handles multi-location businesses better than any other WordPress plugin I’ve tested. You can create separate location entries for each business address, each with its own schema markup, opening hours, and contact information.
The location management interface is clean and organized. Adding a new location takes just a few clicks. The plugin automatically generates individual location pages and creates proper schema markup for each one.
I currently manage a client with seven locations using AIOSEO. Each location appears correctly in local search results for its specific area. The schema implementation is clean and validates perfectly in Google’s testing tools.
AIOSEO also includes excellent Google Maps integration. The plugin connects directly to Google’s API and embeds maps automatically on your location pages. The maps are customizable with your brand colors and styling.
The broader AIOSEO plugin includes comprehensive SEO features beyond just local optimization. You get schema markup for multiple content types, XML sitemap generation, and detailed on-page analysis. It’s a complete SEO solution, not just a local plugin.
The learning curve is steeper than Yoast. AIOSEO has more settings and options, which means more flexibility but also more complexity. It took me a few hours to fully understand all the features and configure everything optimally.
Pricing is the other consideration. AIOSEO’s local features are only available in their paid plans. For multiple locations, you need their higher tier plan, which costs more than Yoast.
But if you manage multiple locations or plan to scale your business to multiple locations, AIOSEO is worth every penny. The time savings in managing multiple location schemas and the built-in Maps functionality pay for themselves.
I appreciate that AIOSEO doesn’t create dependency on their plugin for critical SEO data. If you ever switch plugins, your content and settings can migrate relatively cleanly.
For single location businesses, AIOSEO might be more than you need. But for multi-location operations or agencies managing multiple client sites, it’s the best option I’ve found. If you’re still weighing these two plugins side by side, our All in One SEO vs Yoast comparison breaks down every key difference to help you decide.
Rank Math: Best Free Alternative
Rank Math changed my perspective on what’s possible with free WordPress plugins.
The free version of Rank Math includes local SEO schema markup features that other plugins charge for. You can set up your business type, add your location information, and implement proper structured data without spending a dollar.
I tested Rank Math extensively on a client site where budget was extremely tight. The local SEO implementation worked perfectly. Google recognized the schema markup. The business appeared in local search results with rich snippets showing their hours and location.
The schema builder in Rank Math is powerful and flexible. You can create schema for local businesses, service areas, multiple locations, and various other business types. All from the free version.
Rank Math also includes a full SEO plugin with features like keyword optimization, sitemap generation, and redirects management. You’re getting a complete SEO solution for free.
The interface is where Rank Math loses points for me. It’s cluttered. There are so many options, settings, and features crammed into the dashboard that finding what you need takes time. New users often feel overwhelmed.
I spent probably twice as long configuring Rank Math compared to Yoast because I had to hunt through menus and figure out where specific settings lived.
The local SEO features are less polished than the premium plugins. There’s no automatic location page generation. No built-in store locator. No direct Google Maps API integration. You can add these features manually, but the plugin doesn’t automate them.
Support and documentation are adequate but not exceptional. The free plugin comes with community forum support only. If you run into technical issues, you’re mostly on your own to figure them out.
For businesses that want solid local SEO structured data without paying for a plugin, Rank Math is excellent. You sacrifice some convenience and polish, but the core functionality works well.
I recommend Rank Math for technically comfortable users who don’t mind spending extra time on setup and configuration. If you’re willing to learn the interface and manually handle some elements the premium plugins automate, you’ll save money without sacrificing SEO effectiveness.
Manual Setup: No Plugin Required
I’m a fan of plugins for most users, but some developers prefer complete control over their code.
If you’re comfortable editing PHP files and working with JSON-LD structured data, you don’t actually need a plugin for local SEO. You can add the schema markup manually to your WordPress theme.
I’ve implemented manual local schema on a few custom-built sites where adding another plugin would have hurt performance. The core schema for a local business is relatively simple code that you can add to your header or footer template.
The advantage of manual implementation is zero plugin overhead. No extra database queries. No additional HTTP requests. Your site stays lean and fast.
You also get complete control over exactly what schema properties you include and how they’re formatted. Premium plugins sometimes add schema elements you don’t need. Manual implementation lets you include only what’s relevant.
The disadvantage is maintenance. Every time you change your business hours, update your phone number, or modify your address, you need to manually edit code files. With a plugin, you change it once in the settings interface.
Manual schema implementation also requires you to stay current with schema.org standards and Google’s requirements. These occasionally change. Plugins update automatically to reflect new best practices.
I only recommend manual setup if you’re a developer who enjoys working directly with code and wants maximum site performance. For everyone else, plugins are the smarter choice.
In the next section on schema markup, I’ll provide code examples for anyone interested in the manual approach. But most readers should stick with one of the plugin options above.
Free vs. Premium: Which Local SEO Plugin Is Worth the Money?
This is the question everyone asks. Can you succeed with free plugins or do you need to invest in premium options?
The honest answer depends on three factors: your business type, your technical comfort level, and your budget.
For single location businesses with a small budget and willingness to learn, Rank Math’s free version provides everything you absolutely need for local SEO. The schema markup works. Google reads it correctly. You’ll rank just fine.
For single location businesses that value time over money and want the smoothest experience, Yoast Local SEO is worth the investment. The time you save in setup and ongoing management pays for the plugin cost within a few months.
For multi-location businesses, you realistically need a premium solution. Managing multiple location schemas and keeping everything organized is painful without proper tools. AIOSEO’s paid plans are worth it for this use case.
Your technical skill matters too. If you’re comfortable with WordPress, reading documentation, and troubleshooting issues, free plugins work fine. If you prefer straightforward interfaces and want everything to just work, premium plugins offer that peace of mind.
I started with free tools when I was learning. As my business grew and my time became more valuable, I switched to premium plugins for the convenience. Both approaches can work.
Here’s my decision framework. If you’re just starting out, begin with Rank Math free. Learn how local schema works. See results. If you find yourself frustrated by the interface or wishing for easier management, upgrade to Yoast Local SEO or AIOSEO.
If you’re managing multiple locations from day one, skip the free options and go straight to AIOSEO. The time savings justify the cost immediately.
If you’re a developer building sites for clients, invest in premium plugins. Your clients get better results faster, and you can charge accordingly for professional implementation.
The worst approach is installing five different SEO plugins trying to get features from each. This slows your site, creates conflicts, and confuses Google with duplicate schema markup. Pick one plugin and configure it properly.
Whatever plugin you choose, the real work is filling in accurate information about your business and keeping it updated. The plugin is just a tool. Your knowledge of your business and your local market is what actually drives rankings.
In the next section, I’ll show you exactly how to implement local business schema regardless of which plugin you choose.
Adding Local Business Schema to Your WordPress Site
Schema markup was the most confusing part of local SEO when I started. Everyone said I needed it, but nobody explained what it actually was in plain English.
Let me break this down in a way that finally made sense to me after months of confusion.
Schema markup is code you add to your website that tells search engines specific facts about your business. It’s like creating a data card that Google can read instantly instead of trying to guess what your business does by reading all your content.
Without schema markup, Google has to scan through your entire website trying to figure out your business name, address, phone number, hours, and what type of business you are. With schema markup, you hand Google all that information in a standardized format it can read in milliseconds.
This matters because Google uses schema data to create those rich results you see in search. The business listings that show hours, ratings, and location directly in search results? That’s schema markup at work.
I’m going to show you exactly how to implement local business schema on WordPress, whether you use a plugin or prefer manual code. More importantly, I’ll show you how to verify it’s working correctly so you don’t waste time with broken implementation.
What Is Schema Markup? (And Why Top-Ranking Local Businesses All Use It)
Schema markup is structured data written in a specific format that search engines understand universally.
Think of it this way. When you write “We’re open Monday through Friday from 9am to 5pm” on your website, that’s content humans can read. But Google’s algorithm has to interpret that sentence, figure out which days you mentioned, convert the times to a standard format, and hope it understood correctly.
When you use schema markup, you tell Google directly in its language: Monday is a work day, hours are 09:00 to 17:00, Friday is a work day, hours are 09:00 to 17:00. No interpretation needed. No guessing. Just clear, structured information.
The schema data doesn’t appear visibly on your website. It sits in your page code where search engines can read it but visitors don’t see it. It’s purely for communicating with search engines.
I remember the first time I implemented schema correctly and then searched for my business. Instead of just showing my website link, Google displayed a rich information panel with my business name, exact address, phone number with a click to call button, customer rating, hours, and a map. That data card appeared because of schema markup.
Schema.org is the organization that maintains the standardized vocabulary for structured data. Google, Microsoft, Yahoo, and other search engines all agreed to use Schema.org standards. When you implement schema following their guidelines, every search engine can read it.
For local businesses, the most important schema type is LocalBusiness. This schema type tells search engines you’re a physical business that serves customers at a specific location or within a service area.
The structured data format most commonly used for schema is called JSON-LD. It’s a way of writing the data that’s easy for both humans and machines to read. Plugins handle writing JSON-LD for you automatically. If you code it manually, you write it in JSON-LD format.
Google can technically rank your website without schema markup. But you’ll miss out on rich results, knowledge panels, and the trust signals that come from providing clear structured data. In competitive local markets, sites with proper schema consistently outrank sites without it.
I tested this myself by removing schema from one of my business sites for a month. My rankings didn’t crash, but my click-through rate from search results dropped significantly because my listing looked plain compared to competitors with rich snippets showing hours and ratings.
Schema markup isn’t just for ranking. It’s for visibility and clicks. Your listing stands out more. Searchers get useful information before they even click. It builds trust and improves your conversion rate from search.
Adding LocalBusiness Schema to WordPress (Plugin vs. Manual)
There are two ways to add local business schema to WordPress. Use a plugin that handles it automatically, or add the code manually to your theme files.
I’ve done both. For most people, the plugin route is smarter. It’s faster, less technical, and easier to maintain. But I’ll show you both approaches so you can choose what fits your situation.
Using a Plugin for Schema Implementation
If you’re using one of the plugins I recommended in the previous section, schema implementation is mostly automated. Let me walk through the basic process for each.
With Rank Math, go to your WordPress dashboard and find Rank Math in the left menu. Click on Titles and Meta, then select Local Business. Enable local SEO and you’ll see fields for your business information.
Enter your business name exactly as it appears on your Google Business Profile. Add your complete address with street, city, state, and zip code. Put in your phone number using consistent formatting.
Choose your business type from the dropdown menu. Rank Math offers dozens of options based on Schema.org types. Pick the most specific option that matches your business. If you’re a restaurant, select Restaurant, not just Food Establishment.
Add your opening hours for each day of the week. The plugin creates opening hours markup automatically in the correct schema format. Include special hours if your schedule varies.
Add your geographic coordinates. You can find these by searching your address on Google Maps and copying the latitude and longitude from the URL. This helps Google place you precisely on maps.
For Yoast Local SEO, the process is similar but with a slightly different interface. After installing the plugin, go to SEO, then Local SEO in your WordPress menu. The setup wizard walks you through entering all your business details.
Yoast automatically generates a location page on your site that displays your information with embedded schema. You can customize the design to match your theme.
AIOSEO follows a comparable pattern. Navigate to All in One SEO, then Local SEO. Fill in your business information in the clearly labeled fields. AIOSEO handles all the JSON-LD code generation behind the scenes.
All three plugins add the schema markup to your website’s header section automatically. You don’t need to touch any code files or templates. Just fill in the information through the plugin settings and save.
The plugins also let you add multiple properties beyond the basics. You can specify if you accept reservations, what payment methods you take, your price range, and dozens of other attributes. Include everything that applies to your business.
Manual Schema Implementation
For developers who want direct control, manual schema implementation gives you complete customization and avoids plugin overhead.
The schema code goes in your theme’s header.php file or in a custom function hooked to wp_head. I prefer using a child theme’s functions.php file to add the schema so theme updates don’t overwrite it.
Here’s a simplified example of LocalBusiness schema in JSON-LD format. This is educational code to show you the structure, not a complete copy-paste solution.
The code starts with a script tag marking it as JSON-LD. Then you define the context as Schema.org and the type as LocalBusiness or a more specific subtype like Restaurant, Dentist, or LegalService.
Include properties for name, which is your business name. Add an address property with your street address, city, state, postal code, and country. Include telephone with your phone number.
The opening hours markup requires an array of opening hours specifications. Each day or day range gets an entry with the days of week and opening and closing times in 24 hour format.
Add geo coordinates with latitude and longitude properties. Include your website URL. You can add image URLs pointing to photos of your business.
The manual code gives you precise control over every property. You can add only what’s relevant to your business and exclude everything else. This keeps your schema lean and focused.
The downside is maintenance. When your hours change or you update your phone number, you have to edit code files instead of just changing a plugin setting. For businesses with frequently changing information, plugins are more practical.
I use manual schema on sites where performance is critical and I know the business information stays relatively stable. For most clients, I implement schema through plugins for easier ongoing management.
Essential Schema Properties to Include
Certain schema properties are required for local business schema to work correctly. Others are optional but enhance your listing.
The required properties Google needs are business type, name, address, and telephone. Without these four, your schema is incomplete and may not generate rich results.
Business type should be as specific as possible. Instead of just LocalBusiness, use Restaurant, HairSalon, AutoRepair, or whatever specific type matches your business. Schema.org has hundreds of business types.
Name is your business name exactly as it appears everywhere else. Don’t add keywords or promotional language. Just the real name.
Address must include street address, city, state or province, postal code, and country. Write it in the format Google expects with each component separated.
Telephone should include your primary business phone number. Use a consistent format. I prefer including the country code for maximum clarity.
Beyond these required fields, several optional properties significantly improve your schema effectiveness.
Opening hours markup is technically optional but practically essential. Telling Google when you’re open helps your listing appear for time-sensitive searches. It also displays your hours directly in search results, which builds trust and reduces wasted calls during closed hours.
The opening hours format specifies days of the week and times. You can define different hours for different days. If you’re closed certain days, mark them as closed rather than leaving them out.
Geographic coordinates pinpoint your exact location. Latitude and longitude help Google show you accurately on maps. You can find these by right-clicking your location in Google Maps and selecting the coordinates that appear.
URL points to your website homepage or a specific landing page. This creates the link between your schema and your WordPress site.
Image URLs can include photos of your business exterior, interior, products, or team. Rich results sometimes display these images, making your listing more visually appealing.
Price range indicates how expensive your business is using dollar signs. One dollar sign means inexpensive, four means very expensive. This helps set customer expectations.
Accepts reservations is a yes or no property indicating whether customers can book in advance. Useful for restaurants, salons, and appointment-based businesses.
Payment methods accepted tells customers if you take credit cards, cash, or other payment types. Not critical for rankings but helpful for user experience.
Service area defines the geographic regions you serve. Essential for mobile businesses without a physical location customers visit.
Aggregate rating shows your average rating and number of reviews. This must pull from legitimate reviews on your site or Google Business Profile. Don’t fake this data.
The more accurate, complete information you provide through schema properties, the better Google understands your business and the richer your search results become.
I include every applicable property when setting up schema. It takes an extra 15 minutes during setup but pays off in more prominent search listings and better user experience.
How to Validate Your Schema (Google Rich Results Test)
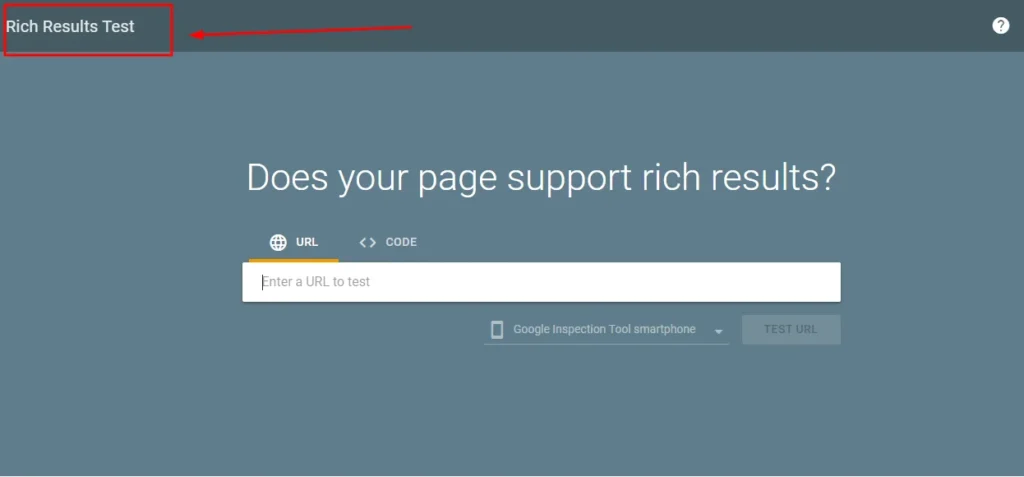
Adding schema to your site is only half the job. You must verify it’s implemented correctly or you’re wasting your time.
I learned this lesson when I thought I had schema working perfectly, but it was actually broken for three weeks before I discovered the error. My rankings suffered during that time because Google couldn’t read my business information.
Google provides a free tool called Rich Results Test that checks your schema implementation. I use this tool every single time I add or modify schema markup.
Go to search.google.com/test/rich-results and enter your website URL. The tool fetches your page and analyzes all the schema markup it finds.
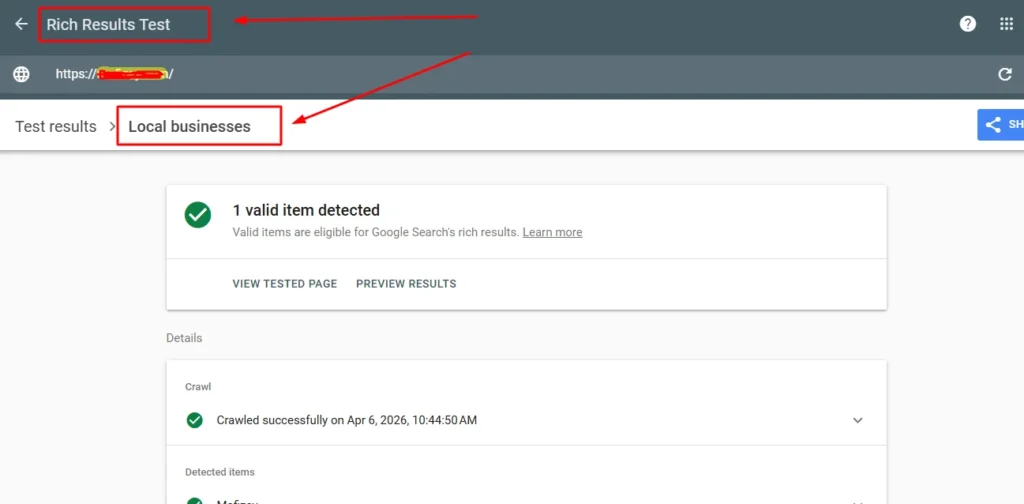
Within seconds, you’ll see results showing which schema types the tool detected and whether they’re valid. For local business schema, you should see LocalBusiness or your specific business type listed.
Click on the detected schema type to expand the details. The tool shows you every property it found and the values for each. Scan through this list to verify everything is correct.
Check that your business name matches exactly what you intended. Verify the address is complete and accurate. Confirm the phone number is correct. Make sure opening hours show the right days and times.
The tool flags errors in red and warnings in yellow. Errors mean something is broken and must be fixed. Warnings suggest improvements but won’t necessarily prevent rich results.
Common errors I see include missing required properties, malformed phone numbers, incorrect date formats for opening hours, and broken JSON syntax if you coded it manually.
If the tool shows errors, fix them immediately. Go back to your plugin settings or your manual code and correct the issues. Then test again until you get a clean validation.
I keep testing until I see green checkmarks on all required properties. Sometimes this takes three or four iterations of fixing errors and retesting.
After your schema validates correctly, check back in a week and test again. Sometimes errors creep in from plugin updates, theme changes, or other site modifications. Regular validation ensures your schema stays healthy.
You can also test your schema by viewing your page source code. Right-click your page and select View Page Source. Search for “application/ld+json” and you’ll find your schema code. It should be readable and properly formatted.
The effort you put into schema validation pays off when Google starts showing rich results for your business. Your listings become more prominent, informative, and clickable than competitors without proper schema.
Schema markup is technical, but the plugins make it approachable for non-developers. Whether you use a plugin or code it manually, the key is implementing it completely, accurately, and validating it works correctly.
This foundation of proper schema supports everything else you do for local SEO. It’s how you communicate clearly with Google about who you are, what you do, and where you operate.
Embed Google Maps on Your WordPress Contact Page
Embedding Google Maps on your WordPress site does more than just help visitors find you. It sends powerful location verification signals to Google that strengthen your local SEO.
I remember the week I added Google Maps to my contact page. Within days, my business started appearing more consistently in location-based searches. The map created a direct connection between my website and my physical location that Google could verify instantly.
The process of adding maps to WordPress is straightforward, but where you place them and how you configure them matters. I’m going to show you exactly how to generate the embed code and the strategic places to add maps on your site.
How to Generate Your Google Maps Embed Code
Getting your Google Maps embed code takes about two minutes once you know the steps.
Go to google.com/maps in your web browser. Type your business address into the search box and press enter. Google will display your location on the map with a marker.
Click on your business listing if it appears, or just click the red marker showing your location. A sidebar will open with information about that location.
Look for the Share button. Click it and you’ll see options for sharing the map. Select the Embed a map tab at the top of the popup window.
Google shows you a preview of how the embedded map will look. Below that preview, you’ll see different size options: small, medium, large, or custom size. I typically use medium for most pages, but you can choose based on your design.
The HTML code appears in a box below the size options. This is your embed code. Click the Copy HTML button to copy it to your clipboard.
That’s it. You now have the code you need to add an interactive Google Map to any page on your WordPress site.
One important detail I learned through testing: make sure you’re logged into the Google account associated with your Google Business Profile when generating this code. It ensures the map shows your verified business location with all the correct details.
The embed code is an iframe, which is basically a window that displays Google Maps content within your webpage. It’s completely safe to use and won’t slow down your site significantly.
I keep a copy of my embed code saved in a text file so I don’t have to regenerate it every time I need it. Just paste it once and save it somewhere for future use.
Where to Place Maps on Your WordPress Site
Strategic map placement amplifies your local SEO signals and improves user experience.
Your contact page is the primary location for embedding Google Maps. This is where visitors expect to find your address and directions. It’s also where Google looks first for location verification signals.
I create a dedicated contact page on every local business WordPress site I build. The page includes my business name, full address, phone number with click to call functionality, email address, contact form, business hours, and the embedded Google Map.
The map goes above the fold whenever possible. I want visitors to see it immediately without scrolling. This helps people quickly determine if my location works for them.
To add the map to your WordPress contact page, edit the page in your WordPress editor. Switch to the HTML or code view if you’re using the classic editor, or add a Custom HTML block if you’re using the block editor.
Paste your Google Maps embed code directly into the HTML area. Save the page and preview it. The map should appear interactive and functional.
For multi-location businesses, I create a separate location page for each physical address. Each page gets its own unique Google Map showing that specific location.
These individual location pages are critical for multi-location local SEO. Each page should have unique content about that location, not just a copied template with the address swapped.
Some businesses ask me about adding maps to their footer so it appears on every page. I have mixed feelings about this approach.
The advantage is sitewide location visibility. Every page reinforces your address and location. The disadvantage is added page weight on every page load, which can impact site speed.
I generally recommend footer maps only for businesses where location is absolutely critical to every visitor interaction, like retail stores or restaurants. For service businesses, a prominent contact page map is usually sufficient.
About pages are another good placement option. When people visit your about page to learn who you are, showing your physical location builds credibility and local connection.
Location pages for cities you serve should also include maps, but these are typically embedded maps showing the service area or a map highlighting the city you’re targeting, not your physical address.
The key principle is intentional placement. Every map you embed should serve a purpose, either for user experience or for sending location signals to Google. Don’t just scatter maps everywhere hoping it helps SEO.
Using WordPress Map Plugins for Advanced Features
Basic Google Maps embeds work well for simple needs, but plugins offer advanced functionality for complex situations.
WP Google Maps is a popular plugin I’ve used for clients who need custom map styling, multiple location markers on a single map, or advanced features like directions and nearby location searches.
This plugin lets you create unlimited maps, add custom markers with your brand colors, include location descriptions in map popups, and even restrict maps to show only specific areas or zoom levels.
For businesses with multiple locations, WP Google Maps can display all locations on one master map with individual markers. Visitors can click each marker to see that location’s details and get directions.
I used this exact setup for a client with 12 retail locations across their state. One map on their locations page showed all stores. Visitors could find the nearest one at a glance.
Mapbox is another plugin option that offers even more design customization. If your brand has specific visual requirements and you want your map to match your site design perfectly, Mapbox gives you that control.
The tradeoff with these advanced plugins is complexity and sometimes cost. WP Google Maps has free and premium versions. The free version covers basic multi-location needs. Premium unlocks advanced features.
For most single-location businesses, the standard Google Maps embed is sufficient. You don’t need a plugin. Save yourself the complexity and potential performance impact.
I only recommend map plugins when you have specific requirements the basic embed can’t handle. Multiple locations on one map, custom marker designs, location filtering, or integration with store locator functionality.
Whatever approach you choose, the embedded map should load quickly, display correctly on mobile devices, and show accurate location information. Test it on multiple devices and browsers to ensure it works everywhere.
The Google Maps integration on your WordPress site creates a visible, verifiable connection between your website and your physical location. This signals to both users and search engines that you’re a legitimate local business at a real address.
Fix Your NAP Consistency Problem (Before It Kills Your Rankings)
NAP consistency is one of those local SEO factors that seems simple but trips up almost every business I work with.
NAP stands for Name, Address, and Phone number. Consistency means these three pieces of information appear exactly the same everywhere they’re published online. Same format. Same spelling. Same abbreviations.
I’ve seen businesses lose rankings they worked months to achieve because of small NAP inconsistencies they didn’t know existed. One client used “Street” on their website but “St” on their Yelp listing. That tiny difference hurt their local rankings until we fixed it.
Google uses NAP consistency to verify your business is legitimate and to build confidence in the information it shows searchers. Inconsistent information raises red flags and reduces trust.
Let me show you exactly how to audit your NAP, find problems, and fix them systematically.
What is NAP Consistency? (And Why One Wrong Letter Kills Rankings)
NAP consistency means your business name, address, and phone number match character for character across every place they appear online.
Your website, Google Business Profile, Facebook page, Yelp listing, industry directories, and every other platform where your business information appears should show identical NAP details.
Here’s why this matters so much. Google doesn’t have a human reviewing your business. The algorithm looks at your NAP information across multiple sources and tries to confirm it’s all referring to the same business.
When Google sees “ABC Consulting” on your website, “ABC Consulting LLC” on Yelp, and “ABC Consulting, LLC” on Facebook, it has to decide if these are the same business or three different ones. Even though you and I know they’re the same, the algorithm sees variations that create uncertainty.
That uncertainty lowers Google’s confidence in showing your business for local searches. Why would Google prominently display a business when it’s not even sure it has the correct name?
I learned about NAP consistency the hard way. My business name legally includes “LLC” at the end. On my website, I wrote it without the LLC because it looked cleaner. My Google Business Profile had the LLC because it matched my legal documents. My Yelp listing had “LLC” with periods: “L.L.C.”
Three different versions of my business name. Google didn’t know which was correct. My local rankings suffered until I standardized everything.
The NAP variations that hurt your local rankings are often smaller than you’d think:
- Suite 100, Ste 100, and Suite #100 all mean the same thing — but not to Google’s algorithm.
- Street vs. St. vs. St — pick one and never deviate.
- (555) 123-4567 vs. 555.123.4567 vs. 555-123-4567 — same digits, three formats, one problem.
- ‘LLC’ vs. ‘L.L.C.’ vs. no designation at all in your business name.
Pick your canonical format for each element and document it. Then use copy-paste from that document everywhere, every time.
Business names with or without LLC, Inc, Co, Ltd. Decide whether to include the legal designation and be consistent.
Even spacing matters. “123 Main Street” is different from “123 Main Street” if there’s an extra space. Sounds ridiculous, but algorithms don’t ignore these details.
The business name address phone consistency rule is simple: pick one canonical version of each element and use it everywhere without exception.
I created a master NAP document for my business. A simple text file that has my exact business name, complete address with proper formatting, and phone number in my chosen format. Whenever I submit my business anywhere, I copy and paste from this document to ensure perfect consistency.
This small step eliminated NAP errors and saved me from the ranking drops that come from inconsistent information.
How to Audit Your NAP Across the Web (Find the Mistakes)
You can’t fix NAP problems you don’t know about. Auditing your NAP across the web reveals where inconsistencies hide.
Start with a manual Google search. Type your business name in quotes followed by your city. Look at the search results and see how your business name appears in each listing.
I do this search and open the first 20 results. I check how my business name, address, and phone number appear on each site. Even sites I didn’t create myself sometimes have my information, often pulled from business databases.
Create a spreadsheet to track what you find. Columns for website URL, business name as shown, address as shown, phone number as shown. Each row is one citation or listing you discover.
This manual method works but takes time. For faster, more comprehensive audits, I use citation audit tools.
SEMrush has a listing management tool that scans dozens of business directories and shows you how your NAP appears on each. It flags inconsistencies automatically and shows you exactly what needs fixing.
The tool showed me citations I didn’t even know existed. Old directory listings from years ago with outdated phone numbers. Business aggregator sites that pulled incorrect information from somewhere.
Moz Local offers similar functionality. Enter your business details and it scans major directories, comparing what it finds against your correct NAP information.
These tools cost money, but for serious local SEO, the time savings and comprehensive coverage justify the investment. A one-time audit costs less than the revenue you lose from poor local rankings.
As you audit, you’ll likely find listings you created and forgot about. Old Yellow Pages accounts. Chamber of commerce directories. Industry specific listing sites. Long forgotten social media profiles.
You’ll also find listings you never created. These are often aggregated from public business databases. You may need to claim these listings to correct the information.
Create your master NAP document first before you start the audit. This gives you the reference standard to compare every listing against.
After the audit, prioritize fixing high authority sites first. Google Business Profile is priority one. Yelp, Facebook, Bing Places, and Apple Maps are priority two. Industry directories and local citations are priority three.
Don’t try to fix everything in one day. I spend 30 minutes daily updating listings until they’re all consistent. Spreading the work prevents burnout and lets you be careful with each correction.
Adding NAP to Your WordPress Footer (Sitewide Visibility)
Your WordPress website should display your NAP consistently on every page, and the footer is the perfect place for this.
Footer NAP placement gives you sitewide consistency. Every page of your site reinforces your business name, address, and phone number. This helps both visitors and search engines always know how to contact you and where you’re located.
I add NAP to the footer using WordPress widgets or by editing the footer template directly if I’m comfortable with code.
For the widget approach, go to Appearance then Widgets in your WordPress dashboard. Look for your footer widget area. Most themes have footer widgets built in.
Add a Text widget or HTML widget to your footer. Type or paste your NAP information using proper formatting.
I format it like this:
Business Name
123 Main Street, Suite 100
City, State 12345
Phone: (555) 123-4567
Clear, readable, consistent with how it appears everywhere else.
If you want to get more advanced, you can add schema markup to your footer NAP using HTML microdata or JSON-LD. This tells search engines explicitly that this is your business contact information.
For businesses using a page builder like Elementor or Divi’s theme builder, adding footer NAP is even easier. These builders let you design your footer visually and add text elements exactly where you want them.
The important principle is consistency. Your footer NAP must match your Google Business Profile exactly. Copy it directly from your master NAP document to avoid typing errors.
I make the phone number clickable using a tel: link. Mobile visitors can tap it to call immediately. The HTML looks like this: <a href='tel:+15551234567'>(555) 123-4567</a> — just replace the number with your own.
The address can also be clickable, linking to your Google Maps listing or your contact page. This improves user experience and creates internal linking opportunities.
Some WordPress themes include built-in business information sections in their theme options. You enter your NAP once in the theme settings and it appears automatically in the footer. If your theme has this, use it. It’s the easiest way to maintain sitewide NAP consistency.
Check your footer on mobile devices after adding NAP information. Make sure it’s readable and the phone number click-to-call works properly. Most local searches happen on mobile, so mobile functionality is critical.
Your footer NAP should include your business name, complete address, phone number, and optionally your email address and business hours. Don’t clutter it with too much else. Keep it clean and scannable.
This sitewide NAP presence reinforces your local signals on every page. It helps visitors contact you from anywhere on your site. And it gives search engines consistent, clear business information on every page they crawl.
Top 20 Local Business Directories for Citations
Building citations means getting your business listed in online directories with consistent NAP information.
Not all directories matter equally. I focus on high authority directories that Google trusts and that actually send potential customers.
Here are the top 20 local business directories where I ensure every local business I work with has accurate citations:
Convert to a clean numbered list format:
Your Local Chamber of Commerce — Highly localized authority signal.
Google Business Profile — Non-negotiable foundation. Everything builds from here.
Bing Places for Business — Powers a meaningful share of searches. Free and fast to set up.
Apple Business Connect (Apple Maps) — Critical for iPhone users. Growing in importance.
Facebook Business Page — High domain authority, large user base, social trust signals.
Yelp — Essential for restaurants, retail, and services. Strong search result presence.
Yellow Pages (yp.com) — Declining in use but retains solid domain authority.
Better Business Bureau (bbb.org) — If you’re accredited, provides a quality trust backlink.
Foursquare — Powers location data for dozens of third-party apps.
Nextdoor — Excellent for neighborhood-focused service businesses.
Angi (formerly Angie’s List) — Home services and contractors.
HomeAdvisor — Second major home services platform.
TripAdvisor — Hospitality, restaurants, and tourist-facing businesses.
OpenTable — Restaurants accepting reservations.
Thumbtack — Local service providers across many categories.
Manta — General business directory with decent authority.
Hotfrog — Worth claiming; low effort, moderate value.
Citysearch — Useful for businesses in larger metros.
MapQuest — Still used for directions and local search.
Yahoo Local — Lower priority but easy to add.
Beyond these general directories, look for industry specific directories. Real estate agents should be in Zillow and Realtor.com. Lawyers should be in Avvo and FindLaw. Doctors should be in Healthgrades and Vitals.
Local directories matter too. City specific business associations. Regional tourism bureaus. Neighborhood business groups. These local citations carry weight for proximity signals.
When submitting to directories, always use your master NAP document. Copy and paste to ensure perfect consistency. Never type manually and risk introducing errors.
Most directories let you add additional information beyond NAP. Business description, website URL, hours, photos, categories. Fill out every field completely. More information means better listing quality.
How to Build Citations Without Spamming Low-Quality Directories
Quality beats quantity every time with citation building.
I’d rather have 20 citations on high authority, relevant directories than 200 citations on spammy, low-quality sites. Google evaluates citation quality, not just citation quantity.
Low quality directories are easy to spot. They exist purely for SEO. They have no real user traffic. They’re filled with spam listings. Their websites look like they were built in 1998 and never updated.
These directories don’t help your SEO. They might even hurt it by associating your business with low quality sources.
I focus on directories that real people actually use. Yelp gets real traffic. Google Business Profile gets real searches. Facebook has real users. These citations matter because they reach potential customers, not just search algorithms.
Avoid automated citation services that promise to submit your business to 500 directories overnight. These services spam your information everywhere with no quality control. You’ll end up on garbage sites you can never remove yourself from.
I build citations manually or use reputable services like Moz Local or BrightLocal that focus on quality directories. Yes, it takes more time. But the results are better and you maintain control.
When evaluating a directory, ask yourself: would a potential customer realistically find my business here? If the answer is no, skip it.
Industry specific directories are almost always worth the effort. If you’re a plumber, getting listed on plumbing association sites and local trade organization directories makes sense. These are relevant, authoritative citations.
Local citations specific to your city or region carry extra weight. The Austin Business Journal directory matters if you’re in Austin. The Denver Chamber of Commerce directory matters if you’re in Denver.
I aim for 30 to 50 high quality citations for most local businesses. That includes the major platforms plus industry directories and local sources. Going beyond 50 only makes sense if you find genuinely relevant, high authority directories.
Maintain your citations over time. If you change your phone number, update it everywhere. If you move locations, update every single citation. Outdated citations hurt worse than no citations because they create inconsistency.
NAP consistency is tedious work. It’s not glamorous. But it’s foundational to local SEO success. Get it right once, maintain it carefully, and you’ll build the trust signals Google needs to rank you prominently in local search results.
How to Optimize Your WordPress Site for Local Keywords
Local keyword research is completely different from regular keyword research, and understanding this difference changed my entire approach to content.
When I started local SEO, I targeted broad keywords like “SEO services” and wondered why I never ranked despite doing everything else right. Then I learned about local keyword modifiers and city-specific search terms.
The moment I shifted to targeting “SEO services in Austin” and “Austin small business SEO,” my rankings improved within weeks. The search volume was lower, but the quality of traffic was dramatically better.
Optimizing your WordPress site for local keywords means understanding what people in your area actually search for and making sure your content matches those searches.
Let me show you the exact process I use for local keyword research and on-page optimization.
How to Do Local Keyword Research (Finding What Your City Searches For)
Local keyword research starts with your core service or product, then adds geographic modifiers.
Don’t just target “plumber.” Target “plumber in Seattle,” “emergency plumber Seattle,” “Seattle residential plumbing,” and other combinations that include your city.
The easiest starting point is Google’s autocomplete feature. Type your service into Google followed by “in” and watch what suggestions appear. Google shows you real searches people in your area perform.
I type “marketing services in Austin” and Google suggests “marketing services in Austin TX,” “digital marketing services in Austin,” “affordable marketing services in Austin.” Each suggestion is a keyword people actually search.
Try variations. Start with your city name, then try neighborhood names. “Plumber in downtown Portland” might have less volume than “plumber in Portland” but could be more relevant if you specifically serve downtown.
The “near me” searches are huge for local businesses. People constantly search “plumber near me,” “coffee shop near me,” “dentist near me.” You can’t explicitly target these because the search is personalized to each user’s location, but optimizing for your city helps you appear for these searches when people are in your area.
Google Keyword Planner is the free tool I use for validating search volume. It’s designed for Google Ads but works perfectly for SEO research.
Create a free Google Ads account if you don’t have one. You don’t need to run ads. Just access the Keyword Planner tool.
Enter your service plus your city as the starting keyword. The tool shows you search volume and suggests related keywords. For local keywords, even 10 to 50 searches per month can be valuable because these are highly targeted local searchers.
I look for keywords with clear intent. “Best plumber in Denver” shows commercial intent. Someone searching this is probably ready to hire. “How to fix a leaky faucet” shows informational intent. They might do it themselves.
For local businesses, commercial and transactional keywords generate better results than purely informational ones. Focus on keywords that indicate readiness to buy or hire.
Geo-targeting means aligning your content with specific geographic areas. If you serve multiple cities, research keywords for each city separately. Search behavior varies by location.
I worked with a contractor who served three cities. Keyword research revealed that one city searched primarily for “bathroom remodeling,” another searched for “bath renovation,” and the third searched for “bathroom contractor.” Same service, different language preferences.
Creating separate content for each city using their preferred terminology improved rankings in all three markets.
Long-tail local keywords are goldmines. “Emergency dentist open Sunday in Brooklyn” has tiny search volume but incredibly high intent. If your content answers that specific query, you’ll capture those searchers.
Make a spreadsheet of your target local keywords. Organize them by search volume, intent, and priority. This becomes your content roadmap.
On-Page SEO: Where to Put Your City and State
Once you’ve identified your local keywords, strategic placement on your WordPress pages maximizes their impact.
Your H1 tag should include your city or region for location-specific pages. If your homepage targets your city, the H1 should naturally incorporate that location.
I don’t force it awkwardly. “Seattle’s Premier Coffee Roaster” works better than “Coffee Roaster Seattle WA.” Write for humans first, optimize for search engines second.
The title tag, which appears in search results and browser tabs, must include your location. This is critical because Google heavily weights title tag content.
For my homepage, my title tag is “Local SEO Services in Austin, TX | My Business Name.” This tells both searchers and Google exactly what I do and where I do it.
The meta description should mention your location too. This doesn’t directly impact rankings but improves click-through rates when people see your city in the search result description.
Your first paragraph should naturally mention your location. I write introductions like “Welcome to our family-owned bakery serving fresh pastries to Denver residents since 2010.” Natural, readable, location-included.
Sprinkle location mentions throughout your content where they fit naturally. Don’t force your city name into every paragraph. That’s obvious keyword stuffing. Instead, talk about serving local customers, reference local landmarks, mention neighborhood names.
Image alt text is another opportunity. Instead of “storefront photo,” use “our downtown Portland storefront at 5th and Main.” Descriptive and location-optimized.
Headers beyond the H1 can include location variations. H2 tags like “Serving the Greater Phoenix Area” or “Why Phoenix Homeowners Choose Our Services” work perfectly.
The URL structure for location pages should include the city name. Instead of yoursite.com/services, use yoursite.com/austin-seo-services for clarity.
Internal linking with location keywords helps too. When linking from your blog to your services page, use anchor text like “our Austin SEO services” instead of just “click here.”
The key is balance. Your content should read naturally while incorporating local keywords in the places that matter most for SEO. For a complete breakdown of keyword placement across every element of your site, our guide on how to add SEO keywords in WordPress covers each placement point in detail.
Creating Location-Specific Landing Pages
Multi-location businesses need dedicated landing pages for each location they serve.
I cannot stress this enough: each location page must have unique content. Google penalizes duplicate content. If you copy your main location page and just swap the city name, Google will detect it and likely ignore the duplicate pages.
Creating truly unique location pages takes effort. For each city or neighborhood you serve, write original content that specifically addresses that area.
Talk about the specific neighborhoods within that city you serve. Mention local landmarks or well-known businesses near you. Include testimonials from customers in that city if you have them.
I worked on a cleaning service with location pages for six different cities. Each page discussed specific neighborhoods in that city, mentioned local parks or schools, and included photos from jobs in that area. Every page was genuinely unique and valuable.
The URL structure for location pages should clearly indicate the location. Use yoursite.com/cities/denver or yoursite.com/locations/brooklyn for clean, descriptive URLs.
Each location page needs its own schema markup identifying that specific location. If it’s a physical address you operate from, use LocalBusiness schema. If it’s a service area, use Service schema with areaServed property.
Include a Google Map on each location page showing that specific area. For service areas without physical locations, show a map of the service region.
Location pages should link back to your main services page and to each other where relevant. This internal linking structure helps Google understand the relationship between your locations.
I add unique calls to action on location pages. Instead of a generic “contact us,” I use “Call our Denver office at (555) 123-4567” with the location-specific phone number if you have separate numbers.
If you track different metrics for different locations, location-specific landing pages let you measure performance by area. You can see which cities generate the most conversions and adjust your marketing accordingly.
Optimizing Your WordPress Contact Page for Local SEO
Your contact page is one of the most important pages for local SEO, yet most businesses treat it as an afterthought.
I build contact pages with a checklist of local SEO elements that work together to maximize location signals.
First, your complete NAP information must be prominently displayed. Business name, full street address with city, state, and zip code, phone number with area code.
Make the phone number clickable with a tel: link so mobile visitors can call with one tap. Most contact page visits come from mobile devices.
Embed your Google Map showing your exact location. I covered this in the maps section, but it bears repeating here. The map helps visitors find you and verifies your location for Google.
Display your business hours clearly. If your hours vary by day or season, show the complete schedule. People looking at your contact page want to know when you’re open.
Include a contact form, but don’t make it the only contact method. Some people prefer forms, others want to call or email directly. Offer multiple options.
Write actual content on your contact page, not just your contact details. A few paragraphs about your location, the areas you serve, and why people in your city choose your business.
This content naturally includes your city and region multiple times without feeling forced.
Add your city and state to the contact page title tag and H1. “Contact Our Austin Office” or “Get in Touch with Seattle’s Best Bakery” work well.
If you serve multiple locations from one office, list all the service areas on your contact page. “Serving Austin, Round Rock, Cedar Park, and surrounding areas” tells both users and Google your geographic scope.
Include social media links on your contact page. This connects your website to your social profiles, all of which should have consistent NAP information.
The contact page often gets linked to from external sites when people reference your business. Make sure it has proper schema markup so those backlinks carry maximum SEO value.
Add photos of your physical location if you have a storefront or office. Exterior photos help people recognize your building when they arrive. Interior photos build familiarity and trust.
Your contact page should be linked from your main navigation menu so it’s accessible from every page on your site. Footer links to your contact page also help.
I test every element on the contact page to ensure it works. Form submissions go to the right email. Phone links dial correctly on mobile. Map loads properly. Nothing breaks the user experience.
A well-optimized contact page serves dual purposes. It helps potential customers reach you easily and sends strong local SEO signals to Google about your location and service area.
These on-page local keyword optimizations work together to make your WordPress site clearly relevant for location-specific searches. You’re not trying to trick Google. You’re making it crystal clear what you do and where you do it.
How to Get Google Reviews That Move Your Local Rankings
Reviews transformed my local SEO results more than any other single factor.
I spent months optimizing my website, building citations, and perfecting my schema markup. My rankings improved slightly. Then I focused on systematically collecting customer reviews, and within two months I jumped from position 6 to position 2 in the map pack for my main keyword.
Reviews aren’t just about your star rating. The way you get reviews, what customers say in them, and how frequently you receive them all impact your local rankings.
Most businesses ask for reviews randomly and hope for generic praise. I’m going to show you a strategic approach that makes reviews work harder for your SEO.
Why Review Frequency Beats Review Volume in 2026
Google cares more about when you got reviews than how many total reviews you have.
A business with 20 reviews from the past month will frequently outrank a business with 50 reviews from three years ago. The algorithm favors recent reviews as a signal of current activity and relevance.
This changed how I approach review collection. Instead of a one-time push to get as many reviews as possible, I built a system for getting a steady flow of reviews month after month.
I aim for 3 to 5 new reviews every month. This consistent flow keeps my review count growing and signals to Google that my business is active and serving customers right now.
Review velocity is the term for this concept. How quickly you’re accumulating new reviews relative to competitors in your market.
Think about it from Google’s perspective. If your business shows zero new reviews for six months, the algorithm might wonder if you’re still operating. Are you still serving customers? Is your business declining?
Fresh reviews prove ongoing activity. They show you’re actively providing services and customers are satisfied enough to leave feedback.
I track my review acquisition rate monthly. If I notice a month with zero new reviews, I immediately ramp up my review request process. Gaps in review flow can hurt rankings.
This doesn’t mean old reviews don’t matter. They do. Total review count still influences rankings, especially your prominence score. But the timing of your recent reviews matters just as much, if not more.
My goal is steady, consistent growth. Three reviews this month, four next month, two the month after. Not perfectly even, but showing clear ongoing activity.
Competitors who got 30 reviews in their first month then nothing for a year will lose ground to businesses with consistent monthly review flow.
Set a monthly review goal based on how many customers you serve. If you complete 20 jobs per month, aim for getting reviews from 15-25% of those customers. That’s 3 to 5 reviews monthly from a realistic portion of your customer base.
The compound effect of review velocity is powerful. Consistent monthly reviews for a year gives you 36 to 60 new reviews plus all your existing ones, with recent reviews proving current business activity.
The Keyword-Embedded Review Strategy (Most Businesses Miss This)
Most customer reviews say things like “Great service!” or “Highly recommend!” These are nice but don’t help your SEO much.
Reviews that mention your specific services and location carry significantly more SEO weight because they signal relevance for those keyword combinations.
A review saying “Best plumber in Denver! Fixed our water heater quickly and professionally” is infinitely more valuable than “Great work, very professional.”
The first review includes your service (plumber), your location (Denver), and specific work performed (water heater repair). The second review is generic and could apply to any business in any industry.
Google reads review text. The words customers use in reviews become relevance signals for search queries. Reviews mentioning specific services help you rank for searches about those services.
This was a breakthrough realization for me. I started gently guiding customers toward writing more specific reviews, and my rankings for specific service searches improved noticeably.
Here’s how to encourage keyword-rich reviews without being manipulative or violating any guidelines.
When you ask for a review, be specific about what you want them to review. Instead of “Can you leave us a review?”, try “Can you share your experience with our bathroom remodeling service?”
This naturally prompts them to mention the specific service in their review.
Include helpful prompts in your review request. “We’d love to hear about your experience with our Austin landscaping team” encourages location and service mentions.
After completing a job in a specific service area, ask: “Could you share your thoughts about our work in the North Seattle area?” This prompts geographic specificity.
Never tell customers exactly what to write. That’s against Google’s review policies and can get your reviews flagged as fake. You’re simply prompting them to think about specific aspects of their experience.
I send review requests via email with a template like this:
“Hi [Name], thank you for choosing our Denver carpet cleaning service. We’d love to hear about your experience. What did you think of our work in your [neighborhood] home? Your feedback helps other Denver homeowners find quality carpet care.”
This template naturally encourages them to mention the service (carpet cleaning), location (Denver), and their neighborhood, while still letting them write their own authentic review.
The reviews I get using this approach mention specific services 60-70% of the time versus maybe 20% with generic review requests.
These keyword-embedded reviews don’t just help rankings. They’re more useful to potential customers reading them. Specific reviews with detailed information are more credible and persuasive than vague praise.
Balance is important. You still want authentic reviews. Don’t make your prompts so heavy-handed that reviews sound scripted. The goal is subtle guidance toward specificity, not manipulation.
How to Ask for Reviews (Without Being Annoying)
Timing is everything when requesting reviews.
Ask too early and the customer hasn’t fully experienced your service. Ask too late and they’ve forgotten about you. Ask too often and you’re annoying. Ask too rarely and you miss opportunities.
The perfect moment to request a review is immediately after successful service completion when satisfaction is highest.
For my service business, I ask for reviews within 24 hours of finishing work. The experience is fresh in their mind. They’re still feeling positive about the outcome.
I use email for most review requests because it’s non-intrusive. The customer can respond when convenient, and I can include direct links to my review platforms.
Hi [Name],
Thank you for choosing [Business Name] for your [specific service]. I hope everything went smoothly.
If you have 60 seconds, I’d really appreciate your honest feedback on Google — it helps other [City] residents find quality [service type].
[Insert your direct Google review link here — go to your Google Business Profile, click ‘Get more reviews,’ and copy the link.]
Thank you, [Your Name]
Short, specific, easy. The direct link is critical. Don’t make them search for your business. The easier the process, the higher your response rate.
For in-person businesses like retail or restaurants, I ask face to face at checkout or when the customer expresses satisfaction. “We’d love your feedback on Google if you have a moment later” with a business card showing the review link as a QR code.
Text messages work well for service businesses with customer phone numbers. A quick text with a review link gets high response rates, especially from younger customers who prefer texting.
Automated review request systems save massive time if you have high transaction volume. Services like Podium or Birdeye send automatic review requests after service completion.
I use automation for the initial request, but follow-ups are manual and personalized. If someone doesn’t leave a review after the automated request, I might follow up personally a week later, but only once.
Never offer incentives for reviews. No discounts, gifts, or contest entries in exchange for reviews. This violates Google’s policies and can get all your reviews removed.
Also never offer incentives for positive reviews specifically. That’s even worse and can result in permanent penalties.
Make the ask comfortable and casual. “If you had a good experience, I’d appreciate you sharing that on Google” respects their autonomy while making the request clear.
Some customers will say yes and forget. That’s fine. Don’t badger them. Others will say no. Respect that. The customers who had exceptional experiences often volunteer reviews without being asked.
Response rates vary by industry. I typically see 15-25% of customers leave reviews when asked directly. That’s normal. Don’t be discouraged if not everyone responds.
The key is systematic consistency. Ask every satisfied customer using the same process every time. The compound effect generates steady review flow.
Why You Should Never Buy Reviews (And What Google Does If You Do)
I need to address this directly because I still see businesses buying fake reviews and destroying their online presence.
Buying reviews is against Google’s policies. It’s detectable. It’s punishable. And it will hurt your business more than having no reviews at all.
Google uses sophisticated algorithms to detect fake reviews. They analyze reviewer behavior, review patterns, language similarity, IP addresses, and dozens of other signals.
When Google detects fake reviews, the consequences range from removing the fake reviews to suspending your entire Google Business Profile. I’ve seen businesses lose years of legitimate reviews and rankings because they mixed in fake ones.
The suspension process can take months to appeal. During that time, you’re invisible in local search. No map pack listing. No knowledge panel. No local visibility whatsoever.
Even if you avoid detection initially, competitors or customers can report fake reviews. Google investigates reports and finds patterns you didn’t think were detectable.
Fake review services often use the same reviewer accounts across multiple businesses. Google connects these patterns and nukes all the reviews from those accounts, even ones you paid for thinking they were safe.
The language in fake reviews tends to be similar because they’re often written by the same person or generated with templates. Google’s natural language processing detects these patterns.
Fake reviews posted from the same IP addresses or in rapid succession trigger red flags. So do reviews from brand new Google accounts with no other review activity.
Beyond the detection risk, fake reviews don’t help your business anyway. They create false expectations. Customers come expecting five-star service based on fake reviews and get disappointed when reality doesn’t match.
Fake positive reviews also attract more scrutiny of all your reviews. One suspicious review makes customers question the authenticity of your entire review profile.
The ethical alternative is simple: provide excellent service and ask real customers for honest feedback. Yes, this takes longer. Yes, you’ll get some less than five-star reviews. But you build a genuine, sustainable reputation.
I’d rather have 30 authentic reviews with an average of 4.6 stars than 100 fake reviews at 5.0 stars. The authentic reviews are sustainable, believable, and won’t get my business suspended.
If you’re tempted by fake reviews because you’re starting with zero reviews, I understand the frustration. But resist. Start the right way by asking your first ten customers for reviews. Those early reviews are the hardest to get, but once you have momentum, it gets easier.
Google rewards authentic review accumulation over time. A steady increase in real reviews looks natural and trustworthy. A sudden spike of perfect reviews looks suspicious.
Build your reputation the right way. Your business will be stronger and more sustainable for it.
How to Respond to Reviews (The Templates That Work)
Responding to reviews improves your local SEO and builds customer trust.
Google sees review responses as engagement signals. Businesses that respond to reviews show they’re active and care about customer feedback. This contributes to your prominence and trustworthiness scores.
I respond to every single review I receive, both positive and negative. This consistent engagement has become part of my local SEO strategy.
For positive reviews, my responses are brief, genuine, and include the reviewer’s name when they’ve shared it. I thank them specifically for mentioning what they appreciated.
Template for positive review responses:
Apply the same visual template formatting fix (horizontal rule separators, clear START/END) as described in Section 64. No content changes needed.
I naturally include my location and service type in responses, reinforcing those keywords. But I keep it conversational and authentic.
Negative reviews require more care. Never argue or get defensive. Address the specific concern, apologize for their experience, and offer to make it right.
Template for negative review responses:
“Hi [Name], thank you for this feedback. I’m sorry your experience with our [service] didn’t meet expectations. This isn’t the standard we hold ourselves to. I’d like to discuss this with you directly to make things right. Please contact me at [phone/email] at your convenience. We appreciate the opportunity to improve.”
This response shows potential customers you take feedback seriously and try to resolve issues. It often results in the reviewer updating their review or removing it after you’ve addressed their concern privately.
For reviews mentioning specific team members, I acknowledge those individuals. “I’ll make sure to pass your kind words along to Mike. He takes pride in his work.”
Response timing matters. I try to respond within 24-48 hours of receiving a review. Quick responses show you’re actively engaged with customer feedback.
Keep responses concise. A few sentences are enough. Long responses look defensive or overly promotional.
Never copy-paste the same response to multiple reviews. Google can detect this and it looks spammy to potential customers. Each response should be personalized to that specific review.
Some negative reviews are clearly fake or from competitors. Even these deserve professional responses. Publicly addressing them as potential misunderstandings while offering to investigate protects your reputation.
Avoid using review responses as sales pitches. Don’t respond to every review with “Check out our new special!” That looks desperate and unprofessional.
The goal of review responses is to show engagement, appreciation, and professionalism. Done consistently, this builds both your SEO profile and your public reputation.
Displaying Reviews on Your WordPress Site
Bringing your Google reviews onto your WordPress site amplifies their SEO value and builds trust with site visitors.
Several WordPress plugins make this easy. I’ve used Widget for Google Reviews and Google Reviews Widget successfully.
These plugins connect to Google’s API and automatically pull your reviews from your Google Business Profile onto your website. You can display them in sidebars, on your homepage, or on dedicated testimonial pages.
The plugins usually offer customization options for design, number of reviews to display, minimum star rating to show, and layout style.
I typically display my 5-10 most recent reviews with 4+ stars on my homepage. This shows fresh, positive feedback to visitors immediately.
Having reviews on your site provides fresh content that updates automatically as you receive new reviews. This content freshness is a positive SEO signal.
You can also add schema markup for reviews to make them eligible for rich snippets in search results. Review stars appearing in your search listing dramatically improves click-through rates.
The schema for reviews is called AggregateRating and includes your average rating and total number of reviews. Most review display plugins handle this schema automatically if you enable it in settings.
Beyond automated plugins, you can manually feature testimonials from reviews. I pull particularly detailed, keyword-rich reviews and create testimonial sections that I write into my content manually.
This lets me strategically place reviews on service-specific pages. A detailed review about bathroom remodeling goes on the bathroom remodeling service page with the customer’s permission.
Always get permission before featuring customer testimonials prominently. Most people are fine with it, especially if you offer to exclude their last name or use initials for privacy.
Video testimonials are even more powerful if customers are willing to provide them. A 30-second video of a satisfied customer talking about your service builds immense trust and provides rich content for your site.
The combination of reviews on Google, reviews on third-party sites like Yelp, and reviews featured on your WordPress site creates multiple touchpoints where potential customers see social proof of your quality.
This comprehensive review strategy of systematic collection, keyword embedding, consistent response, and strategic display turns reviews into one of your strongest local SEO and conversion optimization tools.
Technical WordPress SEO That Directly Impacts Local Rankings
Technical SEO sounds intimidating, but the elements that actually impact local rankings are manageable even for non-technical users.
I ignored technical SEO for my first year running a local business website. My content was great, my citations were perfect, but my site loaded slowly and looked broken on mobile phones. My rankings suffered because of it.
The moment I fixed the technical issues, my local rankings improved within two weeks. Google could crawl my site properly, mobile users could navigate easily, and pages loaded fast enough to keep visitors engaged.
You don’t need to be a developer to handle the technical WordPress SEO elements that matter for local search. If you’re not sure where your site stands right now, running an SEO audit for WordPress will surface the issues worth fixing before you begin. Let me show you the specific items that actually move the needle.
Why Mobile Optimization is Critical for Local SEO
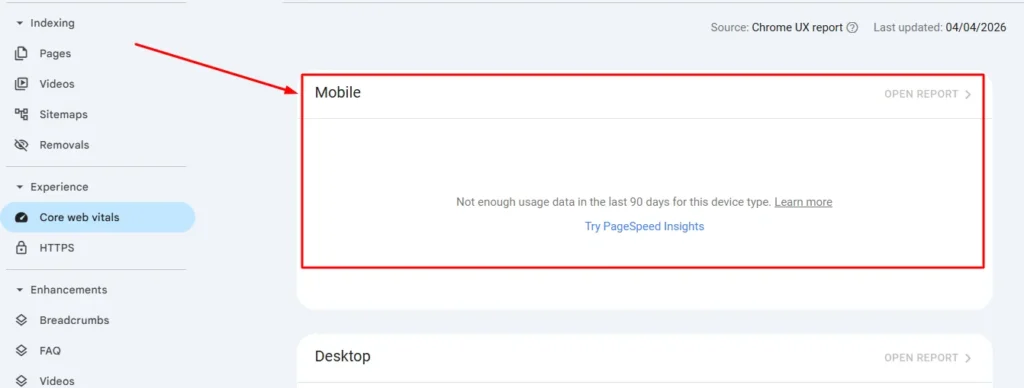
Most local searches happen on mobile devices, and Google knows this.
When someone searches “coffee shop near me” or “emergency plumber,” they’re almost always on their phone, often standing somewhere needing immediate service. Google prioritizes mobile-friendly sites for these searches because mobile experience directly impacts user satisfaction.
Google switched to mobile-first indexing, which means they primarily use the mobile version of your site for ranking and indexing. If your site looks great on desktop but terrible on mobile, you’re hurting your rankings.
I test every WordPress site I build on actual mobile devices, not just desktop browser testing tools. I pull out my phone, load the site, and try to use it like a real customer would.
Can I read the text without zooming? Are the buttons big enough to tap with my thumb? Does the phone number click to call? Can I find your address and get directions easily?
These user experience elements directly impact whether mobile visitors convert into customers, and Google tracks engagement signals that reflect mobile usability.
Responsive design is the standard approach for mobile optimization. Your WordPress theme should automatically adjust layout, text size, and images based on the screen size viewing your site.
Most modern WordPress themes are responsive by default, but always verify. Check your site on phones, tablets, and different screen sizes to ensure everything looks good everywhere.
Navigation is critical on mobile. Your menu should collapse into a hamburger icon or similar mobile menu that doesn’t take up half the screen. Important information like phone number and location should be immediately visible.
I place a click-to-call phone number in the header of every local business site I build. Mobile visitors can tap it from any page and call immediately without hunting for contact information.
Form fields should be large enough to tap easily and fill out on a small screen. If your contact form has tiny input boxes, mobile users will struggle and likely abandon the form.
Images must be optimized for mobile loading. Large desktop images that look great on a big monitor can take forever to load on a phone with a slow connection. Use responsive images that serve appropriate sizes to different devices.
Google’s Mobile-Friendly Test tool shows you exactly how Google sees your mobile site. Visit search.google.com/test/mobile-friendly and enter your URL. Fix any issues the tool identifies.
Page speed on mobile matters even more than on desktop because mobile connections are often slower. I’ll cover speed optimization in the next section, but know that mobile speed is a specific ranking factor for local searches.
Near me searches are inherently mobile because they rely on the searcher’s current location. Optimizing for these searches means perfecting your mobile experience.
I track my mobile traffic percentage in Google Analytics. For most local businesses, 60-80% of traffic comes from mobile devices. If your mobile experience is poor, you’re failing most of your potential customers.
Site Speed and Core Web Vitals for Local Rankings
Slow websites frustrate users and hurt rankings, especially for local searches where people want quick answers.
Google uses Core Web Vitals as ranking signals. These metrics measure loading performance, interactivity, and visual stability. Sites that score well on these metrics rank better than slow, clunky sites.
The three Core Web Vitals are LCP, FID, and CLS. Let me explain each in simple terms.
LCP stands for Largest Contentful Paint. It measures how long it takes for the main content of your page to load. Google wants this under 2.5 seconds. If your homepage takes 6 seconds to show the main content, you’re hurting your rankings.
I improved my LCP by optimizing images, using a caching plugin, and choosing faster WordPress hosting. My homepage LCP dropped from 4.2 seconds to 1.8 seconds, and my rankings improved noticeably.
INP stands for Interaction to Next Paint, the metric Google now uses to measure responsiveness (it replaced the older FID metric in 2024). It measures how quickly your page responds to any user interaction — a click, a tap, a keyboard press. Google wants this under 200 milliseconds. Heavy JavaScript and bloated plugins are the most common culprits. Slow, unresponsive sites score poorly.
Heavy JavaScript and too many plugins often cause poor FID scores. I audit my plugins regularly and remove any that aren’t essential. Fewer plugins means faster, more responsive sites.
CLS stands for Cumulative Layout Shift. It measures how much your page content jumps around while loading. You know that annoying experience where you try to click something but the page shifts and you click the wrong thing? That’s layout shift.
Google wants CLS under 0.1. I fixed layout shift issues by setting specific image dimensions in my HTML so the browser reserves the right space before images load.
WordPress caching plugins are the easiest way to improve site speed. I use WP Rocket on most sites, though W3 Total Cache and WP Super Cache are good free alternatives.
Caching stores static versions of your pages so the server doesn’t have to generate them from scratch every time someone visits. This dramatically reduces loading time.
Image optimization is critical. Large, uncompressed images are the number one cause of slow WordPress sites. I use the ShortPixel or Imagify plugins to automatically compress images without visible quality loss.
Lazy loading makes images load only when they’re about to appear on screen instead of all at once when the page loads. Most modern WordPress themes include lazy loading, or you can add it with a plugin.
Hosting quality impacts speed more than many people realize. Cheap shared hosting on oversold servers will always be slow no matter how much you optimize. I recommend hosts like SiteGround, WP Engine, or Kinsta for local business sites that need reliable speed.
A Content Delivery Network (CDN) serves your site files from servers geographically close to your visitors. For local businesses serving one city, CDN impact is minimal. For businesses serving multiple regions, CDNs improve speed for visitors far from your hosting server.
Google PageSpeed Insights shows you exactly what’s slowing down your site. Enter your URL at pagespeed.web.dev and review the recommendations. Focus on the high-impact items flagged in red first.
I check my Core Web Vitals monthly using Google Search Console. The Experience report shows real-world performance data from actual visitors to your site.
Site speed optimization is ongoing work, not a one-time fix. As you add content, images, and functionality, speed can degrade. Regular monitoring keeps you aware of performance issues before they hurt rankings.
For local searches where users want immediate information, speed is part of user experience. Fast sites keep visitors engaged. Slow sites send them back to search results to try a competitor.
Internal Linking Strategy for Location Pages
Internal links connect your pages together and help both users and search engines navigate your site structure.
For local SEO, strategic internal linking between your location pages, service pages, and content creates a clear geographic and topical hierarchy.
I always link to location pages from my homepage. If you serve multiple cities, having a clear “Service Areas” or “Locations” section on your homepage with links to each city page establishes those pages as important.
Each location page should link to relevant service pages. If you have a Denver location page, link from that page to service pages with anchor text like “our Denver plumbing services” or “contact our Denver team.”
This creates connections between geography and services, strengthening relevance signals for location plus service keyword combinations.
Blog posts are excellent opportunities for contextual internal links to location pages. When writing content about local topics, naturally link to the relevant location pages.
I wrote a blog post about “How to Prepare Your Home for Colorado Winters” and naturally linked to our Colorado service pages throughout the article.
Avoid orphan pages that have no internal links pointing to them. Every location page should be linked from multiple other pages on your site so search engines can easily discover and understand their importance.
The footer is a good place for location page links if you have multiple locations. A simple “Locations” footer menu with links to each city page ensures sitewide access.
Sidebar links work too, especially on blog pages. A sidebar widget showing “We Serve:” with a list of cities links to location pages from every blog post.
Anchor text matters for internal links. Use descriptive anchor text that includes location keywords when linking to location pages. Instead of “click here,” use “our Austin office” or “San Diego services.”
Don’t overdo exact match anchor text. Mix it up with branded anchors (“Our Company in Portland”), partial matches (“Portland area services”), and natural phrases (“when we expanded to Seattle”).
Breadcrumb navigation helps both users and search engines understand site structure. For a location page, breadcrumbs might show: Home > Locations > Texas > Austin. This creates natural internal links and clarifies hierarchy.
Related location pages should link to each other when relevant. Your Austin page could mention “also serving nearby Round Rock and Cedar Park” with links to those location pages.
I review my internal linking structure quarterly using a crawler like Screaming Frog. This shows me orphaned pages, broken links, and linking patterns I might have missed manually. If you prefer a more automated approach, an AI internal link recommendation plugin for WordPress can surface these opportunities directly inside your dashboard without running a manual crawl.
Strong internal linking distributes authority throughout your site, helps search engines understand your most important pages, and keeps visitors exploring more of your content instead of bouncing.
WordPress Hosting and Server Location
Hosting quality affects your site speed, uptime, security, and indirectly your search rankings.
Cheap hosting seems like a money saver, but slow loading times and frequent downtime cost you more in lost customers and poor rankings than you save on hosting fees.
I moved a client from a $5/month shared hosting plan to SiteGround’s $15/month plan, and their average page load time dropped from 6 seconds to under 2 seconds. Their bounce rate decreased and rankings improved within a month. If you’re ready to make the same move, our step-by-step guide on how to migrate your WordPress site to a new host walks you through the process without downtime.
WordPress-optimized hosting is worth the investment for business sites. These hosts configure servers specifically for WordPress performance and often include automatic caching, security hardening, and staging environments.
Server location has a small impact on local SEO. If your business serves customers in Texas, hosting on servers in Texas or nearby states provides slightly faster loading times for your local visitors.
However, this impact is minimal compared to other speed factors. Don’t stress about finding hosting in your exact city. Focus on choosing quality, fast hosting regardless of location.
For businesses serving multiple regions across a large country, a CDN matters more than server location. The CDN serves cached content from multiple locations automatically.
Uptime is critical. If your site is down when Google tries to crawl it or when potential customers search for you, you lose opportunities. Quality hosts maintain 99.9% or better uptime.
I check uptime using monitors like UptimeRobot. If my site goes down, I get immediate alerts so I can address issues quickly.
Security matters for both SEO and business reputation. Hacked sites get de-indexed by Google and lose all rankings. WordPress-optimized hosts include security features like malware scanning, automatic updates, and firewall protection.
Managed WordPress hosting takes care of technical maintenance so you can focus on your business. Hosts like WP Engine, Kinsta, and Flywheel handle updates, backups, and security automatically.
For local businesses that aren’t technical, managed hosting is worth the premium. Your site stays fast, secure, and updated without requiring your time and expertise.
Backup systems are essential. If something breaks on your site, you need a recent backup to restore from. Quality hosts include automatic daily backups.
I’ve had to restore client sites from backups multiple times over the years. Bad plugin updates, user errors, security issues. Backups saved the day every time.
SSL certificates (the https:// in your URL) are required for good rankings and user trust. All reputable hosts now include free SSL certificates. Make sure yours is installed and working correctly.
The technical foundation of quality hosting, proper speed optimization, mobile responsiveness, and clean internal linking supports everything else you do for local SEO.
These elements aren’t the flashy parts of SEO, but they’re the infrastructure that makes the visible optimizations effective. Get the technical foundation right, and your content and optimization efforts deliver better results.
Managing Multiple Locations on WordPress (For Agencies and Franchises)
Multi-location SEO is exponentially more complex than single-location optimization, but WordPress offers specific tools that make it manageable.
I learned multi-location WordPress SEO by managing a franchise client with 15 locations across three states. The challenges were immediate: how do you create 15 unique location pages without duplicating content? How do you manage separate schema for each location? How do you track performance by location?
WordPress custom post types solved most of these problems elegantly. Let me show you exactly how to set up and optimize WordPress for multiple business locations.
Setting Up Location Custom Post Types in WordPress
Custom post types are like creating a new content category in WordPress specifically for locations.
Instead of manually creating pages for each location, you create a “Locations” post type. Each location becomes an individual post within that type, with consistent formatting and fields across all locations.
Most local SEO plugins handle this automatically. Yoast Local SEO adds a “Locations” custom post type when you activate it. AIOSEO has similar functionality in their local SEO features.
When you enable the locations post type in Yoast, a new “Locations” menu item appears in your WordPress dashboard. Click “Add New” under Locations to create a new location entry.
Each location gets fields for business name, address, phone, coordinates, opening hours, and other location-specific details. Fill these out for each location, and the plugin handles schema markup automatically.
The beauty of custom post types is consistency. Every location page has the same structure and fields, making management easier and ensuring no location is missing critical information.
For developers who want manual control, creating a custom post type requires adding code to your theme’s functions.php file. The code registers the post type and defines its capabilities.
I only recommend manual custom post types if you have specific requirements the plugins don’t meet or if you’re building a highly customized system.
The plugin approach is easier, maintains schema automatically, and updates when schema standards change. Unless you have compelling reasons to code it yourself, use a plugin.
Once your locations custom post type is set up, you can bulk manage locations like you manage blog posts. View all locations in a list, filter by category or region, and update multiple locations efficiently.
For franchises or agencies managing dozens of locations, this system saves enormous time compared to individual location pages built manually.
Customizing Your Location Page URLs
URL structure for location pages affects both user experience and SEO clarity.
The default URL structure for custom post types is usually yoursite.com/locations/location-name. This works fine but you might want to customize it to match your business terminology.
If you call your locations “branches,” you want yoursite.com/branches/branch-name. If you’re a retail chain with stores, yoursite.com/stores/store-name makes more sense.
Yoast Local SEO lets you customize the permalink structure for locations. Go to SEO > Local SEO > Settings, find the permalinks section, and change “locations” to whatever term you prefer.
This customization is purely cosmetic but matters for brand consistency and user expectations. Your customers might not understand “locations” but immediately understand “stores” or “offices.”
For businesses serving cities without physical locations in each city, I recommend service-area specific URLs. Instead of yoursite.com/locations/denver, use yoursite.com/service-areas/denver to accurately reflect that you serve Denver but aren’t necessarily located there.
Clean, descriptive URLs help search engines and users understand page content before even visiting the page.
I structure multi-location URLs hierarchically when it makes sense. For a national business with state and city pages, I might use:
yoursite.com/locations/texas for the state overview
yoursite.com/locations/texas/austin for the Austin location
yoursite.com/locations/texas/dallas for the Dallas location
This structure clarifies geographic relationships and creates natural internal linking opportunities.
Avoid using location IDs or numbers in URLs. yoursite.com/location/12345 means nothing to humans or search engines. yoursite.com/locations/chicago is clear and keyword-rich.
Once you set your permalink structure, don’t change it without proper redirects. Changing URLs breaks existing links and loses SEO value unless you redirect the old URLs to new ones.
I set permalink structure correctly at the beginning and leave it alone. Consistency matters more than perfect structure.
Optimizing Each Location Page Individually
This is where most multi-location businesses fail. They create templated pages with identical content except for the city name.
Google detects this duplicate content immediately and often ignores all but one version, making most of your location pages useless for SEO.
Each location page must have substantially unique content. This requires real effort but makes the difference between ranking in multiple cities and ranking nowhere.
For each location, I write original content that specifically addresses that area. I talk about the neighborhoods you serve within that city, mention local landmarks, reference area-specific considerations.
A roofing company serving Denver might discuss how Denver’s hailstorms create unique roofing challenges. The same company’s Fort Collins page might discuss heavy snow load considerations common in that area.
These local specifics create genuinely unique, valuable content that serves readers and satisfies Google’s uniqueness requirements.
Include testimonials from customers in that specific location if you have them. Showing real customers from that city builds local credibility.
Photos from work you’ve done in that area help too. Showing actual jobs in recognizable local settings proves your presence and experience in that location.
Each location page needs its own Google Business Profile. Don’t try to use one profile for multiple locations. Google requires separate profiles for each physical location, and each location page should link to its specific Google Business Profile.
The schema markup for each location must reflect that specific location’s details. Address, phone number, hours, and coordinates must be unique to that location, not copied from your main location.
I create a content template for location pages that ensures consistency in structure while requiring unique content for key sections. The template includes:
Location-specific H1 with city name
Unique introductory paragraph about serving that city
Services offered section (can be similar across locations)
Why choose us in [city] section (must be unique)
Local testimonials section
Specific location information (NAP, hours, map)
Unique call to action mentioning the city
The services section can have similar content across locations because you offer the same services everywhere. But the introduction, why choose us, and testimonials must be unique.
Avoid the temptation to outsource location page creation to cheap content mills. They’ll give you slightly reworded duplicate content that doesn’t help SEO.
I write location pages myself or hire quality writers who research each city and create genuinely unique content. Yes, it’s more expensive and time-consuming. But one good location page that ranks is worth more than ten duplicate pages that don’t.
Service Area Businesses (No Physical Storefront)
Many local businesses don’t have physical locations customers visit. Plumbers, electricians, mobile pet groomers, house cleaners, and similar service providers work from home offices but serve customers across a region.
Service area optimization for WordPress requires a different approach than physical location optimization.
In your Google Business Profile, you hide your address and instead specify service areas. You might list 10 cities you serve or set a 25-mile radius around your home office.
On your WordPress site, you create service area pages for each major city or region you serve, even though you don’t have a physical location there.
These service area pages explain that you serve that city, describe your services in that area, and include customer testimonials from that location if available.
The key difference from physical location pages is transparency. Don’t pretend you have an office in a city where you don’t. Instead, clearly state “Serving the Denver area” or “Proudly serving Denver residents.”
I use schema markup differently for service area businesses. Instead of LocalBusiness schema with a specific address, I use Service schema with areaServed properties listing the cities or regions served.
This tells Google you’re a service provider operating in those areas without claiming a physical location that doesn’t exist.
For service area pages, include information about response times in that area, any location-specific considerations, and proof you regularly serve that location through testimonials or case studies.
A map on service area pages should show the coverage area, not a specific pin on a fake address. Show the city boundaries or service radius rather than claiming a specific location.
Internal linking between service area pages works the same as location pages. Link from your main services page to each service area page and between related service areas when relevant.
Service area pages need unique content just like physical location pages. Different cities have different characteristics, regulations, customer needs. Address these specifics in your content.
I find service area SEO actually more flexible than physical location SEO because you can target any city you’re willing to serve without needing a physical office there.
The downside is less prominence in the map pack compared to businesses with physical locations in the search area. But with proper optimization, service area businesses can still rank well in local organic results and appear in the map pack for searches near their actual location.
Managing multiple locations or service areas on WordPress requires organization, consistency, and commitment to creating unique valuable content for each location.
The technical setup through custom post types is straightforward. The ongoing content creation and optimization is where the real work happens. But for businesses serving multiple markets, multi-location WordPress SEO opens revenue opportunities that single-location optimization can’t match.
Google Business Profile Features Most Businesses Completely Ignore (But Shouldn’t)
Most businesses set up their Google Business Profile once and never touch it again. They’re missing opportunities that could significantly boost their local visibility.
I discovered these hidden features by experimenting with my own Google Business Profile and studying what top-ranking businesses do differently. Small features most people ignore turned out to have measurable ranking impact.
Let me show you the Google Business Profile features that provide competitive advantages when used correctly.
The Q&A Section Hack (Create Your Own FAQ)
The Q&A section on your Google Business Profile lets people ask questions about your business. What most businesses don’t know is that you can post questions and answer them yourself.
This feature is a goldmine for targeting specific keywords and addressing common customer questions directly on your Google listing.
I was shocked when I discovered that Google not only allows this but seems to encourage it. You can create an entire FAQ section by asking and answering your own questions.
Here’s exactly how to do it. Open your Google Business Profile listing as if you were a customer. Find the “Questions & Answers” section. You can now ask a question just like a customer would.
Ask strategic questions that address what your customers actually want to know. “Do you offer emergency services?” “What areas do you serve?” “What are your rates?”
Then switch to managing your business profile and answer those questions thoroughly and professionally.
The beauty is that these Q&A entries appear prominently on your Google Business Profile and in search results. They provide immediate answers to potential customers before they even visit your website.
I use this to target specific service keywords. I post questions like “Do you provide residential and commercial landscaping?” and answer “Yes, we provide both residential and commercial landscaping services throughout Austin and surrounding areas.”
Notice how I naturally included my services and location in the answer? This creates keyword relevance signals within my Google Business Profile.
The Q&A section ranks in Google search sometimes. When someone searches specific questions about businesses like yours, Google may show Q&A content from Business Profiles that have answered those questions.
I recommend creating 5 to 10 strategic questions that address:
Your most common customer questions
Services you offer that people might not realize
Areas you serve
Policies that matter to customers (pricing, scheduling, guarantees)
Qualifications or certifications that build trust
Write answers that are helpful, specific, and naturally include relevant keywords without sounding stuffed or unnatural.
Monitor your Q&A section regularly. Real customers will also post questions, and you need to answer them quickly. Unanswered customer questions look neglectful.
I check my Google Business Profile Q&A weekly and respond to any new customer questions within 24 hours.
Sometimes competitors or troublemakers post inappropriate or false questions. You can report and request removal of questions that violate Google’s policies.
The Q&A feature turns your static Google Business Profile into a dynamic FAQ resource that serves customers and strengthens your keyword relevance simultaneously.
Using the Services Section to Target High-Value Keywords
The Services section in your Google Business Profile is one of the most underutilized features I see.
Most businesses either leave it completely blank or add one generic line like “plumbing services” without details.
This section is your opportunity to list every specific service you offer with detailed descriptions, and Google reads every word for relevance signals.
When someone searches for a specific service like “water heater installation” and your Services section includes a detailed description of your water heater installation service, Google recognizes the relevance and you rank higher for that specific search.
I treat the Services section like mini landing pages within my Google Business Profile.
For each service I offer, I create a separate service entry with a descriptive title and a detailed explanation of what that service includes, using natural language with relevant keywords.
Instead of just “SEO services,” I create separate entries for:
“Local SEO for Small Businesses” with a description explaining this service specifically
“WordPress SEO Optimization” with details about WordPress-specific optimization
“Google Business Profile Management” describing profile optimization services
“Citation Building and NAP Management” explaining directory listings and consistency
Each service gets its own entry with 2-3 sentences describing what’s included, who it’s for, and any key benefits or features.
This serves two purposes. First, it helps potential customers understand exactly what you offer and whether you have the specific service they need. Second, it creates keyword-rich content within your Google Business Profile that strengthens relevance for long-tail searches.
I make sure service descriptions sound natural and helpful, not like keyword spam. Write for humans first, but choose words that match how people search for your services.
Google may display your services in your Business Profile listing or in special service sections of search results. The more detailed and complete your services section, the more opportunities for visibility.
Add services regularly as you expand offerings or identify new keyword opportunities. The services section can be updated anytime without verification.
I review my services quarterly and refine descriptions based on customer feedback and keyword research. If customers consistently search for terms I haven’t included, I add services or adjust descriptions to incorporate those terms.
The Services section is free advertising space within your Google Business Profile. Use every character to describe what you offer and how you serve customers.
The 100+ Photo Strategy (Google’s Own Data Shows 520% More Direction Requests)
Photos on your Google Business Profile have a measurable impact on customer actions that shocked me when I first saw the data.
Businesses with more than 100 photos get 520% more direction requests and 440% more clicks to their website compared to businesses with fewer photos.
Those numbers are staggering. More photos directly translate to more customers finding and contacting you.
I maintain a target of 100+ photos on every Google Business Profile I manage, and I update photos monthly to keep content fresh.
The type of photos matters as much as quantity. Google and customers respond differently to various photo categories.
Exterior photos help customers recognize your building when they arrive. Clear shots of your storefront from different angles, including close-ups of your sign and wide shots showing your building in context of nearby landmarks.
I take exterior photos during different times of day and different seasons to show what the business looks like in various conditions. This helps customers find you regardless of when they visit.
Interior photos build familiarity and set expectations. Show your workspace, your waiting area, your showroom, or wherever customers interact with your business.
Clean, well-lit interior photos create positive impressions. I avoid cluttered or dark photos that make businesses look disorganized or uninviting.
Team photos build trust by showing real people behind the business. Photos of your staff, your team working, or you personally create human connection.
I include captions identifying team members when possible. “Meet Sarah, our lead designer” or “Our installation team completing a project” adds personality.
Product or service photos show what you actually do. For service businesses, this means before and after shots, work in progress, completed projects. For retail, this means your products.
These photos demonstrate quality and give customers realistic expectations of your work.
Customer photos are powerful social proof. Photos of happy customers with your team, customers using your products, or customers in your space show real satisfaction.
Always get permission before posting photos featuring customers. Many people are happy to be included once you ask.
I create a photo upload schedule to maintain consistency. The first week of each month, I upload 5-10 new photos. This keeps my profile fresh and gradually builds toward 100+ photos.
Photos should be high quality but not overly edited or staged. Authentic photos perform better than stock-looking images.
The file names and metadata for photos can include location and service keywords, though I’m not sure how much weight Google gives this. I name files descriptively anyway: “austin-kitchen-remodeling-project.jpg” instead of “IMG_1234.jpg.”
Google Business Profile shows recently added photos prominently. Regular photo updates keep your profile looking active and current.
Beyond the 520% stat, photos simply make your Business Profile more engaging and professional. Customers spend more time looking at profiles with lots of photos, and that engagement likely signals quality to Google’s algorithm.
Building to 100+ photos takes time. Don’t stress about reaching it immediately. Start with 20 good photos across all categories and add more monthly until you hit 100+.
Why Posting Weekly to Your Google Business Profile Matters in 2026
Google Business Profile posts are like social media updates directly in your Business Profile and search results.
Posting regularly on your Google Business Profile signals to Google that your business is active and engaged. I’ve consistently seen correlation between posting frequency and improved local rankings.
Google explicitly states that regular posts can improve visibility, though they don’t quantify exactly how much. Based on my experience, weekly posting provides noticeable benefits without being excessively time-consuming.
I post to my Google Business Profile every Monday morning. This consistency creates a weekly touchpoint with Google’s algorithm showing ongoing business activity.
Post types include updates, offers, events, and products. I vary the post types to keep content diverse.
Update posts share general business news. “We’ve expanded our service area to include Round Rock and Cedar Park” or “New team member spotlight: Meet our new lead technician.”
Offer posts promote special deals or discounts. “15% off kitchen remodeling projects booked this month” with a promotional code if applicable.
Event posts announce upcoming events, open houses, workshops, or appearances. Even small businesses can create events like “Free consultation days” or “Customer appreciation week.”
Product posts highlight specific products for retail businesses. Service businesses can use these to spotlight specific services.
Each post should include an image. Posts with images get significantly more engagement than text-only posts.
I keep posts concise, around 100-150 words. Brief, scannable content performs better than long paragraphs.
Include a clear call to action in every post. “Call today to schedule,” “Visit our showroom,” “Book your free estimate,” or “Learn more on our website.”
You can add a button to posts linking to your website, a booking page, or a contact form. Use this to drive traffic from your post directly to conversion opportunities.
Posts appear in your Business Profile for seven days, then move to older posts. This seven-day visibility window is why weekly posting makes sense. You always have a current post visible.
I batch create posts monthly. On the last day of each month, I write four posts for the next month and schedule them to publish weekly. This takes about an hour and ensures consistent posting even during busy weeks.
Google Business Profile posts also appear sometimes in regular Google search results, giving you additional visibility beyond your standard listing.
Keywords in posts matter. I naturally incorporate location and service keywords in post content to reinforce relevance signals.
Monitor post performance through your Google Business Profile Insights. You can see how many people viewed each post and how many clicked through to your website or called after seeing a post.
Weekly posting requires minimal time investment but maintains your profile as fresh, active, and engaging. Combined with regular reviews and photo updates, it signals a thriving business that deserves prominent search visibility.
Managing Seasonal Closures (Temporarily Closed Status)
The temporarily closed status is crucial for businesses with seasonal operations, those undergoing renovations, or facing temporary closures for any reason.
I learned about this feature when a client panicked during their planned two-week closure for renovations. They thought they had to delete their Google Business Profile or leave it showing incorrect hours.
Instead, Google offers a “temporarily closed” status that maintains your profile while accurately indicating you’re not currently serving customers.
To mark your business temporarily closed, edit your Google Business Profile business information and find the “Mark as temporarily closed” option. Select this and optionally add a reopening date if you know it.
Your listing remains visible in search results with a “Temporarily closed” notation. Your photos, reviews, and other information stay intact. Customers can still view your profile and save it for later.
This is infinitely better than deleting your profile, which loses all your reviews, rankings, and history. Temporary closure status preserves everything while honestly communicating your current status.
For seasonal businesses like ski resorts or summer camps, using temporary closure during off-seasons makes sense. Your profile stays indexed and maintains ranking authority while accurately showing you’re not currently open.
When you reopen, simply remove the temporary closure status and update your hours. Your profile immediately returns to full visibility.
I’ve seen businesses forget to remove temporary closure status after reopening, accidentally continuing to show as closed weeks after resuming operations. Set a reminder to update your status on your reopening date.
The temporary closure feature is also relevant for unexpected closures. Building damage, supply issues, or any situation requiring temporary shutdown. Marking your status accurately maintains customer trust better than leaving old information showing you’re open when you’re not.
Some businesses mark temporarily closed before major renovations or rebranding, then reopen with updated photos and information. This manages customer expectations during transition periods.
Google distinguishes between temporarily closed and permanently closed. Permanent closure should only be marked when you’re actually closing the business forever. This starts a process that eventually removes your listing entirely.
Never mark a temporary situation as permanently closed thinking you’ll reverse it later. The permanent closure process is difficult to reverse and can result in losing your listing.
The temporarily closed feature protects your Google Business Profile investment during unavoidable interruptions while maintaining honesty with customers and Google’s algorithm.
These five Google Business Profile features create competitive advantages when most businesses ignore them. The Q&A section, detailed services, abundant photos, regular posts, and proper closure management separate businesses that actively optimize their profiles from those that set it and forget it.
Google rewards engagement and completeness. Businesses that use every available feature, keep information current, and stay active consistently rank higher than passive profiles with minimal information.
7 Local SEO Mistakes That Get WordPress Sites Banned (Or Just Waste Your Time)
I’ve watched businesses destroy their local SEO through mistakes that seemed harmless or even smart at the time. Some mistakes get you banned. Others just waste months of effort with no results.
Learning from others’ mistakes is cheaper than making them yourself. I’m going to show you the seven most damaging local SEO mistakes I’ve seen and how to avoid them.
These aren’t minor technical issues. These are business-killing errors that can set you back months or even get your Google Business Profile permanently suspended.
Mistake #1: Keyword Stuffing Your Business Name
This is the most tempting mistake because you see competitors doing it and seemingly getting away with it.
You notice businesses ranking well with names like “Joe’s Plumbing – Best Emergency Plumber in Denver 24/7” and think you should do the same. Don’t.
Adding keywords to your business name in Google Business Profile violates Google’s guidelines and risks account suspension.
Your business name should be your actual, legal business name. Nothing more. If your legal name is “Smith Home Services LLC,” that’s what goes in your Google Business Profile. Not “Smith Home Services – Premier Austin HVAC and Plumbing.”
I know the temptation is strong. Keywords in your business name would boost rankings for those terms. That’s exactly why Google prohibits it. It’s manipulation.
Google’s systems detect keyword-stuffed business names. Sometimes immediately, sometimes months later. When they do, consequences range from forced name changes to complete account suspension.
I’ve helped three businesses recover from suspensions caused by keyword-stuffed names. The recovery process took 6-8 weeks of back and forth with Google support, during which their Business Profile was invisible in search. They lost thousands in revenue during that period.
The correct place for those keywords is your website, your business description, and your services section. Google finds them there without policy violations.
Your website landing pages can have titles like “Premier Austin HVAC and Plumbing Services.” Your Google Business Profile description can say “We’re Austin’s trusted provider of HVAC and plumbing services.” Your services section lists “Emergency Plumbing” and “HVAC Repair” separately.
All the keyword value without the risk.
Some businesses have descriptive names that happen to include location or service words. “Austin Wedding Photography” might be your actual business name, legally registered that way. That’s fine. The problem is adding keywords to a name that doesn’t normally include them.
If you’re unsure whether your business name is acceptable, check your legal business registration. Whatever appears on your business license, incorporation papers, or DBA registration is what belongs in your Google Business Profile.
I see businesses rank well with keyword-stuffed names and assume it’s safe. Those businesses either haven’t been caught yet, or Google is testing them. Eventually, most get flagged.
Don’t risk your entire local presence for a small ranking boost from keywords in your name. The risk far outweighs the temporary benefit.
Mistake #2: Buying Fake Reviews
I covered fake reviews in depth in the reviews section, but they belong in this mistakes list because the consequences are severe enough to warrant repeating: Google uses patterns you can’t see to detect fake reviews, and the punishment is account suspension — sometimes removing all your reviews, including legitimate ones. If you skipped past the review section earlier, go back and read it. This is the mistake I’ve watched destroy businesses that were otherwise doing everything right.
Mistake #3: NAP Inconsistencies Across the Web
This mistake rarely announces itself you don’t realize it’s hurting your rankings until you audit your citations. The short version: even subtle differences like ‘Street’ vs. ‘St.’ across different directories create confusion for Google’s algorithm. Run a citation audit using Moz Local or SEMrush, fix your top 10 listings first, and keep a master NAP document to prevent it recurring. Full details are in the NAP section earlier in this guide.
Mistake #4: Focusing on Review Quantity Instead of Velocity
Businesses celebrate reaching milestones like “50 reviews!” or “100 reviews!” without considering when those reviews were accumulated.
Total review count matters, but review velocity matters more for current rankings.
Getting 30 reviews in your first month then zero reviews for the next six months creates a ranking problem. Google sees stagnant review activity and may interpret it as declining business quality or fake review patterns.
I made this mistake with a client. We ran an intensive review campaign and collected 45 reviews in one month. Great, right? Then we stopped actively asking because we felt we had “enough.”
Over the next few months, that client’s rankings gradually declined despite having more total reviews than when they were ranking higher. The lack of fresh reviews signaled stagnation to Google.
The fix was implementing ongoing review requests as a standard business process. Now they get 3-5 reviews monthly through systematic post-service requests.
Think about reviews like content. Search engines favor websites that publish new content regularly over websites that published a lot once and then stopped.
Build review acquisition into your standard customer interaction process. After every completed job, send a review request. Make it automatic, not something you remember to do occasionally.
For subscription or repeat customers, you can’t ask for reviews after every interaction. Space requests months apart from the same customer. But overall, your business should accumulate reviews consistently.
This doesn’t mean fake urgency to hit quotas. You can’t manufacture more customers just to get reviews. But you should ask every real customer for feedback, creating natural ongoing review flow.
Monthly review velocity is more valuable than a large but stale review count. Three new reviews this month beat thirty reviews from last year for current ranking impact.
Mistake #5: Incomplete GMB Profiles
I see Google Business Profiles with half the fields left blank all the time. Business description missing. Hours not filled out. Services section empty. Photos limited to one logo image.
Every blank field is a missed opportunity to provide information to Google and potential customers.
Google uses profile completeness as a ranking signal. Two businesses with otherwise similar profiles, the one with 100% completion will likely outrank the one at 60% completion.
Completeness also affects conversion. A customer comparing two businesses will choose the one with complete information showing hours, photos, services, and detailed descriptions over the sparse profile missing half its information.
I audit every field in Google Business Profile and fill out everything that applies to the business. It takes maybe an hour for a single-location business, but that hour’s work improves rankings and conversions ongoing.
The common excuse is “I don’t know what to write in the description” or “I don’t have professional photos.” These are solvable problems, not reasons to leave fields blank.
For descriptions, write 2-3 paragraphs explaining what you do, who you serve, what makes you different, and where you’re located. Natural, helpful content with relevant keywords woven in.
For photos, use your smartphone. You don’t need professional photography, though it helps. Clear, well-lit photos of your business, team, and work are enough.
Services section is often left blank because businesses don’t realize it exists or understand its value. I explained earlier how valuable this section is for keyword targeting. Never leave it empty.
Business hours should be complete and accurate for every day of the week. If you’re closed Sundays, mark it as closed. Don’t just leave Sunday blank.
Attributes are another overlooked section. Mark all that apply: wheelchair accessible, outdoor seating, free wifi, accepts credit cards, whatever’s relevant. Each attribute helps Google understand your business better.
Profile completeness is not optional for serious local SEO. It’s foundational. Treat your Google Business Profile with the same care you treat your website.
Mistake #6: Choosing the Wrong Primary Category
Your primary business category choice influences which searches you appear in more than almost any other single setting.
I’ve seen businesses rank poorly for their main service because they chose a broad or incorrect primary category.
A business offering primarily residential plumbing services chose “Contractor” as their primary category because they technically are a contractor. But “Plumber” is far more specific and matches what their customers search.
They weren’t appearing for “plumber near me” searches because Google didn’t see plumbing as their primary focus based on the category.
Changing the primary category to “Plumber” immediately improved their visibility for plumbing-related searches.
The primary category tells Google what you fundamentally are. Choose the single most accurate category that matches your primary revenue source and the searches you most want to rank for.
You can add secondary categories for other services you offer. If you’re primarily a plumber but also do HVAC work, “Plumber” is primary and “HVAC contractor” is secondary.
I research what categories successful competitors use. If the top-ranking businesses in my niche all use a specific primary category, that’s probably the right choice.
Google offers hundreds of categories. Sometimes the perfect category for your business exists and you just need to find it. Search through the full list before settling on a broad category.
Some businesses choose vanity categories that sound prestigious but don’t match how customers search. A “Consultant” category sounds professional, but “Marketing Consultant” or “Business Consultant” is more specific and matches actual searches better.
Wrong category selection is easily fixed, but it can cost you months of poor rankings before you realize the problem. Get it right initially by researching competitor categories and thinking about what customers actually search for.
Mistake #7: Not Adding a Backup Admin to Your GMB Account
This mistake doesn’t hurt SEO directly, but it can instantly destroy all your local SEO progress if you lose access to your Google Business Profile.
I emphasized this in the setup section because it’s critical, but businesses still skip it assuming “that won’t happen to me.”
Then they lose access to the email account that controls their Google Business Profile. Or an employee who set it up leaves the company without transferring ownership. Or the account gets hacked and locked.
Without a backup admin, recovery is slow, frustrating, and sometimes impossible. You’re stuck in Google support limbo while your business is invisible in local search.
The fix takes two minutes. Add a second owner-level user to your Google Business Profile using a different email address. Store that backup email login information securely.
I create a dedicated Gmail account specifically as a backup admin for my Google Business Profile. It’s not my personal email. It’s not an employee’s email. It’s a separate account used only for backup access, with its own secure password stored in a password manager.
This saved me once when my primary Google account had suspicious activity and was temporarily locked. I logged in with the backup account, managed my profile normally, and resolved the primary account issue without losing business.
Think of backup admin access like insurance. You hope you never need it, but if you do, you’ll be incredibly grateful you set it up.
Some businesses use their web developer’s or marketing agency’s email as the backup admin. That works if you trust that relationship long-term. But I prefer controlling both admin accounts myself using dedicated emails I own.
Don’t wait until you have a problem to add backup access. Do it immediately after creating your Google Business Profile. It’s one of those simple preventive measures that can save your business from disaster.
These seven mistakes range from policy violations that get you banned to inefficiencies that waste your time and limit your results. Avoiding them protects your local SEO investment and accelerates your path to strong rankings.
Local SEO success comes from doing the important things right consistently while avoiding the mistakes that derail progress. Now you know both what to do and what to avoid.
Your Local SEO for WordPress Action Plan (What to Do This Week)
You’ve learned a lot about local SEO for WordPress in this guide. Now I want to give you a clear action plan so you know exactly what to do and when.
Trying to do everything at once leads to overwhelm and half-finished implementation. Breaking it into prioritized steps gets results without burning you out.
I’m going to show you what to tackle this week, what becomes ongoing monthly work, and what you review quarterly. This systematic approach builds sustainable local SEO rather than a short-term ranking spike.
Week 1: Set Up Your Foundation
Your first week focuses on the foundational elements that everything else builds upon.
Day 1: Create or claim your Google Business Profile. Fill out every field completely. Request verification.
Day 2: Install your chosen local SEO plugin (Rank Math free, Yoast Local SEO, or AIOSEO). Configure with your business information.
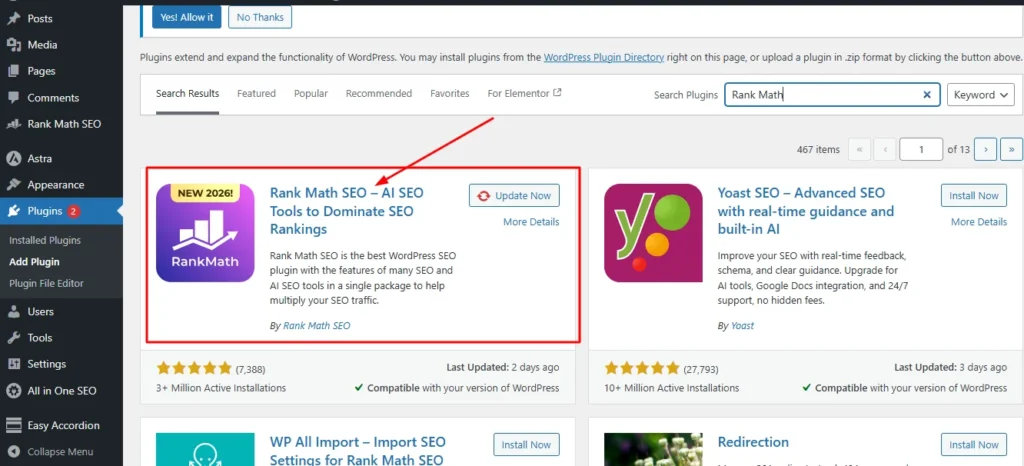
Day 3: Activate and configure local business schema. Run Google’s Rich Results Test and fix any errors.
Day 4: Optimize your contact page — complete NAP, embedded Google Map, hours, and location-specific content.
Day 5: Audit your NAP across your top 10 listings. Create your master NAP document. Fix inconsistencies on Google, Bing, Yelp, and Facebook first.
Day 6: Add NAP to your WordPress footer with a clickable phone number. Verify mobile display.
Day 7: Submit your sitemap to Google Search Console and Bing Webmaster Tools.
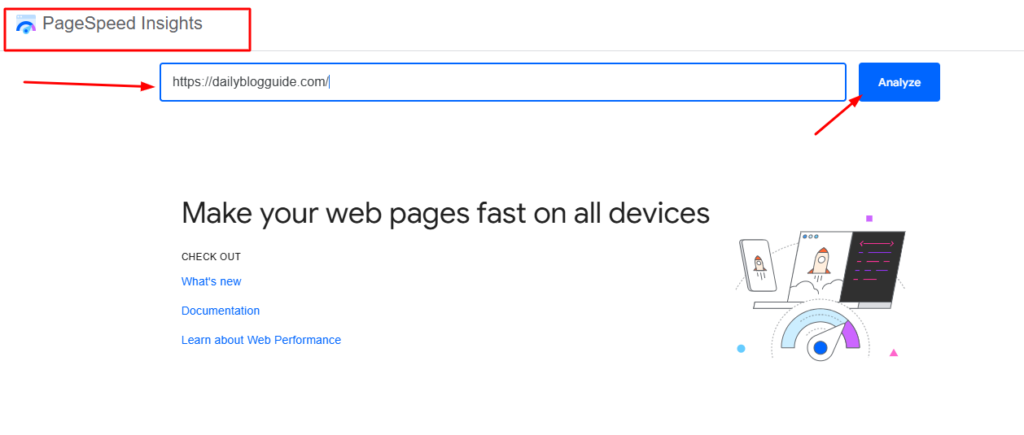
Monthly Maintenance Tasks
Local SEO isn’t set-it-and-forget-it. Monthly maintenance keeps your presence fresh and your rankings growing.
First Monday of each month: Create and schedule four Google Business Profile posts for the month. Write one update, one offer or announcement, and two service highlights. Schedule them to publish weekly throughout the month.
First week of each month: Upload 5-10 new photos to your Google Business Profile. Include a mix of exterior shots, interior updates, team photos, and recent work examples. Aim to reach and maintain 100+ total photos.
Throughout the month: Request reviews from satisfied customers. Send review requests within 24 hours of completing service. Aim for 3-5 new reviews per month from real customers.
Twice monthly: Respond to all new reviews. Thank customers for positive reviews. Address concerns in negative reviews professionally. Never let reviews sit unanswered for more than a few days.
Mid-month: Check your Google Business Profile for customer questions in the Q&A section. Answer any new questions promptly. Add 1-2 strategic questions and answers yourself if traffic has been slow.
End of month: Review your Google Business Profile Insights and Google Analytics data. Track your impression growth, click-through rates, calls, and direction requests. Note what’s working and what needs adjustment.
End of month: Add 1-2 new citations to quality directories or update existing citations if information has changed. Building citations is gradual work spread over months, not a one-time task.
These monthly tasks take 3-4 hours total, spread throughout the month. Consistent execution compounds over time into strong rankings and steady customer flow.
Quarterly Audits
Every three months, do deeper analysis and optimization work.
Q1, Q2, Q3, Q4 Reviews: Run a complete NAP audit across all your citations. Use a tool like Moz Local or SEMrush Listing Management to find inconsistencies. Clean up any errors that have crept in.
Quarterly: Revalidate your schema markup using Google’s Rich Results Test. Plugin updates or theme changes sometimes break schema. Catching and fixing issues quarterly prevents extended periods of broken structured data.
Quarterly: Analyze your keyword rankings for your primary local keywords. Are you moving up, staying flat, or declining? Identify which keywords need more focus based on performance and business priorities.
Quarterly: Review your top competitors’ Google Business Profiles. What are they doing that you’re not? Are they posting more frequently? Do they have more photos? Better reviews? Learn from their successes.
Quarterly: Check your website’s technical SEO health. Run a speed test. Verify mobile functionality. Test all forms and click-to-call links. Fix any broken elements immediately. If you’d like a structured checklist for this review, our guide on how to do an SEO audit walks you through every element step by step.
Quarterly: Update your WordPress content if business information has changed. Hours, services, service areas, team members, anything that affects your local SEO should be current everywhere.
Quarterly: Review your internal linking structure. Are new blog posts linking to your location pages? Are service pages properly linked from your homepage? Strengthen weak internal linking.
Quarterly: Backup your website completely and test the backup’s restoration. You should already have automatic backups, but testing them quarterly ensures they work when you need them.
These quarterly tasks take 4-6 hours but provide deep insight into your local SEO health and catch problems before they significantly impact rankings.
Tracking Your Progress
You need to measure results to know if your efforts are working and where to focus next.
Google Search Console is essential for tracking your local SEO performance. Connect your WordPress site to Search Console if you haven’t already.
In Search Console, look at the Performance report. Filter for queries containing your city name or local modifiers. Track impressions and clicks for these local terms over time.
Growing impressions mean you’re appearing more frequently in local searches. Growing clicks mean people are choosing your listing when they see it. Both metrics should trend upward over time.
Your average position for local keywords should gradually improve. Don’t expect instant jumps to position one. Look for steady month-over-month improvement.
Google Business Profile Insights show how people find and interact with your Business Profile. Track how many people view your profile, how many click to your website, how many call, how many request directions.
These action metrics matter more than vanity metrics. Calls and direction requests represent real potential customers engaging with your business.
Compare month-over-month performance. Are you getting more profile views this month than last month? More calls? If numbers are growing, your optimization is working.
If numbers are flat or declining, dig into what changed. Did you stop posting? Have reviews slowed down? Did a competitor surge ahead?
Website traffic from local organic search (from Google Analytics 4)
- Google Business Profile total views (from Insights)
- Phone calls from Google Business Profile (from Insights)
- Impressions for my top 3 local keywords (from Search Console)
- Total Google reviews and average rating (from Business Profile)
- Website traffic from local organic search (from Google Analytics)
These five metrics tell me if local SEO is driving real business results or just vanity numbers.
Set goals for each metric. “Increase profile views by 10% month over month.” “Get 5 new reviews this month.” “Improve average position for primary keyword from 4.2 to 3.8.”
Small, measurable goals keep you focused and let you celebrate progress.
Realistic Timeline: When Will You See Results?
Everyone wants to know how long local SEO takes to work. The honest answer is: it depends, but here are realistic expectations based on my experience.
For Google Business Profile and Map Pack rankings, you can see initial results within 2-4 weeks of proper optimization. Your profile becomes complete, you get a few reviews, you add photos and posts. You start appearing in the Map Pack for some searches, often positions 4-10 initially.
With continued optimization and review accumulation, you can reach top 3 Map Pack positions within 2-3 months for lower competition keywords. More competitive keywords take 4-6 months.
The Map Pack is faster to crack than organic rankings because competition is limited to your geographic area and Google prioritizes Google Business Profile freshness and completion.
For organic WordPress rankings in regular search results, expect 3-6 months to reach first page results for local keywords with moderate competition. Your site needs time to establish authority through content, links, and consistent signals.
Highly competitive local markets take longer. If you’re a personal injury lawyer in a major city competing against firms with years of established SEO, 6-12 months for strong rankings is realistic.
Less competitive niches move faster. A specialized service in a smaller city might rank well within 2-3 months because there are fewer optimized competitors.
The variables affecting timeline include:
Competition level in your market and industry
Starting point (brand new profile vs. existing profile with some history)
Consistency of implementation (doing everything vs. partial efforts)
Review velocity (steady reviews vs. sporadic)
Content quality on your WordPress site
Citation building pace
Technical SEO health of your website
I tell clients to commit to 6 months of consistent local SEO work before evaluating whether it’s working. Three months shows initial progress. Six months shows clear trends. Twelve months builds dominant local presence.
Quick wins happen. You might rank well for a low-competition long-tail keyword within weeks. But sustained, broad visibility across your target keywords takes months of consistent work.
The businesses that succeed with local SEO are those that treat it as ongoing marketing, not a one-time project. Rankings aren’t ‘done.’ They require maintenance and growth work continuously. Once this foundation is solid, our guide on how to improve your local SEO rankings covers the advanced tactics you can layer on to stay ahead of local competitors.
But the compound effect is powerful. Your efforts in month one support months two and three. Reviews accumulated early benefit you months later. Citations you build now strengthen your profile for years.
Start with your Week 1 foundation. Execute monthly maintenance consistently. Run quarterly audits to stay on track. Track your five key metrics to measure progress. And give it the time it needs to build momentum.
Local SEO for WordPress isn’t magic. It’s systematic implementation of proven tactics over time. Now you have the complete roadmap to do it right.
Frequently Asked Questions About Local SEO for WordPress
Can I add keywords to my Google Business Profile name to rank better?
No, and I strongly advise against trying. Adding keywords to your business name violates Google’s guidelines and risks getting your entire Google Business Profile suspended. I’ve seen businesses lose months of rankings and all their reviews because they stuffed keywords into their business name. Your business name should be your actual legal name, exactly as it appears on your business license and official documents. Put your target keywords in your website content, business description, and services section instead, where they’re allowed and just as effective without the risk.
How many reviews do I need to rank #1 in Google Maps?
It’s not about hitting a specific number. What matters more is how recently you got those reviews compared to your competitors. A business with 20 reviews from the last month often outranks a business with 50 reviews from three years ago because Google values review velocity over total volume. Focus on getting 3-5 new reviews every single month through systematic requests to satisfied customers. This ongoing flow of fresh reviews signals active business operations and current customer satisfaction, which Google rewards with better rankings.
Do I need a premium WordPress plugin for local SEO or can I do it for free?
You can achieve excellent local SEO results with free plugins like Rank Math. The free version includes local business schema markup, which is the most critical technical element for local SEO. Premium plugins like Yoast Local SEO or AIOSEO offer easier setup and extra features like automated location page creation for multi-location businesses. If you have a single location, moderate technical comfort, and a tight budget, start with Rank Math’s free version. If you want simpler setup and have budget available, Yoast Local SEO or AIOSEO are worth the investment for time savings and convenience.
What’s the difference between the Map Pack and regular search results?
The Map Pack is the box showing the top three businesses on Google Maps that appears above regular search results for local queries. It captures 44% of all clicks for local searches, making it dramatically more valuable than traditional organic rankings for local businesses. To appear in the Map Pack, you need a fully optimized Google Business Profile. Regular organic search results rely more on your WordPress website’s SEO. You should prioritize Map Pack optimization first because it delivers faster results and higher ROI for local businesses.
How do I optimize my WordPress site if I’m a mobile business with no physical storefront?
In your Google Business Profile, hide your address and instead set up service areas showing the cities or regions you serve. On your WordPress site, create dedicated service area pages for each city you target, like “Plumbing Services in Denver” or “Austin Area Electrical Services.” Each page needs unique content discussing that specific area, local customer testimonials if you have them, and genuine information about serving that location. Use Service schema with areaServed properties instead of LocalBusiness schema with a specific address. Be transparent that you serve the area rather than claiming a physical location that doesn’t exist.
What should I do if I lose access to my Google Business Profile?
Recovery is difficult and time-consuming, which is why prevention is critical. The moment you create or claim your Google Business Profile, add a second admin user with owner-level access using a completely different email address. Store that backup email login securely. If you lose access to your primary account, you can still manage your profile through the backup account. If you didn’t set up a backup and lose access, contact Google Business Profile support immediately and be prepared for a lengthy verification process that could take weeks or even months while your business remains invisible in local search.
How long does it take to see results from local SEO?
If you optimize your Google Business Profile correctly and implement everything I’ve covered in this guide, you can start appearing in the Map Pack within 2-4 weeks. Initial appearances might be in positions 4-10, with movement to the top 3 positions taking another 1-2 months with consistent review accumulation and posting. Organic WordPress rankings in regular search results take longer, typically 3-6 months for page one visibility for moderately competitive local keywords. The timeline depends on your competition level, how consistently you implement the strategies, and your review velocity. Commit to six months of consistent work before evaluating whether local SEO is working for your business.
Should I hire someone to write fake positive reviews for my business?
Absolutely not, and I can’t stress this strongly enough. Buying fake reviews violates Google’s policies and will eventually get you caught. Google uses sophisticated algorithms to detect fake review patterns through reviewer behavior analysis, language patterns, IP tracking, and dozens of other signals you can’t see. When caught, consequences range from all your reviews being removed (including legitimate ones) to complete Google Business Profile suspension. I’ve watched businesses lose years of rankings and months of revenue recovering from fake review penalties. Build your review profile the right way by providing excellent service and systematically asking real customers for honest feedback. It’s slower but sustainable and risk-free.
Congratulations! You now have the complete roadmap for local SEO for WordPress.
You now have a real, tested roadmap for local SEO on WordPress — not theory, but the exact process I’ve used to move businesses from invisible to dominant in their local markets.
The first step is always the hardest. Open your Google Business Profile, fill out every field, and build from there. Everything else in this guide supports that foundation.
Start with Week 1. Build the habits of monthly maintenance. Track five numbers. Give it six months of consistent effort.
When a nearby customer searches for what you offer and finds your business first, you’ll know it was worth it.how dozens of fresh five-star reviews.
That’s the power of local SEO for WordPress done right. Now go build it.


