

When I first tried to move content from one WordPress site to another using JSON, I spent three hours hunting for an import button that flat-out does not exist. I found three methods that genuinely work to wordpress import json content from another website each tested on real client projects. There is no built-in JSON importer in WordPress, and that missing button has tripped up everyone from first-time site owners to developers who absolutely should have known better.
I figured it out the slow way: WordPress uses XML by default, not JSON. But once I understood what was actually happening, I found three methods that genuinely work each tested on real client projects.
This guide covers all three ways to wordpress import json content from another website. By the end, you will know exactly which approach fits your skill level, which mistakes cause imports to break, and what to do when something goes wrong.
WordPress Does Not Import JSON by Default : Here Is What You Need to Know First
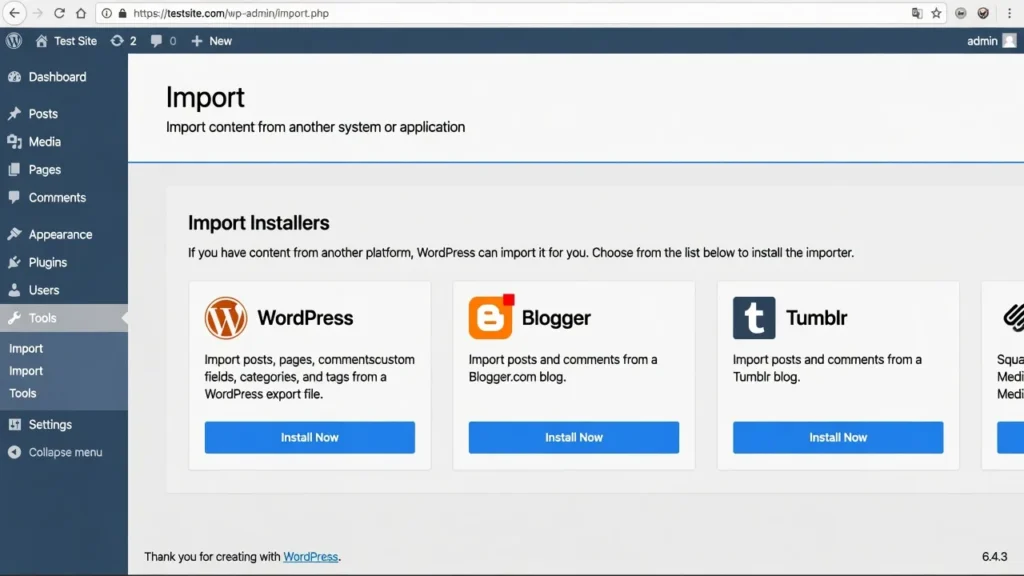
WordPress was built before JSON became the web’s standard data format. The built-in import tool uses XML specifically a format called WXR (WordPress eXtended RSS). Open Tools → Import in your dashboard and you will see importers for WordPress, Blogger, and a handful of other platforms, but there is no JSON option anywhere on that list.
That is not an oversight. WordPress launched in 2003, and XML was the right choice for that era. JSON support did not arrive until WordPress 4.7 in December 2016, through the REST API, and it has never been backfilled into the core importer. The REST API is fully documented at developer.wordpress.org/rest-api/.
So if you want to transfer WordPress content between sites using JSON, you are operating outside what WordPress ships with. Your three paths are: a specialized plugin, custom PHP code, or direct WordPress REST API calls.
Why WordPress Import JSON Content Requires a Different Approach Than Standard Imports
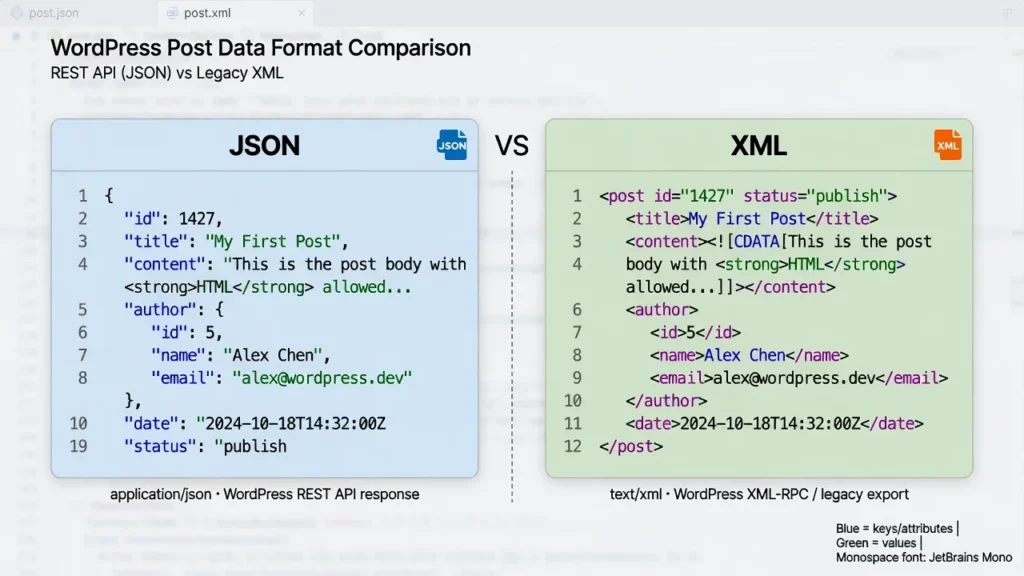
If you have never worked with JSON before, here is the short version: JSON (JavaScript Object Notation) is a plain-text format that organizes data into key-value pairs, like this:
{
  "title": "My Post Title",
  "content": "This is the post content.",
  "author": "Jane Smith",
  "date": "2025-01-15"
}
It is lightweight, human-readable, and easy for modern web applications to parse quickly. That last point is why it became the default format for the WordPress REST API every WordPress site running version 4.7 or newer outputs content as a JSON data structure automatically, no configuration required.
You would use JSON for WordPress site migration when pulling content from an external API, syndicating posts from another source, or building a custom integration between two sites. It also powers things you might not expect Elementor stores all its page designs as JSON, and WordPress block patterns export as JSON files. I cover both of those use cases later in this guide.
Note: WordPress does not natively export or import pure JSON files what the REST API returns is JSON, but the built-in importer uses XML. This guide explains the practical difference and which approach to use for your specific goal.
The Three Methods This Guide Covers (Choose Yours)
I have personally tested three approaches for importing JSON content into WordPress. Each one fits a different situation:
Method 1: JSON Content Importer Plugin (Beginner) Best for non-developers who want a plugin solution. Install it, enter your JSON source URL, and display the content with a shortcode or Gutenberg block. Works well for displaying external API data on your site.
Method 2: WordPress Built-in Export and Import for Complete Site Migration (All Levels) Best for complete WordPress site migration between two WordPress sites. Export all content from your source site using the Tools menu, then bulk import WordPress posts, pages, comments, and media files in one seamless workflow. No code required.
Method 3: WordPress REST API with Custom PHP (Developer) Best for developers who need full control over field mapping, custom post types, or authenticated API access. Write PHP code that fetches JSON from the WordPress REST API endpoint and creates posts programmatically with wp_insert_post.
Not sure which to pick? Start with Method 2 no code, no plugins to configure, and it reliably handles complete site transfers.
If your content currently lives in a spreadsheet, a Google Sheets WordPress import via the WP All Import plugin is another path worth knowing, though it falls outside the scope of this guide.
Before You Start: Prepare Both WordPress Sites Correctly
Most failed imports I have had to fix were not caused by the import process itself they happened because the destination site was not ready to receive the content.
Whether you are migrating your WordPress site to a new host or simply transferring posts between two existing sites, a few preparation steps before you start will save you from broken layouts, missing images, and the frustration of redoing everything from scratch.
These are the steps I run through before every content migration WordPress project, no matter how straightforward it looks.
Install Your Theme on the Destination Site First
Before you import any content, install and activate the theme you want to use on your destination WordPress site. I learned this the hard way when I imported a complete set of pages to a fresh WordPress installation that had no theme activated. The content imported successfully, but every page looked completely broken because there was no theme to render the layout properly.
If you are migrating from a site that uses Elementor, Divi, or any other page builder, install that same page builder on the destination site before importing. Page builder content depends on its plugin being active to render correctly.
Here is the preparation sequence I follow for every WordPress content transfer project where I want the destination site to look exactly like the source site:
- Install WordPress on the destination site
- Install and activate the same theme used on the source site
- Install and activate any page builder plugins the source site uses
- Install any plugins that register custom post types used in your content
- Create at least one user account on the destination site to assign imported content to
Complete these five steps before you import a single post. Skipping any of them creates problems that are frustrating to diagnose after the fact.
Back Up Both Sites Before You Touch Anything
I always create a complete backup of both the source and destination sites before running any import no exceptions.
Imports can fail in unexpected ways. Your WordPress database import might create duplicate posts, broken category relationships, or corrupted custom fields. With no backup, your only recovery option is deleting hundreds of posts one by one.
Use a free plugin like UpdraftPlus or Duplicator to generate a full backup before you start (following WordPress security best practices ensures your backup strategy protects you beyond just import scenarios).
Save the file to Google Drive, Dropbox, or your local hard drive somewhere completely separate from your web hosting account, so a server failure cannot take out your site and your backup at the same time.
If you have access to localhost testing or a staging environment, run the entire import there first. This is the single best way to catch problems before real visitors are affected.
Method 1 Using the JSON Content Importer Plugin (Best for Beginners)
The JSON Content Importer plugin is the easiest way to pull external JSON data into WordPress without touching a single line of code. It connects to any JSON endpoint or JSON feed URL, fetches the data automatically, and lets you display it on any page using either a shortcode or a Gutenberg block.
I reach for this plugin whenever a client needs live content on their site event listings from a ticketing API, product feeds from a supplier, or news items from a third-party source. The page always shows fresh data because the plugin fetches directly from the source every time it loads.
Installing JSON Content Importer from WordPress.org
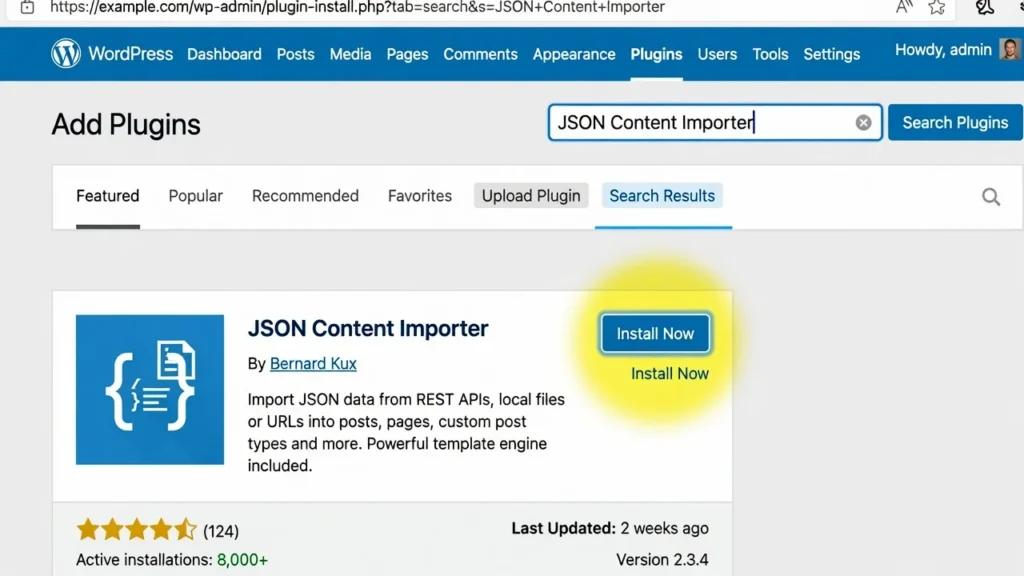
Installing this WordPress import plugin takes about two minutes. Go to your WordPress dashboard and navigate to Plugins → Add New. In the search box, type “JSON Content Importer” and press enter. You will see the plugin by Bernard Kux appear in the search results.
Click Install Now, then click Activate once installation completes. The plugin adds a new settings section under Settings → JSON Content Importer in your dashboard. The plugin is free, actively maintained, and available directly from WordPress.org. No account or license key is required to get started.
If the plugin fails to activate or you encounter installation errors, check our plugin installation troubleshooting guide for common fixes.
Entering Your JSON Source URL and Configuring Fields
After activating the plugin, open its settings page under Settings → JSON Content Importer. Find the field labeled JSON Feed URL or API Endpoint and paste the full URL of your JSON source. This can be a WordPress REST API endpoint from another site (such as https://sourcesite.com/wp-json/wp/v2/posts) or any web service returning JSON data.
Click the Preview button to test the connection. The plugin fetches your feed and shows all available fields: title, content, author, date, and any custom fields included in the response.
From there, map each JSON field to its matching WordPress destination. Tell the plugin which JSON key becomes the post title, which becomes the post content, and which to ignore. This field mapping step is what separates a clean import from a page full of garbled data.
Displaying Your Imported JSON Using Shortcode or Block
Once you have configured your JSON source and field mapping, you have two ways to display the imported data on your site.
Option 1: Use the Shortcode The plugin generates a shortcode like [jsoncontentimporter url="your-api-url"]. Copy it and paste it into any post, page, or text widget. Compatible with any WordPress theme, including older ones that predate the block editor.
Option 2: Use the Gutenberg Block In the block editor, search for the JSON Content Importer block in the inserter. Add it to your page, enter the JSON source URL in the block settings panel, and the content renders immediately in the editor.
I default to the Gutenberg block on new builds because the live preview speeds up setup. The shortcode is the better pick for older themes or when you need the same import shortcode placed across dozens of pages at once.
When JSON Content Importer Is Not Enough (Important Limitations)
The JSON Content Importer plugin does its job well, but it has three hard limits that catch people off guard. Know these before you invest time configuring it.
Limit 1: No bearer token authentication. If your API requires an Authorization header with a bearer token or API key, this plugin cannot connect. Method 3 covers how to handle API authentication WordPress scenarios using custom PHP.
Limit 2: It displays data it does not store it. The plugin fetches JSON every time someone loads the page. It does not write actual WordPress posts to your database. If you need to permanently import custom fields WordPress data or create posts you can edit later, you need a different solution.
Limit 3: No custom post type mapping. The plugin handles standard posts by default. If your content needs to go into portfolio, product, or event custom post types, use Method 3.
For pulling live data from a public API and displaying it on a page or post, this plugin is exactly the right tool. For authentication, permanent post creation, or custom post types jump to Method 3.
Method 2 WordPress Built-in Export and Import for Complete Site Migration
This is the method I use most often for complete WordPress site migration. It uses the built-in WordPress export and import workflow to transfer everything: posts, pages, comments, categories, tags, custom fields, and media files.
One important clarification: WordPress exports in XML format (called WXR), not JSON. But for anyone searching for how to wordpress import json content from another website, this method accomplishes exactly what they actually need a complete, reliable content transfer with no code required. The format difference is invisible to you during the process.
I have used this workflow on dozens of migrations sites with hundreds of posts and thousands of images and it works every time, as long as you follow the steps in order and do not miss the critical checkbox I will call out in Step 2.
Step 1 Export All Content from Your Source WordPress Site
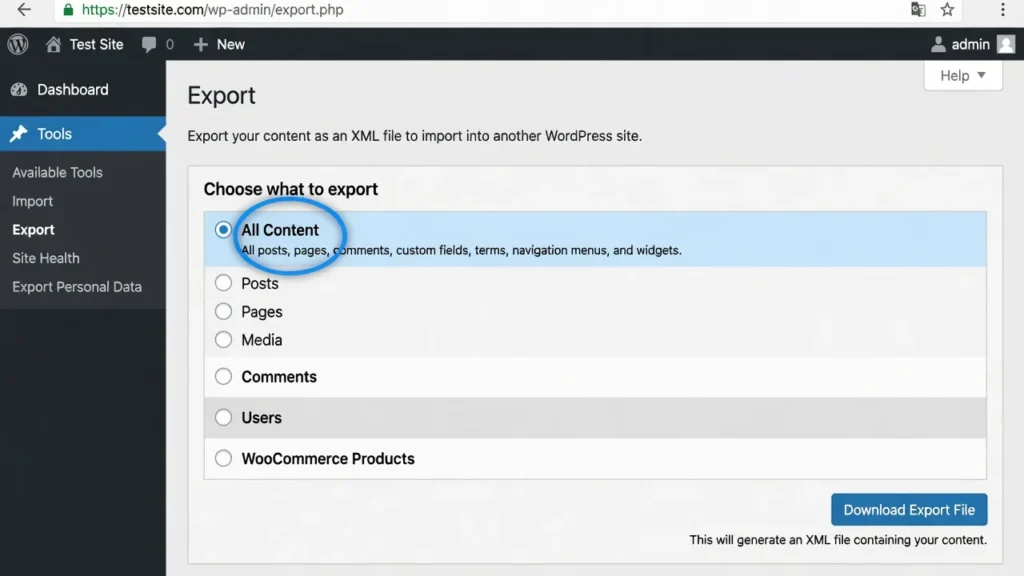
Log into your source WordPress site and navigate to Tools → Export.
You will see a few export options. The default “All Content” selection captures everything: posts, pages, comments, custom fields, categories, tags, navigation menus, and media URLs. I use this option for complete transfers.
If you only need specific content types, select Posts, Pages, or Media individually to create a smaller, faster file.
Click Download Export File. WordPress generates an XML file and saves it to your computer. Even for sites with hundreds of posts, the file is typically only a few megabytes it contains text content and media URLs, not the actual image files. The images download separately during the import step, which I cover next.
If your source site uses special characters, accented letters, or non-Latin scripts in post content, the XML export handles encoding correctly but double-check a few sample posts after import to confirm characters transferred without corruption.
Step 2 Install the WordPress Importer on Your Destination Site
Switch to your destination WordPress site the one that will receive the content.
Go to Tools → Import. You will see a list of available importers for different platforms. Find the option labeled “WordPress” and click Install Now underneath it. WordPress downloads and installs the official WordPress Importer plugin to handle your WordPress database import.
Once installation finishes, click the Run Importer link that appears directly below it. This opens the configuration screen where you will upload the export file you just downloaded.
The One Checkbox That Most People Miss (Images Will Break Without It)
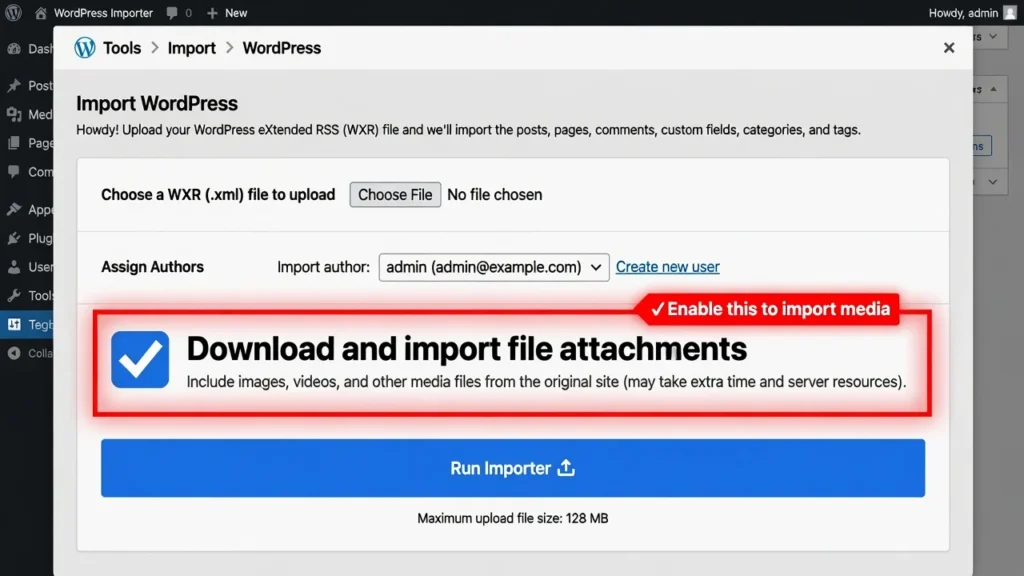
This is the single most important step in the entire process, and it is the mistake I see most often.
After you upload your export file and assign content to a user, you will see a checkbox labeled “Download and import file attachments.”
Check this box. Do not skip it.
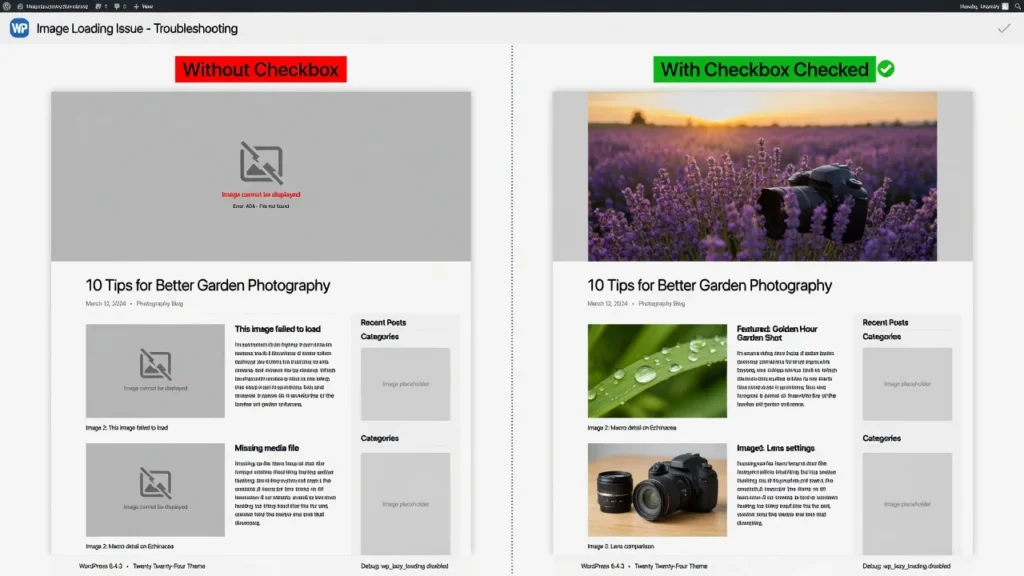
If you miss it, WordPress will import all your posts and pages perfectly but every single image will appear as a broken placeholder. Your featured image import will fail, all inline images will show as missing icons, and you will think the entire process failed when only the media transfer was skipped.
I made this mistake on my very first WordPress content transfer project. I imported 200 posts, celebrated when they all appeared in my posts list, then opened the site and found nothing but broken image icons everywhere. I had to delete everything and start completely over.
When you check “Download and import file attachments,” WordPress automatically downloads every image, PDF, and media file from your source site and uploads them to your destination site’s media library — preserving your featured image import and all inline images correctly.
Click Submit and wait. Imports with many posts or large media files can take several minutes. Do not close the browser tab until you see the success confirmation.
What Transfers and What Does Not (Set Your Expectations)
After your import completes, here is exactly what made the trip and what did not.
What transfers successfully:
- All posts and pages with their full content
- Post categories import and tag assignments
- Comments and comment metadata
- Custom fields and post meta data import (when properly formatted)
- Media files and featured images (only when the attachment checkbox was checked)
- Post publication dates and author assignments
What does NOT transfer:
- General site settings site title, tagline, permalink structure
- Navigation menus (stored separately, need manual recreation)
- Theme customizer settings and widget configurations
- Plugin settings and plugin-specific data
- User accounts and user roles
- Custom database tables created by plugins
After every import, I spend about 15 minutes manually rebuilding navigation menus and checking site settings. If you are moving to a new domain or host, follow a website migration SEO checklist to ensure your search rankings survive the transition. This is completely normal the WordPress importer was designed for content, not configuration.
Method 3 Using the WordPress REST API to Import Posts Programmatically
If you are comfortable writing PHP, the WordPress REST API gives you complete control over exactly how content is fetched, how fields are mapped, and where data lands in your database. This is the right method for custom post types, complex custom field mapping, authenticated APIs, or any situation a plugin cannot handle cleanly.
The three steps are: enable REST API access on your source site, fetch the JSON data with PHP and cURL, then create posts on your destination site using wp_insert_post. Let me walk through each one.
Step 1 Enable REST API Access on Your Source WordPress Site
The WordPress REST API is enabled by default on every WordPress site running version 4.7 or newer. No setup required.
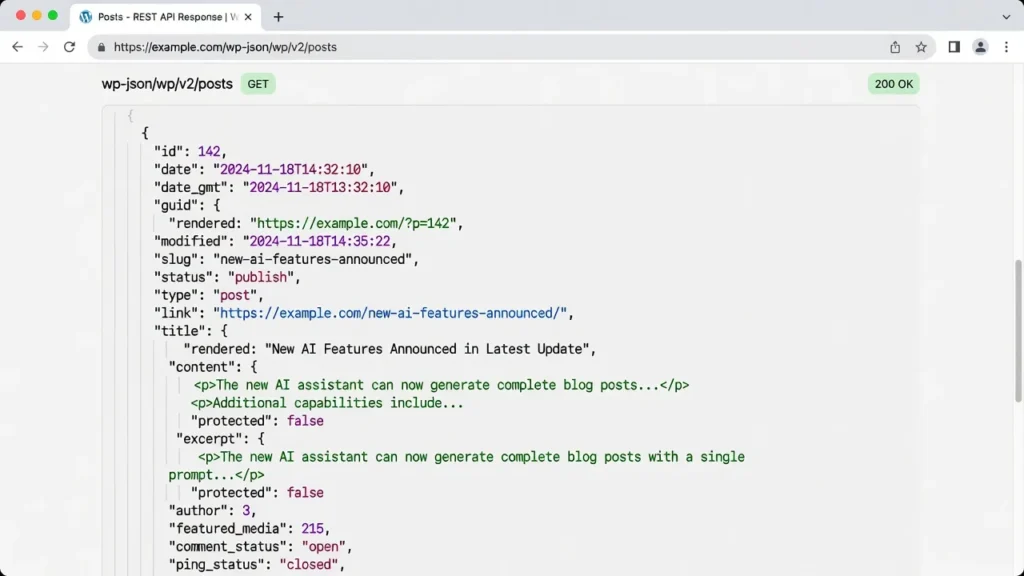
Your REST API endpoint follows this structure:
https://yoursite.com/wp-json/wp/v2/posts
Replace yoursite.com with your actual domain, then open that URL in your browser. If the API is working, you will see a JSON array of your most recent posts each containing its title, content, excerpt, featured image ID, categories, tags, and custom fields.
Quick heads-up: The REST API returns 10 posts per page by default. To retrieve more, add ?per_page=100 to the URL (100 is the maximum per request). For sites with more than 100 posts, loop through additional pages using the ?page=2 parameter and increment it until you have all posts.
If you see an error or blank page instead of JSON, confirm your WordPress version is 4.7 or newer and check whether a security plugin like Wordfence is blocking REST API access.
The REST API is the official interface for programmatic content access documented in full at developer.wordpress.org/rest-api/.
Step 2 Fetch the JSON Data Using PHP and cURL
To retrieve JSON data from the WordPress REST API, make an HTTP request using PHP and cURL:
<?php
$api_url = 'https://sourcesite.com/wp-json/wp/v2/posts';

$ch = curl_init();
curl_setopt($ch, CURLOPT_URL, $api_url);
curl_setopt($ch, CURLOPT_RETURNTRANSFER, true);
$response = curl_exec($ch);
curl_close($ch);

$posts = json_decode($response, true);
?>
This sends an HTTP request to the source site’s REST API endpoint. The JSON response is then parsed into a PHP array using json_decode() so you can work with each post’s data directly.
Add basic error handling before running this on a real site:
<?php
if (curl_errno($ch) || empty($response)) {
    error_log('API fetch failed: ' . curl_error($ch));
    return;
}
?>
The $posts variable now holds all your fetched post data. Loop through it to access titles, content, featured image IDs, categories, and any other fields you need.
Step 3 Create Posts on the Destination Site with wp_insert_post()
Once you have the fetched post data in a PHP array, use wp_insert_post() to create actual posts on your destination site:
<?php
foreach ($posts as $post_data) {
    $new_post = array(
        'post_title'    => $post_data['title']['rendered'],
        'post_content'  => $post_data['content']['rendered'],
        'post_excerpt'  => $post_data['excerpt']['rendered'],
        'post_status'   => 'publish',
        'post_type'     => 'post',
        'post_name'     => sanitize_title($post_data['slug']), // Preserves original URL slug for SEO
        'post_category' => array(), // Add category IDs here
        'tags_input'    => array(), // Add tags here
    );

    wp_insert_post($new_post);
}
?>
The wp_insert_post() function writes each post directly to your WordPress database tables. You can specify the title, content, excerpt, status, post type, categories, and tags in a single call.
Important: Pay attention to the post_name field wp_insert_post will auto-generate new slugs on the destination site if you do not set it explicitly. This can break internal links and hurt SEO if the URL structure changes. Always set post_name to sanitize_title($post_data['slug']) to preserve the original URL.
Duplicate prevention: Add a duplicate check before wp_insert_post() runs if you plan to execute this script more than once. Without it, you will create duplicate posts every run. A reliable approach is to store the source post’s original ID in a custom meta field when first importing it, then check for that ID before inserting any new post.
For post categories import and WordPress tags import, map the category and tag names from your source site to their corresponding IDs on the destination. Use wp_insert_term() to create any missing terms before the main import loop runs.
Importing from a Protected API That Requires Bearer Token Authentication
Many APIs require authentication before they return data. If your JSON source requires a bearer token, modify your cURL request to include an Authorization header.
Before you wire this into your import script, test the API connection separately in Postman. Add your Authorization header there and confirm the API returns actual JSON with your token. This 5-minute check prevents hours of debugging what looks like an import problem but is actually an authentication failure.
Here is the code for authenticated requests:
<?php
$api_url      = 'https://api.example.com/posts';
$bearer_token = 'your_token_here';

$ch = curl_init();
curl_setopt($ch, CURLOPT_URL, $api_url);
curl_setopt($ch, CURLOPT_RETURNTRANSFER, true);
curl_setopt($ch, CURLOPT_HTTPHEADER, array(
    'Authorization: Bearer ' . $bearer_token
));

$response = curl_exec($ch);
curl_close($ch);

$posts = json_decode($response, true);
?>
The key addition is CURLOPT_HTTPHEADER, which attaches the Authorization header to every request. Check your API documentation carefully some APIs expect Bearer your_token, others use Token your_token, and some have entirely custom header names.
If you want to avoid writing PHP entirely, the Gato GraphQL plugin handles authenticated API connections through a graphical interface. It takes longer to configure than JSON Content Importer, but it eliminates the bearer token limitation without a single line of code.
Importing More Than Just Posts : Custom Fields, Media, and Custom Post Types
Most people starting their first import only think about post titles and content. But a real WordPress site includes custom fields, featured images, custom post types, categories, and tags. If you do not handle these elements, your imported content can look broken and unusable not just cosmetically incomplete.
I ran into this on a project where the source site used Advanced Custom Fields for pricing tables, product specs, and comparison data. All 300 posts transferred successfully, but every ACF field came through completely empty. I had to rewrite the entire import script to handle post meta data import separately from the main content.
Importing JSON Data to WordPress Custom Post Types
If your source site uses custom post types like portfolio, products, or events, specify the post type in your wp_insert_post() call:
<?php
$new_post = array(
    'post_title'   => 'My Custom Post',
    'post_content' => 'Content here',
    'post_status'  => 'publish',
    'post_type'    => 'portfolio', // Specify your custom post type slug
);

wp_insert_post($new_post);
?>
Before running the import, verify the custom post type is registered on your destination site. The easiest check: look in your dashboard navigation for a menu item matching the post type name. If the custom post type exists, its menu item will be there. If not, the import will either reject those entries or downgrade them to standard posts.
If you prefer a visual plugin solution, WP All Import supports WordPress content types including custom post types through a drag-and-drop field mapping interface no code required.
Bringing Featured Images Along with Your JSON Import
Featured images do not travel automatically when you import content via the REST API. The API returns the featured image ID from the source site, but that ID points to nothing on your destination site.
To handle featured image import correctly, download each image from the source and upload it to your destination’s media library:
<?php
require_once(ABSPATH . 'wp-admin/includes/media.php');
require_once(ABSPATH . 'wp-admin/includes/file.php');
require_once(ABSPATH . 'wp-admin/includes/image.php');

$image_url = 'https://sourcesite.com/wp-content/uploads/image.jpg';
$post_id   = 123; // The ID of your newly created post

$image_id = media_sideload_image($image_url, $post_id, null, 'id');
set_post_thumbnail($post_id, $image_id);
?>
The media_sideload_image() function downloads the file and uploads it to the media library. set_post_thumbnail() then assigns it as the featured image. Skip this step and all your featured images will be missing after the import.
Note: If you are using Method 2 (the built-in WordPress importer), this whole process happens automatically as long as you checked “Download and import file attachments.” One more reason that checkbox is non-negotiable.
Importing ACF Custom Fields and Post Metadata
If your source site uses Advanced Custom Fields or any other custom field system, import post meta data separately from the main post content. WordPress stores custom fields in the postmeta database table, not inside the post record itself.
Use update_post_meta() for each field:
<?php
$post_id     = 123; // Your newly created post ID
$field_key   = 'custom_field_name';
$field_value = 'Custom field value from JSON';

update_post_meta($post_id, $field_key, $field_value);
?>
For WordPress ACF import, you need the field keys not just the labels. ACF stores each field’s value alongside a hidden reference key (prefixed with an underscore) that links the value back to its field definition. For example, a field named price also requires a corresponding _price entry pointing to the field’s internal key.
You can find both keys in your source site under Custom Fields → Field Groups → select your group → click into each field to see its key settings.
To import multiple custom fields at once:
<?php
foreach ($custom_fields as $key => $value) {
    update_post_meta($post_id, $key, $value);
}
?>
If you only import the field values without the corresponding ACF key references, your fields will appear in WordPress but ACF will not recognize them as its own they will show up in the generic custom fields box instead of the ACF field group UI.
A Quicker Way to Transfer Elementor Templates and Page Designs as JSON
If you use Elementor page builder, you have a specialized JSON workflow that can transfer an entire page design — with all its sections, colors, typography, and spacing in under two minutes.
I use these Elementor-specific methods when migrating a site built with Elementor or when I want to reuse a tested page design across multiple client projects without rebuilding it each time.
Path 1 Import JSON Templates Through the WordPress Dashboard
The most straightforward way to import an Elementor template is through the WordPress dashboard. Go to Templates → Saved Templates in your WordPress menu.
Click the Import Templates button at the top of the page. A file selection dialog opens. Navigate to your Elementor JSON template file and select it. The template imports immediately and appears in your saved templates list.
To use the imported template on a page, open that page in Elementor, click the folder icon in the editor to open the Template Library, switch to the My Templates tab, and click Insert next to your imported template.
Before inserting, check your page layout setting. Set the page to Elementor Full Width or Canvas under Page Settings → Page Layout. If you skip this step, your imported template will render inside the default theme’s content area with margins and sidebars, which makes the design look broken and distorted. I learned this after importing a beautiful full-width hero section that appeared squished into a narrow column because I had forgotten to change the page layout setting.
Path 2 Import JSON Templates Directly Inside the Elementor Editor
You can also import a JSON template without leaving the Elementor editor.
Open the page you want to edit in Elementor. Click the folder icon in the bottom panel to open the Template Library. In the library popup, click the arrow icon next to the search bar this opens the import option. Select your JSON file and click Import Now.
The template appears immediately in your My Templates tab and inserts directly into the current page with one click.
This method is faster when you are already working inside the editor and want to test how a template looks in context before committing to it.
Elementor Kit Import vs Template Import : What Is the Difference?
Elementor has two different import systems, and understanding the difference saves you from importing more than you intended.
Template Import transfers a single page design one set of sections, columns, and widgets. Use this when you want to apply a specific page layout without changing your site’s global styles.
Kit Import transfers everything: page templates, global colors, global fonts, theme style settings, and site-wide design tokens. Use this when you want to replicate an entire site’s visual identity, not just a single page layout.
To import a full kit, go to Elementor → Tools → Import/Export Kit. Upload your kit ZIP file and choose which elements to import you can selectively import only the colour palette, only the fonts, or only specific templates.
I use selective kit import when I want to transfer a client’s brand colors and typography to a new site without overwriting any page designs I have already built there.
What to Do When Your JSON Import Goes Wrong
Even when you follow every step correctly, imports can still fail in frustrating ways. I have debugged dozens of broken imports over the years, and the same four problems show up over and over each with a clear fix.
Here is what to check first.
All Posts Imported But All Images Are Broken
This is the most common import failure I encounter, and the cause is almost always the same: the “Download and import file attachments” checkbox was not checked.
Everything else will look fine. Posts are present, text content is intact, titles are correct. But visit any page on the frontend and every image shows as a broken icon.
The fix is simple — run the import again with the checkbox enabled this time.
WordPress is smart enough to detect duplicate posts and skip them. The second import pass ignores all content that already transferred and only downloads the missing media files.
Once it finishes, refresh your site. Your featured image import and all inline images will display correctly.
If you cannot find the original export file, return to your source site and generate a fresh export. Select Media instead of All Content to create a media-only file, then import that to your destination site. Your existing posts stay completely untouched.
“Failed to Parse JSON” Error : What It Means and How to Fix It
A “Failed to Parse JSON” error means the data WordPress received is not valid JSON. Here are the three most common causes:
Cause 1: Corrupted or malformatted JSON file. Copy your JSON content and paste it into a free validator like JSONLint.com. The tool pinpoints the exact line with the error. Fix it and try importing again.
Cause 2: The API is returning HTML instead of JSON. If your API is offline, requires authentication, or is blocking your server’s IP address, it may respond with an HTML error page. WordPress then tries to parse that HTML as JSON and fails immediately. Check your API status and verify authentication credentials.
Cause 3: Wrong Content-Type header from the server. Some servers return valid JSON but mislabel it as text/html in the response headers. WordPress rejects it because the Content-Type does not match the data. If you control the source API, ensure every response includes Content-Type: application/json.
Always validate your JSON in a tool like JSONLint before troubleshooting your import settings. A 30-second validation check can save 30 minutes of confused debugging.
Import Runs But Creates Empty or Blank Posts
If your import completes without errors but your posts show up with blank titles or empty content, you have a field mapping problem. The import ran successfully, but the data ended up in the wrong fields — or nowhere at all.
The quickest diagnostic is to print the raw JSON data structure you are importing and compare it to what you are telling WordPress to expect. Add this line temporarily to your import script:
<?php print_r($post_data); ?>
This outputs the full structure of each post object. Look at the exact keys being used: is it title or post_title? Is the content under content or content.rendered? WordPress REST API responses nest rendered content inside a sub-object, so the correct key for the post title is $post_data['title']['rendered'], not $post_data['title'].
Check your field mapping against the actual JSON structure and correct any mismatches. The posts already created with blank content will need to be deleted and re-imported after you fix the mapping.
Authentication Errors When Connecting to Protected APIs
If you are trying to import from an API that requires a bearer token or API key, and you keep seeing authentication errors or empty responses, your Authorization header is not being sent correctly.
Test your token in Postman first. Create a new GET request, add your Authorization header manually, and send it. If Postman returns real JSON data, your token is valid and the issue is in how your PHP code is sending the header.
The most common PHP mistakes are: missing the CURLOPT_HTTPHEADER option entirely, using the wrong header format (check whether the API expects Bearer or Token before your key), or accidentally including extra whitespace in the token string.
If authentication errors persist after verifying the header format, check whether your server’s IP address has been blocked or rate-limited by the source API. Some APIs block server IP ranges used by shared hosting providers. Contact the API provider to whitelist your IP if this is the case.
For errors not covered above, including white screen of death or fatal PHP errors during import, see our WordPress critical error troubleshooting guide.
Bonus: How to Import and Export WordPress Block Patterns as JSON
If you use the WordPress block editor with a block theme, you can export and import custom block patterns as JSON files. This has nothing to do with post migration but it can save you from losing hours of design work in a single accidental click.
I discovered this feature the hard way. I accidentally deleted a complex block pattern I had spent an hour building. The template parts system had not saved it properly, but I had exported a JSON backup two days earlier. It was restored in about ten seconds.
How to Export a WordPress Block Pattern as a JSON File
Block patterns are reusable design blocks you create in the WordPress block editor. To export one as JSON, go to Appearance → Editor in your dashboard. This opens the full-site editor.
In the left panel, click Patterns. You will see all your saved patterns listed. Hover over the pattern you want to export and click the three-dot menu that appears. Select Export as JSON from the dropdown.
WordPress generates a JSON file and downloads it immediately. The file contains the complete block markup, all settings, and all content inside the pattern. Store it somewhere safe I keep a folder of pattern backups alongside my theme files.
I export every custom pattern I build before making any major changes to a site. It takes three clicks and has saved me from several near-disasters.
Restoring a Lost Pattern Using JSON Import
If you accidentally delete a pattern, if a plugin update corrupts your pattern library, or if you want to import a pattern from another site, use the Import from JSON feature in the same Patterns panel.
Go to Appearance → Editor → Patterns. Click the Import from JSON button at the top of the panel. Select your JSON backup file. The pattern restores immediately and appears in your pattern library exactly as it was when you exported it.
This feature works across different WordPress installations. Export a pattern from one site, import it to another, and the block markup transfers cleanly as long as both sites use compatible block themes and the same block types are available.
Post-Import Checklist : How to Verify Everything Transferred Correctly
After any import completes successfully, do not assume everything worked perfectly. I have learned to always run through a verification checklist before I celebrate or tell a client their migration is complete. Imports can succeed technically while still leaving gaps that only show up when you look at the live site.
8-Point Verification Checklist After WordPress JSON Import
1. Check your post count Compare the total number of posts on your source site (Posts → All Posts, look at the count in the top bar) with the count on your destination site. If the numbers match, your content transferred completely.
2. Spot-check five to ten individual posts Open random posts on the destination site. Read through them. Look at the title, headings, body content, and formatting. Confirm everything matches the source.
3. Verify featured images Click into five posts and check their featured images. Open the frontend view of each post and confirm the featured image displays correctly in the post header.
4. Check categories import Go to Posts → Categories and confirm all your categories transferred. Click each category and verify the correct posts are assigned to it.
5. Check WordPress tags import Go to Posts → Tags and confirm all tags transferred and are correctly assigned to posts.
6. Test media library Go to Media → Library and compare the number of media files between source and destination sites. Spot-check several images to confirm they display correctly.
7. Check custom fields Open posts that use custom fields or ACF fields. Confirm all field data transferred correctly and is displaying as expected in the front end.
8. Review general site settings that did NOT transfer Remember that site configuration does not import automatically. Set these up manually:
- Site title and tagline (Settings → General)
- Permalink structure (Settings → Permalinks — click Save Changes to flush rewrite rules). If you are moving your site to a new domain, verify that all internal links are updated and redirects are configured correctly.
- Navigation menus (Appearance → Menus)
- Widgets (Appearance → Widgets)
- Theme customizer settings (Appearance → Customize)
Conclusion
The main challenge when you try to wordpress import json content from another website is that WordPress was built around XML, not JSON. But you now have three proven methods that work: the JSON Content Importer plugin for live API data displays, the built-in WordPress export and import workflow for complete site migrations, and custom PHP with the REST API when you need full developer-level control.
Before you start any of them: install your theme, run your backups, and remember that checkbox the one labeled “Download and import file attachments.” Missing it is the single most preventable mistake in this entire process.
When something breaks, the troubleshooting section in this guide covers the four most common failures with specific fixes for each.
For most people moving a full WordPress site to a new host or domain, Method 2 is the right call no code, no extra plugins to configure, and it handles content of any size reliably.
Frequently Asked Questions About Importing WordPress JSON Content
Why doesn’t WordPress have a built-in JSON importer?
WordPress was built before JSON became popular, so the core import tool uses XML (WXR format) instead. JSON support requires either a plugin or the WordPress REST API. This is a legacy design choice, not a bug. The REST API is now WordPress’s official JSON solution for modern integrations.
What happens if I forget the attachment checkbox?
All your posts and pages will import successfully, but every image will show as broken. You can fix this by running the import again with the checkbox enabled. WordPress will skip the duplicate posts and only download the missing images.
Can I import from an API that requires a bearer token?
The standard JSON Content Importer plugin does not support bearer tokens. You have two options:
Option 1: Use the Gato GraphQL plugin, which supports authenticated API connections through a graphical interface without writing code.
Option 2: Write custom PHP with cURL as shown in Method 3, using the CURLOPT_HTTPHEADER option to send your Authorization header with every request.
Does importing also bring over menus and site settings?
No. Only content transfers.
What imports: posts, pages, comments, categories, tags, custom fields, and media (if the attachment checkbox is checked).
What does NOT import: menus, general site settings, theme customizer options, widgets, plugin settings, and user accounts.
Can I import a JSON file without using a plugin?
Yes. Upload your JSON file to your server, then add code to your functions.php file using file_get_contents() to read it, json_decode() to parse it, and wp_insert_post() to create posts. This requires intermediate PHP skills. If you are not comfortable editing code, use a plugin instead.
How do I import an Elementor template JSON file?
Go to Templates → Saved Templates → click Import Templates. Select your JSON file and upload. For complete site kits with fonts and colors, use Elementor → Tools → Import/Export Kit instead. Before applying the template, set your page layout to Elementor Full Width in the page settings, or the design will look broken.
Will importing JSON content duplicate existing posts?
WordPress checks for duplicates using a unique ID (GUID). If the same post exists, WordPress skips it. This works reliably only if both sites have the same domain. If domains differ, WordPress may create duplicates. Always test imports on a staging site first to check for duplication issues before importing to your live site.


