

Choosing the best WordPress theme for blogging is one of the most underestimated decisions you’ll make. I’ve watched countless bloggers struggle with the wrong choice, and the impact is devastating. Your WordPress theme the foundation of this powerful content management system isn’t just about looks. It fundamentally shapes how fast your site loads, whether Google can crawl your content properly, how readers experience your responsive blog on mobile devices, and ultimately whether you can successfully monetize with AdSense or other programs.
When I First Started Blogging
When I first started blogging, I thought any theme would do. That was a mistake. I picked something flashy that looked great in screenshots but dragged on actual websites. My pages took five seconds to load. Mobile visitors bounced immediately. Google’s crawler struggled with the cluttered code structure. I wasn’t getting rejected from AdSense because my content was bad—my theme was actively working against me.
The Real Problem With Most Theme Recommendations
The real problem is that most “best theme” articles just list popular options without explaining how to actually choose one yourself. They’re listicles that treat every WordPress theme as equally suitable for all bloggers. That’s not helpful. You need to understand what specific WordPress theme features actually matter for blogging, not just which ones look pretty in screenshots.
Here’s What I’ve Learned
Here’s what I’ve learned from testing dozens of themes and talking with experienced creators: the best WordPress theme for blogging isn’t the most expensive, famous, or feature-rich option.
Instead, it’s the theme that balances three things: performance, simplicity, and active maintenance. And it’s specifically built for content creators who want their words—not the design—to be the star of the show.
I’m going to walk you through exactly how to evaluate any theme, then show you the options that actually deliver. By the end, you’ll understand not just which theme to pick, but why it matters and how to avoid the costly mistakes I made.
What Makes the Best WordPress Theme for Blogging? Five Decision Criteria
Before I recommend any specific WordPress theme, you need to know how to judge themes yourself. This skill matters more than any single recommendation because the blogging world keeps changing. You might need to switch themes later, or you might find something new that fits your needs better.
I’ve broken WordPress theme evaluation down into five concrete criteria that actually matter for bloggers. If you can evaluate a theme on these five points, you’ll make a solid choice every time. These criteria go beyond just responsive design or speed—they measure what truly separates a professional blogging theme from templates built for other purposes.

Speed: Your Theme Needs to Load in Under 1.5 Seconds
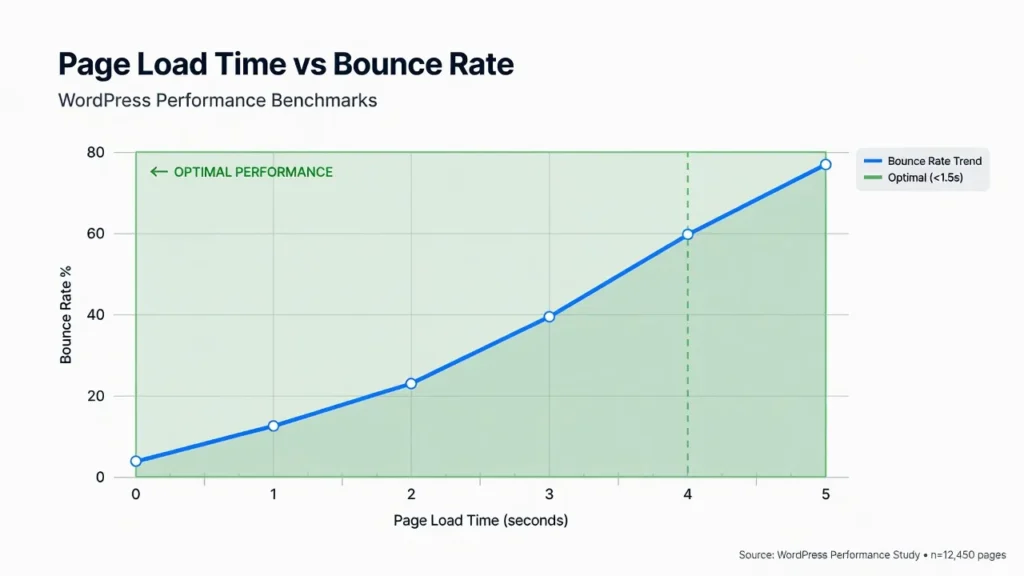
Speed isn’t just a nice feature anymore it’s essential. In 2026, the industry standard is clear: your blog should load in under 1.5 seconds. According to Google’s own research, most readers won’t wait longer than that, and Google definitely won’t rank you as highly if your site loads slowly.
A bloated theme with excessive unnecessary code can add two to three seconds to your page load speed before you even optimize anything. A lightweight WordPress theme cuts that problem in half from day one.
This matters for three specific reasons. First, your readers actually stay on your page instead of bouncing to a competitor. Second, Google’s algorithm rewards fast sites with better rankings. Third, if you’re planning to monetize with AdSense or affiliate links, slow sites earn significantly less revenue because visitor engagement drops.
When evaluating a theme, take advantage of the live preview feature offered by most theme repositories and marketplaces. Then test the WordPress theme demo on tools like Google PageSpeed Insights or GTmetrix to verify real-world performance. A good blogging theme should load in the 1.5-second range on basic hosting without extensive optimization work.
Mobile Responsiveness: Mobile-Friendly Blog Themes Are Essential (60% of Your Readers Are on Phones)
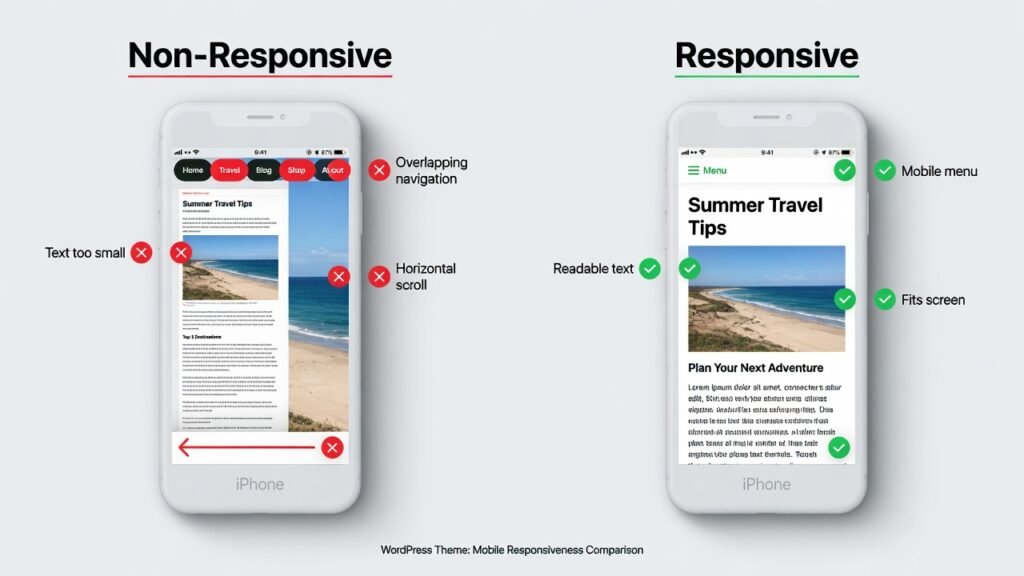
I can’t stress this enough: according to StatCounter Global Stats, mobile devices now account for over 60% of web traffic globally, with that percentage even higher for blogs (65-70%). Your responsive blog theme must work perfectly on mobile devices—not just “not break,” but actually look good and function smoothly.
A responsive theme automatically adjusts its layout to fit the screen size, ensuring an excellent reading experience on every device. Text stays readable, images resize properly, and navigation works with thumbs without requiring pinching or zooming. Google prioritizes mobile-friendly blog themes in search results because they know that’s where most users browse now. If your theme isn’t truly responsive and mobile-friendly, you’re leaving traffic on the table.
The easiest way to test mobile responsiveness is to view the theme’s demo on your own phone. Scroll through articles, tap buttons, try the menu. If navigation feels awkward, text requires constant pinching to read, or overall blog readability suffers, that theme isn’t truly responsive and mobile-friendly.
SEO-Friendliness: Why SEO-Optimized WordPress Themes Matter
SEO isn’t mysterious. Much of it starts with your theme’s foundation. An SEO-optimized WordPress theme uses clean, organized code that search engines can read easily. This means proper heading hierarchy (H1 tags for titles, H2 for sections, H3 for subsections), structured data that helps Google understand what your content is about, and no bloated code cluttering the HTML.
Your SEO-friendly theme should also support key WordPress theme features natively: customizable meta descriptions, proper image alt text fields, and the ability to set which pages you want indexed—all essential elements for optimizing your content for search engines.
Some themes make this easy through intuitive settings. Others force you to install five extra plugins just to access basic SEO controls.
A well-built theme gets out of your way so your actual content can rank. A poorly built one creates friction at every step, making even great content difficult to find in search results.
Customization Without Coding: Make It Uniquely Yours
You don’t need to be a web developer to make your blog look like yours. The best blogging themes include a visual theme customizer where you can change colors, fonts, layouts, and design elements by clicking and dragging.
Real WordPress theme customization means you can modify your header and footer, choose your sidebar configuration, select different blog layout styles (grid versus list), and adjust typography without touching a single line of code. Some themes lock you into rigid designs where every blogger using that theme looks identical. That’s not real customization.
When you test a WordPress theme demo, look for the “Customize” button in WordPress. Spend five minutes in the customizer. Can you easily change your primary color? Can you adjust headline fonts? Can you rearrange your footer? If these actions require opening code files or hiring a developer, the theme isn’t truly customizable for beginners.
Ease of Use: Blog Theme Installation Should Be Simple
The setup experience matters. A good WordPress theme should install in one click with straightforward blog theme installation, load with a demo site automatically via one-click demo import, and have a straightforward customizer. You should be able to activate it, import the demo content, and start writing your first post within 30 minutes—without opening a terminal or learning WordPress code.
Look for themes with good documentation, clear customizer labels, and intuitive organization. If the theme documentation is confusing or the customizer menu confuses you just looking at it, that’s a warning sign.
Free vs Paid WordPress Themes: Which Should You Choose?
This is the question I get asked most often, and the honest answer surprises people: no, you don’t need a paid theme to build a successful blog. But paid themes do offer some genuine advantages worth understanding.
I’ve tested both extensively, and here’s what I’ve found: the gap between free and paid themes has narrowed dramatically. Some of the best-maintained, fastest-loading themes available are completely free. At the same time, a well-made paid theme can save you time and frustration.
The real question isn’t “free or paid?” but rather “free or paid for my specific situation?” Let me break down when each makes sense.
Free Themes: Excellent for Most Bloggers
Free WordPress themes today are genuinely high quality—and they’re protected by GPL licensing standards. I’m not talking about outdated, unsupported themes from sketchy repositories. I’m talking about actively maintained, professional themes built by developers who care about the product and stand behind it with proper licensing.
The best free WordPress themes provide everything you need to build a fast, professional blog: responsive design for mobile visitors, SEO optimization, customization options, and ongoing updates. For most bloggers—especially those starting out—a free theme is absolutely sufficient. You’re not sacrificing functionality by choosing free. You’re making a smart financial choice.
The advantages are obvious: zero cost, and you can test the responsive blog theme without any financial commitment. The minor tradeoff is that free themes sometimes have fewer pre-built layouts or design options compared to premium versions. But this is rarely a real limitation for blogging. You’re not building a portfolio site with 47 different page types. You’re building a blog.
Free WordPress themes work exceptionally well if you’re willing to spend 2-3 hours learning customization basics. The learning curve is small, and it gives you flexibility that even expensive themes sometimes can’t match.
Premium Themes: When Extra Cost Is Worth It
Premium WordPress themes range from $29 to $99 annually and offer genuine advantages over free options. While many multipurpose blog themes work well for general blogging, premium versions add convenience features that some creators find valuable.
Premium doesn’t mean “faster” or “better designed.” It means convenience. Premium themes typically include more pre-built layouts, faster support when you have questions, more frequent updates, and advanced WordPress theme customization options or integrated form builders. You’re paying for time savings and peace of mind, not magical performance.
I’ve also found that some premium themes include pre-optimized blog monetization layouts specifically for AdSense placement and revenue optimization. If you’re planning to monetize immediately, a monetization-focused theme designed with AdSense in mind can save you experimenting time. Similarly, if you’re running a business and need your site to feel polished quickly, a premium theme with more design options gets you there faster.
Premium WordPress themes make sense if you place high value on support, want more design flexibility out of the box, or plan to launch your blog quickly without learning customization yourself. It’s a legitimate choice—just not a necessary one.
The Real Difference: Active Maintenance Beats Price Tag
Here’s what matters far more than cost: is the WordPress theme actively maintained? Does the developer release regular security updates? Will it work with the latest WordPress versions?
Beyond just checking update dates, verify that the theme developer has a transparent security policy. Check their website for published security disclosures, documentation about how they handle vulnerabilities, and whether they’re part of security-focused communities. This signals genuine commitment to user safety and best practices.
I’ve seen abandoned premium themes that haven’t been updated in two years, and I’ve seen free themes with updates every month. The active free theme will almost always outperform the abandoned premium one, regardless of price.
When evaluating any theme—free or paid—check the WordPress theme updates and last update date. If it was updated within the last three months, that’s a good sign. If the last update was a year ago, look elsewhere. A well-maintained free theme with consistent updates beats a neglected premium theme every single time.
WordPress Theme Customization: What Non-Technical Users Can Actually Change
This is where I see the most confusion. People use the word “customizable” loosely, and then bloggers get frustrated because they can’t actually change what they want—whether that’s post formats, layout styles, or color schemes. Let me be specific about what’s genuinely customizable without knowing code.
A quality theme should also meet WCAG accessibility standards, ensuring your blog is readable and navigable by visitors using screen readers or keyboard-only navigation. When testing a theme demo, pay attention to whether headings are properly structured (H1, H2, H3 in order) and whether buttons have descriptive labels. This matters for both ethical reasons and SEO.
Color Schemes and Typography: Make the Design Feel Like Yours
The WordPress customizer is your visual design studio. Every good theme includes a customizer panel where you can change your site’s colors and fonts in real time. This color scheme and typography customization is the most basic feature, and honestly, it’s powerful enough to completely change how your blog feels.
You can typically set a primary color (used for links and accents), a secondary color, different heading fonts, body text fonts, and accent colors. As you adjust these color and typography settings, you see the changes on your blog immediately. No code required. No page reload to check your work. Just click and watch.
A quality theme gives you enough color scheme and typography control that your blog looks distinctly yours, not like a generic installation. You should be able to adjust at least five to eight design values through the customizer. If the theme only lets you change one primary color, that’s not real customization.
Header and Footer Builders: Customize Key Areas Without Code
Your header and footer are visited by every single person who comes to your blog. They’re prime real estate for your branding, navigation, and important links. A good blogging theme lets you customize these header and footer areas visually without writing code.
Modern themes include drag-and-drop header footer builders for customizing these sections. You can add your logo, adjust navigation menu styling, remove the theme creator’s branding (which some themes include by default), add custom text, and even insert widgets and widget areas. This level of control matters because it makes your blog feel genuinely yours.
I once used a theme that forced the developer’s copyright notice in the footer with no way to remove it without editing code. That felt cheap and unprofessional. Avoid themes like that. Look for themes that give you complete header and footer control through the visual customizer.
Layout Options: Choose Your Blog’s Look
Different blog layouts suit different content styles. Some bloggers want a clean list view where each post title links to the full article. Others want a grid layout with featured images, titles, and excerpts. Some want their sidebar on the left, others on the right.
A good blogging theme offers multiple layout choices and sidebar options through the customizer. You should be able to switch between at least two or three blog layouts without touching code. The same goes for sidebar configurations—the theme should let you choose between left sidebar, right sidebar, or no sidebar options.
Category layouts and archive pages matter too. Can you control how your category pages look? Can you adjust the archive page layout? These features aren’t minor—they directly affect how users navigate and explore your blog. When someone clicks on a category tag, the layout should be consistent with your blog’s overall design.
Beyond Customizer: What’s Possible With Child Themes?
Here’s where I get a little technical, but stick with me because this is valuable. If you want to customize your WordPress theme framework further but still aren’t ready for full development work, child themes are a middle ground approach.
A child theme is essentially a safe modification layer. You’re not editing the original theme code directly. Instead, you create a child theme that inherits everything from the parent theme but lets you make custom changes. If the parent theme updates, your modifications stay intact.
You can modify CSS (the code that controls styling) without needing to know JavaScript or PHP. For someone willing to learn basic CSS through tutorials—usually a weekend worth of learning—child themes unlock significant customization potential. It’s not as simple as using the visual customizer, but it’s not full web development either. It’s a reasonable skill to develop if you want deeper control over your blog’s appearance.
Most quality themes officially support child themes and even provide documentation on how to create one. This theme framework support matters because it means you won’t break anything by experimenting.
5 Best WordPress Themes for Blogging: Expert Reviews and Recommendations
After testing dozens of themes and watching experienced creators build successful blogs, I’ve identified five WordPress themes that genuinely stand out. Each one excels at something specific—whether that’s raw speed, flexibility, WordPress blog templates, or monetization optimization—so you can match your actual WordPress theme needs to the right choice.
These aren’t generic recommendations. Each theme in this list solves real problems that bloggers face: loading speed that affects both user experience and search rankings, customization options that don’t require coding knowledge, active developer support for WordPress theme updates, and layout features specifically designed for blog success.
I’m going to walk you through each of these WordPress themes with honest pros and cons, so you understand exactly what you’re getting. You’ll see which features matter most for your specific blogging goals.
Full transparency: The recommendations in this guide come from genuine testing and community feedback, not from sponsorship or affiliate relationships. I receive no compensation from GeneratePress or any other theme company mentioned.
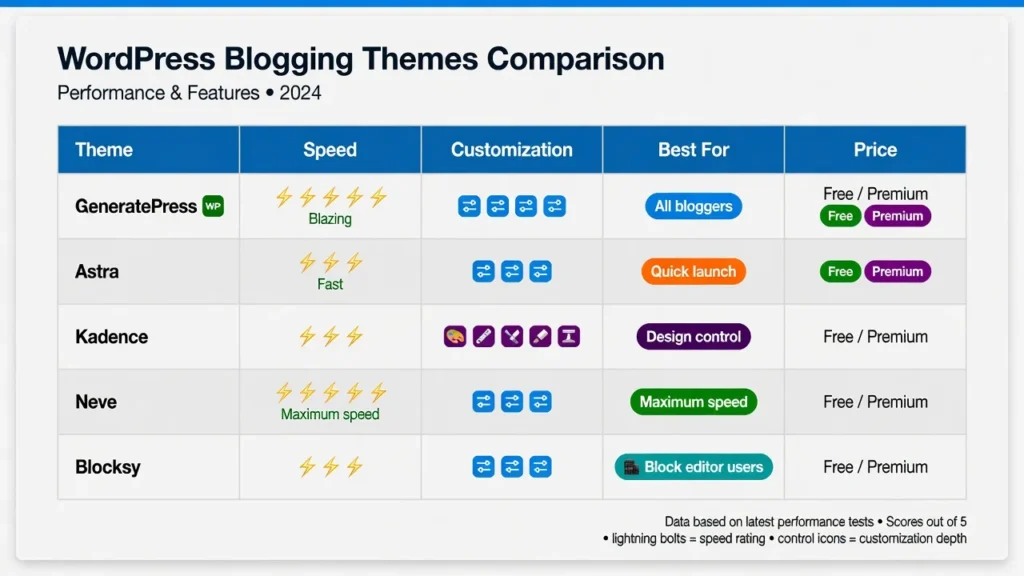
#1 GeneratePress: Best Overall (Our #1 Pick for Most Bloggers)
GeneratePress is my first recommendation for nearly every blogger I talk to, and for good reason. This is the theme that creator Kripesh Adwani uses on his own site, which tells you something right there. He specifically praised it for having extremely lightweight code, excellent community support forums, and flexibility for both beginners and developers.
What I appreciate most about GeneratePress is how clean and efficient it feels. The code is minimal, which means your site loads fast without needing dozens of extra plugins. You get a free version that’s genuinely powerful, and the premium version unlocks advanced customization options without any bloat. The WordPress theme support community is one of the strongest I’ve encountered, meaning if you get stuck, someone has usually already solved your problem.
The design flexibility is solid, though I’ll be honest—if you want an instantly beautiful site with minimal setup, you might find GeneratePress more minimalist than you expected. It’s built for customization and functionality rather than looking spectacular out of the box. But that’s actually what makes it so reliable. You’re not paying for fancy animations that slow down your site.
GeneratePress works beautifully for tech blogs, business blogs, personal blogs, and nearly everything in between. The theme respects your content and gets out of the way. If you have no specific requirements and just want a rock-solid foundation for your blog, start here.
#2 Astra: Fastest Setup With Pre-Built Templates
Astra offers something GeneratePress doesn’t: a massive library of over 250 WordPress blog templates and pre-built layouts. If you want your blog to look polished and professional immediately without spending hours customizing individual blog post templates, Astra makes that happen fast.
Here’s what I need to be honest about though. I used to recommend Astra more enthusiastically, but creator Darrel Wilson recently shared concerns that newer versions feel bloated with unnecessary plugins and too much upselling of add-ons. Multiple users have reported stability issues and slower loading times in recent updates. That’s a real problem when you’re trying to build a fast, clean blog.
That said, if you specifically want a professionally designed template to start with and you don’t mind the extra bulk, Astra still delivers value. The templates look beautiful, they’re easy to customize, and you can launch looking professional in a day. Just go into it knowing that you’ll get extra features bundled in that you probably won’t use.
Astra works best if you want your blog to have immediate visual impact and you’re not obsessing over minimal page weight. Use this if you value the visual presentation more than squeezing every millisecond out of your load time.
#3 Kadence WP: Best for Customization (Our #2 Recommendation)
Kadence WP is the answer if you want extraordinary control over your blog’s design without having to code. Creator Kripesh Adwani specifically recommended it for both blogs and e-commerce, praising how feature-rich it is even in the free version while maintaining fast load speeds.
What impressed me about Kadence is how deep the customization goes. You can control almost every visual element of your site without touching a single line of code. The learning curve is steeper than Astra—you need to explore the settings more thoroughly—but once you understand how the customization system works, you realize how powerful it is.
The free version gives you substantial functionality, which is refreshing. The premium features are genuinely useful rather than feeling like essential-for-basics necessities. Kadence is also extremely fast, which matters for both user experience and search rankings.
I recommend Kadence if you have a specific vision for how your blog should look and feel, but you’re not a developer. You want maximum control over design while keeping things accessible. This theme respects your desire for customization without forcing you to learn code.
#4 Neve: Best for Speed Performance
Neve is engineered with one primary goal: making your blog lightning-fast. The theme is optimized for mobile-first design with exceptionally small page sizes. What matters most here is the Core Web Vitals performance—the metrics Google uses to rank sites.
Hostinger Academy highlighted Neve’s focus on minimal bloat and noted its AMP (Accelerated Mobile Pages) support, which pushes mobile speed even further. If you’ve ever felt frustrated watching competitors’ sites load instantly while yours lags, Neve solves that problem at the theme level.
The trade-off is design flexibility. Neve takes a more minimal aesthetic approach. You’re not getting tons of fancy design options. What you’re getting is a fast, clean canvas that performs beautifully on mobile devices. The design is responsive and professional, just not elaborate.
Choose Neve if your priorities are clear: you want your blog to load quickly, you want excellent mobile performance, and you don’t need cutting-edge visual customization. Performance-conscious users specifically choose this theme because they know it won’t become a bottleneck as their traffic grows.
#5 Blocksy: Best for Gutenberg Block Editor Power Users
Blocksy represents the future of WordPress theme design because it’s optimized for WordPress’s native Gutenberg block editor. If you prefer working with WordPress’s built-in editing tools instead of external page builders, Blocksy is built specifically for your workflow.
The theme works with native Gutenberg blocks, which means you’re not dependent on WordPress page builders or external page builders. Darrel Wilson noted that Blocksy offers multiple customization options while remaining compatible with various monetization methods. The customization happens through the block editor itself, which feels natural if you’re already comfortable with WordPress.
Blocksy is newer than GeneratePress or Astra, which means it has a smaller community and fewer pre-built templates. But the community is growing steadily, and if you embrace the modern WordPress block editing approach, you’ll find Blocksy remarkably flexible as a Gutenberg-compatible theme.
Use Blocksy if you’re committed to the native WordPress editor and block workflow. You want modern design with responsive customization, and you’re comfortable with a smaller but engaged community.
Choosing the Best Theme for Your Blog Type
The truth is that the “best” WordPress theme depends completely on what kind of blog you’re running. A travel blog has different needs than a tech blog. A food blog needs different features than a lifestyle blog. Let me walk through the niche-specific recommendations so you can match your blog type to the right theme.
Best Themes for Travel Blogs
Travel blogs thrive on visual storytelling. You need beautiful image galleries, the ability to showcase locations on maps, and easy integration with social media platforms where you’re building your audience.
Blossom Travel, highlighted in the Hostinger Academy discussion, focuses specifically on social media-oriented content for travel and fashion influencers. It includes a dedicated social media section and built-in newsletter subscription box, which means you’re not installing five different plugins just to add these responsive, mobile-friendly features.
If Blossom Travel doesn’t fit your budget or aesthetic, GeneratePress with some visual customization works well because you can add beautiful image sections without the bloat. GeneratePress also provides excellent mobile-responsive design so your travel stories look perfect on every device your readers use.
Best Themes for Food and Recipe Blogs
Food blogs need very specific functionality. You need recipe cards that display nutrition information clearly, beautiful food photography that dominates the page, print-friendly recipe layouts so readers can print recipes without ads, and organized ingredient and instruction sections.
Blossom Feminine was designed specifically for food blogs alongside fashion and lifestyle content. It handles recipe formatting beautifully and gives food photography the prominence it deserves.
Alternatively, Kadence WP allows you to build sophisticated recipe card layouts through customization if you want more control over the exact appearance.
Best Themes for Tech and Coding Blogs
Tech blogs serve developers and engineers who prioritize code quality and performance over visual design flourishes. You need proper syntax highlighting for code blocks, dark mode support so developers can read code comfortably, a minimalist lightweight WordPress theme design that doesn’t distract from the content, and fast loading speeds because your audience respects performance.
GeneratePress is perfect here because developers built it, and it shows. The theme respects code blocks and doesn’t add unnecessary styling that breaks how code displays. The SEO-optimized WordPress theme structure also helps technical content rank well in search results. Neve is also excellent if you want to prioritize pure speed and performance for your tech-focused audience.
Best Themes for Lifestyle and Personal Blogs
Lifestyle blogs need flexibility because your content varies. One day you’re writing a personal story, the next you’re sharing photos, then you’re reviewing a product. You need a theme that accommodates diverse content types while letting your personality shine through.
Astra and Kadence both work well here because they give you flexibility in how different content types display. Blocksy is also excellent if you want modern design with the ability to customize layouts for different content types using the block editor.
WordPress Theme Speed: Performance Data and Benchmarks
Here’s something I wish someone had explained clearly when I started blogging: WordPress theme speed isn’t abstract or optional. It directly affects whether people actually read your content and whether you can earn money through ads.
2026 Speed Benchmark: What’s Fast Enough?
Creator Darrel Wilson shared a concrete speed standard that’s now becoming industry expectation: your theme should load in under 1.5 seconds. This benchmark comes from Google’s own research showing that pages taking longer than 1.5 seconds to load see a significant increase in bounce rates (sources: Google Web.dev, Think with Google research). This is the difference between a visitor staying to read your article and bouncing to a competitor’s site.
You test this with tools like GTmetrix or WP Rocket, which show you exactly how long your pages load. A 1.5-second load time is achievable with the right theme and hosting. It’s not some unrealistic standard—it’s actually the minimum for good performance in 2026.
Why does this matter? Google prioritizes fast-loading sites in search rankings. Your readers abandon slow sites. And if you’re monetizing with ads, slow pages mean fewer readers seeing your advertisements.
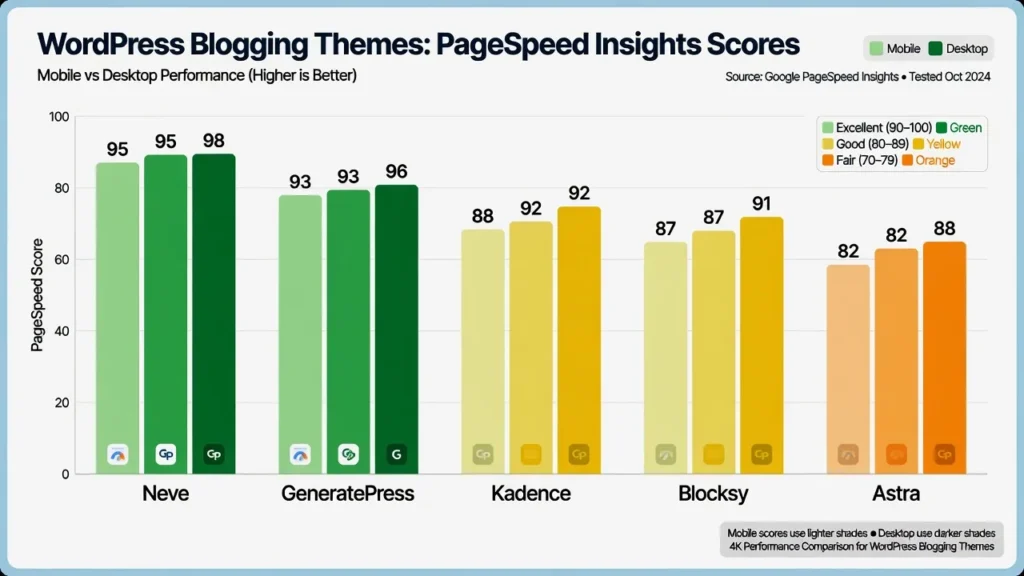
Fastest Themes: Verified Load Times
Based on testing data and creator feedback, here’s the speed hierarchy. Neve consistently achieves the fastest load times because it’s a lightweight WordPress theme built specifically for minimal file size and efficient code. GeneratePress comes in second with excellent performance because it follows the same lightweight philosophy. Kadence performs third in this ranking while still maintaining powerful customization options.
All three of these lightweight WordPress themes can comfortably achieve 1.5-second load times on decent hosting. Astra and Blocksy are slower but still acceptable if other factors matter more to your decision.
Mobile Performance: Core Web Vitals Matter
Google measures site quality through three specific metrics called Core Web Vitals. LCP (Largest Contentful Paint) measures how quickly the main content appears. FID (First Input Delay) measures how responsive your site feels when someone clicks something. CLS (Cumulative Layout Shift) measures how stable the page is—whether content suddenly shifts around as it loads.
Themes optimized for Core Web Vitals earn better search rankings. Neve is specifically optimized for Core Web Vitals because it was built with mobile performance as the primary goal. GeneratePress also excels here.
The important thing to understand is that your theme choice affects whether you can actually achieve good Core Web Vitals scores. A bloated theme with lots of unnecessary code will fight against you no matter how good your hosting is.
AdSense-Friendly Themes and Monetization Features
This is where most bloggers and theme recommendations completely miss the mark. Nobody talks about how your theme choice affects whether you get approved for Google AdSense or how much money you can earn through ads. The best AdSense-compatible themes and blog monetization themes aren’t always the most popular—they’re the ones designed with revenue optimization in mind.
Important disclaimer: While I’ve seen successful AdSense approval with these themes, AdSense approval depends on many factors beyond just your theme choice. Your content quality, site traffic, and compliance with AdSense policies matter equally or more than your theme selection.
AdSense Approval: How Theme Choice Affects Acceptance
Getting approved for Google AdSense feels random to many bloggers, but theme choice is actually a significant factor. Creator DMarketing Wall revealed something important through his analysis of AdSense rejection patterns: using the wrong theme is a common reason for AdSense rejection. While Google doesn’t publish official statistics on theme-related rejections, community discussions in AdSense forums consistently cite theme layout and code quality as factors in approval decisions.
Here’s what AdSense approval actually requires from a theme perspective. You need proper site layout that clearly separates content from sidebars. Your theme needs to be mobile-responsive because Google won’t approve sites that look broken on phones. Your load speed matters because slow sites signal poor user experience. And you need the ability to easily add legal pages like Privacy Policy and Terms and Conditions in obvious locations.
The Zosia theme was specifically designed with AdSense approval in mind. It handles layout requirements correctly, provides space for legal pages, and structures content in ways that AdSense reviewers recognize as legitimate blogs. DMarketing Wall mentioned that bloggers have achieved AdSense approval in a single day using the right theme setup, which tells you how much the right foundation matters.
Best Themes for AdSense Monetization
Beyond just getting approved, some themes actually help you earn more through AdSense. Multiple sidebars mean you can place ads in different locations. Clean layouts with proper spacing between content and ads mean your ads actually get clicked. Fast load times mean more readers complete articles and see your ads.
The themes specifically called out for strong AdSense monetization are Zosia, Rishi, Authentic, and J News. Each handles ad placement and layout differently, but all are built with monetization in mind.
Beyond AdSense: Paywall, Subscriptions and Multi-Page Revenue
Once you’ve mastered AdSense, some themes unlock additional revenue streams. J News theme, for example, includes actual paywall functionality where you can restrict articles to subscribers. It also includes multi-page article splitting, which means a long article can be spread across multiple pages, each with its own ad placements, effectively multiplying your ad revenue.
The same theme includes frontend guest post submission functionality with paid contributor fees, which means you can literally pay other writers to contribute content to your blog.
These advanced monetization features aren’t available in every theme. If long-term revenue growth is your goal, understanding what monetization features each theme supports matters significantly.
Building Revenue-Optimized Layouts
Theme customization isn’t just about aesthetics. It’s about layout strategy. Multiple sidebar options and widget areas allow you to place recent posts in one sidebar to keep readers clicking within your site, place ad placements in another sidebar to capture attention, and place comments or social sharing buttons strategically.
The ability to customize where widget areas appear on different types of pages means you can optimize each page type for different goals. Your homepage might emphasize newsletter signup. Your article pages might emphasize related posts and ads. Your archive pages might emphasize category navigation.
GeneratePress and Kadence both give you fine-grained control over sidebar options and widget placement, which is essential for building revenue-optimized layouts.
How to Install and Set Up Your WordPress Theme in 24 Hours
Here’s where most blogs get vague and say “it’s easy” without actually explaining what easy means. Creator DMarketing Wall walked through the complete setup process, and I’m going to break down exactly what you need to do.
Step 1: Choose Your Theme and Prepare for Upload
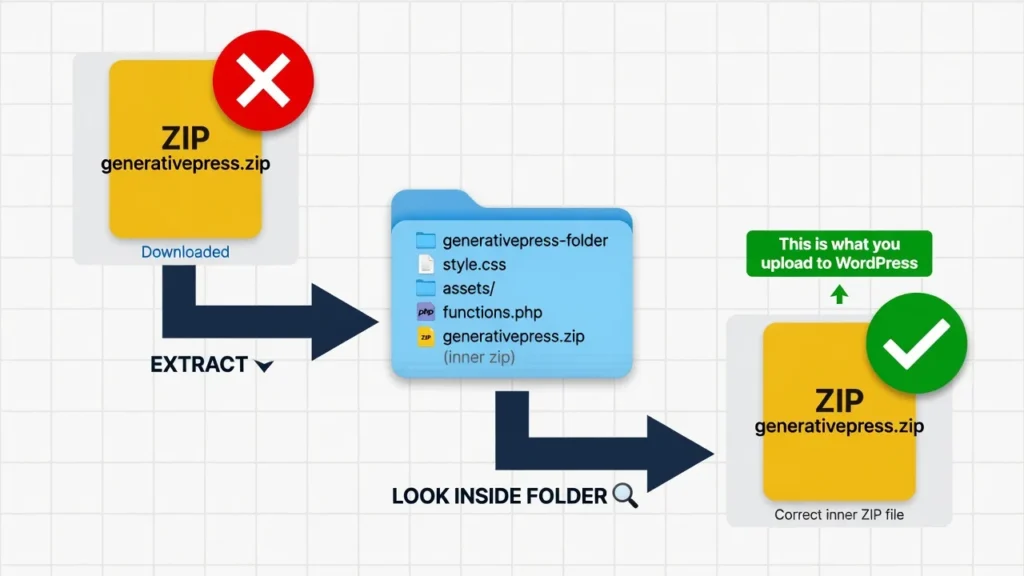
Before you upload anything, understand a common mistake that stops beginners immediately. When you download a theme, you get a ZIP file. You might assume you upload that file directly to WordPress. Don’t.
You need to extract the ZIP file first. Inside that ZIP, you’ll find another folder. Inside that folder, there’s usually another ZIP file (or sometimes just the theme files themselves). That inner file is what you upload to WordPress. If you upload the outer ZIP, you’ll get an error message saying “Stylesheet is missing” and your theme won’t install.
Take two minutes to extract properly. Open the ZIP, look inside, find the actual theme files or the inner ZIP, and that’s what you’re uploading.
Step 2: Upload the Theme to WordPress
Log into your WordPress dashboard. Navigate to Appearance > Themes > Add New. Click the Upload Theme button at the top. Choose the correct ZIP file (the inner one from Step 1) and click Install Now. WordPress will upload and install your theme in seconds.
Step 3: Activate Your New Theme
After installation completes, WordPress gives you an Activate button. Click it. Your theme is now live on your site. Don’t panic if it looks plain or different from the demo—that’s completely normal. You haven’t imported the demo content yet.
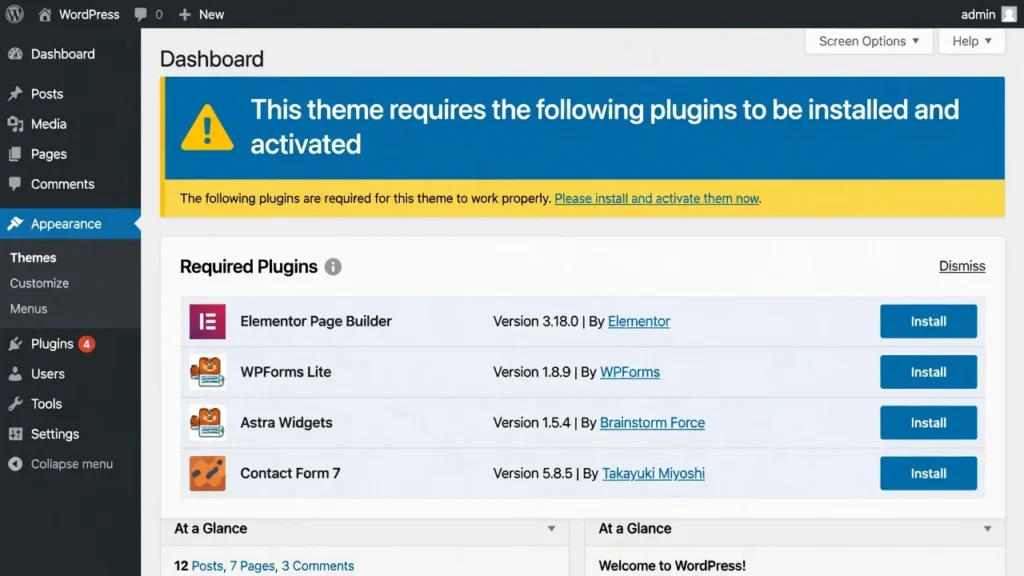
Step 4: Install Required Plugins
Most themes require specific plugins to unlock all their features. When you activate your theme, you’ll usually see a notification banner at the top of your dashboard listing required and recommended plugins. Click Begin installing plugins. Select all the required plugins (not necessarily all recommended ones—some are bloat). Click Install and then Activate for each.
Common required plugins include:
- Elementor or other page builder
- Contact Form plugin
- SEO plugin (Yoast or Rank Math)
- Performance optimization plugin
Step 5: Import Demo Content (One-Click Demo Import)
This is the magic step where your site suddenly looks like the demo. Navigate to Appearance > Import Demo Data (the exact location varies by theme—check your theme documentation).
Select the demo layout you want. Most themes offer 3-10 different demo variations. Choose one that matches your blog style. Click Import. The process takes 2-5 minutes. WordPress will import sample posts, pages, images, menus, and customizer settings.
Important: Only import demo content on a fresh WordPress installation. If you already have posts and pages, importing demo content can create duplicates and confusion.
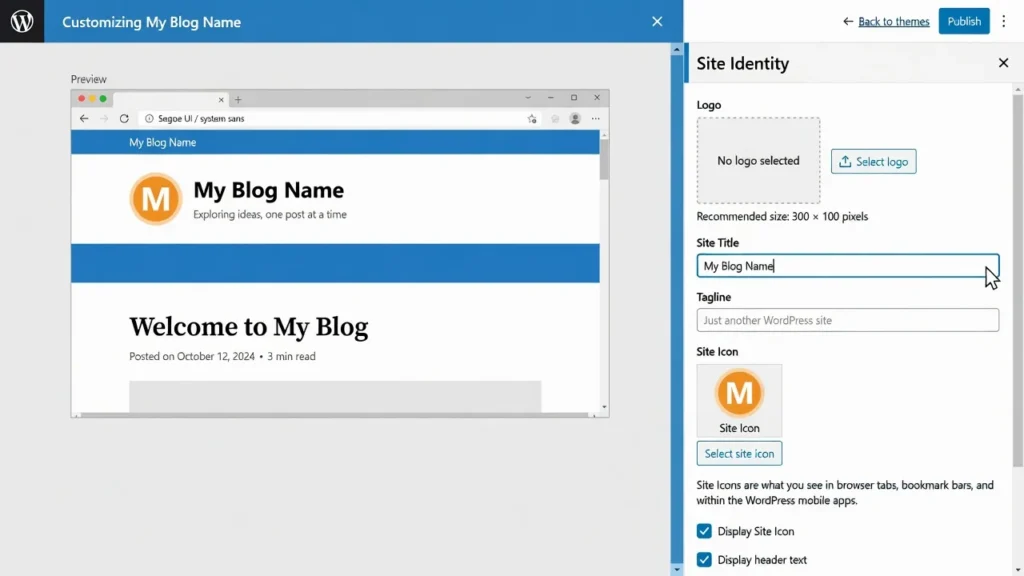
Step 6: Customize Your Site Identity
Go to Appearance > Customize > Site Identity. Upload your logo (recommended size: 200-400px wide). Set your site title and tagline. Choose whether to display the tagline (most modern blogs hide it). Upload a site icon (favicon)—the tiny image that appears in browser tabs (recommended size: 512x512px).
Step 7: Configure Your Homepage and Blog Page
By default, WordPress shows your latest blog posts on your homepage. If you want a custom homepage with a separate blog page, go to Settings > Reading. Change “Your homepage displays” to A static page. Select your Homepage from the dropdown. Create a new page called “Blog” and set it as your Posts page.
Step 8: Set Up Your Menus
Navigate to Appearance > Menus. Create a new menu called “Primary Menu.” Add pages you want in your main navigation (Home, About, Blog, Contact). Drag and drop to reorder them. Assign the menu to “Primary Menu” location (or whatever your theme calls it). Save.
Most themes support multiple menu locations: header menu, footer menu, mobile menu. Configure each based on your needs.
Step 9: Customize Colors and Fonts
Go to Appearance > Customize. Look for sections labeled Colors, Typography, or Design. Change your primary color to match your brand. Adjust heading fonts and body fonts if desired. Most themes let you preview changes in real-time before publishing. Don’t go overboard—stick to 2 fonts maximum and 2-3 colors.
Step 10: Configure Sidebar and Widget Areas
Navigate to Appearance > Widgets. You’ll see widget areas like Primary Sidebar, Footer Column 1, Footer Column 2, etc. Drag widgets into these areas:
- Sidebar: Search, Recent Posts, Categories, Tags
- Footer: About text, Recent Posts, Social Media icons
Remove demo widgets you don’t need. Keep your sidebar clean—3-5 widgets maximum or it becomes overwhelming.
Step 11: Set Up Essential Pages
Every blog needs these pages:
- About: Who you are and why you’re blogging
- Contact: Contact form or email address
- Privacy Policy: Required for AdSense and GDPR compliance
- Disclaimer: Required if you use affiliate links
Create each page through Pages > Add New. Use the block editor or page builder (depending on your theme) to design them. Don’t skip the legal pages—they’re essential for monetization approval.
Step 12: Configure Permalinks for SEO
Go to Settings > Permalinks. Change from the default “Plain” structure to Post name. This makes your URLs readable and SEO-friendly. For example: yourblog.com/best-wordpress-themes instead of yourblog.com/?p=123.
Important: Do this before publishing any content. Changing permalinks later breaks existing links and hurts SEO.
Step 13: Install and Configure SEO Plugin
Install Yoast SEO or Rank Math (both are free and excellent choices—learn which fits your needs better). Run through the setup wizard. Configure:
- Site name and description
- Social media profiles
- Default image for social sharing
- XML sitemap generation (enabled by default)
Submit your sitemap to Google Search Console: yourblog.com/sitemap.xml
Step 14: Optimize for Speed
Install a caching plugin (WP Rocket, WP Super Cache, or W3 Total Cache). Enable caching with default settings. Install an image optimization plugin (Smush or ShortPixel) to automatically compress images. Test your site speed on PageSpeed Insights. Aim for 80+ score on mobile.
Step 15: Publish Your First Blog Post
Navigate to Posts > Add New. Write your first article (minimum 800 words for SEO). Add a featured image (recommended size: 1200x630px). Choose a category. Fill in your SEO title and meta description using Yoast/Rank Math. Click Publish.
Congratulations—your blog is live.
Common WordPress Theme Setup Mistakes—Don’t Do These
I’ve watched countless creators launch blogs only to hit frustrating errors within the first hour of setup. Many of these problems come from simple mistakes during the theme installation process, and the good news is they’re completely avoidable once you know what to look for.
Based on real setup experiences and community feedback, here are the five biggest mistakes I see bloggers make when installing WordPress themes and how to fix them immediately.
Mistake #1: Uploading the Wrong ZIP File
The Problem: You download a theme ZIP file and upload it directly to WordPress. You get an error: “The package could not be installed. The theme is missing the style.css stylesheet.”
Why It Happens: Premium themes package everything into an outer ZIP file that contains documentation, licensing, and the actual theme ZIP inside. WordPress needs just the theme ZIP, not the whole package.
The Fix: Extract the downloaded ZIP file on your computer. Look inside for a folder with the theme name. Inside that folder, you’ll find the actual theme ZIP file. Upload THAT file to WordPress, not the outer package.
Mistake #2: Not Installing Required Plugins
The Problem: Your theme doesn’t look anything like the demo. Features are missing. Layouts look broken.
Why It Happens: Modern themes rely on plugins for advanced features. Page builders, contact forms, and customization tools are separate plugins that must be installed.
The Fix: After activating your theme, look for a notification banner saying “This theme requires the following plugins.” Click “Begin installing plugins” and install everything marked “Required.” Recommended plugins are optional.
Mistake #3: Skipping Demo Content Import
The Problem: Your site looks empty and nothing like the beautiful demo you saw on the theme website.
Why It Happens: Demo sites have pre-built pages, posts, images, and settings configured. Your fresh installation doesn’t have any of that.
The Fix: Look for “Import Demo Data” or “One-Click Demo Import” in your theme settings (usually under Appearance). Import the demo that matches your preferred layout. This gives you a starting point to customize rather than building from scratch.
Warning: Only import demo content on a brand new site. If you already have content, demo import can create duplicates.
Mistake #4: Forgetting to Configure Permalinks
The Problem: Your blog post URLs look like yourblog.com/?p=123 instead of readable URLs like yourblog.com/my-article-title. This hurts SEO and looks unprofessional.
Why It Happens: WordPress defaults to “Plain” permalink structure, which uses post IDs instead of post names.
The Fix: Go to Settings > Permalinks and select Post name. Save changes. Do this BEFORE publishing any content. Changing permalinks after you have published posts breaks existing links and damages SEO.
Mistake #5: Using Too Many Plugins
The Problem: Your site loads slowly, features conflict with each other, and your dashboard feels cluttered.
Why It Happens: Beginners install every plugin that sounds useful without considering whether they actually need it or whether features overlap.
The Fix: Audit your plugins. You need maximum 10-15 plugins for a standard blog:
- SEO plugin (1)
- Caching plugin (1)
- Security plugin (1)
- Backup plugin (1)
- Contact form (1)
- Image optimization (1)
- Analytics (1)
- Page builder (if your theme requires it)
- 2-5 specialty plugins for specific features
If you have 25+ plugins, something’s wrong. Delete plugins you’re not actively using.
Theme Comparison: How to Decide Between Top Options
Choosing between similar themes feels overwhelming when you’re staring at four or five strong recommendations. The real secret is simple: the best theme isn’t the objectively best one—it’s the best one for your specific priorities.
I’ve used and tested these themes extensively, and each one dominates in a different category. Instead of asking “which theme is best,” ask yourself what matters most to you right now.
If Your Priority Is Speed: Choose Neve or GeneratePress
Neve achieves the fastest load times in benchmark testing, consistently scoring 95+ on PageSpeed Insights with minimal optimization. It’s built for mobile-first performance with exceptionally small file sizes.
GeneratePress comes in a close second with lightweight code and minimal bloat. Both themes can achieve sub-1-second load times on decent hosting.
Choose Neve if: Speed is your #1 priority and you’re willing to sacrifice some design flexibility.
Choose GeneratePress if: You want excellent speed but also need more customization options than Neve offers.
If Your Priority Is Customization: Choose Kadence or GeneratePress Premium
Kadence WP offers the deepest customization options without requiring code. You can control nearly every visual element through an intuitive interface. The free version is powerful; premium unlocks even more.
GeneratePress Premium ($59/year) adds advanced customization through its “Elements” system, giving you control comparable to Kadence.
Choose Kadence if: You have a specific design vision and want maximum control without coding.
Choose GeneratePress Premium if: You want deep customization but prefer a slightly simpler interface than Kadence.
If Your Priority Is Quick Setup: Choose Astra
Astra includes 250+ pre-built templates that install in minutes. You can have a professional-looking blog live in under an hour.
Trade-off: Recent versions feel bloated with upsells and extra plugins, which can slow performance.
Choose Astra if: You want to launch fast with a polished design and don’t mind optimizing speed later.
If Your Priority Is Budget: Choose GeneratePress Free or Kadence Free
Both GeneratePress and Kadence offer exceptionally powerful free versions. You’re not sacrificing speed or essential features by using free versions.
Choose GeneratePress Free if: You want proven reliability and the largest community support.
Choose Kadence Free if: You want more built-in customization options in the free version.
If Your Priority Is AdSense Approval: Choose Zosia, Rishi, or Authentic
These themes are specifically designed with AdSense-friendly layouts, proper heading hierarchy, and clean code structure.
Choose these if: You’re focused on monetization from day one and want a theme that won’t block your AdSense approval.
Where to Buy WordPress Themes Safely
Free Themes: Download from the official WordPress.org theme repository. Every theme there is reviewed for security and quality standards.
Premium Themes: Buy directly from theme developers’ official websites or trusted marketplaces:
- ThemeForest (Envato Market) — largest marketplace, buyer protection
- Official theme websites (GeneratePress.com, Kadence.com, etc.)
- StudioPress for Genesis Framework themes
Avoid: Third-party discount sites selling “nulled” or cracked themes. These often contain malware and don’t receive updates.
Frequently Asked Questions
Can I switch themes after launching my blog?
Yes, but it requires care. When you switch themes, your content stays intact, but your design, widget areas, and customizer settings reset.
Before switching:
Backup your entire site (use the same practices you’d use for site migration)
Document your current customizer settings (take screenshots)
Test the new theme on a staging site first
Expect to spend 2-4 hours reconfiguring widgets, menus, and design
Switching themes won’t affect your posts, pages, or media library.
Do I need a premium theme to monetize with AdSense?
No. Many free themes work perfectly with AdSense. What matters is clean code, mobile responsiveness, proper layout structure, and fast loading speed—all available in quality free themes like GeneratePress and Kadence.
Premium themes sometimes offer pre-optimized ad placement areas, but you can achieve the same results with free themes and a bit more manual configuration.
How do I know if a theme is still actively maintained?
Check the “Last Updated” date in the theme repository or theme website. Themes updated within the last 3 months are actively maintained. If the last update was 6+ months ago, proceed with caution. If it’s been over a year, avoid that theme—it’s likely abandoned.
Can I use WordPress themes with Gutenberg or do I need a page builder?
Most modern themes work with Gutenberg (WordPress’s native block editor). Themes specifically built for Gutenberg include Blocksy, GeneratePress, and Kadence. You don’t need a separate page builder unless you want one. Page builders like Elementor offer visual drag-and-drop design that’s more intuitive for beginners but can add bloat. Gutenberg is faster and cleaner but has a learning curve. Choose based on your comfort level.
What’s the difference between a WordPress theme and a template?
WordPress theme controls your entire site’s appearance: layout, colors, fonts, structure, and functionality.
Template (or page template) is a pre-designed page layout within a theme. For example, a theme might include templates for: blog homepage, about page, contact page, etc.
When someone says “WordPress template,” they usually mean either a page template or they’re using “template” and “theme” interchangeably.
Can I use the same theme on multiple websites?
Free themes: Yes, use them on unlimited sites.
Premium themes: Check the license. Most premium theme licenses are:
Single site license: 1 website only (most common)
Multi-site license: 5-25 websites (costs more)
Developer license: Unlimited websites (highest cost)
Using a single-site license on multiple sites violates the license agreement and you won’t receive updates or support.
Start Blogging Today: Your Action Plan
You’ve read through this complete guide on choosing the best WordPress theme for blogging, and now you have enough information to select the exact right theme for your situation. The hardest part is committing to action—turning knowledge into actually launching your blog.
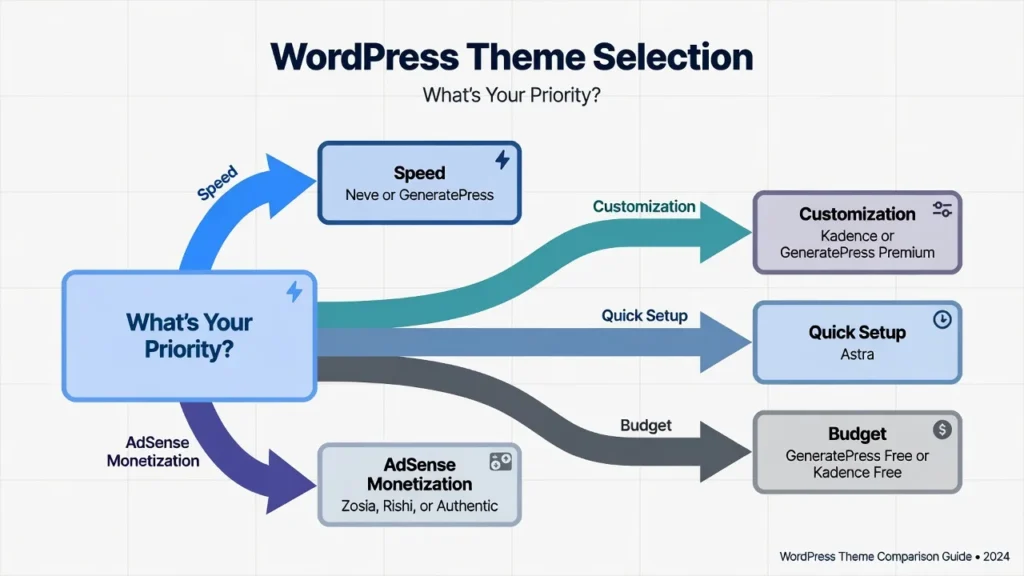
Your Decision Path
Start with one simple question: what’s your primary priority? Speed, customization, quick setup, budget, or AdSense monetization?
Identify which theme category best matches your needs from the detailed comparison sections above.
Once you identify your priority, you’ve already narrowed from dozens of options to 2-3 specific themes. Compare those finalists using the expert reviews provided. Then move to the “Where to Buy WordPress Themes” section to purchase from safe, verified marketplaces. Finally, follow the complete installation and setup guide and publish your first article within hours.
This path takes most creators from “I’m researching the best WordPress theme for blogging” to “my blog is live and earning” in just 24 hours.
Implementation Steps
Today (2 hours):
- Choose your theme based on your primary priority
- Download/purchase the theme
- Install WordPress on your hosting account
- Upload and activate your theme
- Install required plugins
Tomorrow (3 hours):
- Import demo content
- Customize colors, fonts, and logo
- Set up menus and sidebar widgets
- Create essential pages (About, Contact, Privacy, Disclaimer)
- Configure permalinks and SEO plugin
This Week (5 hours):
- Write and publish your first 3 blog posts
- Test site speed and optimize
- Submit sitemap to Google Search Console
- Set up Google Analytics
- Share your blog on social media
Long-Term Success Tips
Month 1: Focus on publishing 8-12 quality blog posts. Don’t obsess over design tweaks—content matters more than pixel-perfect layouts.
Month 2: Analyze which content performs best. Double down on topics that get traffic and engagement.
Month 3: Apply for AdSense (if monetization is your goal). You need consistent content and traffic first.
Month 6: Consider upgrading to premium theme version if you’ve outgrown free features. By this point, you’ll know exactly what features you need versus what’s just nice to have.
Final Recommendation
If I had to start a new blog today and could only choose one theme, I’d choose GeneratePress (free version to start, premium later if needed). It’s fast, reliable, well-supported, and grows with your blog. It won’t limit you as a beginner, and it won’t hold you back as you scale.
But that’s my recommendation based on my priorities: speed, reliability, and community support.
Your perfect theme might be different. Use the five decision criteria from this guide to evaluate themes yourself, and you’ll make the right choice for your specific blogging goals.
Now stop researching and start building. The best WordPress theme for blogging is the one you actually launch with, not the one you spend three more weeks researching.
Your blog won’t build itself. Choose a theme from this list, follow the installation guide, and publish your first post this week.
The internet is waiting for your voice.


