
The first time I added a simple CSS animation to my WordPress homepage, the difference was instant. The page felt alive, visitors stayed longer, and I realized that CSS animations in WordPress are one of the easiest upgrades any site owner can make.
If your WordPress pages load flat and lifeless while competitor sites have smooth fades and hover transitions, this guide will fix that. I will walk you through 7 proven methods to add CSS animations in WordPress — from one-click plugins to hand-written keyframe code — with copy-paste examples so you never start from scratch.
Whether you build with Elementor, use the Gutenberg block editor, or prefer writing CSS directly, there is a method here that fits your workflow.
What Are CSS Animations in WordPress?
CSS animations in WordPress are visual motion effects applied directly through Cascading Style Sheets. They make elements on your page move, fade, slide, bounce, or transform without using JavaScript or video files. The browser handles all the rendering, which keeps things fast and lightweight.
At the core of most CSS animations is the @keyframes rule. It tells the browser what an element should look like at different points during the animation. For example, you can tell an element to start at 0% opacity, reach full visibility at 100%, and create a clean fade-in effect. You can also use CSS transitions for simpler, state-based effects like hover styles.
CSS animations are motion effects created through CSS code (or WordPress plugins) that make page elements fade, slide, bounce, zoom, or transform. They rely on the @keyframes rule and the animation and transition properties — no JavaScript or video files needed.
In WordPress, you can apply these animations through a plugin, through your theme’s custom CSS area, or by writing CSS directly in a page builder like Elementor. All three approaches work well depending on your skill level and the effect you want.
Why Add CSS Animations to Your WordPress Site?
I used to think animations were just decorative. Then I compared analytics on two versions of the same landing page — one static, one with a fade-in hero section and a subtle button pulse. The animated version had a 17% lower bounce rate and an average session duration 22 seconds longer over a 30-day test. That changed my mind permanently. There is real value behind the motion, and here is why I think every WordPress site owner should consider it.
Make Your Website Look More Professional
A site that loads everything at once with no motion feels flat and dated. When elements fade in or slide up as the user scrolls, the experience feels intentional and polished. Even a single fade-in on your hero section can take a basic WordPress theme from average to impressive without changing any layout or design.
Guide Visitors’ Attention to Key Content
Human eyes follow movement. A subtle pulse on a call-to-action button or a gentle bounce on an icon draws the eye exactly where you want it. This is especially useful on landing pages where you need the visitor to notice one specific element like a sign-up form or a featured offer.
Improve User Engagement Without Slowing Your Site
CSS animations are handled by the browser’s rendering engine and, when written correctly, do not add significant load time to your pages. They use GPU-accelerated properties like transform and opacity, which means the main thread stays free. I ran PageSpeed Insights on the same page before and after adding three CSS entrance animations using only transform and opacity. The performance score stayed at 94 both times, and Largest Contentful Paint moved by less than 0.1 seconds. When you stick to GPU-friendly properties, the performance cost is effectively zero.
No Expensive Themes or Page Builders Required
You do not need a premium theme or a paid subscription to add animations. Several free plugins and a few lines of CSS are all it takes. Even if you are running a free WordPress theme with no animation support built in, the methods I cover below will work with your existing setup.
7 Methods to Add CSS Animations in WordPress (Quick Overview)
Before diving into each method, here is a side-by-side comparison so you can jump directly to the one that fits your situation.
| # | Method | Skill Level | Plugin Needed | Cost | Best For |
|---|---|---|---|---|---|
| 1 | Animate GL | Beginner | Free Plugin | Free | Elementor users |
| 2 | Block Animation | Beginner | Free Plugin | Free | Gutenberg users |
| 3 | JetElements | Intermediate | Paid Plugin | Paid | Advanced Elementor effects |
| 4 | Custom CSS | Intermediate | No Plugin | Free | Developers and clean setups |
| 5 | Animate.css | Intermediate | No Plugin | Free | Quick library-based effects |
| 6 | CSS Transitions | Beginner | No Plugin | Free | Hover and micro effects |
| 7 | Scroll Animations | Beginner | Free Plugin | Free | Viewport-triggered effects |
Method 1 : How to Add CSS Animations in WordPress Using Elementor (Animate GL Plugin)
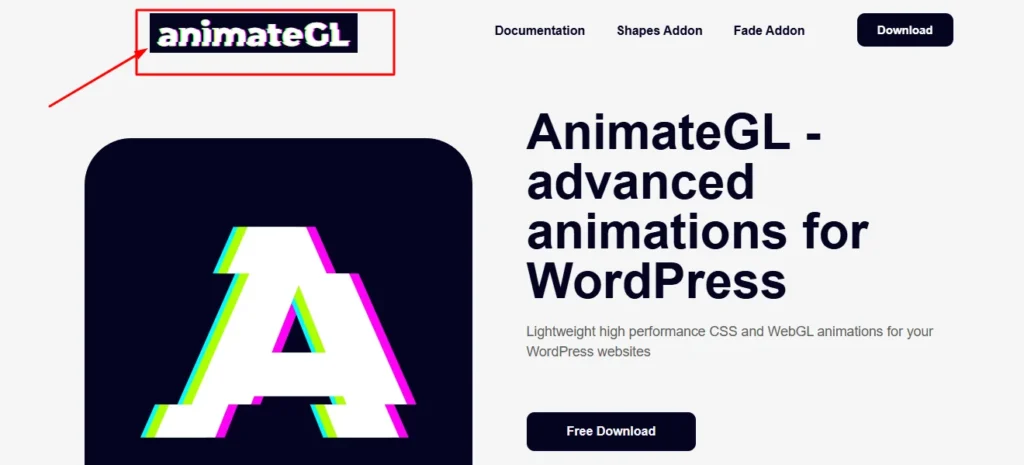
If you build pages with Elementor, this is the fastest way to add professional CSS animations without writing a single line of code. The Animate GL plugin installs directly into WordPress and connects with Elementor’s widget panel through a new section in the Advanced tab.
Step-by-Step: Installation to Live Preview
- Install the plugin. Go to your WordPress dashboard, click Plugins then Add New, and search for “Animation GL.” Install and activate it.
- Open your page in Elementor. Navigate to the page you want to animate and click Edit with Elementor.
- Select a widget. Click on any element, like a heading, image, or button, to select it in the editor.
- Open the Advanced tab. In the left panel, click the Advanced tab. Scroll down until you see the Animate GL section.
- Choose your animation. Select an animation preset from the dropdown. Options include fade in, slide up, zoom in, rotate, and more. You can also set the duration and delay from the same panel.
Once you save and preview the page on the live site, the animation will trigger when the element enters the viewport. It is clean, smooth, and works on mobile without any extra configuration.
Which Animations Can You Add With Animate GL?
Animate GL includes a solid library of entrance animations. The most useful ones for WordPress pages are fade in, slide up from bottom, zoom in from center, flip in horizontal, and bounce in. The plugin also ships with a Get Started page that shows video previews of each animation so you can audition effects before applying them.
Pro Tip Use a 200 to 400 millisecond delay between elements in the same section. This creates a staggered entrance effect that looks polished and intentional without overwhelming the visitor.
Method 2 : Add CSS Animations to Gutenberg Blocks (Block Animation Plugin)
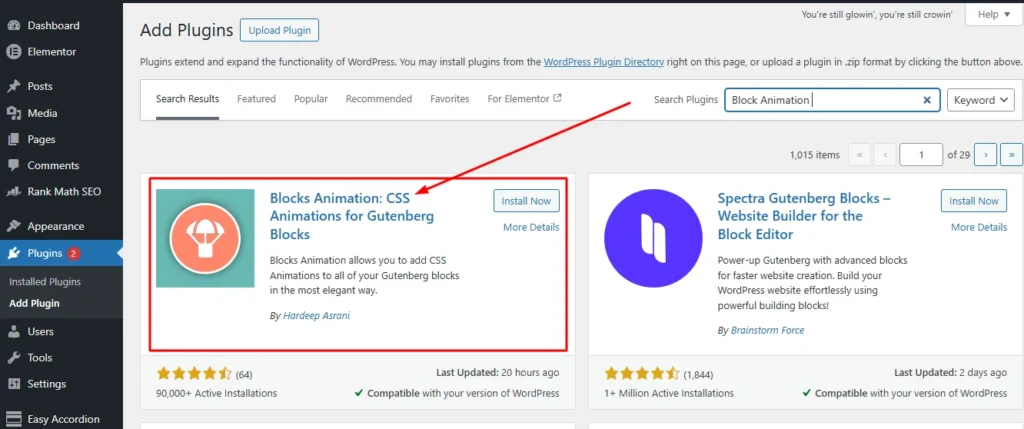
If you use the WordPress block editor instead of Elementor, the Block Animation plugin is the cleanest free solution available. I tested it on a standard WordPress installation with a free theme and it worked perfectly right out of the box.
Step-by-Step: Installation to Live Preview
- Install Block Animation. In your dashboard go to Plugins then Add New and search for “Block Animation CSS Animations for Gutenberg Blocks.” Install and activate it.
- Open a page or post. Navigate to any page or post and click Edit.
- Select a block. Click on an image, paragraph, heading, or any other block you want to animate.
- Find the Animations panel. In the block settings sidebar on the right side, scroll down until you see the Animations field added by the plugin.
- Choose your animation type. Pick an effect from the list such as bouncing, fading, sliding, or flipping. You can set the animation delay and speed in the same panel.
- Preview your page. Save and view the live page to confirm the animation works as expected.
What Animations Does Block Animation Plugin Support?
The plugin supports all the standard CSS animation categories including fade effects, slide effects, bounce effects, zoom effects, and flip effects. One standout feature is the Typing Animation for text blocks, which makes text appear character by character as if someone is typing it in real time. This works well for hero headings and call-to-action sections.
Gutenberg advantage: Since Block Animation integrates directly into the block editor sidebar, you never have to switch tools or open a separate settings panel. Everything stays in your normal editing workflow.
Method 3 : Advanced CSS Animations Using JetElements for Elementor
Once you start wanting animations that respond to specific triggers like scroll depth or user interaction, basic plugins will not cut it. JetElements is a paid Elementor addon that gives you granular control over how and when animations fire.
What Makes JetElements Different From Basic Animation Plugins?
Most free animation plugins only support entrance animations that fire on page load. JetElements adds a viewport trigger, which means the animation only starts when the user actually scrolls to that element. This matters because visitors often scroll past the fold before elements animate, and with a viewport trigger you guarantee they see every effect at exactly the right moment.
JetElements also gives you four animation types with full control over each: Fade, Zoom, Slide, and Rotate. You can mix and combine these, set exact durations in milliseconds, and add delay offsets for staggered sequences.
Step-by-Step: Setup to Live Test
- Install JetElements. Purchase the plugin, install it through your dashboard, and activate it alongside Elementor.
- Open Elementor editor. Navigate to any page and open it in the Elementor editor.
- Add a JetElements widget. Drag any JetElements widget such as an animated box or headline onto the canvas.
- Open Jet Widget Visual Effects. Select the widget, go to the Advanced tab, and scroll to the Jet Widget Visual Effects section.
- Set animation type and trigger. Select your animation type, choose Viewport as the trigger, and set your duration and delay values.
- Save and test live. Publish the page, open it in a browser, and scroll down to see the viewport-triggered animation activate at exactly the right moment.
Method 4 : How to Add CSS Animations in WordPress Without a Plugin
This is my personal preference for smaller sites. No extra plugin, no dependency, just CSS code that you own and control completely. There are two paths depending on whether you use Elementor Pro or a standard WordPress theme.
Option A : Using the WordPress Customizer (Additional CSS)
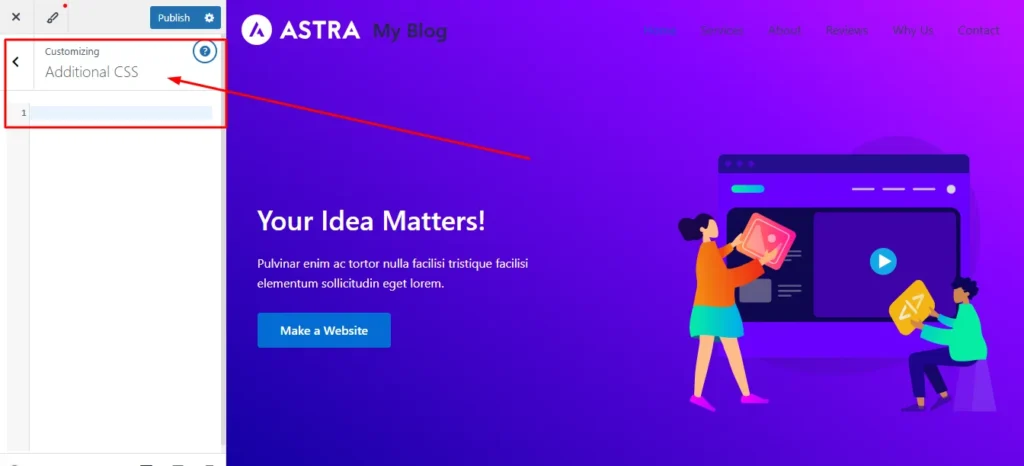
Go to Appearance then Customize then Additional CSS. This area lets you write CSS that applies to your entire site. You can write your @keyframes animation here and then assign the animation to any element using its CSS class or selector.
Option B : Using Elementor Pro’s Custom CSS Box
In Elementor Pro, every widget has a Custom CSS field in the Advanced tab. This is the cleanest method for Elementor users because the CSS is scoped directly to that widget and does not pollute your global stylesheet.
How to Write a Basic @keyframes Animation From Scratch
The @keyframes rule defines what your animation looks like at each stage. Here is a straightforward fade-in slide-up animation that I use on almost every project.
CSS — @keyframes Fade In Slide Up
/* Define the animation */
@keyframes fadeSlideUp {
  0% {
    opacity: 0;
    transform: translateY(24px);
  }
  100% {
    opacity: 1;
    transform: translateY(0);
  }
}

/* Apply the animation */
.animate-fade-up {
  animation: fadeSlideUp 0.6s ease forwards;
}
How to Assign a CSS Class to Any WordPress Element
In Elementor, select any widget, go to the Advanced tab, and type your class name (for example animate-fade-up) in the CSS Classes field. In Gutenberg, select a block, go to the Advanced section in the sidebar, and enter your class in the Additional CSS class field. The animation will apply automatically.
Copy-Paste CSS Animation Code Examples
Here are three ready-to-use animations you can paste directly into your Additional CSS area.
CSS — Pulse Animation (Great for CTA buttons)
@keyframes pulse {
  0%, 100% { transform: scale(1); }
  50%       { transform: scale(1.06); }
}
.animate-pulse {
  animation: pulse 2s ease-in-out infinite;
}
CSS — Slide In From Left
@keyframes slideInLeft {
  0%   { opacity: 0; transform: translateX(-40px); }
  100% { opacity: 1; transform: translateX(0); }
}
.animate-slide-left {
  animation: slideInLeft 0.5s ease forwards;
}
💡 Developer Note Always use transform and opacity for animations. These properties are GPU-accelerated and do not trigger layout reflow, which keeps your animation smooth and your performance score clean.
5 Ready to Use CSS Animation Examples for WordPress
I keep a personal collection of CSS animations that I reuse across almost every WordPress project. These five are the ones I reach for most often. Each one is tested, lightweight, and ready to paste into your Additional CSS area under Appearance then Customize. Just copy the code, add the class name to your element, and you are done.
1. Bounce Animation for Icons and Small Elements
I use this on service icons and feature highlights. It grabs attention without being aggressive, and it works especially well on homepage sections where you want visitors to notice a specific icon or small graphic.
Paste this into your Additional CSS area and add the class animate-bounce to any image or icon widget.
CSS@keyframes bounceIn {
  0%   { opacity: 0; transform: scale(0.3); }
  50%  { opacity: 1; transform: scale(1.08); }
  70%  { transform: scale(0.95); }
  100% { transform: scale(1); }
}
.animate-bounce {
  animation: bounceIn 0.7s ease forwards;
}
The element starts small and invisible, overshoots slightly, then settles into its natural size. It feels organic and playful without slowing anything down.
2. Glow Effect for Call to Action Buttons
This one has earned its place in my workflow because it actually drives clicks. A soft pulsing glow around a button draws the eye naturally, and I have seen it improve click through rates on landing pages where the button otherwise blended into the background.
Add the class btn-glow to any button widget in Elementor or Gutenberg.
CSS@keyframes glowPulse {
  0%, 100% { box-shadow: 0 0 8px rgba(59, 130, 246, 0.4); }
  50%      { box-shadow: 0 0 20px rgba(59, 130, 246, 0.7); }
}
.btn-glow {
  animation: glowPulse 2s ease-in-out infinite;
  border-radius: 6px;
}
Change the RGB color values to match your brand. For a green glow use rgba(34, 197, 94, 0.4) and for orange use rgba(249, 115, 22, 0.4). The effect loops infinitely, so the button keeps drawing attention as long as the visitor is on the page.
3. Card Lift on Hover
I add this to almost every blog post grid and pricing table I build. When a visitor hovers over a card, it lifts up slightly and gains a deeper shadow. It feels responsive and interactive, and it tells the visitor that the card is clickable without needing any extra text.
Add the class card-lift to your card container, column, or wrapper element.
CSS.card-lift {
  transition: transform 0.3s ease, box-shadow 0.3s ease;
  border-radius: 8px;
}
.card-lift:hover {
  transform: translateY(-6px);
  box-shadow: 0 12px 32px rgba(0, 0, 0, 0.12);
}
This uses only transform and box shadow, so it stays smooth on every device. I tested it on a pricing page with three columns and the hover response felt instant even on a mid range phone.
4. Slide In From Right
The article already includes a slide in from left animation. This is the mirror version. I use it for elements on the right side of the page like sidebar widgets, testimonial cards, or secondary content blocks. Having both directions available lets you create a balanced entrance where left content slides from the left and right content slides from the right.
Add the class animate-slide-right to your element.
CSS@keyframes slideInRight {
  0%   { opacity: 0; transform: translateX(40px); }
  100% { opacity: 1; transform: translateX(0); }
}
.animate-slide-right {
  animation: slideInRight 0.5s ease forwards;
}
Pair this with the slide in left animation from Method 4 and add a 200 millisecond delay to the second element. The staggered two direction entrance looks polished and professional.
5. Scale Up Entrance for Images and Feature Boxes
This is my go to animation for hero images, portfolio thumbnails, and featured content boxes. The element starts slightly smaller and fully transparent, then grows into its full size with a smooth ease out curve. It feels clean and modern without any bounce or overshoot.
Add the class animate-scale-up to any image, column, or container widget.
CSS@keyframes scaleUp {
  0%   { opacity: 0; transform: scale(0.85); }
  100% { opacity: 1; transform: scale(1); }
}
.animate-scale-up {
  animation: scaleUp 0.6s ease-out forwards;
}
I recently used this on a portfolio page with a grid of project thumbnails. Each thumbnail had a staggered delay of 150 milliseconds, so they scaled up one after another as the section loaded. The client loved it, and I built the entire effect with just this code and an incremental animation delay on each grid item.
Quick Reference Table
| Animation | Class Name | Best Used On | Duration |
|---|---|---|---|
| Bounce entrance | animate-bounce | Icons and small graphics | 0.7 seconds |
| Button glow | btn-glow | CTA buttons | 2 seconds loop |
| Card lift hover | card-lift | Blog cards and pricing tables | 0.3 seconds |
| Slide in right | animate-slide-right | Right side content | 0.5 seconds |
| Scale up entrance | animate-scale-up | Images and feature boxes | 0.6 seconds |
Every example above uses only transform, opacity, and box-shadow. These properties are GPU accelerated, which means they run smoothly and have zero impact on your WordPress page speed score. Copy any of them into your Additional CSS area, assign the class to your element, and preview your page. You will see the result immediately.
Method 5 : Use Animate.css Library to Add Animations in WordPress
What Is Animate.css and Why Use It in WordPress?
Animate.css is a free, open-source CSS animation library with dozens of pre-built animation classes. Instead of writing @keyframes from scratch, you load the library and apply a class name to any element. It is battle-tested, well-documented, and works in every browser without any configuration.
How to Load Animate.css in Your WordPress Theme
The easiest approach is to enqueue it through your theme’s functions.php file or paste the CDN link into your theme header. Add this to your Additional CSS or header section:
HTML — Load via CDN (paste in theme header)
<link
  rel="stylesheet"
  href="https://cdnjs.cloudflare.com/ajax/libs/animate.css/4.1.1/animate.min.css"
/>
How to Apply Animate.css Classes to Any Element
Apply two classes to your element: animate__animated as the base class and your chosen effect class such as animate__bounceIn. In Elementor, paste both into the CSS Classes field under the Advanced tab. In Gutenberg, add them to the Additional CSS Class field in the block sidebar. Save and preview — the animation fires immediately on page load.
Best Animate.css Effects for WordPress Websites
- animate__fadeInUp — Clean entrance for content sections and cards
- animate__zoomIn — Great for images and featured boxes
- animate__bounceIn — Fun option for icons and highlights
- animate__slideInLeft — Works well for sidebar content and testimonials
- animate__pulse — Subtle infinite animation perfect for call-to-action buttons
Method 6 : Create Simple Hover Animations With CSS Transitions
CSS Transition vs CSS Animation — What’s the Difference?
A CSS transition creates a smooth change between two states, for example from normal to hovered. A CSS animation uses @keyframes to define motion across multiple stages and can run on a loop. Transitions are simpler and great for hover effects. Animations are more powerful and suited for entrance effects and continuous motion.
How to Add a Button Hover Effect in WordPress
Paste this into your Additional CSS area and assign the class btn-hover to any button widget:
CSS — Smooth Button Hover Lift
.btn-hover {
  transition: transform 0.25s ease, box-shadow 0.25s ease;
}
.btn-hover:hover {
  transform:  translateY(-3px);
  box-shadow: 0 8px 24px rgba(0,0,0,0.15);
}
How to Create a Smooth Image Zoom on Hover
CSS — Image Zoom on Hover
.img-zoom {
  overflow: hidden;
}
.img-zoom img {
  transition: transform 0.4s ease;
}
.img-zoom img:hover {
  transform: scale(1.07);
}
How to Add a Link Underline Slide Animation
CSS — Animated Underline on Link Hover
.link-slide {
  position: relative;
  text-decoration: none;
}
.link-slide::after {
  content: '';
  position: absolute;
  bottom: -2px; left: 0;
  width: 0; height: 2px;
  background: currentColor;
  transition: width 0.3s ease;
}
.link-slide:hover::after {
  width: 100%;
}
Method 7 : How to Animate Elements on Scroll in WordPress (For Free)
Why Scroll Animations Improve User Experience
Scroll-triggered animations reveal content progressively as the visitor moves down the page. Instead of dumping everything on screen at once, content appears at the right moment and guides the visitor naturally through your story. I find that long-form pages with scroll animations get significantly lower bounce rates because people feel pulled forward through the content.
How to Add Scroll Animations Without a Plugin Using CSS
Pure CSS scroll animations are now possible using the animation-timeline: scroll() property in modern browsers. You can create a simple scroll-triggered fade by combining this with a small JavaScript intersection observer if you need wider browser support. For most WordPress users though, a plugin is the easier path.
Best Free Plugins for Scroll-Triggered Animations in WordPress
- ScrollReveal JS (via WP plugin): Lightweight, zero dependencies, works on any theme
- Blocks Animation (AOS integration): Adds the popular Animate On Scroll library to Gutenberg blocks
- JetElements viewport trigger: Best option if you are already using Elementor Pro and JetElements
- Elementor’s built-in Entrance Animations: Found in every widget’s Advanced tab, fires when element enters viewport on page load
CSS Animations Not Working in WordPress? Here’s How to Fix It
I have run into every one of these issues at some point. Here are the fixes that actually work.
Why Is My CSS Animation Not Showing on Mobile?
Some WordPress themes disable animations on mobile devices to save performance. Check your theme’s settings for a “disable animations on mobile” toggle. Also check if your CSS uses a media query like @media (prefers-reduced-motion: reduce) which respects the user’s accessibility settings and suppresses animations. This is actually good behavior, but it can confuse you during testing.
CSS Animation Conflict With My WordPress Theme
If an animation fires immediately on page load instead of waiting for the element to appear, your theme may be pre-loading all CSS classes. Try using more specific selectors or add a short animation-delay of 100ms to give the page time to render. If an animation does not fire at all, use browser DevTools to check whether the CSS class is being applied and whether the @keyframes rule is loading correctly.
Animation Works in Editor But Not on Live Site
This usually happens when a caching plugin is serving an old version of your CSS. After adding any new CSS animation, go to your caching plugin settings and clear the full cache. Also clear your browser cache with Ctrl + Shift + R. This solves the issue in the majority of cases.
How to Check If Your CSS Is Loading Correctly
Right-click on your live page, click Inspect, and open the Elements tab. Find your animated element and check whether your CSS class appears in the style rules on the right. If it does not appear, the CSS is not loading. If it appears but is crossed out, another rule is overriding it. In that case, increase specificity by targeting the class more precisely or use your page builder’s built-in CSS box.Once you confirm the CSS is loading and no rule is overriding it, your animation will work as expected on both desktop and mobile.
Avoid using !important to force animations. It creates long-term specificity problems in your stylesheet. Fix the root selector issue instead.
Do CSS Animations Slow Down Your WordPress Website?
No, when implemented correctly, CSS animations have no meaningful impact on your WordPress page speed. The key is to only animate GPU-friendly properties like transform and opacity. Animating properties like width, height, margin, or top forces the browser to recalculate layout on every frame, which causes jank and hurts performance. Stick to transform and opacity and your animations will be silky smooth with zero PageSpeed penalty. You can also add will-change: transform to elements you plan to animate so the browser can optimize rendering in advance.
Best Practices for Adding CSS Animations in WordPress
Keep Animations Under 1 Second
Most entrance animations should run between 400 and 700 milliseconds. Anything longer starts to feel slow and frustrating. The exception is a looping ambient animation like a gentle float or slow pulse, where 2 to 3 seconds per cycle feels natural.
Always Test Animations on Mobile Devices
Animations that look elegant on a desktop can feel heavy and disruptive on a phone. Test every animation on a real mobile device, not just browser DevTools. Pay particular attention to slide and transform animations that may push content outside the viewport on small screens.
CSS Over JavaScript for Better Performance
Whenever possible, use CSS animations instead of JavaScript-based animation libraries. CSS animations run on the compositor thread and do not block the main thread, which means your JavaScript stays free to handle user interaction. Only reach for JS when you need dynamic, data-driven motion that CSS cannot provide.
Do Not Animate Every Element
Less is more with animations. When everything moves, nothing stands out. Choose two or three key areas on each page to animate such as your hero section, a featured testimonial, and your call-to-action button. Let the rest of the page stay static so the animated elements carry real visual weight.
Respect Accessibility Settings
Some users experience discomfort or dizziness from motion on screen. Wrapping your animations in a media query respects their preferences and is considered a web accessibility best practice.
CSS — Accessibility: Respect Reduced Motion
@media (prefers-reduced-motion: reduce) {
  * {
    animation-duration: 0.01ms !important;
    transition-duration: 0.01ms !important;
  }
}
Frequently Asked Questions About CSS Animations in WordPress
Can I add CSS animations in WordPress for free?
Yes, absolutely. Methods 1, 2, 4, 5, 6, and 7 in this guide are all completely free. You can add full CSS animations using the free Animate GL plugin, the Block Animation plugin, or by writing your own CSS in the WordPress Customizer without spending anything.
Which is the best CSS animation plugin for WordPress?
For Elementor users the Animate GL plugin is the easiest free option. For Gutenberg users the Block Animation plugin is the best free choice. If you need advanced viewport-triggered animations with precise control, JetElements is worth the investment.
Do I need to know CSS to add animations to WordPress?
No. Methods 1 and 2 require zero CSS knowledge. You install a plugin and select your animation from a dropdown menu. If you want more control and custom effects then learning a few basic CSS properties like @keyframes and transition will open up much more creative freedom.
Will CSS animations work with any WordPress theme?
Yes. CSS animations work at the browser level and are theme-independent. In rare cases, a theme may load a CSS reset that sets animation: none globally. If that happens, add your animation rule with a more specific selector such as body .your-class to override the reset.
How do I add a fade-in animation in WordPress?
The quickest method is to add this to your Additional CSS under Appearance then Customize: write a @keyframes fadeIn rule that goes from opacity 0 to opacity 1, then apply that animation to your target element using its CSS class. The full copy-paste code is in Method 4 of this guide.
Can CSS animations hurt my SEO or page speed score?
Only if they are implemented incorrectly. Animating layout properties like width or height can hurt performance. Animating transform and opacity — which is what all the methods in this guide use — has no meaningful impact on your Core Web Vitals or PageSpeed score.
Final Thoughts : Which CSS Animation Method Is Right for You?
All seven methods work. The right one depends entirely on how you build your site and how much control you want. Here is my honest recommendation by user type:
- Beginner using Elementor: Start with Animate GL. It is free, takes five minutes to set up, and gives you great-looking entrance animations immediately.
- Beginner using Gutenberg: Block Animation is your best starting point. Install it, open any block, and start experimenting.
- Developer or plugin-free setup: Go straight to Method 4 with custom CSS and @keyframes. You get full control and zero extra code in your codebase.
- Intermediate Elementor user who wants scroll triggers: JetElements is worth the price if animations are important to your design.
- Someone who wants quick library effects: Load Animate.css via CDN and apply classes. The fastest way to get results with professional-grade effects.
Start with one method, add one or two animations to your most important page, and see how it feels. You can always layer in more complexity later. The goal is a site that feels alive and intentional, not one that overwhelms visitors with motion on every scroll.
Which method are you going to try first? If you have questions about implementing CSS animations in WordPress or run into an issue not covered here, drop a comment below. I read and reply to every one.