How to Disable Comments in WordPress (3 Easy Ways for 2026)
If you have been running a WordPress site for any amount of time, you already know that the comment section can quickly become more of a headache than a feature. I have been there myself. What starts as an open space for readers to share thoughts often turns into a daily cleanup job.
The good news is that WordPress gives you full control over this. If you want to learn how to disable comments in WordPress the right way, this guide covers every method in plain steps so you can pick the one that fits your setup. In this guide I am going to walk you through every method step by step so you can choose the one that fits your situation best.
Why WordPress Site Owners Disable Comments
Before jumping into the how, it helps to understand the why. A lot of site owners assume they need to keep comments enabled to look active or engaging. But that is not always true, and there are some very good reasons to turn them off completely.
Spam, Phishing Links, and Fake Complaints
This is the number one reason most people eventually disable comments. The moment your site starts getting any real traffic, the spam follows. You will see comments promoting random products, dropping suspicious links, or leaving vague complaints that make no sense in context.
These are not real readers. They are bots or low-effort human spammers trying to get a backlink or spread a phishing link. Approving them by accident can hurt your site’s reputation. Cleaning them up manually every day wastes your time. Beyond disabling comments, following WordPress security best practices helps protect your site from these and other common threats
Disabling comments entirely removes this problem at the source.
Pages Where Comments Never Made Sense
Think about your Contact page, your About page, your Privacy Policy, or your Services page. None of these pages need a comment section. A visitor landing on your Contact page is there to reach you, not to start a conversation in a public thread below the page.
Leaving comments open on these pages just adds clutter and creates one more thing you have to manage. Turning them off on static pages is one of the simplest housekeeping tasks you can do for your site.
Should You Disable or Just Moderate WordPress Comments?
The right answer depends entirely on what your site is trying to do. WordPress gives you the flexibility to enable or disable comments based on your site’s goals and audience. If you run a blog where community discussion adds genuine value, moderation might be the better path. WordPress lets you hold comments for approval before they go live, which filters out most spam before anyone sees it.
But if you are running a business site, a portfolio, an affiliate blog, or any site where comments add no real value to the reader experience, disabling them is the cleaner choice. There is no rule that says you must have comments enabled. Most professional sites today function perfectly well without them.
How to Disable Comments in WordPress : Quick Overview
Here is a fast summary before we go into the detailed steps. If you are in a hurry, this gives you the full picture at a glance.
- To stop comments on all future posts, go to Settings then Discussion and uncheck the allow comments option.
- To disable comments on all your existing posts and pages at once, use the Bulk Edit feature inside Posts and Pages.
- To disable comments on just one specific post or page, open the editor and use the Discussion panel on the right side.
- For the most complete control including REST API and custom post types, install the free Disable Comments plugin.
Each of these methods is covered in full detail below.
Method 1 : Disable Comments on All Future WordPress Posts
This is the first thing I recommend doing no matter what. Even if you plan to handle existing posts separately, you want to stop new comments from being allowed on anything you publish going forward. This method takes about thirty seconds. This setting controls whether you want to allow people to post comments on your content going forward.
Step 1 : Go to Settings and Open Discussion
Log in to your WordPress dashboard. On the left side menu, hover over Settings and click Discussion. This is where WordPress stores all your global comment preferences.
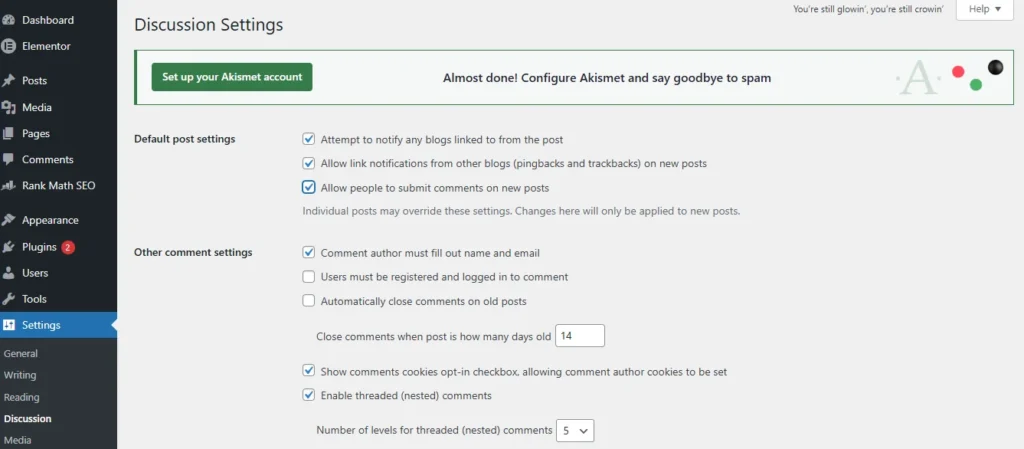
Step 2 : Uncheck the Allow Comments Option
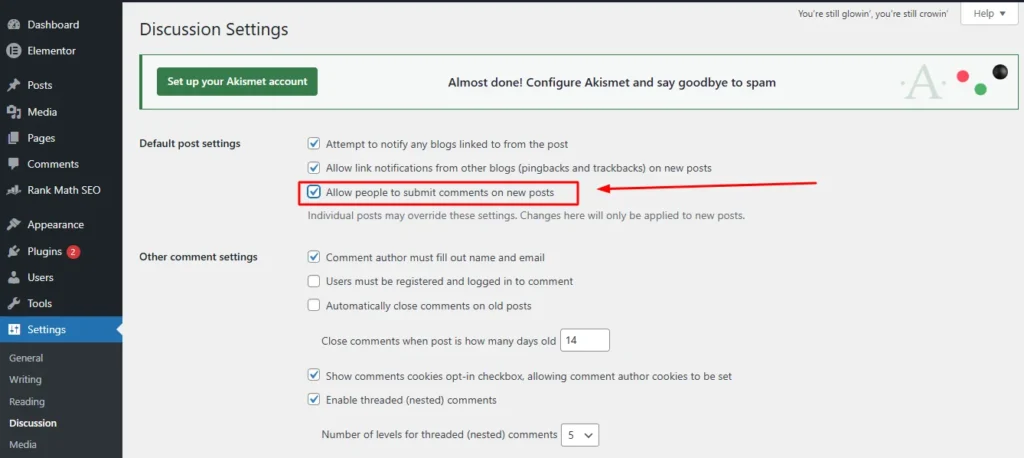
Look for the option that says “Allow people to submit comments on new posts.” This setting controls whether you want to allow people to post comments on your content going forward. It will have a checkbox next to it. Uncheck that box.
This single setting tells WordPress not to open up comments on anything you publish from this point forward. It does not affect posts or pages that already exist on your site.
Step 3 : Save Your Changes
Scroll to the bottom of the Discussion Settings page and click Save Changes. That is it. Every new post or page you create from now on will have comments disabled by default.
Method 2 : Bulk Disable Comments on All Existing WordPress Posts and Pages
Turning off comments for future content is a good start, but your existing posts are still sitting there with comments open unless you go back and update them. This is where bulk editing saves you a lot of time.
Step 1 : Go to Posts and Select All
In your WordPress dashboard, click Posts in the left menu then click All Posts. At the top of the list you will see a checkbox next to the column heading. Click that to select every post on the current page.
If you have more than twenty posts, you may need to change the number of items displayed per page first. Go to Screen Options at the top right of the page and increase the number to show all your posts at once.
Step 2 : Use Bulk Actions to Open the Edit Panel
With all your posts selected, find the Bulk Actions dropdown menu at the top of the list. Click it and choose Edit from the options. Then click the Apply button next to it.
A bulk editing panel will appear above your post list. This panel lets you update shared settings across all selected posts at the same time.
Step 3 : Change Comment Status to Do Not Allow
Inside the bulk edit panel, look for the Comments setting. It will have a dropdown next to it. Click that dropdown and select Do not allow.
Then click the Update button on the right side of the panel. WordPress will apply this change to every selected post. This removes the comment section from all those posts instantly.
Step 4 : Repeat the Same Process for Pages
Go back to your dashboard and click Pages then All Pages. Follow the exact same steps. Select all pages, open Bulk Actions, choose Edit, apply, then change the Comments setting to Do not allow and update.
A lot of guides forget to mention this step. Your pages and posts are managed separately in WordPress, so you need to do this for both.
Method 3 : Disable Comments on a Single WordPress Post or Page
Sometimes you only want to disable comments on one specific post or page without touching anything else. Maybe you have a post that is attracting spam while your others are fine. This method gives you that individual control.
Using the Gutenberg Block Editor Discussion Panel
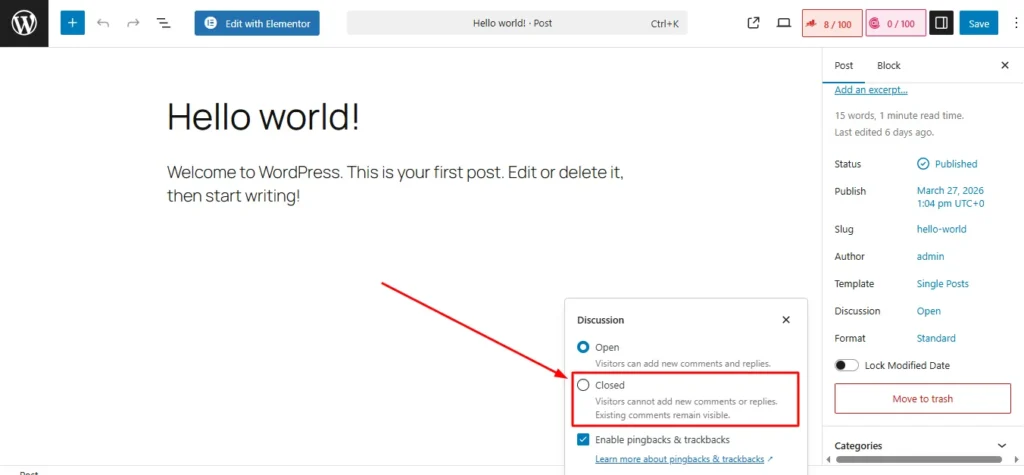
Open the post or page you want to edit in the Gutenberg block editor. On the right side you will see the settings panel. Click on the Post tab at the top of that panel if it is not already selected.
Scroll down inside that panel until you find the Discussion section. Click on it to expand it. You will see a toggle or checkbox that says Allow comments. Turn that off and then click Update to save.
Using the Classic Editor Discussion Box
If you are using the Classic Editor plugin instead of Gutenberg, the process is slightly different. Edit your post and scroll all the way down below the main content area. Look for a box labeled Discussion.
Inside that box you will see checkboxes for Allow comments and Allow trackbacks and pingbacks. Uncheck the Allow comments box and then click Update.
How to Enable the Discussion Box If You Cannot See It
This trips up a lot of people. If you are in the Classic Editor and you cannot see the Discussion box anywhere below your content, it is probably hidden.
Look at the very top right of your editing screen and click Screen Options. A panel will drop down with a list of checkboxes for different page elements. Find Discussion and check the box next to it. The Discussion section will now appear at the bottom of your editing screen.
Using Quick Edit to Turn Off Comments Without Opening the Post
This is a handy shortcut I use all the time. Go to Posts then All Posts. Hover your mouse over the title of the post you want to change. A small row of options will appear below the title including Quick Edit.
Click Quick Edit. A small editing panel opens right there in the list without you having to open the full editor. Look for the Allow Comments checkbox and uncheck it. Then click Update. Done. This works the same way for Pages too.
How to Disable All WordPress Comments Using a Plugin
If you want the most thorough and reliable way to kill comments across your entire site including custom post types and API-level submissions, a plugin is the fastest route.
Why Use a Plugin Instead of Manual Settings
The built-in WordPress settings are good for standard posts and pages. But if your site uses WooCommerce products, portfolio items, events, or any custom post type, those post types often have their own comment settings that the native Discussion settings do not control.
A dedicated plugin handles all of this in one place. It also gives you the option to disable comments at the REST API level, which the manual method does not do.
How to Install the Disable Comments Plugin
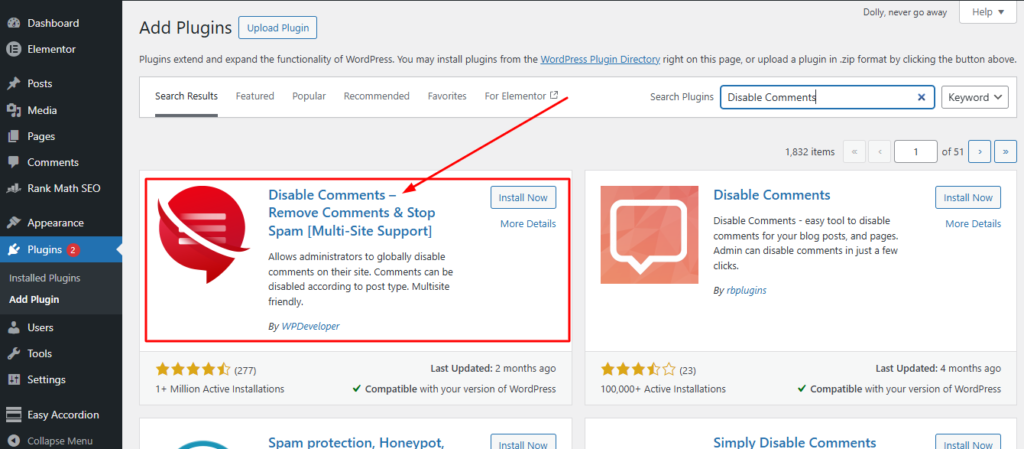
Go to your WordPress dashboard and click Plugins then Add New. In the search bar type Disable Comments. The plugin you are looking for is called Disable Comments by WPDeveloper. It has over one million active installations which tells you it is well trusted in the WordPress community.
Click Install Now and then Activate once the installation finishes.
How to Disable Comments Everywhere With One Click
After activation, go to Settings then Disable Comments in your dashboard menu. You will see an option that says Disable comments on. Select Everywhere.
Click Save Changes. That is all it takes. The plugin will disable comments across your entire site including all post types, pages, and media attachments.
It also hides the Comments menu from your WordPress admin dashboard so the section does not show up as clutter anymore.
Advanced Options : Disable via REST API and XML-RPC
One thing most beginners do not realize is that even after you disable comments through the WordPress interface, technically savvy users or bots can still try to submit comments through the WordPress REST API or through XML-RPC.
The Disable Comments plugin blocks both of these channels. Inside the plugin settings you will see options to disable comments via REST API and via XML-RPC. Make sure both are checked if you want complete protection.
This is especially important if your site has ever had issues with automated comment spam that bypassed the normal submission form.
How to Delete or Remove Existing Comments in WordPress
Disabling comments going forward is important, but if you already have spam or unwanted comments sitting in your database, you need to clean those out too. Here is how to do that efficiently.
How to Manually Delete Spam Comments
Go to your WordPress dashboard and click Comments in the left menu. You will see a list of all your existing comments. Each comment has a row of actions beneath it including Approve, Reply, Edit, Spam, and Trash.
If you see a comment that is spam or unwanted, hover over it and click Trash to send it to the trash, or click Spam to mark it as spam. WordPress will learn from spam markings and use them to filter future submissions.
How to Bulk Delete All WordPress Comments at Once
If you have a large number of comments to remove, doing them one by one is not practical. In the Comments section, check the box at the top of the list to select all comments on the current page.
Then go to the Bulk Actions dropdown and select Move to Trash. Click Apply. Repeat this for each page of comments if you have multiple pages.
Once you have trashed everything, click the Trash link at the top of the Comments page to open the trash folder. Select all comments there and use Bulk Actions to choose Delete Permanently. This clears them from your database completely.
How to Mark Comments as Spam and Permanently Remove Them
If you want to mark comments as spam rather than just trash them, the process is the same but you choose Mark as Spam from the Bulk Actions menu instead of Move to Trash.
Spam comments go into a separate spam folder. You can empty that folder by going into the Spam view and permanently deleting everything there.
Extra WordPress Comment Settings Worth Knowing
Beyond completely turning off comments, WordPress has a few other comment related settings that are worth understanding. These can be useful if you decide to keep comments on some posts but still want to control the experience.
How to Automatically Close Comments on Old Posts
This is one of my favorite settings and not enough people know about it. In Settings then Discussion, look for the option that says “Automatically close comments on posts older than X days.”
Check that box and set a number of days that makes sense for your content. I usually set it to 60 or 90 days. This means once a post ages past that point, WordPress automatically closes the comment section without you having to do anything manually.
This is great for stopping spam on older content that is still getting search traffic but no longer needs active discussion.
How to Require Login Before Commenting
Also inside Settings then Discussion, you will find an option that says “Users must be registered and logged in to comment.” Enabling this means only people with a registered account on your site can leave comments.
This single setting eliminates almost all bot spam and anonymous throwaway comments. If your site has a membership component or registered users, this is a smart way to keep comments active while keeping the quality high.
What Are Pingbacks and Trackbacks and Should You Disable Them
Pingbacks and trackbacks are a legacy WordPress feature designed to notify you when another site links to your content. While the original purpose was useful, most WordPress site owners find that today these notifications are dominated by automated spam rather than genuine link alerts.
In Settings then Discussion, you will see checkboxes for allowing link notifications from other blogs and for allowing pingbacks and trackbacks on new posts. I recommend unchecking both of these unless you have a specific reason to keep them on.
Disabling pingbacks and trackbacks cleans up your comment notifications and removes one more channel for spam to come through.
Does Disabling Comments Affect Your WordPress SEO?
This is a question I get asked a lot and the honest answer is that it depends on your situation. Comments are not inherently good or bad for SEO. What matters is the context.
When Comments Add SEO Value
On certain types of content, genuine reader comments can actually help your SEO. When real people leave thoughtful comments, they naturally include related keywords, ask follow-up questions, and add fresh content to the page.
This user-generated content tells Google that the page is active and that people find it worth engaging with. Combined with optimizing your content with relevant keywords, this engagement signal can give your page a small but real boost over time, especially for popular blog posts or community-focused content.
When Disabling Comments Is the Right SEO Decision
On most business sites, portfolio sites, and affiliate blogs, the comment sections tend to fill up with spam rather than genuine discussion. A comment section full of spammy links and low-quality text actually hurts your page quality in Google’s eyes.
In this case, disabling comments and having a clean page is far better for your SEO than having a comment section cluttered with junk. Google values page quality and user experience above everything else, and a spam-filled comment thread does damage to both. If you’re concerned about your site’s overall SEO health, running a regular SEO audit helps identify other areas that might be affecting your rankings.
What to Do Instead of Comments to Boost Engagement
Disabling comments does not mean you have to lose reader interaction entirely. There are cleaner and more effective alternatives that work better for most sites. You can add social sharing buttons so readers can discuss your content on their preferred platforms. You can include a contact form at the bottom of posts so readers can reach you directly.
You can also link to your social media profiles and encourage discussion there. This keeps the conversation alive without you having to manage a comment section on your own site every day.
Frequently Asked Questions
Can I Disable Comments on WordPress Without a Plugin?
Yes, absolutely. WordPress has built-in settings that let you disable comments without installing any plugin at all. You can turn off comments globally through Settings then Discussion, bulk-disable them on existing posts through the Bulk Edit feature, or turn them off individually inside each post or page editor. A plugin is only needed if you want to cover custom post types or disable comments at the REST API level.
How Do I Disable Comments on WordPress Pages Only?
Go to Pages then All Pages in your dashboard. Select all your pages using the checkbox at the top, then go to Bulk Actions and choose Edit and click Apply. In the bulk edit panel that appears, find the Comments dropdown and set it to Do not allow. Click Update. This disables comments on all your pages while leaving your posts untouched.
Why Are Comments Still Showing After I Disabled Them?
This usually happens for one of two reasons. First, the global Setting under Discussion only applies to new posts going forward. It does not automatically update posts that already existed before you changed the setting. You need to use the Bulk Edit method to update those. Second, some themes display a static comment form even when comments are disabled. In that case, you may need to check your theme settings or use the Disable Comments plugin which hides the form entirely.
Does Disabling Comments Remove Existing Comments?
No. Disabling comments closes the comment section so no new comments can be submitted. But any comments that already exist on your posts and pages will remain in your database and may still be visible on the front end. To remove existing comments you need to go to the Comments section in your dashboard and manually delete or trash them as covered earlier in this guide.
Can I Disable Comments for Specific User Roles in WordPress?
The native WordPress settings do not offer role-based comment control. However, the Disable Comments plugin has an option to exclude certain user roles like Administrators from the restriction. This means you could disable comments for general visitors while still allowing administrators or editors to leave notes if needed. This is a more advanced use case but the plugin handles it cleanly.
Final Thoughts on Disabling WordPress Comments
Knowing how to disable comments in WordPress is one of those small site management skills that makes a surprisingly big difference once you apply it. Whether you are dealing with constant spam, running a professional business site, or simply cleaning up pages that never needed a comment section in the first place, WordPress gives you all the tools you need.
To recap, use Settings then Discussion to stop comments on future posts, use Bulk Edit to clean up your existing content, and use the individual post editor for specific pages. If you want complete site-wide control with no exceptions, the Disable Comments plugin is the most reliable option.
A clean site with no comment clutter looks more professional, performs better, and is much easier to manage day to day. Once you turn off comments where they do not belong, you will wonder why you waited so long to do it.