
I learned these WordPress security best practices the hard way. One morning, I woke up to find my entire website redirecting to a sketchy pharmacy site. My hosting provider had suspended my account. Google flagged my domain with a red warning that terrified visitors before they could even see my content.
At the time, I wasn’t running an online store or handling credit card payments. My blog had maybe 500 visitors monthly. I honestly thought: why would hackers even bother attacking a small site like mine?
That question changed everything.
I discovered hackers don’t care about your traffic numbers or business size. They care about what they can do with your server resources once they break in. That realization pushed me to research, test, and implement comprehensive WordPress security best practices across all my sites.
In this guide, I’ll share the exact WordPress security best practices that stopped 99% of attacks targeting my WordPress sites. Whether you run a personal blog or small business website, these proven techniques work regardless of your site’s size.
When WordPress Security Best Practices Fail: What Happens When Compromise Occurs
The consequences of poor WordPress website security extend far beyond simple defacement or downtime. I learned this through painful personal experience and conversations with dozens of other website owners who faced similar nightmares.
When your WordPress site gets compromised by attackers who exploit wordpress security concerns, several catastrophic things happen simultaneously.
Malware Injection and Hidden Spam Links
First, hackers inject spam content throughout your existing posts and pages. In my case, I discovered hidden links to gambling and pharmaceutical sites buried deep within my article paragraphs. These links were completely invisible to regular visitors browsing your site, yet perfectly visible to Google’s crawlers scanning for SEO signals.
This is called SEO spam, and it’s incredibly common. Search engines see your domain distributing spam links and assume you’re complicit in the scheme.
Rapid Search Engine Penalties
Search engines respond to WordPress malware compromises with shocking speed. Google placed a malware warning on my domain within 48 hours of the initial hack. My organic traffic dropped 94% overnight because browsers displayed scary red security warnings before anyone could reach my content.
Recovering from this damage proved brutal. Even after I cleaned everything and Google removed the warning, it took four months for my traffic to return to previous levels. Many loyal readers never came back because they permanently associated my domain with security risks.
Expensive Professional Cleanup Costs
The cleanup process was expensive and time-consuming. I spent three full days scanning files, removing malicious code, and rebuilding corrupted database sections. A professional cleanup service would have cost $150 to $500 for basic infections. Some website owners face bills exceeding $2,000 if the infection spreads deep into their database.
Email Deliverability Destruction
WordPress website security failures also damage email reputation. My hosting provider’s mail server IP got blacklisted because hackers used my compromised WordPress installation to distribute spam emails. I couldn’t send password reset notifications or contact form responses for two weeks while the IP reputation slowly recovered through third-party monitoring.
This demonstrates why wordpress security monitoring and activity logging matter so much—detecting compromise early prevents cascading damage.
The Dangerous Myth: “I’m Too Small to Get Hacked”
This is probably the most dangerous misconception I hear from new WordPress site owners. I believed it myself until reality proved me catastrophically wrong.
How Automated Attacks Target All WordPress Sites
Hackers use automated tools called bots that scan the entire internet searching for vulnerable WordPress installations. These bots don’t check your Google Analytics to see if you’re worth attacking. They don’t care about your traffic stats. They simply look for outdated plugins, weak passwords, and common wordpress security concerns like unpatched vulnerabilities.
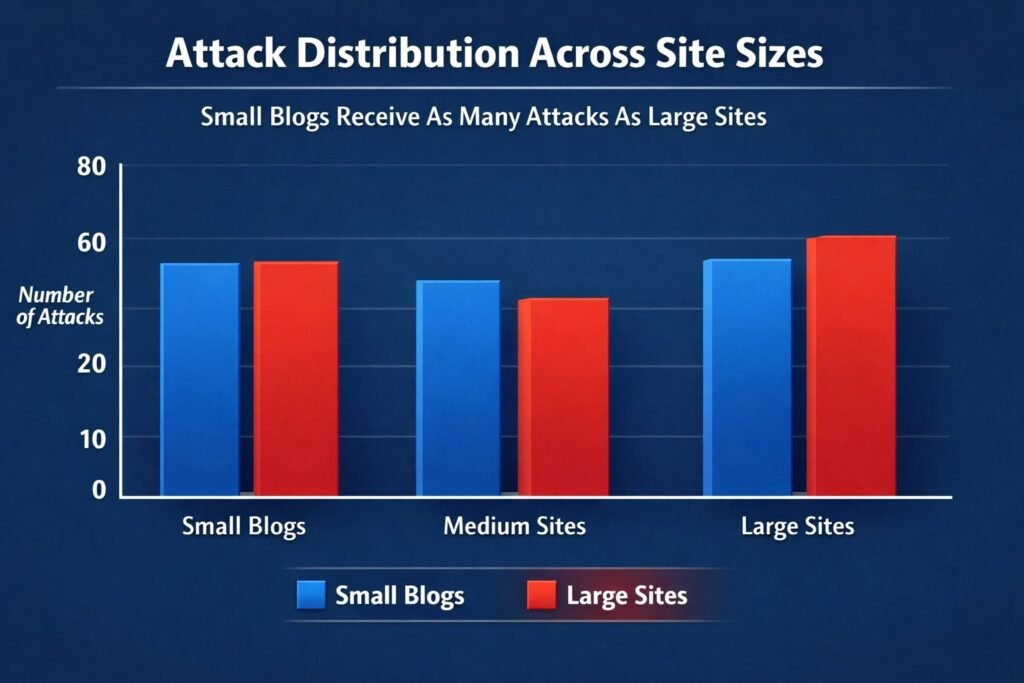
I spoke with a managed WordPress hosting provider who monitors thousands of websites. They told me something that changed my perspective entirely: small personal blogs get attacked just as frequently as large corporate sites. The attacks are completely automated, so there’s no human decision about whether you’re an attractive target. You’re either vulnerable or you’re not.
Why Hackers Want Your Small WordPress Site
I discovered several reasons through research and conversations with security experts why attackers specifically target small WordPress sites.
First, they use your server to distribute malware. Your hosting resources become part of their infrastructure for spreading viruses, ransomware, and malicious code. Your clean domain reputation helps their malicious files bypass spam filters and antivirus detection.
Second, they inject hidden links throughout your content for SEO manipulation. These links are invisible to human visitors but clearly visible to Google’s crawlers. Search engines penalize your site for distributing this spam even though you didn’t authorize it.
Third, compromised sites become part of botnet networks. Your server might participate in distributed denial of service (DDoS attacks) against larger targets without you even knowing your infrastructure is being weaponized.
Fourth, hackers use small sites as testing grounds. They practice new exploitation techniques on your site before attacking higher-value targets. Your WordPress installation becomes their practice facility for developing attack methods like SQL injection or cross-site scripting (XSS) exploits.
The Relentless Nature of Automated Attacks
The automated nature of these attacks means your site faces constant probing regardless of size or obscurity. After I implemented wordpress security monitoring on my WordPress site, I blocked over 1,200 malicious login attempts in a single month—roughly 40 wordpress brute force attacks every single day on a small personal blog with minimal traffic.
WordPress powers over 43% of all websites on the internet. This massive market share makes it the perfect target for automation. Hackers write scripts that scan millions of WordPress sites searching for specific plugin vulnerabilities. When they find an outdated contact form plugin or slider plugin with known security holes, the bot automatically attempts exploitation.
I’ve learned that wordpress security best practices isn’t about how important you think your site is. It’s about closing the doors that automated attacks constantly try to open. Small sites are actually easier targets because owners often skip basic security practices, assuming they’re not important enough to protect.
How Fast Compromise Happens
The scariest part is how quickly compromise occurs. Security researchers have demonstrated that a freshly installed WordPress site with default settings can face its first attack attempt within minutes of going live. Bots continuously scan IP ranges searching for new installations to exploit before owners implement any security measures.
Your small WordPress site sits on the same internet as Fortune 500 companies. The same automated scanning tools probe both. The difference is that large companies have security teams monitoring around the clock, while your personal blog might go days or weeks before you notice something is wrong.
I now understand that every WordPress installation needs basic security protection from day one. The attacks are constant, automated, and completely indifferent to your traffic stats or business model. Treating security as optional because you’re small is like leaving your house unlocked because you don’t think burglars would be interested in your neighborhood.
The good news: implementing basic WordPress security best practices blocks the vast majority of these automated attacks. Hackers move on to easier targets when they encounter proper security measures. You don’t need to be unhackable—you just need to be more secure than the vulnerable sites the bots will find next.
WordPress Security Best Practices: Quick Wins for Immediate Protection
When I first started learning about wordpress security best practices, I felt completely overwhelmed by hundred-item checklists and technical jargon I didn’t understand. I froze up and did nothing, which was worse than implementing imperfect security.
I eventually realized that a handful of quick actions deliver about 80% of security benefits with only 20% of effort. These essential WordPress security best practices form the foundation I now implement within the first hour of launching any new WordPress site.
Update WordPress Core, Themes, and Plugins Right Now
This sounds almost too simple to matter, but outdated software is the single biggest wordpress security concerns I see on WordPress sites. Every time I audit a compromised WordPress installation, I almost always discover plugins or themes that haven’t received wordpress security updates in months or even years.
How WordPress Security Updates Work:
WordPress core updates include critical patches for known vulnerabilities. When security researchers discover a flaw in WordPress, they report it privately to the WordPress security team. The team fixes the problem and releases an update. Then they publicly disclose what was fixed.
That public disclosure creates a roadmap for hackers. They now know exactly what vulnerability exists in older versions of WordPress. They write automated scripts to exploit sites still running those outdated versions.
The same pattern applies to plugins and themes. A security flaw discovered in a popular contact form plugin gets fixed in version 5.6. If you’re still running version 5.4, hackers have documented exploitation methods ready to deploy.
I check for updates at least once weekly. WordPress makes this easy through dashboard notifications. When I see the little number badge next to the Updates menu item, I investigate immediately.
For WordPress core updates, I enable automatic updates for minor releases. These are small wordpress security updates labeled with three numbers like 6.4.1 or 6.4.2. Major updates—jumping from 6.3 to 6.4—require more caution because they can sometimes break plugin compatibility.
I test major updates on a staging copy of my site first. Many hosting providers include staging environments where you can clone your live site, apply updates, and verify everything works before pushing changes to your production website.
Plugin updates require judgment. I check the changelog to see what changed. If it’s labeled as a security update, I install it immediately. If it’s adding new features, I read user reviews first to ensure the latest version isn’t causing problems for other users.
Critical point: I delete inactive plugins and themes completely rather than just deactivating them. Even deactivated plugins can be exploited if they contain plugin vulnerabilities. Hackers can still access plugin files directly through their browser if they know the URL path. According to WordPress.org security research, uninstalled plugins account for nearly 15% of WordPress security breaches.
WordPress Admin Security: Change Your Admin Username
I cringe every time I see a WordPress site using “admin” as the administrator username. This is like posting a welcome sign on your back door for burglars.
When hackers launch wordpress brute force attacks against WordPress sites, they need to guess two things: your username and your password. If your username is “admin,” they already know half the equation. They only need to guess the password, which dramatically reduces attempts needed.
I made this mistake on my first WordPress site years ago. I used “admin” as my username because WordPress suggested it during installation. I didn’t realize I was cutting my wordpress admin security in half.
Changing your username isn’t straightforward. WordPress doesn’t let you modify the username field after account creation. You must use a specific workaround:
Step 1: Create a new administrator account with a unique username. I pick something that’s not obvious or related to my domain name. Something like “sitemanager2024” or “wpadmin_secure” works better than “admin” or my actual first name.
Step 2: Log in with new credentials to verify the account works properly.
Step 3: Navigate to the Users section and locate your old “admin” account.
Step 4: Transfer content ownership. WordPress prompts you to reassign all posts, pages, and media from the old account to your new administrator account. Select this option to prevent accidental content deletion.
Step 5: Delete the old “admin” account permanently. This completely removes it from your database.
Important note: Some people attempt to rename the admin account by editing the database directly. I don’t recommend this unless you’re very comfortable with database management and SQL queries. One incorrect character in a database command can break your entire site.
This step aligns with the principle of least privilege mentioned throughout WordPress security best practices. Your admin username is a critical access control element.
Update Your PHP Version to 8.1 or Higher
PHP is the programming language that powers WordPress. Your web server runs PHP to dynamically generate website pages whenever someone visits.
Older PHP versions contain security vulnerabilities that security researchers discover continuously. The PHP development team releases new versions that patch these security holes and dramatically improve performance.
I was shocked when I first learned that many WordPress sites run on PHP versions from 2015 or earlier. These ancient PHP versions contain dozens of known security flaws that hackers actively exploit through SQL injection and other attacks.
Updating PHP also accelerates your WordPress site. I’ve seen speed improvements of 30-50% just from upgrading PHP 7.2 to PHP 8.1. This affects both user experience and search engine rankings, as page speed is now a Google ranking factor.
Checking your current PHP version is straightforward. Most hosting control panels like cPanel display this information on the main dashboard. You can also install a simple plugin that displays your PHP version in the admin area.
Critical security requirement: If you’re running anything below PHP 7.4, you need to update immediately. PHP versions below 7.4 no longer receive security updates from the PHP development team. This means newly discovered plugin vulnerabilities and core PHP flaws will never get patched.
Before updating PHP, I always check plugin and theme compatibility. Some older plugins break on newer PHP versions. I go through my complete plugin list and verify each has been updated recently and states compatibility with PHP 8.0 or higher.
Most quality hosting providers make PHP updates simple. In cPanel, I navigate to the PHP selector tool and choose my desired version. The change applies within seconds, with no downtime.
Cheaper shared hosting sometimes locks you into outdated PHP versions. This is one reason I eventually moved to managed WordPress hosting providers that keep server software current automatically. This connects directly to the WordPress hosting security best practices section of this guide.
If your hosting provider refuses modern PHP versions, that’s a massive red flag. I consider this grounds for switching hosts entirely because it demonstrates they’re not maintaining infrastructure properly. Your hosting choice is literally your first security decision.
Enable SSL Certificate (HTTPS) for Free
I remember when SSL certificate costs reached hundreds of dollars annually. Website owners had legitimate reasons to skip HTTPS on simple blogs that didn’t process payments.
That excuse disappeared when Let’s Encrypt launched in 2016. This free certificate authority provides SSL certificate installation at no cost. Most hosting providers now include free SSL certificate installation with every hosting account.
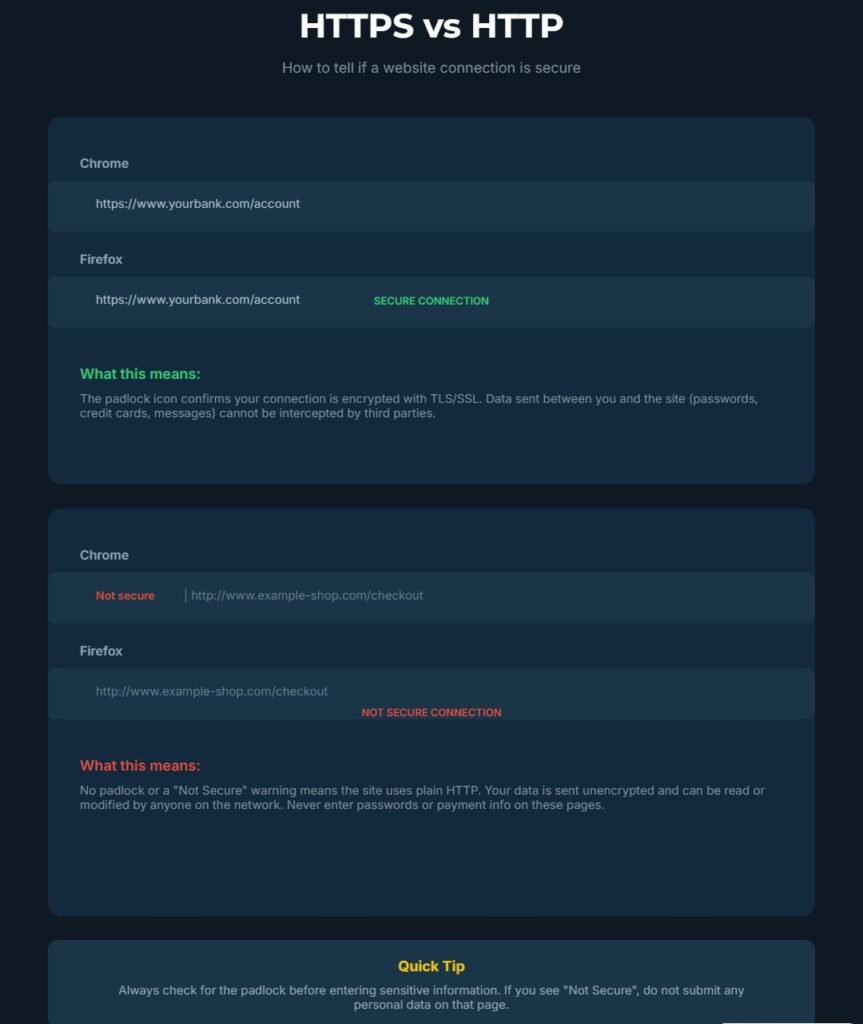
HTTPS encrypts data traveling between your visitor’s browser and your web server. Without HTTPS, anyone monitoring network connections can see everything in plain text—login credentials, contact form submissions, admin dashboard activity, and password reset tokens.
Google penalized non-HTTPS websites in search rankings several years ago. Chrome and other browsers now display scary “Not Secure” warnings when visitors attempt to access HTTP sites. This destroys trust before people even see your content.
Installing an SSL certificate takes just a few clicks in most hosting control panels. I look for a section labeled “SSL/TLS” or “Security.” Most hosts offer one-click Let’s Encrypt installation buttons.
After installing the certificate, I must force WordPress to use HTTPS for all pages. Some hosting providers handle this automatically through .htaccess redirects. Others require you to add the redirect manually.
To verify HTTPS is working:
- Visit your domain and confirm the URL starts with “https://”
- Check for the padlock icon in the browser address bar
- Open developer tools and verify no insecure resource warnings appear
Update WordPress settings in Settings > General. Change both the WordPress Address (URL) and Site Address (URL) to begin with “https://”. This ensures WordPress generates all internal links with HTTPS.
I also install a plugin that scans my content for mixed content warnings. These occur when HTTPS pages try to load images, scripts, or stylesheets from HTTP URLs. Browsers block mixed content, which can break your site design.
Important note: Let’s Encrypt security certificates renew automatically every 90 days on quality hosting providers. Verify your host handles this automatically. If they don’t, set a calendar reminder to manually renew before expiration.
Use a Password Manager for Unbreakable Credentials
I used to think I could remember strong passwords. I created complicated combinations of letters, numbers, and symbols, then forgot them three days later. When I reset, I’d create weaker versions I could remember, and the security value disappeared.
Password managers solved this completely. These tools generate truly random passwords of 20-30 characters, then store them encrypted in a vault you unlock with one master password.
I personally use Bitwarden, which offers a free version that works excellently for most people. Other popular options include LastPass, 1Password, and Dashlane. They all work similarly.
The password manager operates as a browser extension that automatically fills login credentials when you visit websites. You only need to remember one master password. Everything else stays completely random and impossible to guess.
When I create a new WordPress admin account, my password manager generates something like “kL9$mN2pQ7&xR4tY8^vB3zC6”. No human would ever guess this through brute force attacks. The automated bots attempting to access my WordPress login would need billions of attempts to succeed.
Password managers solve the password reuse problem. I used to reuse the same password across multiple sites because remembering unique passwords was impossible. When one site got breached and exposed my password, that same credential worked on all my other accounts. This is why strong passwords matter less than unique passwords—if one database gets compromised, other accounts stay protected.
Now every single login gets a unique random password. If one site’s database gets breached, the stolen password is worthless on my other accounts.
I store my WordPress admin password, database password, FTP credentials, and hosting account password all in my password manager. When I need to log in, the extension auto-fills everything securely.
The master password for your password manager vault needs to be genuinely strong and memorable. I use the passphrase method, combining four or five random words like “correct horse battery staple” that’s easy for me to remember but hard for computers to crack through dictionary attacks.
Some password managers also generate two-factor authentication codes, which I discuss in detail in the next section. This consolidates your security tools into one application, improving both security and convenience.
Why Your Hosting Choice Is Your First Security Decision
I wasted two years on cheap shared hosting before I understood how much security depends on your hosting infrastructure. Moving to better hosting gave me more security benefits than all the WordPress security plugins I’d installed combined.
Your hosting provider controls 60% of your total WordPress website security equation. They manage the server operating system, PHP version, MySQL database system, firewall rules, and network infrastructure. All your site-level security measures sit on top of this foundation.
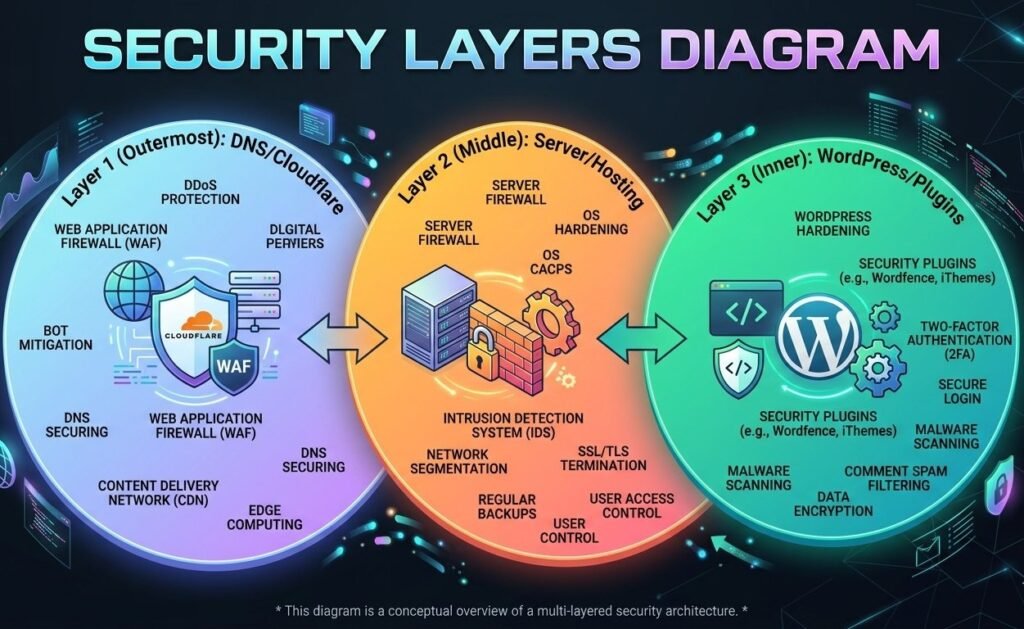
When I started researching hosting security seriously, I discovered that WordPress website security follows a three-layer model:
- DNS layer (first defense)
- Server layer (infrastructure)
- WordPress site layer (application)
Most security guides skip the first two layers completely and only talk about WordPress security plugins. This is a critical mistake because the foundation determines what’s possible at higher levels.
The Hidden Risks of Shared Hosting and Shared IP Addresses
Shared hosting seems like a great deal when you’re starting. You pay maybe five or ten dollars monthly and receive unlimited websites, unlimited bandwidth, and unlimited everything.
The catch is that “shared” means you’re literally sharing server resources with dozens or hundreds of other websites. Your WordPress site sits on the same physical server as those other sites, using the same IP address.
I learned about the “bad neighbor effect” the hard way. One of my early WordPress sites was on shared hosting. My site got flagged by Google as suspicious even though I hadn’t been hacked. After investigating, I discovered that another website on my shared server was distributing malware.
Google and other security services blacklist entire IP addresses when they detect malicious activity. Every website on that IP address gets penalized, even innocent ones. Your site’s reputation gets destroyed by someone else’s security failure. This is one of the biggest WordPress hosting security risks of shared environments.
Shared hosting also means shared server resources. When one website faces a traffic spike or DDoS attack, every site on that server slows down or crashes. Your WordPress site becomes collateral damage.
I noticed strange performance patterns on shared hosting. My site would load quickly at 3am but crawl at 2pm. This happened because other sites on my server peaked during afternoon hours, consuming all CPU and memory resources.
Security vulnerabilities spread easily in shared hosting environments. If hackers compromise one website through an outdated plugin (like older contact form plugins with SQL injection vulnerabilities), they can potentially access other sites on the same server through horizontal privilege escalation techniques.
Managed WordPress hosting providers cost more but eliminate these shared hosting problems. You get isolated server resources dedicated to your sites. Your IP address doesn’t get shared with random strangers who might distribute spam or malware.
I moved all my WordPress sites to managed hosting about three years ago. The difference was immediately obvious. Page load times became consistent throughout the day. I stopped seeing security alerts about my IP reputation.
DNS-Level WordPress Security: Your First Defense Layer (Cloudflare Setup)
DNS-level security was completely foreign to me when I started building websites. I didn’t even understand what DNS meant or why it mattered for wordpress website security.
DNS stands for Domain Name System—the phone directory of the internet that translates human-readable domain names into IP addresses computers understand. When someone types your domain into their browser, DNS servers direct their computer to where your website lives.
Cloudflare sits between your visitors and your hosting server at the DNS level. This is the first layer of the three-layer WordPress security model. All traffic to your website routes through Cloudflare’s network first, creating an opportunity to filter malicious traffic before it reaches your server.
I started using Cloudflare’s free plan about two years ago. The setup was surprisingly straightforward. I changed my domain’s nameservers at my domain registrar to point to Cloudflare’s nameservers. Full propagation took about 24 hours across the internet.
Once Cloudflare manages your DNS, you gain access to multiple security features:
DDoS Protection: Distributed denial of service attacks try to overwhelm your server with massive fake traffic. Without protection, these attacks take your website offline. Cloudflare’s network is massive enough to absorb DDoS attacks that would instantly crush a typical web server. Attack traffic hits Cloudflare’s infrastructure instead of your hosting provider. Cloudflare filters malicious requests and only sends legitimate visitors to your site.
Web Application Firewall (WAF): I enabled Cloudflare’s WAF on my sites. This analyzes incoming traffic patterns and blocks requests matching known attack signatures. SQL injection attempts, cross-site scripting (XSS) attacks, and common WordPress exploits get stopped at the Cloudflare level—before reaching your WordPress installation.
Bot Protection: Cloudflare’s free plan includes basic bot detection that challenges suspicious visitors with a brief browser check. This blocks many automated attack tools that don’t properly emulate real browsers.
Hotlink Protection: This prevents other websites from embedding your images directly in their pages. When other sites hotlink your images, they steal bandwidth and hurt your SEO since search engines see your content hosted on multiple domains.
Caching and CDN Security: Cloudflare stores static copies of your pages on their global content delivery network. Fewer requests hit your actual server, reducing attack surface and opportunities for threats to reach your WordPress installation.
Cloudflare’s DNS-level approach represents the foundational layer of comprehensive WordPress security best practices.
What to Look for in a Secure WordPress Host
I’ve used at least eight different hosting providers over the years. Some were disasters. Some were acceptable. A few were genuinely excellent from a security perspective.
Server-level security starts with the hosting provider maintaining current software versions. Beyond PHP (which I discussed earlier), this includes the operating system, web server software like Apache or Nginx, and the MySQL database system.
I check whether a hosting provider offers automatic security updates for server software. The best hosts apply critical security patches immediately without requiring customer action. Budget hosts often leave servers running outdated software with known plugin vulnerabilities and core flaws.
Server-side firewalls provide another critical security layer. These firewall rules run at the server level before requests reach WordPress. A properly configured server firewall blocks most attack attempts automatically.
I look for hosting providers that specifically mention WordPress security features in their plans. This usually means they’ve implemented:
- WordPress-specific firewall rules
- Daily malware scanning with signature detection
- Intrusion detection systems tuned for common WordPress attack patterns
- Real-time threat monitoring
Daily malware scanning is non-negotiable. The host automatically scans all files on my account daily looking for suspicious code, backdoors, and known malware signatures. I receive alerts if anything concerning appears.
Automatic backups are non-negotiable. I want my hosting provider creating full backups of my website files and database at least daily, storing them separately from the main server. This gives me a safety net if my site gets compromised.
Staging environments let me test updates and changes on a clone of my live site before deploying to production. This prevents broken updates from taking down my live site and helps me catch compatibility issues with security updates.
Account security matters too. I value hosting providers that restrict hosting account access with two-factor authentication. If someone steals my hosting login password, they shouldn’t access my account without also having my phone.
Support quality matters more than most realize for security. When a security issue happens, I need knowledgeable support staff who help quickly. Budget hosting often provides support from undertrained staff reading from scripts.
I switched to managed WordPress hosting that costs about four times what I paid for shared hosting. The security improvements alone justified the cost. I stopped worrying about server configuration, PHP versions, and infrastructure security because the host handles it all. This aligns with the three-layer WordPress security model I discussed earlier, where infrastructure is the foundation.
Strengthening WordPress Login Security: Stop 99% of Brute Force Attacks
The WordPress login page is where the vast majority of automated attacks occur. Hackers know millions of WordPress sites use the same login URL at /wp-admin or /wp-login.php. Their bots constantly probe these URLs trying to guess passwords through brute force.
I’ve blocked over 50,000 malicious login attempts across my WordPress sites in the past year—averaging 137 attack attempts per day. These numbers sound dramatic, but they’re completely normal. Every WordPress site faces this constant barrage of automated wordpress brute force attacks.
The good news: WordPress login security measures are straightforward to implement and incredibly effective. Proper wordpress login security configuration stops almost all automated attacks before they become serious problems.
Enable Two-Factor Authentication (The Right Way)
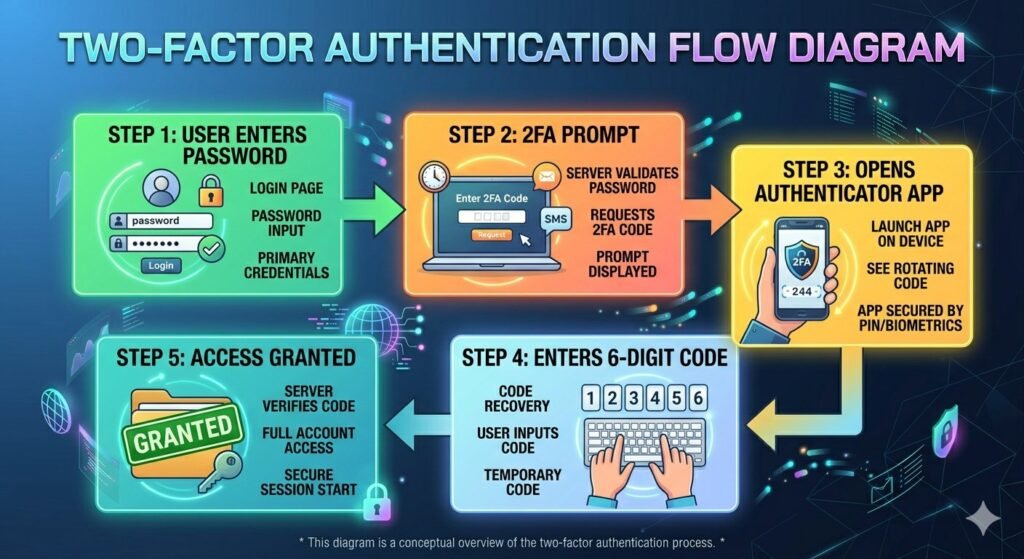
Two-factor authentication (2FA) completely transformed my WordPress security perspective. Even if someone steals my password through data breach or phishing attack, they still can’t access my WordPress admin without my physical device.
Two-factor authentication adds a second verification step after password entry. You provide a time-sensitive code generated on your smartphone or received via email. The codes change every 30 seconds, rendering stolen codes useless almost immediately.
I tested several WordPress two-factor authentication plugins before settling on Fluent Auth. This plugin is free, works reliably, and doesn’t cause login problems or compatibility issues.
Setting up 2FA takes about five minutes:
- Install the plugin and enable it for your administrator account
- The plugin displays a QR code
- Scan the QR code with an authenticator app on your phone
- Verify setup by entering the current code from your phone
- Save backup codes securely in your password manager
I use Google Authenticator for my authentication codes, but other apps like Authy or Microsoft Authenticator work identically. The app generates a new six-digit code every 30 seconds based on the shared secret from the QR code.
Backup codes are critical. Save these in your password manager. They let you access your account if you lose your phone or the authenticator app becomes inaccessible.
When logging into WordPress:
- Enter your username and password normally
- A second screen requests your authentication code
- Open your authenticator app and find the six-digit code for your site
- Enter the code to complete login
This two-step process stops wordpress brute force attacks completely. Even if hackers guess your password after thousands of attempts, they can’t generate valid authentication codes without physical access to your phone or the shared secret.
Convenience concern? Some worry 2FA makes logging in too difficult. I found the opposite. The extra five seconds to grab my phone and enter a code is barely noticeable, and the security improvement is substantial.
Implementation strategy: Following the principle of least privilege I discussed earlier, I enable 2FA for every user account with administrator or editor permissions. Lower-level accounts like subscribers don’t necessarily need it, but anyone who can publish content or install plugins should use 2FA.
Email-based 2FA security caveat: Email-based two-factor authentication is available but less secure than app-based codes. Email can be intercepted or accessed if someone compromises your email account. Security tokens generated by authenticator apps run locally on your device without transmitting them over the internet.
Limit Login Attempts to Block Password Guessing
WordPress by default allows unlimited login attempts. Someone can try guessing your password thousands of times with no consequences. This represents a fundamental security vulnerability.
Brute force attacks work by trying common passwords systematically. The attacker’s software starts with a dictionary of the most common passwords. Passwords like “password123” or “welcome1” get tried on millions of WordPress sites every day.
Without login attempt limits, these attacks eventually succeed against weak passwords. The attacker just needs enough time and computing power to work through their password dictionary.
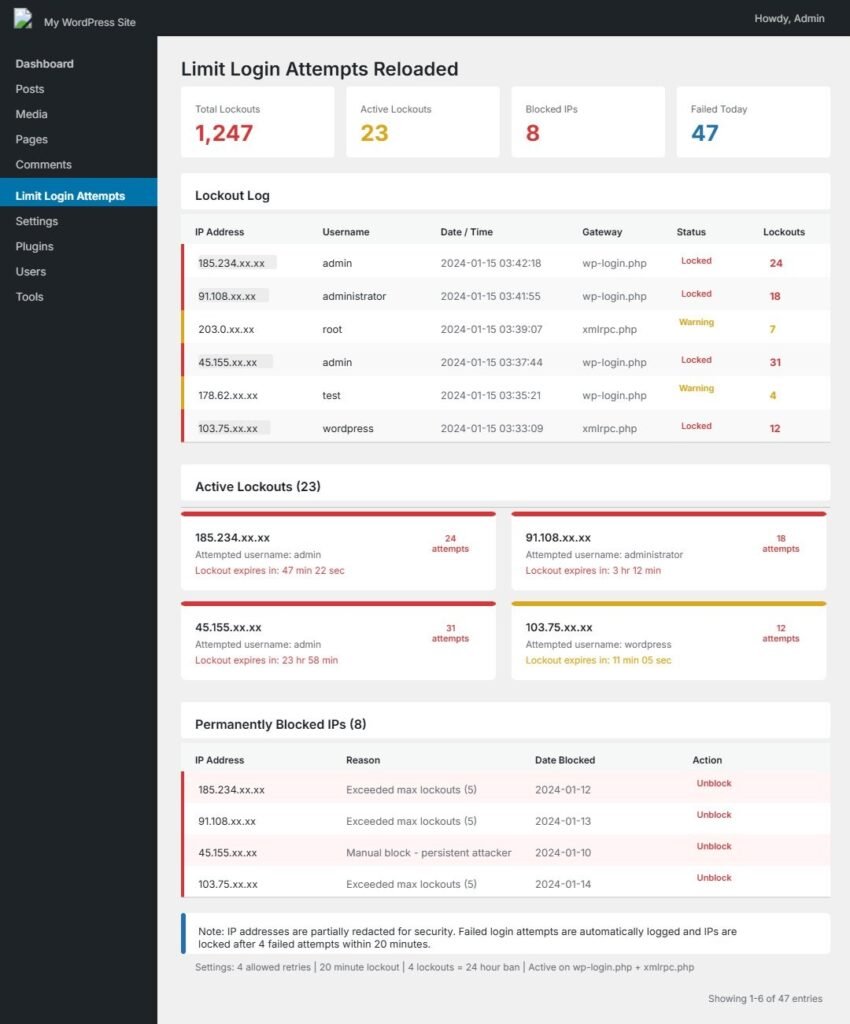
I use the plugin Limit Login Attempts Reloaded to solve this. After someone fails to log in three times from the same IP address, the plugin blocks that IP address for 20 minutes. After multiple lockouts, the block duration increases to several hours.
This disrupts brute force attacks dramatically. An attacker who needs to try 10,000 passwords but can only attempt three every 20 minutes would need approximately 46 days to complete their dictionary. They give up and move on to easier targets.
The plugin logs all failed login attempts so I can see attack patterns. I regularly review these logs and notice the same IP addresses attempting repeated access. These are clearly automated bots, not legitimate users who forgot their password.
I configured the plugin to send email notifications when an IP address gets locked out. This alerts me to active attack attempts. During major attack waves, I receive dozens of notifications daily.
The plugin also lets me permanently block specific IP addresses or entire IP ranges. When I notice attacks from the same data center or hosting provider repeatedly, I can block the entire netblock.
Legitimate user lockout concern: People sometimes worry about accidentally locking out legitimate users. This rarely happens in practice. Real users who forget their password usually realize after one or two failed attempts and use the password reset feature.
I set my lockout threshold to three failed attempts. This catches almost all automated wordpress brute force attacks while giving legitimate users enough attempts to correct typos or remember password variations.
Important note: Combine login attempt limiting with two-factor authentication WordPress (discussed earlier) for defense-in-depth. Even if attackers somehow bypass rate limiting, 2FA stops them completely.
Change Your Default Login URL from /wp-admin
Security through obscurity isn’t a complete security strategy by itself, but it’s an effective supplementary measure. Changing your WordPress login URL makes automated attacks significantly harder.
Every WordPress installation uses the same default login URLs. Hackers know they can access the login page at yoursite.com/wp-admin or yoursite.com/wp-login.php. Their automated bots don’t need to search for the login page. They already know exactly where it is.
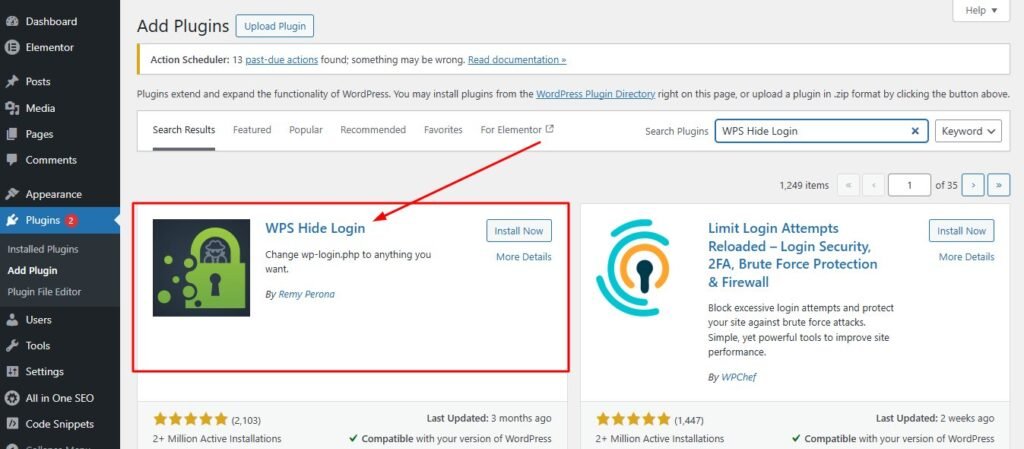
I use the plugin WPS Hide Login to change my login URL to something custom. Instead of /wp-admin, my login page might be at /dashboard or /secure-login or any custom path I choose.
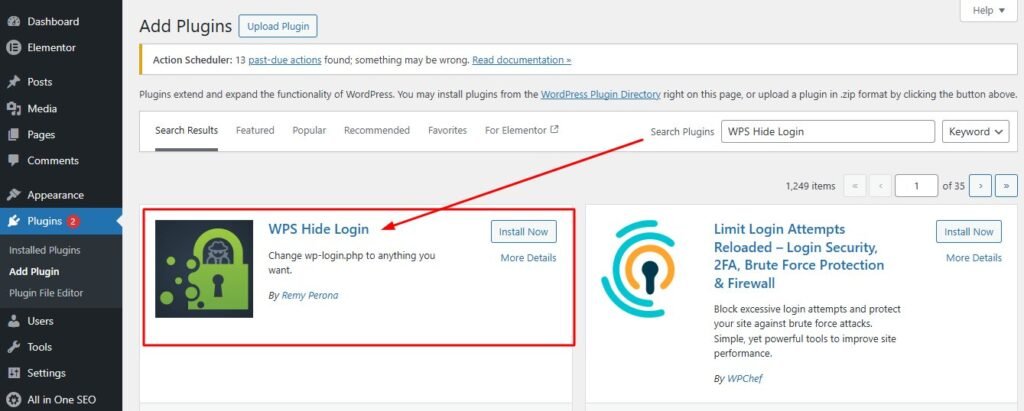
The setup process is straightforward:
- Install WPS Hide Login plugin
- Go to the plugin settings page
- Enter your preferred custom login URL
- Choose something memorable but not obvious
I pick random words or combinations that have meaning to me but wouldn’t be guessable. Something like /office2024 or /manage-site works well. I avoid using my name, business name, or common words that attackers might try.
After changing the login URL:
- The default /wp-admin and /wp-login.php addresses stop working
- Visitors accessing default URLs see 404 error pages
- All automated bots immediately stop finding your login page
I save my custom login URL in my password manager alongside my WordPress credentials. This ensures I never forget where to log in.
Important consideration: Some WordPress plugins and themes hardcode links to /wp-admin. After changing your login URL, verify that all admin links still work properly. Most quality plugins and themes use WordPress functions that automatically adapt to custom login URLs.
The security benefit: Even with all my other security measures in place, bots were hammering my default login URL with thousands of attempts. After hiding the login page, those attacks immediately dropped to zero. Attackers couldn’t find my login page, so their automated scripts failed.
Important caveat: This doesn’t replace strong passwords or two-factor authentication WordPress deployments. A determined attacker specifically targeting your site could discover your custom login URL through various techniques. But it eliminates the opportunistic automated wordpress brute force attacks that comprise 99% of login attempts. This creates the defense-in-depth security approach: multiple overlapping protections so no single vulnerability creates total compromise.
WordPress Admin Security: Email Alerts for Unauthorized Changes
One sophisticated technique hackers use after compromising a WordPress site is creating a new administrator account. They use this backdoor account to maintain access even if you change your password.
I configured my WordPress sites to send immediate email notifications whenever anyone creates a new user account with administrator privileges. This provides instant warning if someone gains unauthorized access.
WordPress doesn’t include this feature by default, but several security plugins provide it. I use WP Activity Log for comprehensive monitoring of WordPress changes. This plugin aligns with the wordpress security monitoring practices essential to WordPress security best practices.
WP Activity Log tracks every significant action in WordPress:
- User logins and logouts
- Post and page publications
- Plugin and theme installations
- User account creation and modification
- Database changes
- File modifications
I configured email alerts specifically for high-risk actions:
- Creating new administrator accounts
- Modifying existing admin permissions
- Plugin installations
- Theme changes
- Security-sensitive database modifications
When I receive alert emails, I immediately log into WordPress and verify the change was legitimate. If I created a new admin account myself, I recognize the action. If I see an unfamiliar account, I know I’ve been compromised and need immediate action.
Real-world example: This early warning system caught an attempted hack on one of my client sites. I received an email at 2am that a new admin account called “wp-admin2” had been created. I:
- Logged in immediately
- Deleted the unauthorized account
- Changed all passwords
- Ran a full security scan
- Reviewed activity logs for other compromise indicators
Without that email alert, the unauthorized admin account might have sat unnoticed for days or weeks. The attacker would have had free access to install malware, steal data, or use the site for distributing spam emails.
I also enabled alerts for plugin and theme installations. If someone installs a new plugin on my site, I want to know immediately. Hackers often install backdoor plugins that maintain access even after you patch the original vulnerability.
Secondary benefit: The activity log helps troubleshooting. When something breaks on my WordPress site, I review the activity log to see exactly what changed. This often identifies problems immediately.
Security principle connection: This monitoring aligns with the principle of least privilege and defense-in-depth concepts discussed earlier. Each user action gets logged and verified, preventing unauthorized admin account escalation.
WordPress Admin Security Through User Role Management
I used to create administrator accounts for everyone who needed access to my WordPress sites. Freelance writers got admin access. Virtual assistants got admin access. Anyone who needed to do anything in WordPress got full administrator privileges.
This was a huge security mistake. Every admin account is a potential entry point for hackers. When a freelance writer’s laptop got infected with malware, that malware had administrator access to my WordPress site.
The principle of least privilege means giving people the minimum permissions they need to do their job, nothing more. WordPress includes several built-in user roles permissions designed for this purpose.
Subscriber accounts can only manage their own profile. They can’t create posts or access most WordPress settings. I use this role for community members who just need an account to access member content.
Contributor accounts can write and manage their own posts but can’t publish them. I assign this role to guest writers who submit content for review. They can write drafts, but an editor needs to approve and publish their work.
Author accounts can write, publish, and manage their own posts but can’t modify other people’s content. This works well for regular blog contributors who should be able to publish without waiting for approval.
Editor accounts can publish and manage posts from anyone, including other users’ content. They can’t install plugins, change themes, or modify WordPress settings. I assign this role to trusted team members who manage content but don’t need technical access.
Administrator accounts have unrestricted access to everything in WordPress. They can install plugins, delete the site, modify any settings, and manage all users. I reserve this role for myself and maybe one trusted technical person.
I regularly audit my user list and delete accounts that are no longer needed. When a freelancer finishes a project, I remove their account immediately. Old unused accounts are wordpress security concerns waiting to be exploited.
I also enforce the same strong password and two-factor authentication WordPress requirements for editor accounts. Even though they have fewer permissions than administrators, compromised editor accounts can still do significant damage.
Comparing WordPress Security Plugins: Evaluation Criteria & Comparison
Plugin Evaluation Criteria: How to Vet Security Plugins Before Installation
I learned to research wordpress security plugins thoroughly before installing them after a bad experience with an abandoned security plugin that actually created vulnerabilities on my site.
Plugin Vetting Checklist:
Check Update Frequency: The first thing I check is the last update date on the WordPress.org repository. If a plugin hasn’t been updated in six months, I consider it potentially abandoned and avoid it.
Why? WordPress releases updates several times annually. A plugin untested with latest WordPress versions might work fine or break your site. More concerning, it definitely hasn’t received security updates during that period.
Evaluate Installation Numbers: I look at active installations. Popular plugins with hundreds of thousands or millions of installations receive more scrutiny from security researchers. Plugin vulnerabilities get discovered and patched faster because more people pay attention.
Read Recent Reviews Carefully: Plugin rating and reviews provide useful information, but I read carefully. I look specifically for recent reviews mentioning:
- Security issues
- Conflicts with other plugins
- Broken functionality after updates
- Performance problems
A 4.5-star rating might hide major problems revealed in recent one-star reviews.
Check for Known Vulnerabilities: I use Patchstack to check for known vulnerabilities in plugins before installing them. Patchstack maintains a database of disclosed security issues in WordPress plugins. I can search any plugin name and see:
- Known vulnerabilities
- Patch status
- Severity ratings
- Affected versions
Evaluate Author Reputation: Plugin development source matters. Plugins from established WordPress companies or well-known developers receive better ongoing maintenance than plugins from unknown individuals or companies.
Check Support Quality: I look at the support forum on WordPress.org repository to see:
- How quickly developers respond to questions
- Whether they actually help resolve issues
- If issues remain unanswered for long periods
Unresponsive developers often abandon plugins eventually.
Test on Staging First: Before activating any plugin on your live site, test it on a staging copy if possible. This verifies the plugin works properly with your specific combination of theme, plugins, and WordPress version before risking problems on production.
The “One Plugin” Rule: Avoid Security Plugin Conflicts
I once installed three different WordPress security plugins simultaneously, thinking more protection would be better. My WordPress site immediately showed random errors. The admin dashboard became sluggish. Some pages wouldn’t load at all.
Multiple WordPress security plugins often conflict because they’re trying to do similar things in different ways. Both plugins might want to create security headers, modify .htaccess rules, or filter incoming requests. When approaches differ, you get unexpected behavior or outright failures.
I now follow a simple rule: Choose one comprehensive security plugin and stick with it. Build additional security layers through hosting-level protections, server configuration, and WordPress hardening settings rather than stacking multiple plugins.
Performance Impact Compounds: Running multiple security plugins rapidly consumes resources:
- Each plugin consumes memory and processor time
- Database resources get spread thin
- Security plugins especially consume resources (file scanning, traffic analysis)
- Cumulative overhead makes sites unusable
I’ve seen WordPress sites become painfully slow because owners installed Wordfence, Sucuri, iThemes Security, and three other WordPress security plugins simultaneously. Each plugin scanned files, checked requests, and ran background processes. The cumulative overhead made sites unusable.
Layered Approach Instead: When I need functionality from multiple sources, I look for plugins that do one specific thing well rather than comprehensive suites. I might use Wordfence for general security but add a separate two-factor authentication WordPress plugin if I prefer its features.
Avoid Feature Overlap: The key is avoiding duplication. If my security plugin includes two-factor authentication, I don’t need a separate 2FA plugin. If it limits login attempts, I don’t need another brute force plugin. This aligns with the principle of least privilege and defense-in-depth concepts—focused protection without redundancy.
Wordfence Security: Best for Beginners
Wordfence became my go-to recommendation for WordPress site owners wanting strong security without technical complexity. The free version provides robust protection that works effectively with default settings.
I installed Wordfence on my first WordPress site after my security wake-up call. The initial setup wizard walks you through basic configuration in about five minutes. I accepted most default options and had working security immediately.
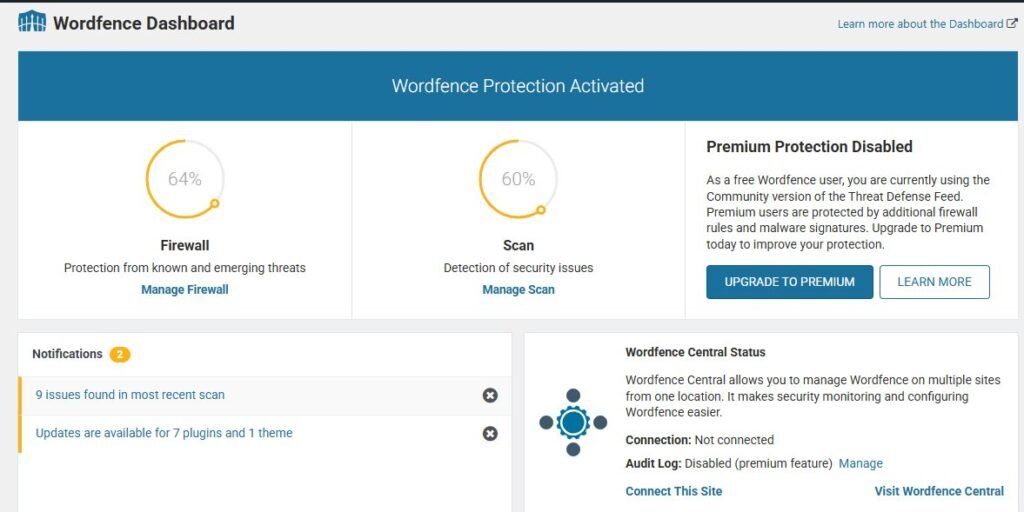
Core Wordfence Security Features:
Web Application Firewall (WAF): The plugin includes a WAF that blocks malicious requests before they reach WordPress. This firewall uses regularly updated rules to identify attack patterns. SQL injection attempts, cross-site scripting (XSS) attacks, and other common exploits get stopped automatically.
Malware Scanner: Wordfence includes a comprehensive malware scanner checking every file on your WordPress installation. The scanner compares your files against official WordPress core files using checksums to detect modifications. It also scans themes and plugins for known malware signatures.
I schedule malware scans to run automatically overnight when site traffic is lowest. Scanning thousands of files consumes server resources, so off-peak timing prevents performance impact on visitors.
Threat Intelligence:
- Free version: slightly older threat signatures for adequate protection on small sites
- Premium version ($99/year): real-time threat intelligence, responds to vulnerabilities within hours of discovery
Traffic Monitoring: Wordfence shows real-time visitors, recent logins, failed login attempts, and blocked attacks. This transparency helps you understand exactly what’s happening on your site.
Two-Factor Authentication: The built-in 2FA feature works reliably, though I prefer dedicated authentication plugins for better flexibility. Wordfence’s implementation is perfectly functional if you want everything in one plugin.
Performance Consideration: Wordfence consumes more server resources than some lightweight alternatives. On shared hosting with limited resources, I noticed slower admin dashboard loading times. This is the trade-off for comprehensive security.
Pricing: Free version works well for personal blogs and small sites. Premium ($99/year, single site) offers real-time threat intelligence. Multi-site licensing costs increase proportionally.
Sucuri Security: Best for Cloud-Based Protection
Sucuri takes a fundamentally different architectural approach to WordPress security best practices compared to Wordfence. Instead of running entirely on your WordPress server, Sucuri’s most powerful features operate from their cloud infrastructure.
Sucuri Free Plugin: The free Sucuri Security plugin provides basic security hardening and monitoring. I’ve used it on several sites for malware scanning and security activity auditing. The plugin interface is clean and easy to understand.
Sucuri Premium: Cloud-Based Web Application Firewall: Where Sucuri truly excels is their premium cloud-based Web Application Firewall (WAF). This firewall sits between visitors and your website at the DNS level—similar to Cloudflare but specifically optimized for WordPress security.
How Cloud WAF Works:
- All traffic to your website routes through Sucuri’s global network first
- Their firewall analyzes every request in real-time
- Malicious traffic gets blocked before reaching your hosting server
- Only legitimate requests reach your WordPress installation
- This approach offloads security processing from your server
This architecture improves performance while adding protection—the opposite of on-server firewalls that consume local resources.
Real-World Testing: I tested Sucuri’s WAF on a client site experiencing repeated hack attempts. After enabling the cloud firewall, attack traffic dropped dramatically. The few attacks reaching the WordPress installation were already filtered down to low-risk probes.
DDoS Protection: The cloud WAF also provides DDoS protection similar to Cloudflare. Large-scale traffic attacks get absorbed by Sucuri’s infrastructure instead of overwhelming your hosting server. For sites facing frequent attacks, this protection alone justifies the cost.
Professional Incident Response: Sucuri includes professional incident response as part of premium plans. If your site gets hacked, their security team handles cleanup:
- Remove malware
- Close security holes
- Restore site to working condition
- Provide detailed incident report
I used this service when a client’s site suffered a severe malware infection. Sucuri’s team cleaned and secured the site within 24 hours. Doing this myself would have taken days of work.
Pricing Consideration: Sucuri’s cloud WAF plans start around $200 per year for basic plans. Premium features and faster support cost more. This pricing justifies for business sites but might be excessive for personal blogs.
Performance Benefit: Sucuri’s caching features provide improved performance. The cloud firewall caches static content and serves it from their global network, reducing load on your hosting server and speeding up page delivery.
iThemes Security / Solid Security: Best for Customization
Solid Security (formerly iThemes Security) takes a modular approach that appeals to users wanting granular control over individual security features.
Modularity Advantage: I appreciate that Solid Security breaks security into distinct, independent categories. You can enable database backups without activating brute force protection. You can use file change detection without the malware scanner. This modularity prevents feature bloat if you only need specific protections—aligning with the principle of least privilege.
Core Features:
Security Audit: The plugin’s security check feature scans your WordPress configuration and recommends improvements. It checks for common security mistakes:
- Using the default database table prefix
- Having file editing enabled in WordPress
- Running outdated PHP versions
- Weak file permissions
- Other configuration vulnerabilities
File Change Detection: I use Solid Security’s file change detection on sites where I need to know immediately if any files get modified. The plugin creates checksums of all WordPress files and monitors for changes. If a hacker modifies a core file or injects malicious code, I get an alert.
Two-Factor Authentication: The 2FA implementation is more flexible than Wordfence’s version. It supports multiple authentication methods and manages team access with different security requirements for different user roles permissions.
Database Backups: Scheduled database backups automatically backup your WordPress database and send the backup file to your email or cloud storage. This provides emergency recovery if other backup systems fail.
Learning Curve: The interface requires more setup than Wordfence. There are many individual settings and toggles across multiple configuration screens. I spent time reading documentation to understand each option. This complexity is the trade-off for granular control.
Pricing Structure:
- Free version: most security hardening features
- Premium version (~$80/year): scheduled malware scanning, advanced 2FA, priority support
Performance Impact: Generally lighter than Wordfence because you selectively enable only needed features. If you don’t need malware scanning, you don’t have to run it and consume those resources.
Advanced WordPress Hardening: Technical Security Configuration for Intermediate Users
After implementing basic security practices, you’re ready for WordPress hardening that requires technical comfort. I recommend implementing these advanced practices only after you have solid backups in place. When you’re editing configuration files and changing server settings, there’s always risk of breaking something if you make a mistake.
Disable WordPress Dashboard File Editing
WordPress includes a built-in code editor that lets administrators edit theme and plugin files directly from the dashboard. This feature is convenient for quick fixes but creates a massive security vulnerability.
If a hacker gains access to your WordPress admin account, they can use this code editor to inject malicious code into your theme files. This gives them a persistent backdoor that survives even if you change your password.
I disable this file editor on every WordPress site I build. The fix requires editing your wp-config.php file, which is the main WordPress configuration file.
I access wp-config.php through my hosting file manager or via SFTP. The file sits in the root directory of your WordPress installation. I always download a backup copy before making any changes.
Near the bottom of wp-config.php, right before the line that says “That’s all, stop editing”, I add this single line of code:
textdefine('DISALLOW_FILE_EDIT', true);After saving the file, the theme editor and plugin editor options disappear completely from the WordPress admin menu. Nobody can edit files through the dashboard anymore, including me.
When I need to edit theme files for legitimate reasons, I use SFTP to download the files, edit them on my computer, and upload the modified versions. This extra step takes a few more seconds but provides much better security.
Implement 7G or 8G Firewall Rules in .htaccess
Server-level firewalls block many attacks before they ever reach WordPress. I discovered lightweight firewall rules called 7G and 8G that work brilliantly on Apache servers.
These firewall rules are maintained by security experts who continuously update them based on new attack patterns. The number refers to the generation of the ruleset. 8G is newer than 7G, but both work effectively.
The firewall rules live in your .htaccess file, which is another configuration file in your WordPress root directory. Like wp-config.php, I always backup .htaccess before editing it.
The .htaccess file might be hidden in your file manager. I enable “show hidden files” to make it visible. On some hosting providers, you create the .htaccess file yourself if it doesn’t exist.
Instead of writing the firewall rules manually, I download the latest version from the official source. I copy the entire ruleset and paste it at the very top of my .htaccess file, above any existing WordPress rules.
The firewall rules block common attack patterns like SQL injection attempts, code execution attempts, and various other malicious requests. They work silently in the background without requiring any ongoing maintenance.
I tested my site thoroughly after adding the firewall rules to make sure nothing broke. Occasionally the rules can interfere with legitimate plugins or theme functionality if those plugins use unusual code patterns.
When I encounter a conflict, I can add exceptions to the firewall rules for specific URLs or request patterns. The documentation included with the firewall explains how to create these exceptions.
The performance impact is minimal because these rules execute at the server level before PHP even loads. They actually improve performance slightly by blocking malicious requests that would otherwise consume WordPress resources.
Set Correct WordPress File Permissions
File permissions control who can read, write, or execute files on your server. Incorrect permissions either create security vulnerabilities or break WordPress functionality.
WordPress file permissions struggle frustrated me at first because they use a numeric system that seems cryptic. The numbers 755 and 644 kept appearing in tutorials without explanation.
After researching, I learned that these numbers represent permission settings for three groups: the file owner, the group, and everyone else. Each digit is a sum of read (4), write (2), and execute (1) permissions.
For WordPress directories, I use 755 permissions. This means the owner can read, write, and execute (7), while the group and others can only read and execute (5). This allows WordPress to function while preventing unauthorized modification.
For WordPress files, I use 644 permissions. The owner can read and write (6), while the group and others can only read (4). Files don’t need execute permissions in most cases.
I change permissions through my hosting file manager or SFTP client. In FileZilla, I right-click a file or folder and select “File permissions” to see the current settings and change them.
Some files need more restrictive permissions. The wp-config.php file should be 440 or 400 because it contains sensitive database credentials that should never be writable by WordPress.
I also verify that critical WordPress directories aren’t world-writable. The wp-content/uploads directory needs to allow file uploads, but it should never have 777 permissions that allow anyone to execute files from that location.
After setting permissions correctly, I test my site to ensure everything still works. I upload a test image to verify the media library functions. I install a test plugin to confirm WordPress can write to the necessary directories.
Secure Your WordPress Database
The WordPress database stores all your content, user information, and site settings. Database security often gets overlooked because the database sits behind the scenes.
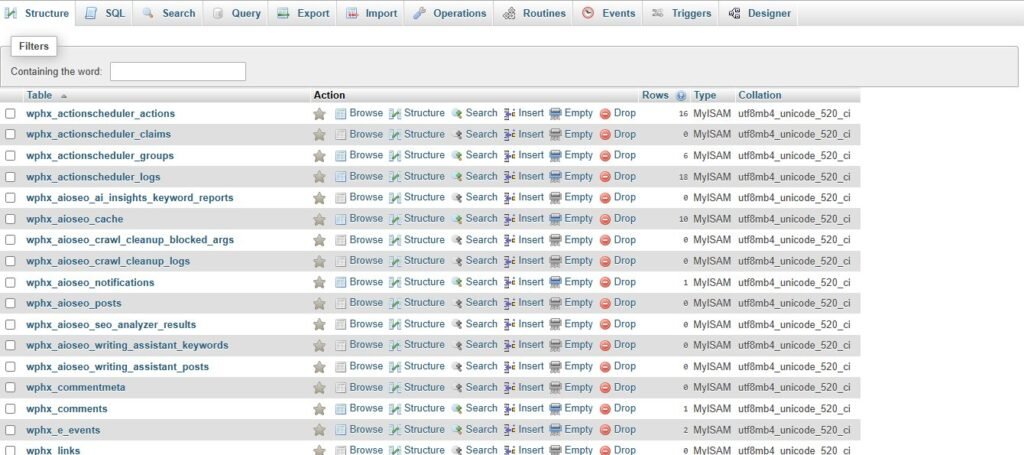
I start by using a complex database password. Many people accept the random password their hosting provider generates during WordPress installation, which is good. I verify that password is at least 20 characters with mixed case letters, numbers, and symbols.
I change the default WordPress database table prefix from “wp_” to something random like “xyz_” or “qm3_”. This makes SQL injection attacks slightly harder because attackers can’t assume table names.
Changing the prefix on an existing site requires database expertise and can break the site if done incorrectly. I only change this on new installations during initial setup. For existing sites, the security benefit doesn’t justify the risk.
I also clean my MySQL database regularly to remove accumulated junk. WordPress stores post revisions, spam comments, trashed items, and orphaned data that pile up over time. This bloat slows down your site and can hide malicious content.
I use a plugin called Advanced Database Cleaner to automate this maintenance. The plugin identifies orphaned database tables left behind by uninstalled plugins. These abandoned tables sometimes contain security vulnerabilities even though the plugin is gone.
Database access should be restricted to localhost only unless you specifically need remote database connections. I verify in my hosting control panel that remote MySQL database access is disabled. This prevents external connection attempts to your database server.
I also enable query logging temporarily when troubleshooting issues to see exactly what database operations are running. This sometimes reveals malicious queries if someone has compromised your database access.
Disable XML-RPC (If You Don’t Need It)
XML-RPC is a WordPress feature that enables remote connections to your site. It allows the WordPress mobile app to work and enables some plugin integrations.
The problem is that XML-RPC has been exploited in various attacks over the years. Hackers use it for brute force amplification attacks, where a single request can try hundreds of username and password combinations.
I disable XML-RPC unless I specifically need it for the WordPress mobile app or a plugin that requires it. Most users don’t need XML-RPC at all.
The easiest method is adding a few lines to your .htaccess file. I add this code block:
text<Files xmlrpc.php>
order deny,allow
deny from all
</Files>
This completely blocks access to the xmlrpc.php file. Anyone trying to use XML-RPC gets an access denied error.
Alternatively, several security plugins include an option to disable XML-RPC with a simple checkbox. This is easier than editing .htaccess manually.
Before disabling XML-RPC, I verify I’m not using any plugins that depend on it. Jetpack uses XML-RPC for some features. If you use Jetpack, disabling XML-RPC might break functionality.
I can test whether XML-RPC is active by visiting yoursite.com/xmlrpc.php in my browser. If it’s working, I see a message saying “XML-RPC server accepts POST requests only.” If it’s blocked, I get a 403 Forbidden error.
Restrict WordPress REST API Access
The WordPress REST API allows external applications to interact with your WordPress site. Developers use it to build custom applications, headless WordPress setups, and mobile apps.
The REST API also exposes information about your site that attackers can use for reconnaissance. It reveals your user list, post data, and site structure without requiring authentication.
I don’t disable the REST API completely because WordPress core functionality and many plugins depend on it. The Gutenberg editor uses the REST API extensively.
Instead, I restrict access to require authentication for sensitive endpoints. I add a code snippet to my theme’s functions.php file or use a code snippets plugin.
I’m cautious about what code I add to functions.php. I test changes on a staging site first because syntax errors in functions.php can crash your entire website.
For most sites, I simply disable REST API access for non-authenticated users. This prevents external tools from harvesting your user list or content structure without blocking legitimate WordPress functionality.
Some security plugins include REST API restriction options that achieve the same result without custom code. This is safer for non-technical users.
Prevent WordPress Version and User Enumeration
WordPress helpfully announces its version number in various places throughout your site. The problem is that this information helps attackers determine which plugin vulnerabilities might work against your installation.
I remove WordPress version disclosure from my site header meta tags. I also remove version numbers appended to script and stylesheet URLs.
User enumeration is another information leak. By default, WordPress reveals usernames through author archive URLs. An attacker can visit yoursite.com/?author=1 and get redirected to yoursite.com/author/username, revealing the administrator username.
I prevent user enumeration by blocking these author archive requests. I add code to my theme that checks if someone is trying to access author pages while not logged in, and redirect them to the homepage instead.
Some themes create author bios and archive pages that legitimately need to show usernames. On these sites, I ensure the username displayed publicly differs from the actual login username.
The goal is making reconnaissance harder for attackers without breaking legitimate site functionality. They can still discover some information through determined effort, but I don’t hand it to them freely.
WordPress Backup Solutions: Your Safety Net When Prevention Fails
I learned about backup importance the painful way. My first WordPress site got hacked, and I had no backup. I lost months of content and had to rebuild everything from scratch.
Now I treat backups as mandatory, not optional. Every security measure can eventually fail. WordPress backup solutions are your guarantee that failure isn’t permanent.
The 3-2-1 Backup Rule for WordPress Sites
I follow the 3-2-1 backup strategy that IT professionals use for critical data. This means maintaining three total copies of your website, stored on two different types of media, with one copy stored offsite.
Three total copies means your live website counts as one copy. You need two additional backups beyond the live site. If one backup becomes corrupted or fails to restore, you still have a second backup as insurance.
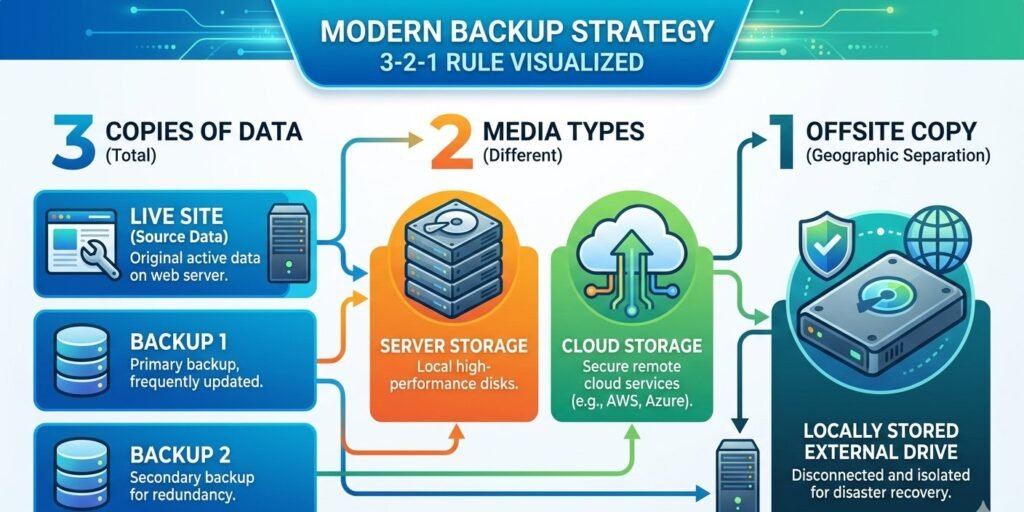
Two different types of media means not putting all your backups in the same place. I keep one backup on my hosting provider’s server and another backup in cloud storage like Dropbox or Google Drive. If the hosting server fails catastrophically, my cloud backup survives.
One offsite backup means at least one copy should be geographically separated from your hosting server. I download monthly backups to my local computer. If my hosting provider suffers a data center fire or natural disaster, my local backup is safe.
I implement this strategy using a combination of automated backup tools and manual downloads. My hosting provider performs daily automated backups. A WordPress backup plugin sends weekly backups to cloud storage. I manually download monthly archives to my computer.
The frequency of WordPress backup solutions depends on how often your site changes. I back up daily for sites where I publish content every day or run an online store with frequent transactions. Weekly backups work fine for sites that update less frequently.
I also test my backups regularly by actually restoring them to a staging environment. Many people assume their backups work but never verify until disaster strikes. I’ve discovered corrupted backup files during testing that would have been useless in an emergency.
Best WordPress Backup Plugins: UpdraftPlus vs BackupBuddy
I’ve tested most major WordPress backup plugins over the years. Two consistently stood out as reliable and feature rich.
UpdraftPlus is my first recommendation for most WordPress sites. The free version provides comprehensive backup functionality that covers everything most site owners need.
I installed UpdraftPlus on several sites and configured automatic daily backups. The plugin backs up both files and database separately, which gives flexibility during restoration. Sometimes I only need to restore the database without touching theme and plugin files.
UpdraftPlus connects directly to cloud storage services. I linked mine to Google Drive, but it also supports Dropbox, Amazon S3, Microsoft OneDrive, and many others. Backups upload automatically to my cloud storage without manual intervention.
The restoration process is straightforward. I access the UpdraftPlus settings, see my list of available backups, and click restore on the backup I want to use. The plugin handles downloading the files and database, then restoring everything to working condition.
The premium version adds scheduled automatic backups, incremental backups that only copy changed files, and priority support. I’ve used the free version successfully for years and only upgraded to premium for client sites requiring more frequent backups.
BackupBuddy is a premium-only WordPress backup solution that costs around $80 per year. I use it on higher-value sites where the extra features justify the cost.
BackupBuddy includes migration tools that make moving WordPress sites between hosts incredibly simple. I used this feature when transferring client sites to new hosting providers. The entire migration process that used to take hours now takes about 15 minutes.
The plugin creates standalone restore scripts that run even if WordPress is completely broken. If my site is so damaged that I can’t access the WordPress admin, I can still upload the restore script and recover my site.
BackupBuddy also offers ImportBuddy, which helps deploy backups to new locations. I’ve used this for creating staging copies of production sites and setting up development environments.
Both plugins have served me well. I recommend UpdraftPlus for most users because the free version is excellent. BackupBuddy makes sense for professionals managing multiple client sites who need the advanced features.
How to Download and Store Backups Locally
Automated cloud backups are convenient, but I don’t rely on them exclusively. I download local copies of my WordPress backups monthly and store them on an external hard drive.
Cloud storage services can experience outages, account suspensions, or data loss. I’ve seen people locked out of cloud storage accounts due to payment issues or security concerns. When you need to restore urgently, you can’t afford to wait for customer support to unlock your account.
I create a manual backup through my WordPress backup plugin once per month. I wait for the backup to complete, then download both the files archive and the database export.
These backup files can be quite large, especially if your site has thousands of images. My larger sites create backup files of 5GB or more. I ensure I have adequate local storage before downloading.
I organize my local backups in dated folders on an external hard drive. I create a folder structure like “MySite/2026/January/” and store that month’s backup inside. This makes finding the right backup easy months or years later.
I also document what was happening on the site when each backup was created. I keep a simple text file noting “January backup taken before major plugin updates” or “March backup from right after site redesign launch.” This context helps me choose the right backup if I need to restore.
External hard drives can fail, so I actually maintain two external drives with identical backups. I alternate which drive I update each month. If one drive fails, I have a slightly older backup on the second drive.
I keep one external drive at my home office and the other at a different location. This protects against theft, fire, or other local disasters destroying both drives simultaneously.
The entire process of downloading and organizing backups takes maybe 30 minutes per month. This small time investment provides enormous peace of mind knowing I can recover my sites even in worst-case scenarios.
Test Your Backups (Or They’re Useless)
I discovered that backups don’t matter unless they actually work. I found this out when I tried to restore a backup and discovered the files were corrupted.
Now I test my backups quarterly by actually performing a restoration to a staging environment. This verifies that the backup files are intact and the restoration process works correctly.
My hosting provider offers staging sites as part of their managed WordPress hosting. I create a new staging site, then use my backup plugin to restore the most recent backup to this staging environment.
I verify that the restored site works properly. I check that the homepage loads, images display, login works, and the admin dashboard is accessible. I test a few key pages and features to ensure nothing is broken.
If I discover problems during testing, I investigate immediately. Maybe the backup process isn’t capturing certain files. Maybe the database export is incomplete. Finding these issues during testing is far better than discovering them during an emergency restoration.
I also verify that my manual local backups can be restored. I create a fresh WordPress installation in a development environment and restore my local backup files to it. This confirms the files I’m storing locally are actually usable.
The restoration process itself is good to practice. When an actual emergency happens, I’m stressed and rushed. Having practiced the restoration procedure multiple times means I can execute it quickly and correctly under pressure.
I document the restoration steps in a simple checklist that I keep with my backups. This ensures I don’t forget critical steps if I haven’t performed a restoration in months.
OWASP WordPress Security Best Practices: Industry Standards & Compliance
When I started working with larger business clients, they asked about security compliance and standards. I discovered OWASP, which provides professional security frameworks that apply to WordPress.
OWASP stands for Open Web Application Security Project. They’re a nonprofit organization focused on improving software security. Their guidelines are considered industry standards for web application security.
Understanding OWASP Top 10 for WordPress Security Best Practices
The OWASP Top 10 lists the most critical web application security risks. I studied how each risk applies to WordPress specifically because the general OWASP descriptions use technical language that doesn’t directly translate.
Injection attacks, particularly SQL injection, target WordPress database queries. Poorly coded plugins might not properly sanitize user input, allowing attackers to inject malicious SQL commands. I avoid this by only using reputable plugins and keeping everything updated.
Broken authentication covers weak password policies, lack of two-factor authentication WordPress implementations, and session management issues. I’ve addressed this through strong passwords, 2FA, and limiting login attempts as discussed earlier.
Sensitive data exposure happens when WordPress sites transmit information over unencrypted connections or store data insecurely. Enabling HTTPS and ensuring proper wordpress file permissions prevents most of these issues.
XML external entities attacks exploit poor XML processing. WordPress’s XML-RPC functionality can be vulnerable, which is why I disable it when not needed.
Broken access control means users can perform actions beyond their permission level. I prevent this by following the principle of least privilege with WordPress user roles permissions.
Security misconfiguration includes default accounts, unnecessary features enabled, and verbose error messages. I harden WordPress configuration through the techniques covered in previous sections.
Cross-site scripting allows attackers to inject malicious scripts into pages viewed by other users. WordPress core includes XSS protection, but poorly coded themes or plugins can introduce cross-site scripting (XSS) vulnerabilities.
Insecure deserialization is highly technical and less common in typical WordPress attacks. I mainly address this by avoiding untrusted plugins and keeping WordPress updated.
Using components with known vulnerabilities describes running outdated WordPress core, plugins, or themes with publicly disclosed security flaws. Regular updates are critical here.
Insufficient logging and monitoring means attacks can go undetected. I’ve implemented activity logging and alerts to catch suspicious behavior quickly.
Implementing Content Security Policy Headers
Content Security Policy headers tell browsers what resources are allowed to load on your website. This prevents cross-site scripting (XSS) attacks by blocking unauthorized scripts.
I add CSP headers through my hosting configuration or WordPress plugin. The headers specify which domains can provide JavaScript, CSS, images, and other resources for my site.
A basic CSP header might allow scripts only from my own domain and explicitly trusted content delivery networks. Any attempt to load scripts from other sources gets blocked by the browser.
I started with a permissive policy and gradually tightened it while testing thoroughly. Overly restrictive CSP headers can break legitimate functionality, especially if you use many third-party services.
Google Analytics, Facebook pixels, advertising networks, and social media embeds all need specific CSP permissions. I added each external service I actually use to the whitelist.
Security headers also prevent inline JavaScript, which is a common XSS attack vector. This forced me to move some inline scripts to external files, improving both security and code organization.
I monitor CSP violation reports to see what the browser is blocking. Modern browsers can send reports when they block resources, helping me identify problems or potential attacks.
Security Logging and Monitoring for Compliance
Compliance requirements often mandate detailed logging of security-relevant events. I implemented comprehensive activity logging using WP Activity Log plugin.
The plugin records every significant action in WordPress. User logins, post publications, plugin installations, settings changes, and file modifications all generate log entries.
I configured the logs to retain data for 90 days, which satisfies most compliance requirements for audit trails. For longer retention, I can export logs monthly and archive them.
The logs include timestamps, user information, IP addresses, and descriptions of what changed. This makes investigating security incidents much easier.
I set up email alerts for critical events. Whenever someone creates a new administrator account, installs a plugin, modifies core files, or performs other high-risk actions, I receive an immediate notification.
For business clients, I export monthly security reports showing login activity, failed login attempts, and administrative changes. This documentation demonstrates due diligence in security monitoring.
How to Conduct a WordPress Security Audit
I perform comprehensive security audits on my WordPress sites quarterly. These audits help me discover vulnerabilities before hackers exploit them.
A security audit is simply a systematic check of all your security measures to verify they’re working correctly and identify any weaknesses.
Scan for Malware and Vulnerabilities: I run comprehensive malware scans quarterly using my security plugin. I also use online scanning tools that analyze my site from an external perspective.
Wordfence and Sucuri both offer free online scanners that check your site without requiring plugin installation. I enter my domain, and the scanner checks for known malware signatures, blacklist status, and security issues.
I also use Sucuri SiteCheck, which scans from outside your server. This catches issues that server-side scanners might miss if the malware is hiding in specific ways.
Google Search Console shows whether Google has detected malware on your site. I check the Security Issues report regularly for any warnings.
After scanning, I review all findings carefully. Not every alert is a real problem. Sometimes security scanners flag legitimate code that happens to match malware patterns.
Audit User Accounts and Permissions: I review every user account on my WordPress site during security audits. I delete accounts for people who no longer need access, like former freelancers or employees.
I verify that each remaining account has appropriate permissions. I downgrade any accounts that have administrator access but don’t actually need it.
I check the email addresses associated with each account. Sometimes hackers create admin accounts using email addresses they control. Any unfamiliar email addresses require investigation.
I also review the last login date for each account if my security plugin tracks that information. Accounts that haven’t been used in months might be forgotten accounts that should be deleted.
Review Installed Plugins and Themes: I audit my complete plugin list and delete anything I’m not actively using. Inactive plugins still present security risks and should be removed completely.
For plugins I am using, I check the last update date. Plugins abandoned by their developers need to be replaced with actively maintained alternatives.
I review each plugin’s rating and recent reviews on WordPress.org repository. Sometimes newly discovered security issues appear in recent reviews before official vulnerability disclosures.
I do the same review for themes. I delete all inactive themes except one default theme like Twenty Twenty-Four that I keep as a fallback.
I also use Patchstack or similar tools to check whether any of my installed plugins have known plugin vulnerabilities.
Check File Integrity: I use Wordfence’s file integrity checking feature to compare all WordPress core files against official releases. Any files that have been modified might indicate malware injection.
I pay special attention to wp-config.php and .htaccess files. These critical configuration files are common targets for malware because changes there can give attackers persistent access.
I review wordpress file permissions to ensure they’re set correctly. World-writable files or directories are security risks.
I also check file ownership through SSH or my hosting file manager. All WordPress files should be owned by your hosting account user, not by the web server user.
Balancing WordPress Security and Website Performance
One concern that stopped me from implementing security measures early on was fear that they would slow down my website. I’d read comments claiming security plugins killed performance.
After testing extensively, I learned that security and performance aren’t opposing forces. With the right approach, you can have both strong security and fast page loads.
Test Performance Impact Before and After Security Changes
I establish performance baselines before making any security changes. I use Google PageSpeed Insights and GTmetrix to test my site’s current loading speed.
I document the key metrics like Time to First Byte, Largest Contentful Paint, and Total Page Size. These numbers become my baseline for comparison.
After implementing each security measure, I retest using the same tools. This shows exactly what performance impact each change causes.
In my testing, I found that some security measures actually improved performance. Enabling HTTPS allows HTTP/2, which loads pages faster. Cloudflare’s security features include caching that speeds up delivery.
Other measures like comprehensive security plugins do add some overhead. Wordfence’s firewall processing typically adds 50-100 milliseconds to page load time. For most sites, this is imperceptible to visitors.
The malware scanner only runs on scheduled scans, usually overnight, so it doesn’t affect visitor experience during peak hours.
Lightweight Security Alternatives to Heavy Plugins
I discovered that server-level security provides strong protection with minimal performance impact.
The 7G/8G wordpress firewall rules I mentioned earlier run in .htaccess before PHP loads. They block attacks with virtually zero performance cost compared to plugin-based firewalls.
Cloudflare’s security operates at the DNS level, processing requests before they reach my server. This offloads security work from my hosting resources entirely.
I use targeted plugins rather than comprehensive security suites when possible. Instead of a massive all-in-one security plugin, I might use a lightweight 2FA plugin, a simple firewall plugin, and separate backup plugin.
This modular approach lets me choose the fastest implementation for each security function rather than accepting whatever performance characteristics come with an all-in-one solution.
Use Conditional Loading to Limit Security Plugin Reach
I learned about conditional loading from performance optimization experts. Most security plugins load their scripts on every single page, even pages where those scripts aren’t needed.
For example, the two-factor authentication WordPress script only needs to load on the login page. There’s no reason for visitors viewing my blog posts to download 2FA code.
I use a plugin called Perfmatters or Asset CleanUp to control exactly which pages load which plugin scripts. I disable security plugin scripts on the front-end of my site where visitors browse content.
I keep the security features active in the WordPress admin area where they’re actually needed for protection. This reduces the number of scripts loading on public pages while maintaining security where it matters.
This approach takes time to configure properly. I need to test carefully to ensure I’m not disabling features that are actually required.
The Security-Performance Sweet Spot: Essential Features Only
I prioritize security features based on the actual threats I face and the protection value they provide.
Two-factor authentication, HTTPS, regular backups, and updated software are non-negotiable. These provide massive security benefits with minimal performance impact.
Limiting login attempts and hiding the login URL stop most automated attacks with essentially zero performance cost.
Web application firewalls add some overhead but block serious attacks. The performance trade-off is absolutely worth it.
Malware scanning can be resource-intensive, so I schedule scans during low-traffic hours. The security benefit outweighs the temporary performance impact during scans.
Features like comment spam protection might not be worth heavy plugins if I’ve disabled comments entirely or use lightweight alternatives.
I evaluate each security feature based on my specific site needs rather than implementing everything possible just because it exists.
Your 30-Day WordPress Security Implementation Plan
When I look at comprehensive security guides with 50+ recommendations, I feel paralyzed by the scope. I don’t know where to start, so I do nothing.
I created a phased implementation plan that breaks WordPress security into manageable weekly goals. This approach prevents overwhelm while building toward comprehensive protection.
Days 1-7: Essential Foundation (Start Here)
The first week focuses on quick wins that deliver maximum security benefit with minimum effort.
Day 1: I update WordPress core, all plugins, and all themes to their latest versions. I review my plugin list and delete anything I’m not actively using.
Day 2: I check my admin username and change it if it’s still “admin” or something obvious. I create a new admin account with a unique username and delete the old account.
Day 3: I install and configure a password manager. I generate strong unique passwords for my WordPress admin, hosting account, database, and FTP access.
Day 4: I verify my PHP version and update to 8.1 or higher if my hosting supports it. I test my site thoroughly after the PHP update.
Day 5: I install an SSL certificate if I haven’t already, and configure WordPress to force HTTPS on all pages. I check for mixed content warnings.
Day 6: I set up my first automated backup using UpdraftPlus or my hosting provider’s backup system. I configure it to backup daily and send copies to cloud storage.
Day 7: I review everything I’ve implemented and verify it’s working correctly. I test my backup by restoring it to a staging environment.
By the end of week one, I’ve eliminated the most common vulnerabilities and established a foundation for additional security layers.
Days 8-14: WordPress Login Security and Access Hardening
Week two focuses specifically on protecting the WordPress login page and user accounts.
Day 8: I install and configure Wordfence or another comprehensive security plugin. I run an initial malware scan and review the results.
Day 9: I enable two-factor authentication WordPress for my administrator account using Fluent Auth or my security plugin’s built-in 2FA.
Day 10: I install Limit Login Attempts Reloaded and configure it to block IP addresses after three failed login attempts.
Day 11: I install WPS Hide Login and change my login URL from /wp-admin to something unique. I save the new URL securely in my password manager.
Day 12: I audit all user accounts, delete any I don’t recognize, and ensure everyone has appropriate permission levels following least privilege principles.
Day 13: I set up WP Activity Log and configure email alerts for critical security events like new admin user creation or plugin installations.
Day 14: I review all the login security measures and verify they’re working. I test that failed login attempts get blocked properly.
Days 15-21: Advanced WordPress Hardening Configuration
Week three tackles more technical security hardening that requires editing configuration files.
Day 15: I backup my wp-config.php file, then add the code to disable file editing from the WordPress dashboard.
Day 16: I download the latest 7G or 8G wordpress firewall rules and carefully add them to my .htaccess file. I test my site thoroughly to ensure nothing broke.
Day 17: I review and correct wordpress file permissions across my WordPress installation. I set directories to 755 and files to 644, with wp-config.php at 440.
Day 18: I check my wordpress database security. I verify I’m using a strong database password and consider changing the table prefix on new sites.
Day 19: I disable XML-RPC if I’m not using it by adding blocking rules to my .htaccess file.
Day 20: I implement Content Security Policy headers either through my hosting configuration or a security plugin.
Day 21: I disable WordPress version disclosure and prevent user enumeration through code in my functions.php or a security plugin.
Days 22-30: Backup, Monitoring, and Maintenance Planning
The final week establishes ongoing security practices and monitoring.
Day 22: I verify my automated backup system is working reliably. I check that backups are being created and stored in cloud storage correctly.
Day 23: I create my first manual backup and download it locally. I store it on an external hard drive in my documented backup system.
Day 24: I test a backup restoration to a staging environment to verify my backups actually work.
Day 25: I sign up for Cloudflare’s free plan and configure it to add DNS-level security and DDoS protection to my site.
Day 26: I create my disaster recovery plan document listing all my security measures, backup locations, and emergency contacts.
Day 27: I set up Google Search Console if I haven’t already and verify there are no security warnings for my site.
Day 28: I run a comprehensive security audit using online scanning tools to verify my security implementation is solid.
Day 29: I document all my security configurations in a secure document. This helps me maintain consistency across multiple sites.
Day 30: I create calendar reminders for ongoing maintenance. Weekly update checks, monthly local backups, quarterly security audits.
2026 WordPress Security Plugin Comparison
| Feature | Wordfence | Sucuri | iThemes (Solid Security) |
| Firewall Type | Endpoint (on-server) | Cloud (DNS-level WAF) | Brute Force Protection Only |
| Malware Scanner | Real-time, file-based | Remote-only (Free), Server-side (Paid) | Site integrity checks |
| Free Version | Excellent. Full scanner and firewall (30-day rule delay). | Limited. Basic scanner & hardening. | Strong. Good hardening and 2FA. |
| Vulnerability Patching | Yes. Virtual patching for known plugin/theme exploits. | Yes. WAF patches common exploits at the edge. | No. Focuses on hardening and 2FA. |
| Speed Impact | Minimal (lightweight endpoint). | Positive. Includes CDN and edge caching. | None. No continuous monitoring. |
| Starting Price | $119/year | $199/year | $99/year |
| Best For… | Robust, all-in-one free protection. | Mission-critical sites needing a cloud WAF & CDN. | Users wanting simple site hardening and 2FA. |
Ongoing Monthly WordPress Security Checklist for Continuous Protection
After the initial 30-day implementation, I maintain security through regular monthly tasks.
I check for and install updates to WordPress core, plugins, and themes at least weekly. I never let updates pile up for more than a few days.
I review my user account list monthly and remove any accounts that are no longer needed.
I check for abandoned plugins that haven’t been updated in 6+ months and find actively maintained replacements.
I run a manual malware scanning session monthly even though automated scans run more frequently.
I test my backup restoration quarterly to ensure backups remain functional.
I review activity logs monthly looking for suspicious patterns or unauthorized changes.
I download a local backup copy and store it on my external drive monthly.
I review my disaster recovery plan and update contact information or procedures that have changed.
Maintaining WordPress Security in 2026 and Beyond
I’ve shared the complete security system I use across all my WordPress sites. This might seem like a lot when viewed all at once, but remember that you don’t implement everything in one day.
Security is genuinely a continuous process, not a one-time project. New wordpress security concerns get discovered. Attack methods evolve. WordPress releases updates. Your security practices need to evolve alongside these changes.
The good news is that maintaining security becomes routine after the initial implementation. Checking for updates takes two minutes. Reviewing activity logs takes five minutes. The ongoing time investment is minimal.
Start with the Days 1-7 quick wins today. Just implementing those seven foundational practices puts you ahead of 80% of WordPress sites in terms of security.
Your specific situation might need more or less emphasis on certain practices. An e-commerce site handling transactions needs more rigorous security than a personal blog. A membership site with user data has different priorities than a portfolio site.
Use the framework I’ve provided and adapt it to your needs. The three-layer approach of DNS security, server security, and site security applies universally regardless of your WordPress site’s purpose.
The attacks I described aren’t hypothetical. They’re happening right now to WordPress sites of all sizes. The question isn’t whether your site will face attacks, but whether your security measures will stop them.
I sleep much better knowing my WordPress sites have comprehensive WordPress security best practices protecting them. The initial time investment paid off through years of secure, stable website operation.
Take the first step today. Start with updating your WordPress installation and plugins. Change your admin username. Install a security plugin. Each small action reduces your vulnerability and moves you toward comprehensive protection.
Frequently Asked Questions About WordPress Security Best Practices
Why do hackers target small WordPress sites if there’s no financial data to steal?
I used to think my small blog was safe because I had barely 500 visitors monthly. Then I got hacked, and I learned the hard truth.
Hackers don’t need your financial data to profit from your site. They want your server resources and domain reputation. When bots compromise small WordPress sites, they turn them into tools for distributing malware, hosting phishing pages, or sending spam emails. Your hosting bandwidth becomes their free infrastructure.
They also inject hidden links throughout your content for SEO manipulation. These links boost rankings for their own websites. The links are invisible to visitors but clearly visible to Google’s crawlers.
Small sites are actually easier targets because owners skip basic wordpress security best practices, assuming they’re not important enough to protect. The automated bots don’t check your traffic stats before attacking. They just scan for wordpress security concerns and vulnerabilities.
I discovered this when my site got used to distribute pharmacy spam. The hackers didn’t want my content or visitors. They wanted my clean domain reputation and server resources to run their operations.
Will installing security plugins slow down my WordPress website?
This was my biggest concern when I started implementing security. I’d heard stories about security plugins destroying site performance.
After testing extensively, I found that modern WordPress security plugins have minimal impact when configured properly. Wordfence typically adds 50 to 100 milliseconds to page load time, which visitors won’t notice.
The key is choosing one comprehensive plugin rather than five overlapping ones. Multiple WordPress security plugins cause conflicts and performance problems.
Some security measures actually improve performance. Cloudflare’s security includes caching that speeds up delivery. HTTPS enables faster HTTP/2 protocol.
The malware scanner is resource-intensive, but I schedule scans overnight when traffic is low. Visitors never experience slowdowns.
I always test before and after using PageSpeed Insights. The performance cost is negligible compared to protection gained. Getting hacked destroys performance far worse than any security plugin.
Do I need two-factor authentication if I already use a strong password?
I thought my 16-character random password was enough until I learned how passwords get compromised.
Phishing attacks trick you into entering passwords on fake login pages. Keyloggers record every keystroke on infected computers. Database breaches expose passwords from other sites.
Two-factor authentication WordPress implementations stop all these attacks because attackers need physical access to your phone. Even with your stolen password, they can’t generate the authentication code.
Statistics convinced me. Sites using 2FA block 99.9% of automated attacks.
Setup takes five minutes with free apps like Google Authenticator. Logging in requires five extra seconds to enter the code. This tiny inconvenience provides massive security.
I enable 2FA for every admin and editor account on all my sites.
How many WordPress backups should I keep and where should I store them?
I follow the 3-2-1 backup rule. Three total copies on two different storage types with one copy offsite.
Three copies means my live site plus two backups. If one backup corrupts, I have a second.
Two storage types means one on my hosting server and another in cloud storage like Google Drive. This protects against storage failures.
One offsite copy means I download monthly backups to an external hard drive. If my host’s data center fails, my local backup survives.
I back up daily for sites with frequent updates or e-commerce. Weekly works for sites that update less often.
I test backups quarterly by restoring to staging. I’ve discovered corrupted backups during testing that would’ve been useless in emergencies.
What’s XML-RPC in WordPress and should I disable it?
XML-RPC lets external applications communicate with WordPress remotely. It powers the WordPress mobile app.
The problem is hackers exploit it for brute force attacks where one request tests hundreds of password combinations.
I disable XML-RPC unless I need it. Most site owners don’t use the mobile app or remote publishing tools.
Ask yourself: Do I use the WordPress mobile app? Do I use Jetpack? Do I use third-party tools that publish remotely?
If no, disable it. I add blocking rules to .htaccess or use a security plugin checkbox.
Jetpack requires XML-RPC, so verify your plugins before disabling.
Should I implement all WordPress security practices at once or gradually?
I tried changing 15 settings in one day once. Something broke, and I spent hours finding which change caused it.
Now I recommend starting with quick wins during week one. Update WordPress, change admin username, install SSL, set up backups. These provide immediate security with minimal risk.
Add one layer weekly over the next month. Week two covers login security. Week three tackles advanced configurations. Week four establishes monitoring.
This approach lets you test each change individually. If something breaks, you know the cause immediately.
You also learn about each practice rather than feeling overwhelmed by 30 simultaneous changes.
The 30-day plan I outlined breaks everything into 15 to 30 minute daily tasks. By month end, you have comprehensive security without stress.
Which WordPress security plugin is best: Wordfence, Sucuri, or iThemes Security?
I’ve tested all three extensively. The best choice depends on your skill level and budget.
For beginners, I recommend Wordfence. The free version works effectively with default settings. Install it, run setup, accept defaults, and you have working security.
For performance-focused sites facing frequent attacks, Sucuri’s cloud firewall operates at DNS level before traffic reaches your server. It improves performance while adding security. Cost starts around $200 yearly.
For advanced users wanting granular control, iThemes/Solid Security offers modular features you enable selectively.
The critical rule is choosing one plugin. Running multiple WordPress security plugins simultaneously causes conflicts.
I use Wordfence free on personal sites, Sucuri cloud WAF on client sites with bigger budgets, and iThemes where I need specific modular features.
How can I tell if my WordPress site has already been hacked?
I check several warning signs during audits.
First, I review user accounts for unfamiliar administrators. Hackers create backdoor accounts to maintain access.
Second, I check Google Search Console for security warnings about malware.
Third, I look for unexpected traffic spikes in Analytics, especially from unusual countries.
Fourth, I watch for performance degradation. Sudden slowdowns without content changes suggest malware consuming resources.
Fifth, I scan wp-content/uploads for PHP files. This directory should only contain images and media.
I also run malware scanning using Wordfence or Sucuri’s free scanner.
If I find warning signs, I immediately audit security, change passwords, scan for malware, and restore from clean backups if needed.
The best approach is implementing WordPress security best practices before compromise rather than detecting hacks after.
Final Thoughts: WordPress Security Best Practices for 2026
I’ve walked you through the complete WordPress security system I use across all my sites. From the foundational DNS-layer protection to advanced database hardening, you now understand how professional WordPress security actually works.
The attacks described in this guide are happening right now. Not to large e-commerce sites, but to personal blogs, small business websites, and portfolio sites just like yours.
The good news: implementing WordPress security best practices doesn’t require a computer science degree. It doesn’t require expensive software. It requires following a systematic approach and committing to ongoing maintenance.
Your WordPress security journey starts with one decision: commit to the 30-day plan. One week of quick wins. One week of login hardening. One week of advanced configuration. One week of monitoring setup.
By day 30, you’ll have eliminated 99% of the automated attacks that target WordPress sites. You’ll sleep better knowing your site is protected.
More importantly, you’ll understand how wordpress security best practices actually work. You’ll know why each step matters. You’ll understand the threats, the defenses, and how they interact.
That knowledge is your greatest security asset.