
When I first launched my WordPress site three years ago, I had absolutely no idea how to add SEO keywords. I remember staring at my beautiful website, wondering why nobody could find it on Google. The frustration was real.
Then I discovered something that changed everything: WordPress SEO plugins.
Adding keywords to your WordPress site isn’t rocket science, but it does require knowing exactly where to click and what to type. In this guide, I’ll walk you through the exact process I use on every page I publish, covering everything from keyword research to on-page SEO optimization.
You’ll learn three different methods using the most popular WordPress SEO plugins, understand where keywords actually matter for search engine optimization, and avoid the mistakes that kept my first website invisible for months.
By the end of this article, you’ll add your first optimized keywords in about 15 minutes using proven SEO best practices. No technical background needed.
Let’s get started.
What Are SEO Keywords in WordPress? (And Why They Actually Matter)
SEO keywords are the words and phrases people type into Google search when searching for something. When you add these keywords to your WordPress site in the right places, search engines understand what your content is about and can deliver better search rankings.
I think of keywords as signposts that guide Google to your content through effective search engine optimization.
Without these signposts, even the best written article sits invisible on page 10 of search results. I learned this the hard way when I published 20 blog posts that got zero organic search traffic because I ignored keyword optimization completely.
Here’s what confused me at first: I kept hearing about something called “meta keywords.” Let me clear this up right now because it still confuses many WordPress users working on their WordPress admin settings.
WordPress Meta Keywords vs. Modern SEO (What Changed?)
Meta keywords used to be a meta tag where you could list keywords for search engines. Google stopped using them back in 2009 because people abused the system by stuffing irrelevant keywords.
I still see this question pop up in WordPress forums: “Where do I add meta keywords?”
The answer is simple. You don’t. Modern SEO focuses on different elements through proper content optimization:
Your SEO title tag, meta description, actual content, header tags, and image descriptions. These are what Google pays attention to now for better search visibility.
When WordPress SEO plugins talk about “focus keywords” or “target keywords,” they’re referring to the main phrase you want to rank for. This focus keyword then gets placed strategically throughout your content using keyword placement techniques, not hidden in an outdated meta tag.
Where Keywords Live in Your WordPress Site
Before I show you the step by step process, you need to understand the seven locations where keywords actually make a difference for keyword optimization.
I optimize every single one of these spots on my important pages using my WordPress dashboard:
SEO title tag appears as the blue clickable link in Google search results. This is your number one priority for meta title optimization.
Meta description is that short snippet under your title in search results. It doesn’t directly affect rankings, but a keyword rich description increases clicks and improves your overall SEO score.
URL slug is the end part of your web address. Clean URLs with keywords perform better than random numbers in search engine optimization.
Headings like H1, H2, and H3 help Google understand your content structure through proper header tags. I always include my main keyword in at least one H2 heading.
First paragraph should contain your focus keyword naturally. Google pays special attention to the opening of your content for keyword placement.
Image alt text describes your images for accessibility and SEO. I add keywords here when it makes sense for image optimization.
Body content is where your keyword appears naturally throughout the article. The key word here is “naturally.” More on keyword density later.
I remember obsessing over keyword density percentages when I started. Should it be 2%? 3%? The truth is, it matters far less than making sure your keyword appears in these strategic locations for proper on-page SEO.
Now let’s talk about finding the right keywords before you add them using keyword research.
Before You Add Keywords: The 5 Minute Research Step Most People Skip
I made a huge mistake on my first WordPress site. I optimized every page for keywords I thought sounded good, without checking if anyone actually searched for them or analyzing the search volume.
Months of work. Zero results.
Keyword research doesn’t have to take hours. I do a quick 5 minute check before optimizing any page, and it’s saved me from wasting time on keywords that will never bring organic search traffic.
Here’s my simple process for effective keyword research.
Free Tools to Find Keywords That Actually Rank
You don’t need expensive tools to find good keywords for your WordPress site. I started with completely free options, and they worked perfectly fine.
Google Keyword Planner is my go to free tool. You need a Google Ads account (which is free to create), but you don’t have to run ads. Just plug in a topic, and it shows you search volumes and related terms.
Google Search itself gives you free keyword ideas. Start typing your topic in the search box and look at the autocomplete suggestions. Those are real searches people make.
Answer the Public generates hundreds of questions people ask about your topic. I use this when I want to find question based keywords that are easier to rank for.
Ubersuggest has a free tier that gives you basic keyword data. It’s limited to a few searches per day, but that’s enough when you’re starting out.
Here’s something most people don’t know: if you install Rank Math (which I’ll show you later), it has a built in “Content AI” feature that suggests related keywords based on what’s currently ranking on Google. This became my favorite research shortcut for SEO analysis.
I open my WordPress editor, enter my focus keyword, and Content AI shows me exactly what terms the top ranking pages are using for content optimization.
How to Choose a Keyword Your WordPress Site Can Actually Rank For
This is where beginners make the biggest mistake. They choose ultra competitive keywords like “best laptop” or “weight loss tips” and wonder why they never rank in Google search.
I follow a simple rule now: if the first page of Google is filled with massive websites like Amazon, Forbes, or Wikipedia, I skip that keyword and find something easier.
Long tail keywords are your friend when starting out. These are longer, more specific phrases that have less competition but better search intent.
Instead of “WordPress SEO,” I might target “how to add SEO keywords in WordPress website.” Yes, the search volume is lower, but my chances of ranking are 10 times higher.
I look for keywords with clear intent. When someone searches “how to add keywords to WordPress,” I know exactly what they want. When someone searches just “WordPress keywords,” their intent is unclear. They might want to learn about keywords, find a plugin installation guide, or something completely different.
Here’s my quick decision framework:
Search volume should be at least 50 to 100 monthly searches. Lower than that, and even ranking first won’t bring meaningful traffic.
Keyword difficulty matters more than volume. I use free tools to check this. If a keyword is marked “hard” or “very hard,” I look for easier alternatives.
Check the actual search results. I type the keyword into Google and look at what’s ranking. If I see smaller blogs and websites on page one, that’s a green light. If I only see major brands, I move on.
One more tip I wish someone told me earlier: don’t optimize your entire WordPress site for one keyword. Each page should target a different, specific keyword. Your homepage might target “WordPress web design services,” while individual blog posts target specific tutorials or questions.
Now that you have your keyword, let’s add it to WordPress.
Choosing Your WordPress SEO Plugin: Yoast vs. Rank Math vs. AIOSEO (Side by Side)
Here’s a question I get asked constantly: which WordPress SEO plugin should I use?
I’ve personally used all three major options over the years. The truth? They all help you add keywords effectively through their SEO settings. The differences come down to interface preferences and specific features.
Let me break down each one based on my real experience.
Yoast SEO was the first plugin I ever installed. It’s the most popular for a reason. Everything you need is right there at the bottom of your post editor through the meta box. The traffic light system (red, orange, green) makes it incredibly easy to see if your optimization is on track.
I recommend Yoast if you’re brand new to WordPress. The interface feels intuitive, and you can’t really mess anything up with the SEO plugin settings.
Rank Math is what I switched to about a year ago. It gives you way more features in the free version compared to Yoast. The scoring system shows you an SEO score (like 75 out of 100) instead of just colors, which I personally prefer.
The killer feature? Content AI suggests related keywords you should include based on what’s ranking right now. That alone has improved my content quality significantly.
All in One SEO (AIOSEO) is the middle ground option. What I love about it is the automated checklist. When you enter your focus keyword, it literally shows you checkmarks for “keyword in title,” “keyword in meta description,” “keyword in first paragraph.” You can’t forget the important stuff.
I used AIOSEO on a client website, and they loved how straightforward the checklist made everything for their WordPress site optimization.
Comparison Table: Features, Interface, and Pricing
| Feature / Criteria | Yoast SEO (Free) | Rank Math (Free) | AIOSEO (Free) |
|---|---|---|---|
| Interface Location | Bottom of post editor | Top tab in post editor | Bottom of post editor |
| Scoring System | Traffic light (Red/Orange/Green) | Numerical SEO score (0–100) | Checklist with green checkmarks |
| Free Features | 1 focus keyword, basic SEO & readability analysis, limited schema | Multiple focus keywords, advanced SEO analysis, schema markup | Moderate: single focus keyword, basic analysis, simple checklist |
| Premium Pricing (1 site) | ~$99/year | ~$59/year | Starts at ~$49/year |
| Ease of Use | Very beginner-friendly, clean interface | Feature-rich but slightly steeper learning curve | Balanced: easier than Rank Math, more features than Yoast |
| Best For | Beginners who want proven SEO practices | Users wanting maximum free features & flexibility | Users who prefer checklists & visual confirmations |
Which Plugin Should You Choose? (Honest Recommendation)
After using all three extensively, here’s my honest take.
If you’re completely new to WordPress and SEO feels overwhelming, go with Yoast. You’ll get results without overthinking the search engine optimization process.
If you’re comfortable with technology and want the most powerful free option, choose Rank Math. The Content AI feature and numerical scoring system are genuinely useful for keyword optimization.
If you like having a clear checklist to follow and want that “am I doing this right?” reassurance, AIOSEO is your plugin.
You truly can’t make a wrong choice here. I know people ranking on page one with each of these plugins. The plugin is just the tool. How you use it matters more.
How to Install Your Chosen SEO Plugin (2 Minute Setup)
Installing any of these plugins follows the exact same process through plugin installation. I’ll walk you through it step by step.
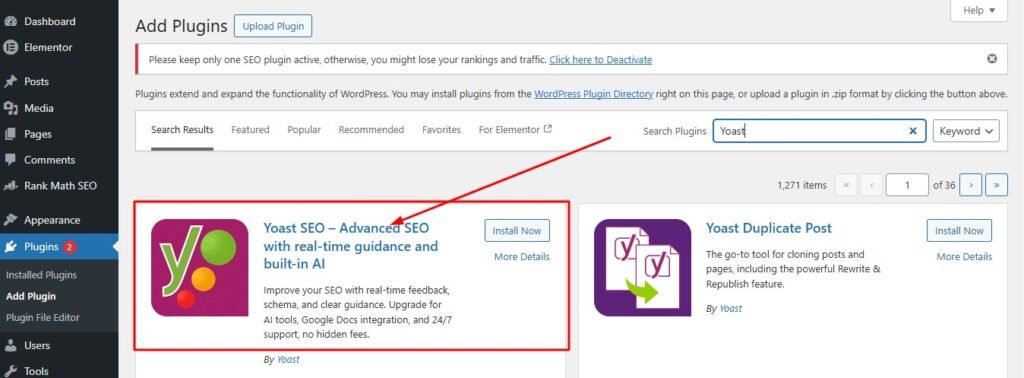
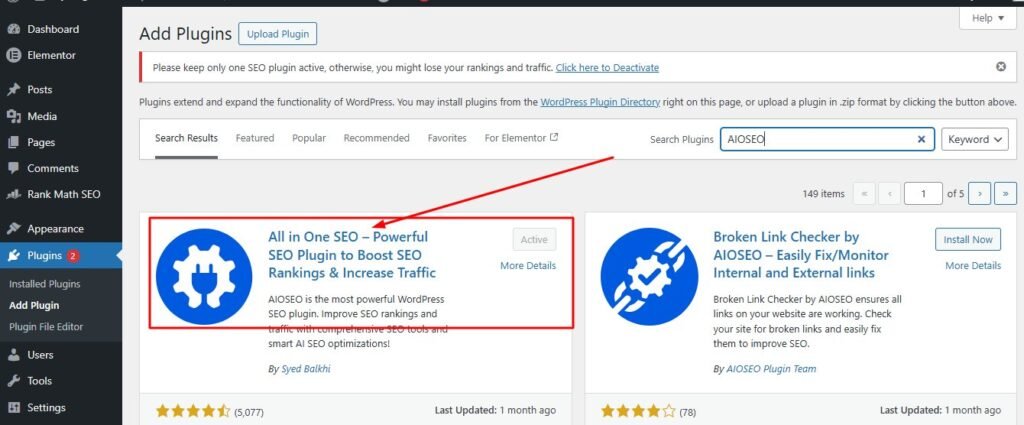
Log into your WordPress dashboard. On the left sidebar, hover over “Plugins” and click “Add New” in the WordPress admin.
In the search box at the top right, type the name of your chosen plugin. “Yoast SEO,” “Rank Math,” or “All in One SEO.”
The correct plugin will appear in the results. Look for the official one with millions of active installations. Click the “Install Now” button.
Wait about 10 seconds while WordPress downloads and installs it through plugin installation. The button will change to “Activate.” Click that button.
That’s it. Your SEO plugin is now active.
Some plugins like Rank Math will launch a setup wizard. I recommend going through it because it configures important SEO settings automatically. The wizard asks simple questions and takes about 2 minutes.
Yoast and AIOSEO work right away without mandatory setup, though they offer optional configuration tours.
Now you’re ready to add your first keywords to your WordPress site.
How to Add SEO Keywords in WordPress: 3 Plugin Methods Compared
This is the section you’ve been waiting for. I’m going to show you exactly how to add keywords to WordPress using each plugin, with every click and field explained.
I’ll use a real example throughout. Let’s say I’m optimizing a blog post about homemade tomato soup, and my focus keyword is “easy tomato soup recipe.”
Method 1: Adding Keywords with Yoast SEO (Step by Step)
Open the page or post you want to optimize in your WordPress editor. I usually write my content first, then optimize it with keywords for better content optimization.
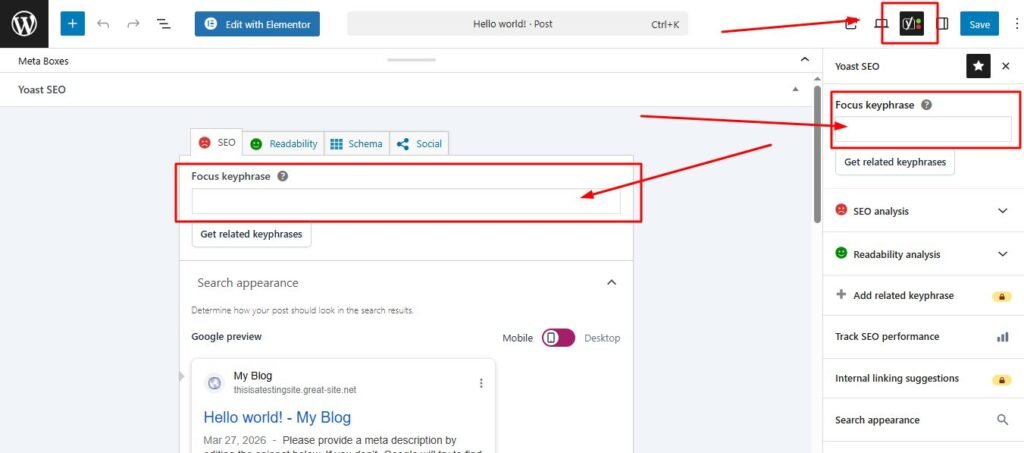
Scroll all the way down past your content editor. You’ll see a big section labeled “Yoast SEO.” That’s your optimization panel with the meta box.
Look for the field that says “Focus keyphrase.” Click inside it and type your main keyword. In my example, I’d type “easy tomato soup recipe.”
The moment you add your focus keyword, Yoast starts analyzing your content for keyword placement. You’ll see colored dots appear on the right side of the screen showing your SEO score.
Now click the “Edit snippet” button. This opens up three critical fields for meta title optimization:
SEO title is what appears in Google search results as your title tag. I make sure my focus keyword appears near the beginning. For example: “Easy Tomato Soup Recipe: Ready in 20 Minutes.”
Watch the bar under the title field. Green means your length is perfect for Google. Red means it’s too long and will get cut off in search results. I always aim for green.
Slug is your URL. Yoast automatically creates one from your post title, but I usually shorten it. Instead of “easy-tomato-soup-recipe-ready-in-20-minutes,” I’d change it to “easy-tomato-soup-recipe.”
Meta description is that preview text under your title in Google. I write a compelling sentence that includes my keyword naturally through meta description optimization. “This easy tomato soup recipe uses fresh ingredients and takes just 20 minutes from start to finish. Perfect for busy weeknights.”
Again, watch for the green bar. Too short or too long gets flagged.
Below the snippet preview, Yoast shows you an “SEO analysis” section. Click the dropdown, and you’ll see specific suggestions for improving your on-page SEO. Things like “keyword not in first paragraph” or “keyword density is low.”
These suggestions are incredibly helpful. I go through each one and fix what I can without making my content sound robotic.
There’s also a “Readability” tab next to the SEO tab. This is something I ignored at first, and it was a mistake. Yoast warns you if your keyword usage makes the text hard to read through their readability score. If your keyword appears too many times, you’ll get a warning about keyword stuffing.
I balance both the SEO score and the readability score. All green on SEO but red on readability means you’ve over optimized.
Before publishing, I click the “Mobile preview” and “Desktop preview” buttons in the snippet preview. This shows exactly how my listing will look on different devices. I’ve caught truncated titles this way more times than I can count.
When everything looks good, I click “Update” or “Publish” in the top right corner of WordPress. My keywords are now embedded in my site’s HTML meta tags, and search engines can see them.
Method 2: Adding Keywords with Rank Math (Step by Step)
Rank Math works a bit differently because the interface is at the top of your WordPress editor instead of the bottom.
Open your post or page. Look at the very top of your screen, just under the title bar in the WordPress editor. You’ll see tabs like “Content,” “SEO,” and “Advanced.” Click the “SEO” tab.
The first thing you’ll see is a big SEO score number in the top right corner. Mine usually starts at something like 25 out of 100 before optimization.
Find the “Focus Keyword” field and type in your target keyword. I’d enter “easy tomato soup recipe” here.
Watch what happens next. The score updates in real time as Rank Math performs SEO analysis. Mine usually jumps to 40 or 50 just from adding the keyword.
Now scroll down a tiny bit to the “Edit Snippet” section. This works similarly to Yoast for meta title optimization.
I customize my SEO title, making sure the keyword appears early. Rank Math shows you exactly how many characters you’re using. I aim for 50 to 60 characters for the title tag.
The permalink field lets me clean up my URL slug. I remove unnecessary words and keep just the keyword.
The meta description gets my keyword plus a compelling benefit statement. Rank Math also shows character count here for meta description WordPress optimization, and I target 120 to 155 characters.
Here’s what makes Rank Math special: as you optimize each element, your SEO score keeps climbing. When I add the keyword to my title, the score jumps. When I add it to my meta description, it jumps again.
I aim for a score above 80. Anything above that is considered excellent optimization following SEO best practices.
Rank Math shows you exactly which “tests” you’ve passed in a list below the snippet preview. Things like:
“Focus keyword used in SEO title: YES”
“Focus keyword appears in first paragraph: NO”
“Keyword found in URL: YES”
This checklist makes it impossible to forget important spots for keyword placement. If something shows “NO,” I go fix it.
One feature I absolutely love: Rank Math tells me to include the keyword in image alt text for image optimization. I open my images, edit the alt text field, and add a natural description that includes my keyword. “Bowl of easy tomato soup garnished with basil” works perfectly.
The URL slug optimization is also highlighted by Rank Math as critical. I make sure my slug is clean and includes the main keyword.
There’s one more advanced checkbox I use on my most important posts: “Pillar Content.” When I check this box, I’m telling search engines this is a comprehensive, cornerstone piece of content on my WordPress site. I only use this for my absolute best guides.
When my SEO score hits 80 or above and all the major tests show green checkmarks, I publish.
Method 3: Adding Keywords with All in One SEO (AIOSEO)
AIOSEO takes yet another approach that some people find easier than the other two for add SEO to WordPress.
Open your post and scroll down below your content in the WordPress editor. You’ll find the “AIOSEO Settings” box.
Click on the “General” tab if it’s not already selected. Right at the top, you’ll see “Focus Keyphrase.” Type in your main keyword.
The moment you do, AIOSEO runs its analysis for keyword optimization. Here’s the cool part: it shows you a “Basic SEO” checklist right there.
The checklist literally tells you:
“Focus keyphrase in SEO title: GREEN CHECK”
“Focus keyphrase in meta description: RED X”
“Focus keyphrase in first paragraph: RED X”
This is why I recommend AIOSEO to people who like clear, actionable feedback for their SEO settings. You can see at a glance what you’ve done and what you still need to fix.
I work through each red X until they all turn into green checks.
For the SEO title and meta description, AIOSEO has a “Post Title” and “Meta Description” field right in the same panel through the meta box. I don’t have to click “Edit Snippet” like in Yoast. It’s all right there.
I write my title with the keyword near the beginning for proper meta title optimization. I write my meta description including the keyword naturally.
The snippet preview sits right below these fields, showing me exactly how my result will appear in Google searches.
If you have AIOSEO Pro (the paid version), there’s an “Additional Keyphrases” feature. This lets you target multiple related keywords on the same page. I’ve used this when a single post could rank for several similar searches.
For example, my tomato soup post might also target “homemade tomato soup” and “quick tomato soup recipe.” The Pro version would analyze all three.
But honestly, the free version handles everything you need for basic keyword optimization on your WordPress site.
When all my checklist items show green and my snippet preview looks good, I hit publish.
Can’t Find Your SEO Settings Box? Here’s Where Each Plugin Hides It
I get this question all the time from people who just installed a plugin and can’t figure out where the SEO settings are in their WordPress admin.
Here’s the exact location for each plugin:
Yoast SEO: Scroll all the way to the bottom of your post editor. Below your content, below any other boxes, you’ll see a section with the Yoast logo. That’s where everything is. If you still don’t see it, click “Screen Options” at the very top right of your WordPress screen and make sure the Yoast SEO box is checked.
Rank Math: Look at the top of your post editor, right below where you type your post title in the WordPress editor. You’ll see tabs labeled “Content,” “SEO,” and others. Click the “SEO” tab. Everything opens right there at the top instead of the bottom. It took me a minute to adjust to this when I switched from Yoast, but now I prefer it.
All in One SEO: Scroll down below your content editor, similar to Yoast. Look for a box labeled “AIOSEO Settings” in the meta box area. If you’re not seeing it, again check your “Screen Options” at the top right of the page.
If you’re in the “Posts” or “Pages” list view instead of editing a specific post, you won’t see the SEO boxes. You have to actually click “Edit” on a post first in your WordPress dashboard.
One more thing that confused me when I started: if you have multiple SEO plugins installed at the same time through plugin installation, they can conflict with each other. WordPress will let you install both Yoast and Rank Math simultaneously, but you should only use one. Deactivate and delete the others to avoid confusion.
Where to Add Keywords to WordPress (The Complete 8 Point Checklist)
Now that you know how to use your plugin, let’s talk about where your keywords should actually appear in your content through proper keyword placement. The plugins guide you, but understanding the why behind each location helps you optimize smarter for on-page SEO.
I follow this exact checklist for every important page I publish on my WordPress site.
1. SEO Title Tag (Most Important)
Your SEO title is the single most important place for your keyword. This is the blue clickable headline people see in Google search results as the title tag.
I always put my main keyword as close to the beginning of the title as possible for meta title optimization. Search engines give more weight to words at the start.
Instead of “A Delicious Recipe for Easy Tomato Soup,” I’d write “Easy Tomato Soup Recipe: Delicious and Quick.”
The character limit is 50 to 60 characters. If you go over, Google cuts off your title with a “…” and your message gets lost in search rankings.
All three plugins show you a green or red indicator for title length through the snippet preview. I never publish until that’s green.
Here’s a mistake I made early on: I’d write boring, keyword stuffed titles like “Easy Tomato Soup Recipe for Easy Tomato Soup.” Terrible, right?
Your title needs to be compelling enough that people actually click. I include power words, numbers, or benefits when possible following SEO best practices. “Easy Tomato Soup Recipe: Ready in 20 Minutes” tells searchers exactly what they’ll get.
2. Meta Description (Your Search Result Sales Pitch)
The meta description doesn’t directly affect your rankings, but it absolutely affects your click through rate in Google search.
This is the short text that appears under your title in search results. When someone searches for your keyword, Google bolds matching words in your meta description. That visual highlight draws the eye.
I write my meta description like a mini sales pitch through meta description WordPress optimization. What’s the benefit of clicking my result instead of the nine others on the page?
“This easy tomato soup recipe uses fresh tomatoes and simple ingredients. Ready in just 20 minutes, it’s perfect for busy weeknights when you want something warm and homemade.”
I include my focus keyword naturally within the first sentence. I keep the total length between 120 and 155 characters for meta description optimization. Too short and you’re wasting valuable space. Too long and Google cuts you off.
The plugins all show you a preview of how your description will look through the snippet preview. If I see that green indicator, I know I’m in the sweet spot.
3. URL Slug (Clean and Keyword Rich)
Your URL slug is the end part of your web address after the domain name.
If my WordPress site is “cookingwithjohn.com” and I’m writing about tomato soup, my full URL would be “cookingwithjohn.com/easy-tomato-soup-recipe.”
That last part, “easy-tomato-soup-recipe,” is the slug.
WordPress automatically generates a slug from your post title in the WordPress editor, but it’s usually messy. A title like “Easy Tomato Soup Recipe That’s Ready in 20 Minutes” becomes “easy-tomato-soup-recipe-thats-ready-in-20-minutes.”
I always clean this up. I remove words like “that’s,” “in,” “the,” and “a.” These are called stop words, and they just clutter your URL.
My final slug would be “easy-tomato-soup-recipe.” Short, clean, and focused on the keyword for better search engine optimization.
The plugins all have a field where you can edit your slug through the SEO settings. I do this every single time before publishing.
Here’s why it matters: shorter URLs get more clicks. They look cleaner in search results and are easier to remember and share.
4. Headings (H1, H2, H3 Tags)
Your H1 heading is usually your post title, and it should definitely contain your main keyword as a header tag.
But here’s what many people miss: your H2 and H3 subheadings are prime real estate for keyword variations in your header tags.
I don’t stuff my exact keyword into every heading. That looks spammy and reads poorly.
Instead, I use variations and related phrases. If my focus keyword is “easy tomato soup recipe,” my H2 headings might be:
“Ingredients for Homemade Tomato Soup”
“How to Make Easy Tomato Soup in 20 Minutes”
“Tips for the Best Tomato Soup Every Time”
Notice how these include related terms like “homemade tomato soup” and “make tomato soup” without sounding forced?
Google understands semantic relationships now through search engine optimization. It knows “homemade tomato soup” and “easy tomato soup recipe” are closely related topics.
I try to get my main keyword or a close variation into at least one or two H2 headings naturally for proper keyword placement.
5. First Paragraph (Critical for SEO)
Google pays special attention to the opening of your content through search engine optimization. I always include my focus keyword within the first 100 words.
This is actually one of the checks that AIOSEO specifically looks for in their SEO analysis. “Keyword in first paragraph” either shows a green check or a red X.
I don’t force it into the very first sentence awkwardly. But somewhere in that opening paragraph, I naturally mention what the page is about using my target keyword.
“This easy tomato soup recipe has become my go-to comfort food when I need something quick and delicious.”
Simple, natural, and the keyword is right there in the opening line for proper content optimization.
6. Image Alt Text (Accessibility Plus SEO)
Image alt text serves two purposes. First, it helps visually impaired people understand your images through screen readers. Second, it gives you another opportunity to include your keyword for image optimization.
I never skip this step anymore.
When you upload an image in WordPress, click on it and look for the “Alt Text” field in the sidebar of the WordPress editor. I write a descriptive sentence that includes my keyword when it makes sense.
For a photo of my finished soup, I’d write: “Bowl of easy tomato soup garnished with fresh basil.”
If I have multiple images, I don’t use the exact same keyword in every single one. That’s over optimization. I vary my descriptions while keeping them relevant for alt text.
“Ingredients for homemade tomato soup arranged on counter”
“Simmering tomato soup in stainless steel pot”
Rank Math specifically highlights this as a ranking factor in their SEO analysis. In the SEO tests checklist, it asks: “Are you using your focus keyword in image alt attributes?”
It takes 10 extra seconds per image, but it genuinely helps with search visibility.
7. Body Content (Natural Integration)
This is where beginners either stuff keywords unnaturally or avoid them entirely. Both are mistakes in content optimization.
I aim to use my focus keyword about 3 to 5 times per 1,000 words of content. That usually gives me a keyword density around 0.5 to 1%, which is perfectly natural.
But here’s what matters more than the exact number: does my content read naturally?
I write my content first as if I’m explaining the topic to a friend in the WordPress editor. Then I go back and make sure my keyword and related terms appear in the right spots.
I use variations and synonyms throughout. If my keyword is “easy tomato soup recipe,” I’ll also naturally use phrases like:
“This soup”
“The recipe”
“Homemade tomato soup”
“Quick tomato soup”
Google is smart enough to understand these all relate to my main topic through search engine optimization.
The readability analysis in Yoast has saved me multiple times from over optimizing. If I use my keyword too many times, Yoast flags it with an orange or red warning showing poor readability score. That’s my signal to dial it back.
8. Internal Links (Anchor Text Strategy)
Internal linking means linking from one page on your WordPress site to another page on your site.
When I write that link, the clickable text is called anchor text. Using keyword rich anchor text helps both pages rank better through internal linking.
Let’s say I have another post about making chicken noodle soup. In my tomato soup article, I might write:
“If you enjoyed this easy tomato soup recipe, you’ll love my quick chicken noodle soup guide.”
That phrase “quick chicken noodle soup guide” becomes the link. It tells Google that the page I’m linking to is about chicken noodle soup.
I try to add 2 to 3 internal links in every blog post I write, linking to related content using descriptive anchor text for better search visibility.
This helps search engines understand my site structure and keeps readers engaged longer.
How to Add Meta Description in WordPress (All 3 Plugins Shown)
Meta descriptions deserve their own section because they’re so important for click through rates in Google search, even though they don’t directly affect rankings.
I’ve seen two identical posts at position 3 and position 4 in Google. The one with the better meta description got twice as many clicks.
Let me show you exactly how to write and add them in each plugin for meta description WordPress optimization.
What Makes a Great WordPress Meta Description
A great meta description does four things for meta description optimization:
It includes your focus keyword, preferably near the beginning. When someone searches for that keyword, Google bolds it in your meta description. That bold text catches the eye.
It promises a clear benefit. What will the reader gain by clicking? I tell them exactly what they’ll learn or achieve.
It creates mild urgency or curiosity. Words like “discover,” “learn,” or “find out” encourage action.
It fits within 120 to 155 characters. Shorter than 120 wastes space. Longer than 155 gets cut off.
Here’s a formula I use constantly:
Benefit + Keyword + Call to Action
“Discover how to make an easy tomato soup recipe using fresh ingredients in just 20 minutes. Perfect for busy weeknights.”
That’s 129 characters. It includes my keyword. It promises a benefit (quick, fresh, easy). And it tells people exactly who it’s for.
I write my meta description thinking about the person searching in Google search. What do they want to know? What would make them click my result instead of the one above or below it?
Crafting the Perfect Meta Description WordPress Sites Need
Different types of pages need different description styles for meta description WordPress optimization.
For blog posts and tutorials, I focus on what the reader will learn. “Learn how to…” or “Discover the steps to…” work well following SEO best practices.
For product pages, I highlight the main benefit or unique feature. “Get professional results without the professional price.”
For service pages, I emphasize the outcome or transformation. “We help small businesses rank on page one in 90 days or less.”
I avoid generic descriptions like “Click here to learn more” or “This is a great article about tomato soup.” Those tell the searcher nothing useful.
I also avoid duplicate descriptions. Each page needs its own unique meta description. WordPress makes it easy to accidentally use the same description across multiple posts, especially if you’re in a hurry.
The plugins all warn you about this in their SEO analysis. If two pages have identical descriptions, you’ll see a warning in your SEO settings.
One last tip: I sometimes test different descriptions on important pages. After a month, I check Google Search Console to see my click through rate. If it’s low, I rewrite the description to be more compelling for better search visibility.
Optimizing Different WordPress Page Types (Homepage, Posts, Products)
Here’s something I wish someone told me when I started: you can’t use the same keyword strategy for every type of page on your WordPress site.
Your homepage, blog posts, product pages, and static pages all need different approaches for keyword optimization. The navigation is even different in WordPress depending on what you’re editing in the WordPress dashboard.
Let me break down each one for proper post optimization and page optimization.
Homepage Keywords (Your Main Site Target)
Your homepage is usually your most important page from an SEO perspective. It gets the most backlinks naturally, and it’s often what ranks for your main brand and service terms in Google search.
I choose broad, high value keywords for homepages. These represent what my entire WordPress site is about.
If I run a local bakery, my homepage keyword might be “artisan bakery in Portland” or “custom wedding cakes Portland.”
If I run a blog about cooking, my homepage might target “easy recipes for beginners” or “quick weeknight dinner ideas.”
Notice these are broader than blog post keywords. A blog post might target “easy 20 minute pasta recipes,” but the homepage targets the overarching theme.
To optimize your homepage in WordPress:
Go to “Pages” in your left sidebar in the WordPress admin, not “Posts.” Find the page marked “Homepage” or whatever your front page is called. Click “Edit.”
The SEO plugin settings work exactly the same way through the meta box, but you’ll find them under that specific page.
I make sure my homepage keyword appears in:
The main headline (H1) header tag
The first paragraph of text
The page title and meta description
At least one subheading
For local businesses, I include the city name in the homepage keyword. “Plumber in Santa Monica” is much easier to rank for than just “plumber.”
Video number one in my research showed exactly this. The example used “plumber in Santa Monica” as the focus keyword, then added related terms like “water leak” and “emergency plumbing” to expand coverage.
Blog Post Keywords (Long Tail Opportunities)
Blog posts are where you target more specific, long tail keywords for post optimization.
These are questions people ask, specific how to queries, or detailed topics that are too narrow for a homepage.
“How to fix a leaky faucet” is a perfect blog post keyword. “What causes low water pressure in kitchen sink” is another great one.
Blog posts are easier to rank because you’re targeting less competitive terms. I can realistically rank a new blog post in 2 to 3 months for the right keyword through proper content optimization.
To add keywords to blog posts:
Click “Posts” in your WordPress sidebar in the WordPress dashboard. Either create a new post or click “Edit” on an existing one.
All the same SEO plugin features are available through the WordPress editor. The only difference is the navigation.
I focus each blog post on one specific question or problem. My title, headings, and content all support that single focus keyword for proper keyword placement.
One mistake I see constantly: people write blog posts that try to cover everything about a topic. “Everything you need to know about plumbing” is impossible to rank for and overwhelming to read.
Instead, I write focused posts like “how to unclog a bathroom sink without chemicals” or “when to call a plumber vs DIY fixes.”
Narrow, specific, and helpful beats broad and generic every time in Google search.
Product or Service Page Keywords (Commercial Intent)
If you run an online store or offer services on your WordPress site, your product and service pages need keywords with commercial intent.
These are searches where someone is ready to buy or hire, not just learn.
“Buy organic coffee beans online” has commercial intent. “What is organic coffee” is informational.
“WordPress website design services” has commercial intent. “How to design a website” is informational.
I target product names, product categories, and buying modifiers (best, cheap, professional, custom).
For a product page selling handmade pottery, I might target “handmade ceramic bowls” or “custom pottery dinner plates.”
The optimization process is identical for page optimization. Find the page under “Pages” or “Products” (if you’re using WooCommerce), click “Edit,” and use your SEO plugin the same way.
The difference is in the content itself. Product pages need:
Clear descriptions with the product keyword
Benefits and features
Trust signals like reviews or guarantees
Strong calls to action
I include my keyword in the product title, description, URL slug, and image alt text just like a blog post through proper keyword placement. But my meta description focuses on buying benefits instead of educational value.
10 Keyword Mistakes That Kill WordPress Rankings (And How Plugins Protect You)
I’ve made every single one of these mistakes at some point. Some of them tanked my rankings for months until I figured out what went wrong with my search engine optimization.
The good news? The plugins we covered actively protect you from most of these errors if you pay attention to their warnings in the SEO analysis.
Mistake 1: Making Your Title Too Long (Red Bar Warning)
Google displays about 50 to 60 characters of your title tag in search results. Anything beyond that gets cut off with those annoying dots.
I used to write long, descriptive titles like “Easy Tomato Soup Recipe That Anyone Can Make in 20 Minutes or Less Using Fresh Ingredients.”
In search results, it appeared as “Easy Tomato Soup Recipe That Anyone Can Make in 20 M…”
Half my message was lost, and it looked unprofessional.
Now I watch for that green bar indicator in my plugin through the snippet preview. If it turns red or orange, my title is too long. I trim it down immediately.
The fix is simple: keep your title focused and punchy. Remove unnecessary words. “Easy Tomato Soup Recipe: Ready in 20 Minutes” says the same thing in 52 characters for better meta title optimization.
Mistake 2: Ignoring the Mobile Preview
About 60% of Google searches happen on mobile devices now. Yet I spent years only checking how my titles and descriptions looked on desktop.
Titles truncate differently on mobile. Meta descriptions show fewer characters. What looks perfect on your computer screen might be a mess on a phone.
Yoast and the other plugins all have mobile preview buttons in the snippet preview. I click that button before every single publish now.
I’ve caught titles that were fine on desktop but completely cut off on mobile. I’ve fixed meta descriptions that were way too long for mobile screens.
This one simple check has improved my mobile click through rates noticeably for better search visibility.
Mistake 3: Forgetting to Edit Your URL Slug
WordPress auto generates your URL slug from your post title in the WordPress editor. But auto generated slugs are almost always too long and messy.
A post titled “10 Easy Tomato Soup Recipes That Your Family Will Love This Winter” becomes:
“10-easy-tomato-soup-recipes-that-your-family-will-love-this-winter”
That’s 64 characters of unnecessary URL bloat.
I manually edit every slug to include just my focus keyword. That same post becomes:
“easy-tomato-soup-recipes”
Clean, short, and focused on the keyword for better keyword placement.
All three plugins have a slug field right in their snippet editor in the SEO settings. I never skip this anymore.
Here’s why it matters: shorter URLs get more clicks in Google search. They look cleaner in search results and are easier to remember and share.
Mistake 4: Keyword Stuffing Your Way to a Penalty
This was my biggest mistake when I started SEO.
I thought more keyword mentions meant better rankings. So I’d cram my keyword into every other sentence until my content read like a robot wrote it showing high keyword density.
“Looking for an easy tomato soup recipe? This easy tomato soup recipe is the best easy tomato soup recipe you’ll find. The easy tomato soup recipe uses…”
Awful, right?
Google actually penalizes this now. It’s called keyword stuffing, and it hurts your rankings instead of helping them in search engine optimization.
Yoast SEO has a readability tab that warns you when your keyword usage makes the text hard to read through the readability score. That orange or red warning is your signal to dial it back.
I aim for natural language first following SEO best practices. If my keyword appears 5 times in 1,000 words of content, that’s perfectly fine. If it appears 20 times showing poor keyword density, something is wrong.
Mistake 5: Writing for Search Engines Instead of Humans
This connects directly to keyword stuffing but goes deeper in content optimization.
I used to write content specifically to please SEO plugins. I’d chase that green SEO score even if it meant making my content worse.
“Include the keyword in the first paragraph? Done. Include it in a heading? Done. Include it exactly 5 times? Done.”
The result was content that technically scored well but was boring, robotic, and unhelpful to actual readers.
One video I studied made this point perfectly: “Don’t keyword stuff. Always write for the human reader first and the search engine second.”
That changed everything for me.
Now I write content for people. I explain things clearly. I answer questions thoroughly. I make it helpful and engaging.
Then I go back and optimize with keywords where it makes sense naturally for proper keyword placement.
My rankings actually improved when I stopped obsessing over perfect SEO scores and started focusing on creating genuinely useful content following SEO best practices.
Mistake 6: Skipping Image Alt Text Optimization
For the first year of my WordPress journey, I completely ignored image alt text.
I’d upload images in the WordPress editor, insert them into posts, and never touch the alt text field. WordPress would leave it blank or auto fill it with the filename like “IMG_20230405.jpg.”
That’s a massive missed opportunity for image optimization.
Search engines can’t “see” images. They rely on alt text to understand what the image shows through image optimization. And alt text is another place where your keyword can appear naturally.
Rank Math specifically checks this in their SEO analysis. In the SEO score tests, it asks: “Are you using your focus keyword in image alt attributes?”
I now add descriptive alt text to every single image, including my keyword when relevant for proper keyword placement.
For my tomato soup post:
“Fresh tomatoes and basil for easy tomato soup recipe”
“Finished bowl of easy tomato soup garnished with herbs”
It takes 10 extra seconds per image. The SEO benefit is real, and you’re also making your WordPress site more accessible for screen readers.
Mistake 7: Using Only One Keyword Per Page
I used to think I could only target one exact keyword per page.
If my keyword was “easy tomato soup recipe,” I’d avoid using phrases like “simple tomato soup” or “quick tomato soup” because I didn’t want to “dilute” my focus.
This is backwards thinking in search engine optimization.
Google understands semantic relationships. It knows that “easy,” “simple,” and “quick” are related terms when talking about recipes.
Adding related keyphrases actually strengthens your page’s topical relevance for better content optimization.
One video showed this perfectly. The example used “plumber in Santa Monica” as the main keyword, then added “water leak” and “emergency plumbing” as additional related terms.
That page could now rank for multiple related searches instead of just one through proper keyword placement.
I do the same thing now. I identify 3 to 5 related phrases and work them into my content naturally.
My tomato soup post targets:
“Easy tomato soup recipe” (main)
“Homemade tomato soup”
“Quick tomato soup”
“Simple tomato soup recipe”
More chances to rank, more organic search traffic, same amount of work.
Mistake 8: Ignoring Plugin SEO Analysis Warnings
When I first used Yoast, I’d see those orange and red warnings in the SEO analysis and think, “Eh, good enough. I’ll publish anyway.”
Bad idea.
Those warnings exist for a reason in the SEO settings. Each one points to a specific problem that’s hurting your SEO.
“Keyword not found in first paragraph” means search engines can’t immediately tell what your page is about.
“No outbound links” means you’re not providing additional resources for readers through internal linking.
“Keyword density too high” means you’re probably keyword stuffing.
I now treat red warnings as blockers. I don’t publish until they’re fixed or I have a very good reason to ignore one following SEO best practices.
Orange warnings are suggestions. I try to fix them, but sometimes they don’t make sense for a specific piece of content. That’s okay.
But I at least review every single warning before clicking publish. It catches mistakes that would have hurt my search rankings.
Mistake 9: Not Checking Your Snippet Preview Before Publishing
The snippet preview shows exactly how your page will appear in Google search results. It’s right there in every SEO plugin.
And I ignored it for months.
I’d write my title and meta description, assume they looked fine, and hit publish.
Then I’d search for my page on Google and discover my title was cut off awkwardly or my meta description was a confusing mess.
The snippet preview would have shown me this before I published.
Now I always click that preview. I look at both desktop and mobile versions. I make sure:
My title displays completely
My meta description fits without truncation
My keyword appears in both
The overall listing looks compelling and professional
This 10 second check has saved me from countless embarrassing search listings for better search visibility.
Mistake 10: Setting and Forgetting (Keywords Need Updates)
I used to think keyword optimization was a one time thing. Optimize the page once and forget about it forever.
Wrong.
Search trends change. Your rankings shift. New competitors appear in Google search. Keywords that worked two years ago might not work today.
I now review my important pages every 3 to 6 months. I check Google Search Console to see which pages are getting impressions but not clicks. I look for opportunities to update keywords or improve meta descriptions.
Sometimes a small change to a title or meta description can double your organic search traffic from a page that’s already ranking on page one.
I keep a simple spreadsheet: page URL, current keyword, current position, and last optimization date. Every quarter, I pick my top 10 pages and refresh them for better content optimization.
It’s ongoing maintenance, but it keeps my content competitive in search engine optimization.
What Success Looks Like: Understanding Your SEO Scores
One question I get constantly from beginners: “What does this green light actually mean? Am I done optimizing?”
The scoring systems in SEO plugins can be confusing if nobody explains them to you.
Let me break down exactly what you’re looking at in each plugin through their SEO analysis and what scores you should actually aim for.
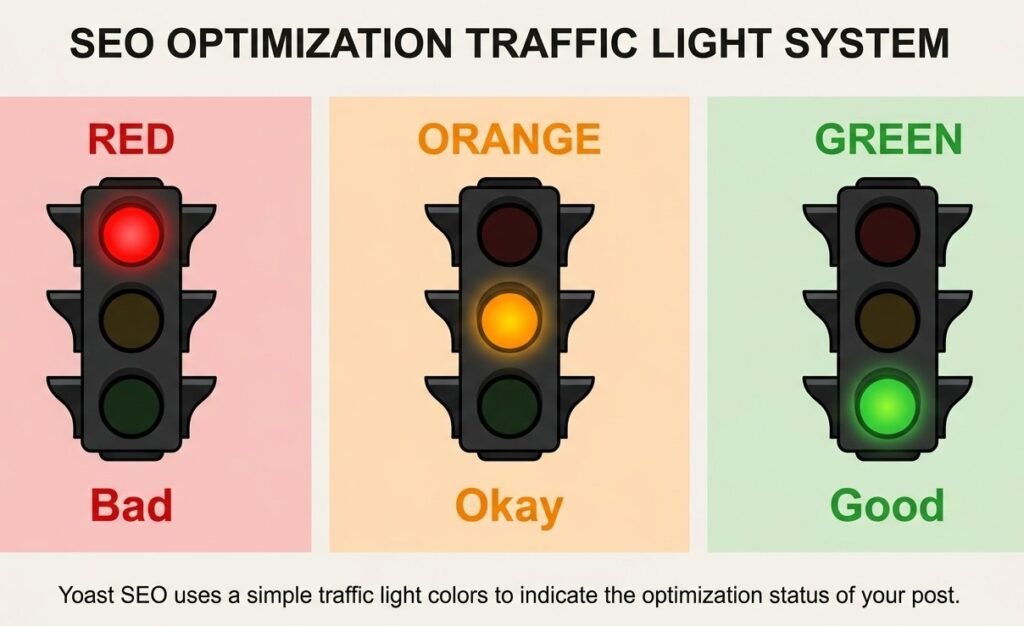
Decoding Yoast’s Traffic Light System
Yoast uses three colors: red, orange, and green in their SEO score system.
Red means there’s a problem that needs fixing. When I see red, I stop and address that specific issue before publishing.
Common red warnings include:
“Focus keyword not found in SEO title” means I forgot to include my main keyword in the title tag. That’s a critical miss.
“Text length is too short” means my content is under 300 words, which is generally too thin for good rankings in search engine optimization.
“No meta description set” means I skipped writing one, and Google will generate one automatically (which usually looks bad).
Orange means things are okay but could be better. These are suggestions rather than critical problems in the SEO analysis.
I see orange warnings like:
“Keyword density is a bit low” means I could include my keyword a few more times naturally for better keyword placement.
“Image has no alt text” means I should add descriptions to my images for image optimization.
Green means you’ve done that specific check correctly following SEO best practices.
Here’s the important part: you don’t need every single item to be green. That’s not realistic and sometimes not even possible.
I aim for all the critical items (title tag, meta description, keyword placement) to be green. If a couple of minor items are orange, that’s totally fine.
The readability tab is equally important with the readability score. I’ve seen people with perfect green SEO scores who have all red readability scores.
That means their content is technically optimized but hard to read. Long sentences, complex words, keyword stuffing.
I balance both tabs in the WordPress editor. I want mostly green on SEO and at least mostly green or orange on readability.
Don’t sacrifice readability to chase perfect SEO scores. Real humans have to actually read and enjoy your content for better search visibility.
Rank Math Scoring: What Does 80 Plus Really Mean?
Rank Math uses a numerical SEO score out of 100 instead of colors.
When I first enter my focus keyword, the score usually starts around 10 to 30. As I optimize different elements, the score climbs in real time through SEO analysis.
Here’s how I interpret the scores:
0 to 40 means poor optimization. Multiple critical issues need fixing in keyword placement. I never publish in this range.
41 to 60 means basic optimization. Some important elements are covered, but there’s clear room for improvement in content optimization.
61 to 80 means good optimization. Most important bases are covered following SEO best practices. This is acceptable for less critical pages.
81 to 100 means excellent optimization. This is my target for important pages and posts on my WordPress site.
I aim for 80 or above on my cornerstone content, homepage, and main service pages.
For smaller blog posts or less important pages, I’m comfortable with 70 to 75 if that’s where natural optimization lands.
Here’s what I love about the numerical system: I can see exactly how much each change improves my SEO score.
When I add my keyword to the title, the score might jump from 30 to 45.
When I optimize my meta description, it jumps to 55.
When I add keyword to image alt text, it climbs to 65.
This gamification aspect keeps me motivated to optimize thoroughly for better search engine optimization.
But I learned not to obsess over hitting exactly 100. Sometimes getting from 85 to 95 requires stuffing keywords unnaturally showing high keyword density, which does more harm than good.
AIOSEO Checklist: How to Get All Green Checks
All in One SEO takes a different approach with its checklist system in the SEO settings.
Instead of colors or numbers, it shows you a list of specific checks with either green checkmarks or red Xs in the meta box.
When I add my focus keyword, AIOSEO immediately tells me through SEO analysis:
“Focus keyword in SEO title: GREEN CHECK”
“Focus keyword in meta description: RED X”
“Focus keyword in first paragraph: RED X”
“Focus keyword in subheadings: RED X”
This makes it impossible to forget important spots for keyword placement.
I work down the list systematically. I fix each red X until it turns into a green check.
Some checks are more important than others following SEO best practices:
Title tag, meta description, and first paragraph are critical. These should always be green before I publish.
Subheadings through header tags and image alt text are important but slightly less critical. I try to get these green when possible.
Additional checks like “content length” and “internal links” are helpful reminders but not dealbreakers.
AIOSEO also shows you a “TruSEO Score” at the top, similar to Rank Math’s numerical SEO score. I aim for 80 or above here too for proper search engine optimization.
The checklist format is why I recommend AIOSEO to people who like clear, actionable feedback. There’s no guessing what needs to be done for content optimization.
Advanced WordPress Keyword Tips (Once You’ve Mastered the Basics)
Once you’re comfortable with basic keyword optimization, there are some advanced techniques that can give you an edge over competitors in Google search.
I didn’t use any of these when I started. But now that I understand the fundamentals, these advanced strategies have noticeably improved my results for search visibility.
Using Content AI for Data Driven Keyword Suggestions
This is one of my favorite features in Rank Math, and most people don’t even know it exists for keyword research.
Content AI analyzes the top ranking pages for your focus keyword and tells you what related keywords those pages are using.
Here’s how I use it for SEO analysis:
I enter my focus keyword in Rank Math in the WordPress editor. Let’s say “WordPress security tips.”
I scroll down in the Rank Math panel and look for the “Content AI” section. I click the button to analyze my keyword.
Rank Math sends a request to Google, looks at the top 10 results, and shows me a list of related keywords those pages all include for content optimization.
For “WordPress security tips,” it might suggest:
Two factor authentication
Security plugins
Strong passwords
Malware protection
Brute force attacks
File permissions
These are terms I should naturally include in my content if I want to compete with the top ranking pages through proper keyword placement.
I don’t force all of them in artificially. But I make sure to cover the main concepts that Google clearly associates with my topic through search engine optimization.
This feature alone has improved my content depth significantly. I catch related topics I might have otherwise missed following SEO best practices.
Marking Pillar Content for Maximum Authority
Rank Math has a checkbox labeled “Pillar Content” that most people ignore in the SEO settings.
I use this on my absolute best, most comprehensive guides. The pages where I’ve put serious effort into creating the definitive resource on a topic for my WordPress site.
When I check this box, I’m telling search engines this is cornerstone content. It’s more important than my average blog post.
I only mark about 5 to 10% of my content as pillar content. These are my 3,000 plus word comprehensive guides for post optimization.
For example, if I run a WordPress tutorial site, I might mark these as pillar content:
“Complete WordPress SEO Guide for Beginners”
“How to Speed Up WordPress: The Definitive Guide”
“WordPress Security: Protect Your Site from Hackers”
Regular blog posts like “How to add a contact form in WordPress” wouldn’t be marked as pillar content. They’re helpful but not comprehensive cornerstone pieces.
I’ve noticed my pillar content tends to accumulate more backlinks naturally. I also link to these pages frequently from other posts on my WordPress site through internal linking, which passes authority to them for better search rankings.
Optimizing for Social Shares (Beyond Google)
Most people optimize for Google search and completely forget about social media. But when someone shares your post on Facebook or Twitter, that preview matters for search visibility.
Yoast SEO has a “Social” tab that lets you customize how your post appears when shared from your WordPress site.
I click on that tab in the meta box and customize three things:
Facebook title: This can be different from your SEO title. I often make it more conversational or emotional for social media.
Facebook description: Again, different from the meta description. Social media users respond to different language than search users.
Facebook image: I upload a custom image designed for social sharing, usually with text overlay and branding.
The same options exist for Twitter (or X as it’s called now) in the SEO settings.
Why does this matter for SEO? Because social shares drive traffic, traffic signals popularity, and popularity influences rankings indirectly in search engine optimization.
I’ve had posts go semi viral on social media that then started ranking better in Google, even though social shares aren’t a direct ranking factor.
It takes an extra 5 minutes to optimize the social tab, but for posts I expect to be widely shared, it’s absolutely worth it.
Targeting Multiple Keywords with Additional Keyphrases
If you have AIOSEO Pro or Rank Math Pro, you can add multiple focus keywords to a single page for better keyword optimization.
I use this when a page could naturally rank for several related searches in Google search.
For example, a post about WordPress speed optimization could target:
“How to speed up WordPress” (main keyword)
“WordPress performance optimization”
“Make WordPress faster”
These are different ways people search for the same information.
With the premium plugin versions, I can add all three as focus keywords through the SEO settings. The plugin then checks if each one appears in the right places through SEO analysis.
This is overkill for most content. But for high value pages that could drive significant organic search traffic, targeting multiple related keywords maximizes your ranking potential through proper keyword placement.
Your First 15 Minutes: Quick Start Action Plan
You’ve learned a lot in this guide about search engine optimization. If you’re feeling a bit overwhelmed, don’t worry. That’s completely normal.
Let me give you a simple action plan to add keywords to your very first WordPress page right now. No overthinking, just follow these steps.
Minute 1 to 2: Install Your Chosen SEO Plugin
Log into your WordPress dashboard.
Hover over “Plugins” in the left sidebar in the WordPress admin and click “Add New.”
In the search box at the top right, type “Yoast SEO” if you want the most beginner friendly option for plugin installation.
Click “Install Now” on the official Yoast SEO plugin.
When the button changes to “Activate,” click it for plugin installation.
If a setup wizard appears, go through it. Just click “Next” and accept the defaults in the SEO settings. You can change settings later.
That’s it. Your SEO plugin is now active and ready on your WordPress site.
Minute 3 to 5: Do Quick Keyword Research
You need one keyword to target. Don’t spend hours on this yet. Just find one decent keyword to practice with through keyword research.
Open Google and start typing a question related to your page topic in Google search. Look at the autocomplete suggestions that appear. Those are real searches people make.
Pick one phrase that matches what your page is about. Write it down.
For example, if you’re writing about indoor plants, you might see suggestions like “best indoor plants for beginners” or “easy indoor plants low light.”
Choose the one that best matches your page content for your focus keyword.
That’s your focus keyword. You’ll optimize your page for this phrase using keyword placement.
Minute 6 to 10: Add Keywords Using Your Plugin
Open the page or post you want to optimize in the WordPress editor. If you haven’t written content yet, write at least a few paragraphs first. You need something to optimize.
Scroll down to the Yoast SEO box at the bottom of your editor in the meta box.
Find the “Focus keyphrase” field and type in your keyword.
Click “Edit snippet” and customize your title for meta title optimization. Make sure your keyword appears near the beginning.
Write a meta description that includes your keyword and describes what the page offers for meta description WordPress optimization.
Clean up your URL slug to include just your keyword.
Watch the colored indicators in the snippet preview. Green is good. Red means something needs fixing.
Minute 11 to 13: Optimize Content Locations
Go back to your content in the WordPress editor and make sure your keyword appears naturally in your first paragraph for proper keyword placement.
Look at your headings using header tags. Include your keyword or a variation in at least one H2 heading.
If you have images, click on one and add alt text that includes your keyword naturally for image optimization.
Don’t force it. If it sounds awkward, rephrase until it reads naturally following SEO best practices.
Minute 14 to 15: Preview and Publish
Scroll back down to your SEO plugin in the meta box.
Click the “Mobile preview” button in the snippet preview to see how your listing will look on phones.
Check that your title and meta description aren’t cut off.
Look at your overall SEO score. If you’re using Yoast, aim for mostly green. If you’re using Rank Math, aim for 70 or above for your first try through SEO analysis.
When everything looks decent, click the “Update” or “Publish” button in the top right of the WordPress dashboard.
Congratulations. You just added SEO keywords to your first WordPress page using proper search engine optimization.
It gets faster with practice. This first one might take 15 minutes. By your tenth page, you’ll do it in 5 minutes without thinking about keyword optimization.
The most important thing is to start. Pick one page right now and optimize it using this plan for better search rankings. Real practice beats reading theory every time when learning content optimization.
Frequently Asked Questions About WordPress SEO Keywords
How many keywords should I add to one WordPress page?
One primary focus keyword plus 3 to 5 related keyphrases for topical depth through proper keyword optimization. Don’t target unrelated keywords on the same page through keyword stuffing.
For example, my tomato soup post targets “easy tomato soup recipe” (primary) plus “homemade tomato soup,” “quick tomato soup,” and “simple tomato soup recipe” (related). These all connect to the same topic, so Google understands my content better through search engine optimization and proper keyword placement.
I learned this lesson the hard way when working in the WordPress editor. When I tried targeting “tomato soup” and “pasta recipes” on the same page, neither ranked in Google search. Focus wins every time in content optimization.
The key is semantic relationships. Google is smart enough to understand that “easy,” “simple,” and “quick” are related terms. Using variations improves your on-page SEO without diluting your focus keyword through natural keyword density.
Which WordPress SEO plugin is best: Yoast, Rank Math, or AIOSEO?
All three achieve the same goal of keyword optimization through their SEO settings. The best one depends on your preferences when working in the WordPress dashboard:
Yoast SEO is best for absolute beginners. The traffic light system makes optimization foolproof through the SEO score and meta box interface. You’ll see red, orange, or green indicators for every element of your SEO analysis.
Rank Math is best if you want maximum free features for your WordPress site. The Content AI and numerical scoring system are incredibly useful for SEO analysis. You get schema markup, multiple focus keywords, and real time SEO score updates all in the free version.
All in One SEO (AIOSEO) is best if you prefer checklist style feedback through the meta box. You see exactly what’s done and what needs fixing through green checkmarks and red Xs in the SEO settings.
I’ve used all three on different WordPress sites through plugin installation. They all helped me rank on page one through proper search engine optimization. Pick the interface that makes sense to you in the WordPress editor.
The WordPress admin interface differs slightly for each plugin, but they all handle the same core functions: SEO title tag optimization, meta description WordPress optimization, URL slug editing, and keyword placement analysis.
Where do I find the SEO settings in WordPress after installing a plugin?
This confused me for weeks when I started using the WordPress dashboard and WordPress admin area.
For Yoast SEO: Scroll to the very bottom of your post editor in the WordPress editor. Below your content, below any other boxes, you’ll see a section labeled “Yoast SEO” in the meta box. That’s where everything is for your SEO settings.
For Rank Math: Look at the TOP of your post editor, right below your title in the WordPress editor. Click the “SEO” tab. SEO settings open right there instead of at the bottom like other plugins.
For All in One SEO: Scroll down below your content editor in the WordPress admin, similar to Yoast. Look for “AIOSEO Settings” in the meta box area.
If you don’t see these boxes after plugin installation, click “Screen Options” at the very top right of your WordPress screen in the WordPress dashboard. Make sure the plugin box is checked to display SEO settings.
One more thing that confused me: if you’re in the “Posts” or “Pages” list view in the WordPress admin instead of editing a specific post, you won’t see the SEO boxes. You have to actually click “Edit” on a post first in the WordPress editor to access keyword optimization tools.
What does the green and red bar mean in Yoast SEO?
The color indicators show title tag and meta description length for the snippet preview:Green means optimal length for Google search. Your SEO title displays completely in search results without getting cut off, which improves search visibility.Red means too long. Google will truncate your title or meta description with “…” which looks unprofessional and loses your message in search rankings.I always aim for green before publishing through the WordPress editor. It takes 10 seconds to trim a few words from your title tag and dramatically improves how your listing appears in Google search.The same system applies to your meta description. Green means 120 to 155 characters, which is the sweet spot for meta description WordPress optimization and better click through rates.Orange means your content is okay but could be improved for better on-page SEO. These are suggestions rather than critical problems in your SEO analysis.The readability score also uses this color system. If you have green SEO score but red readability score, you’ve probably done keyword stuffing. Balance both for best results in search engine optimization.
Can I add keywords to WordPress without a plugin?
Yes, but I don’t recommend it for beginners working on their WordPress site.
Without a WordPress SEO plugin, you’d need to manually edit your theme files (functions.php) or add custom code to insert meta tags. The WordPress editor doesn’t have native fields for meta descriptions, focus keywords, or SEO title tags.
You could use Gutenberg’s basic SEO features in the WordPress editor, but they’re extremely limited compared to actual SEO plugins for proper search engine optimization and keyword placement.
I tried the manual route on my first WordPress site. It was frustrating and error prone. Installing a free WordPress SEO plugin takes 2 minutes through plugin installation in the WordPress admin and saves you hours of headaches.
Manual methods also don’t give you SEO analysis, keyword density warnings, snippet preview, readability score, or any of the helpful feedback that prevents keyword stuffing and other mistakes.
Plugins handle all the technical SEO settings automatically. They create proper meta tags, optimize your URL slug, and even help with image optimization through alt text reminders.
How do I know if my WordPress keywords are actually working?
Check three things for SEO analysis and search visibility:
Plugin score: Yoast should show mostly green lights through the meta box, Rank Math should show 80+ SEO score, AIOSEO should show green checkmarks. This confirms proper keyword placement and on-page SEO.
Google Search Console: Add your WordPress site to Search Console (it’s free). After 2 to 4 weeks, you’ll see which keywords are getting impressions and clicks through organic search traffic to your WordPress dashboard.
Search rankings: Manually search your focus keyword in Google search. If you’re on page 1 or 2 within 3 months, your keyword optimization is working for search visibility.
I check Search Console monthly through the WordPress admin. It shows me exactly which keywords are bringing organic search traffic to my WordPress site and which pages need improvement in content optimization.
The snippet preview in your SEO plugin shows how your page appears in Google search, but Search Console shows real performance data including click through rates and average position in search rankings.
Pay attention to keyword density too. If Yoast’s readability score shows warnings, you might be using your target keyword too many times. Natural content optimization beats keyword stuffing every time in search engine optimization.
What is keyword stuffing and how do I avoid it?
Keyword stuffing is using your focus keyword unnaturally or excessively, showing high keyword density. It looks like this:
“Looking for an easy tomato soup recipe? This easy tomato soup recipe is the best easy tomato soup recipe you’ll find. The easy tomato soup recipe uses…”
Awful, right? Google penalizes this now in search rankings and search engine optimization.
Yoast’s readability tab warns you when keyword usage hurts readability through the readability score in the meta box. If you see orange or red warnings about keyword density in the SEO analysis, you’ve stuffed too many keywords in.
I aim for 3 to 5 mentions per 1,000 words following SEO best practices and proper content optimization. Write naturally first in the WordPress editor, then add keywords where they fit through keyword placement. If it sounds robotic, dial it back.
Modern search engine optimization focuses on semantic relationships, not exact keyword repetition. Use variations, synonyms, and related terms instead of repeating your exact focus keyword over and over in your WordPress site content.
The SEO plugins actually protect you from this through their SEO settings. When you start keyword stuffing, your SEO score drops and readability score goes red. Listen to those warnings in the SEO analysis.
Should I optimize my WordPress homepage differently than blog posts?
Yes, absolutely. Different page types need different keyword strategies for page optimization and post optimization.
Homepage: Target broad, high value keywords representing your entire WordPress site. “WordPress web design services” or “artisan bakery in Portland.” Include your city for local businesses through your SEO title tag and meta description.
Navigate to “Pages” in your WordPress dashboard (not “Posts”) to edit your homepage through the WordPress editor. The SEO plugin settings work the same way in the meta box.
Blog posts: Target specific long tail keywords through post optimization. “How to fix WordPress white screen error” or “easy 20 minute pasta recipes.” These are easier to rank in Google search because competition is lower.
Access blog posts through “Posts” in the WordPress admin. All the same keyword optimization features are available through the SEO settings.
Product pages: Target commercial intent keywords with buying modifiers for page optimization. “Buy handmade ceramic bowls” or “custom WordPress development services.” Your meta description should focus on buying benefits.
I made this mistake constantly in my first year on my WordPress site. I optimized everything the same way through the WordPress dashboard. When I started matching keyword strategy to page type, my search rankings improved dramatically in Google search.
Each page type also needs different header tags and keyword placement. Homepage might have your brand name in the H1, while blog posts have your focus keyword in the H1 through the WordPress editor.
How often should I update my keywords?
I review important pages every 3 to 6 months for keyword optimization and content optimization.
Search trends change. What ranked well last year might not work today in search engine optimization. New competitors appear in Google search. Your own content might be outdated.
I check Google Search Console quarterly through the WordPress admin. If a page gets lots of impressions but few clicks, I rewrite the meta description in the meta box. If search rankings dropped, I update the content and refresh keywords for better content optimization.
Sometimes changing just the SEO title tag or meta description doubles organic search traffic from a page already on page one. It’s ongoing maintenance through the SEO settings, but it keeps my WordPress site competitive.
I also update my URL slug if I completely change the focus keyword, though this requires setting up redirects in the WordPress dashboard to avoid breaking links.
The snippet preview in Yoast, Rank Math, or AIOSEO helps me see how changes look before publishing. I always check both mobile and desktop preview for better search visibility.
Use your WordPress SEO plugin’s SEO analysis feature each time you update. Aim for that green SEO score or 80+ in Rank Math to ensure your keyword placement is still optimized following SEO best practices.
Do image keywords really matter for SEO?
Yes, more than most people realize for image optimization and search visibility.
Search engines can’t “see” images. They rely on alt text to understand what the image shows through image optimization. This helps you rank in Google Images, which drives real organic search traffic to your WordPress site.
Rank Math specifically checks this in SEO analysis: “Is your focus keyword in image alt text?” This is part of proper on-page SEO and keyword placement.
I add descriptive alt text to every image using the WordPress editor, including my keyword when relevant:
“Bowl of easy tomato soup garnished with fresh basil”
“WordPress dashboard showing Yoast SEO settings”
“Rank Math SEO score interface in WordPress editor”
It takes 10 seconds per image in the WordPress admin. The SEO benefit is real through proper keyword placement, plus you’re making your WordPress site accessible for screen readers following SEO best practices.
When you upload images in the WordPress editor, click the image and look for “Alt Text” in the sidebar. Don’t use the same exact focus keyword in every image alt text, that’s keyword stuffing. Vary your descriptions while keeping them relevant for natural content optimization.
Image optimization also includes using keyword rich file names before uploading. Instead of “IMG_12345.jpg,” rename it to “easy-tomato-soup-recipe.jpg” before adding it to your WordPress site through the WordPress dashboard.
What’s the difference between SEO title and regular post title in WordPress?
Your regular post title appears on your WordPress site as the H1 header tag. Your SEO title (also called title tag or meta title) appears in Google search results and browser tabs.
They can be different, and I often make them different for better search engine optimization.
Post title in WordPress editor: “How I Made Easy Tomato Soup in 20 Minutes”
SEO title in meta box: “Easy Tomato Soup Recipe: Ready in 20 Minutes”
Notice the SEO title includes my focus keyword at the very beginning for better keyword placement and meta title optimization. The post title is more conversational for readers on my WordPress site.
All three WordPress SEO plugins (Yoast, Rank Math, AIOSEO) let you customize the SEO title separately in their SEO settings. This appears in the snippet preview before you publish.
I always put my main keyword in both the post title and SEO title, but I optimize the SEO title specifically for Google search using exactly 50 to 60 characters. Watch that green/red bar in the meta box for proper length in the snippet preview.
The SEO title is critical for search rankings. It’s the blue clickable link people see in search results. Make it compelling while including your target keyword for better click through rates and search visibility.
Can I target multiple keywords on one WordPress page?
Yes, but they should all be closely related for proper content optimization.
I target one primary focus keyword plus 3 to 5 related keyphrases on each page through keyword placement. They should all connect to the same topic for search engine optimization.
Good example for one page:
Primary: “easy tomato soup recipe”
Related: “homemade tomato soup,” “quick tomato soup,” “simple tomato soup recipe”
Bad example for one page:
“tomato soup recipe” + “pasta salad recipe” + “chocolate cake”
These are unrelated topics. They confuse Google search about what your page is actually about, hurting your search rankings.
If you have AIOSEO Pro or Rank Math Pro through plugin installation, there’s an “Additional Keyphrases” feature in the SEO settings. This lets you add multiple focus keywords and the plugin checks keyword placement for all of them in the SEO analysis.
But honestly, even with the free version in the WordPress editor, you can naturally include related keywords through your content, header tags, image alt text, and meta description without needing the premium feature.
The key is semantic relationships. Google understands that “easy,” “simple,” “quick,” and “homemade” are all related terms when talking about recipes. Use these variations naturally throughout your content in the WordPress editor for better on-page SEO.
Just watch your keyword density. If your readability score in the meta box drops to red, you’re using too many keywords. Write for humans first, then optimize for search engines following SEO best practices.