How to Do an SEO Audit for WordPress Step by Step

If your WordPress site is not getting the traffic it deserves, the problem might not be your content or your niche. It could be something much simpler sitting quietly in the background, stopping Google from properly reading and ranking your pages.
I have worked on WordPress sites that looked perfectly fine on the surface but had serious SEO issues underneath. Missing meta tags, blocked pages, broken links, slow load times — none of these were visible to the naked eye. But they were all silently killing the rankings.
That is exactly why I always start with a proper SEO audit before doing anything else. It tells you exactly what is wrong, what to fix first, and where your biggest opportunities are hiding.
In this guide I will walk you through a complete step by step WordPress SEO audit that anyone can follow — even if you have no technical background. No guessing, no confusion. Just a clear process that actually works.What Is a WordPress SEO Audit and Why Does It Matter
A WordPress SEO audit is a structured review of your entire website. You examine the technical setup, on-page content, site speed, internal linking, and more — all to find out what is helping your rankings and what is holding them back.
Think of it like a full health checkup for your website. Your doctor does not just look at one thing. They check everything systematically so nothing gets missed. An SEO audit works the same way.
The reason this matters so much for WordPress specifically is that the platform has a lot of moving parts. Plugins, themes, settings, permalink structures — any one of these can create an SEO problem without you realizing it.
Here is what I have personally seen happen when WordPress SEO issues go undetected:
- Pages get accidentally blocked from Google indexing
- Slow loading speed pushes visitors away before they read a single word
- Duplicate content confuses Google and splits your ranking power across multiple URLs
- Missing meta tags mean your pages appear in search results with no proper title or description
- Broken links create dead ends that frustrate both visitors and search engine crawlers
Running a regular WordPress SEO audit catches all of these before they do serious damage to your traffic and rankings.
I recommend running a full audit at least once every two to three months. If you just launched a new site or made major changes, do one immediately.
Step 1 : Check If Google Can Actually Find Your WordPress Site
This is always the very first thing I check. It sounds almost too basic to mention, but I have seen established websites sitting with this mistake for months without anyone noticing.
If Google cannot access your site, none of the other steps matter. You could have the most perfectly optimized content in the world and it would still not rank.
How to Check the WordPress Reading Settings
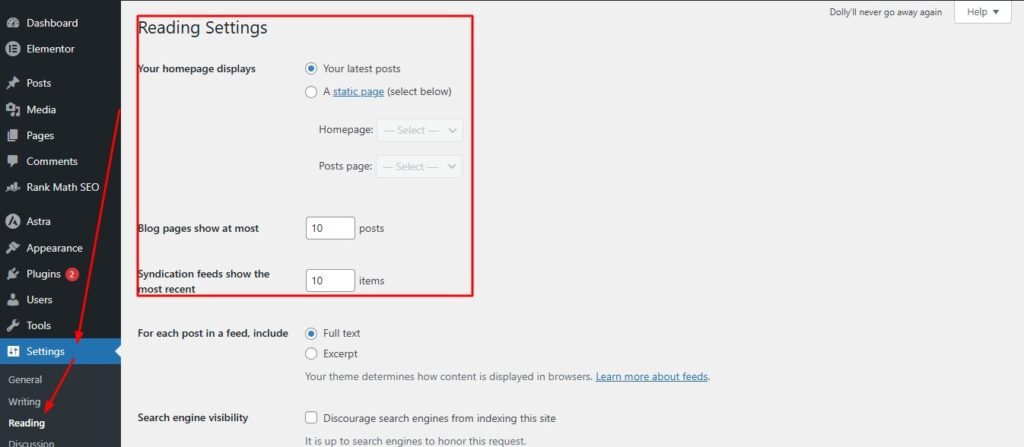
Log into your WordPress dashboard and go to Settings then Reading. Look for the checkbox that says “Discourage search engines from indexing this site.”
If that box is checked, Google is blocked from crawling your entire website. This setting exists for developers who want to keep a site private during the build phase. But it sometimes stays checked after launch by accident.
Uncheck it immediately if it is ticked, then click Save Changes. This single fix has dramatically improved traffic for sites I have worked on that had been sitting invisible to Google for weeks.
How to Verify Your Pages Are Indexed in Google
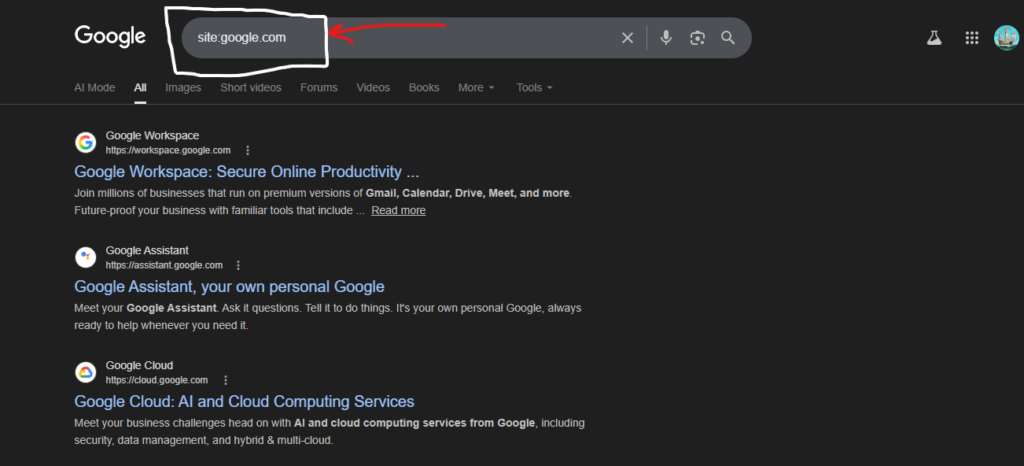
After confirming the setting is correct, go to Google and type this directly into the search bar:
site:yourwebsite.com
Replace yourwebsite.com with your actual domain. Google will show you every page it has currently indexed from your site. If you see a healthy list of pages, your site is being discovered properly.
If you see very few results or nothing at all, you have an indexing problem that needs urgent attention. It means Google has either not crawled your site yet or has been blocked from doing so.
How to Connect Google Search Console to WordPress
Google Search Console is a free tool from Google that gives you direct insight into how your site appears in search results. I consider it absolutely essential for any WordPress SEO audit.
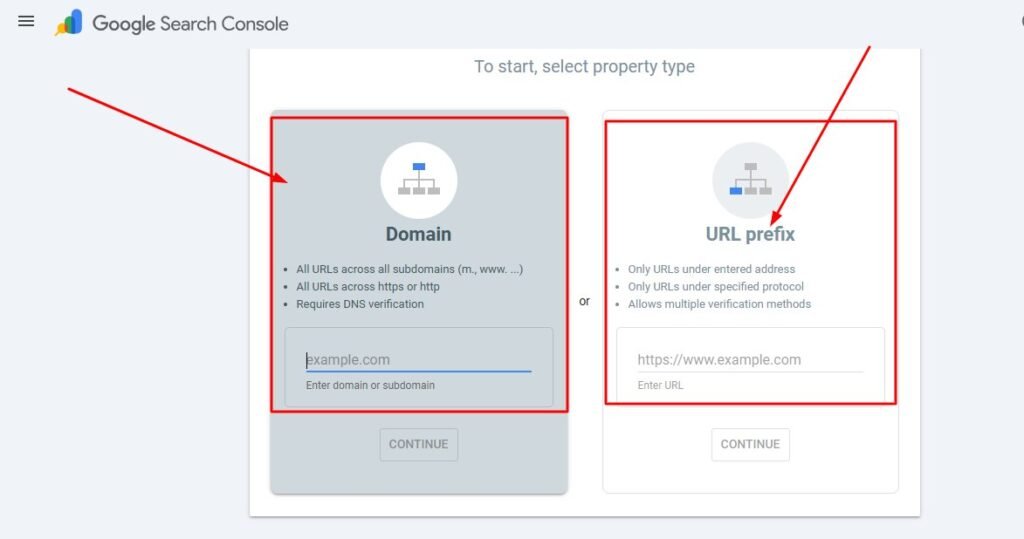
To connect it, go to Google Search Console and add your property by entering your domain name. Google will ask you to verify ownership — the easiest method for WordPress users is to use the HTML tag option and paste the verification code into your AIOSEO settings under Webmaster Tools.
Once verified, you can request indexing for individual pages, see which keywords your site ranks for, monitor Core Web Vitals, and spot crawl errors before they become serious problems.
Step 2 : Run an Automated WordPress SEO Audit with AIOSEO
Once I confirm Google can access the site, my next step is always running an automated audit. This gives me a full overview of all the SEO issues on the site in one place without having to manually check every page individually.
The tool I rely on for this inside WordPress is All in One SEO, commonly known as AIOSEO. It works directly inside your WordPress dashboard which means you get all the audit results without leaving the platform.
How to Use the AIOSEO SEO Analysis Tool
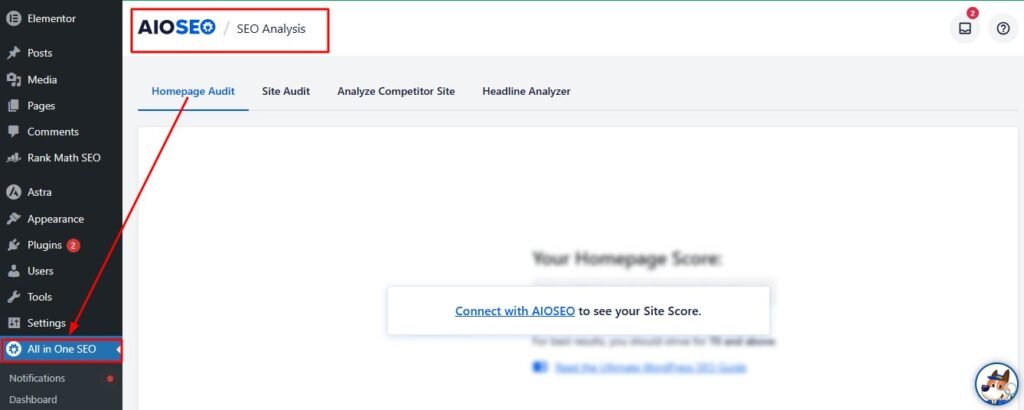
After installing AIOSEO, navigate to All in One SEO then SEO Analysis in your dashboard sidebar. The tool will immediately scan your entire site and present you with a detailed report.
The interface is clean and beginner-friendly. You do not need any technical knowledge to read the results. Everything is explained in plain language with clear suggestions on what to fix and why it matters.
What to Look for in Your WordPress SEO Health Score
At the top of the AIOSEO SEO Analysis report you will see an overall health score presented as a percentage. This score gives you a quick snapshot of how well your site is currently optimized.
Here is how I interpret the score:
- Below 50% — Your site has serious SEO problems that need immediate attention
- 50% to 70% — Your site has moderate issues that are affecting your rankings
- 70% to 85% — Your site is in decent shape but there is clear room for improvement
- Above 85% — Your site is well optimized from a basic SEO perspective
Do not aim for perfection on day one. Focus on understanding where you are and what the biggest issues are. Fixing the critical errors first will have the most impact on your rankings.
Common Issues AIOSEO Finds on WordPress Sites
In my experience, these are the issues that appear most frequently in WordPress SEO analysis reports:
- Missing meta descriptions on posts and pages
- Images that have no alt text attached to them
- Pages with no H1 tag or multiple H1 tags
- Posts with very low word counts that Google considers thin content
- Internal linking gaps where important pages have no other pages linking to them
- SEO titles that are too long and get cut off in search results
Each issue in the AIOSEO report comes with a priority level and a clear explanation of how to fix it. Work through them starting with the critical issues and then move to warnings and notices.
Step 3 : Fix On-Page SEO Problems on Your WordPress Website
On-page SEO is what tells Google what each individual page on your site is about. If your on-page elements are incomplete or incorrect, even a technically perfect site will struggle to rank.
This is one of the areas where I see the most quick wins. Small fixes here often lead to noticeable ranking improvements within a few weeks.
How to Write SEO Optimized Meta Titles and Descriptions
Every single post and page on your WordPress site needs its own unique meta title and meta description. These are the text lines that appear in Google search results when someone discovers your content.
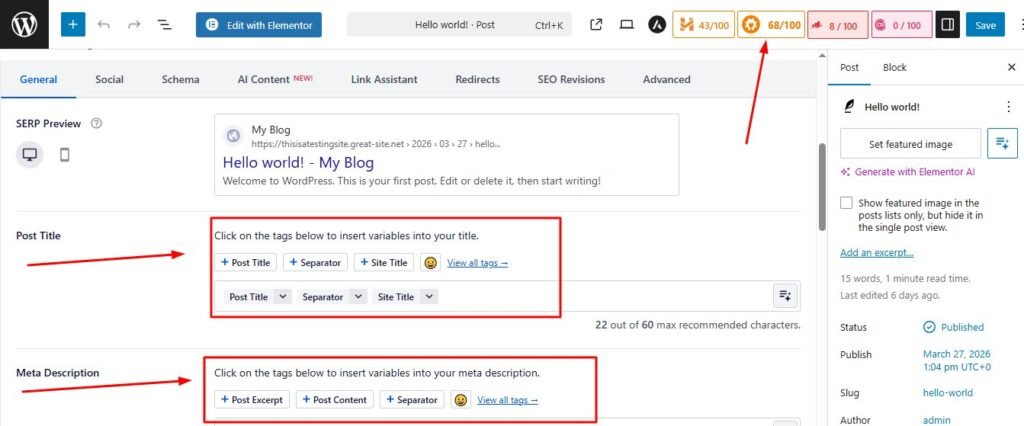
Your meta title should include your target keyword as close to the beginning as possible. Keep it under 60 characters so Google does not cut it off in search results. It should also be compelling enough to make someone want to click on it.
Your meta description should be between 120 and 155 characters. Include your primary keyword naturally and give readers a clear reason to visit your page. Think of it as a short advertisement for your content.
You can edit both directly from the WordPress post editor using AIOSEO. Just scroll down below the content editor and you will see the AIOSEO settings panel with dedicated fields for the title and description.
How to Fix Missing H1 Tags and Heading Structure
Each page on your WordPress site should have exactly one H1 tag. This is almost always your main article or page title. The H1 tells Google the primary topic of that page.
A common problem I find on WordPress sites is pages with no H1 at all, or pages with multiple H1 tags created accidentally by certain themes or page builders. Both situations send confusing signals to Google.
Check your theme settings carefully. Some themes generate H1 tags from your site name or tagline in the header area, which can create duplicate H1 situations on every page of your site without you realizing it.
Beneath your H1, use H2 tags for your main section headings and H3 tags for subsections within those. This logical heading hierarchy helps Google understand the structure and depth of your content.
How to Add Alt Text to Images in WordPress
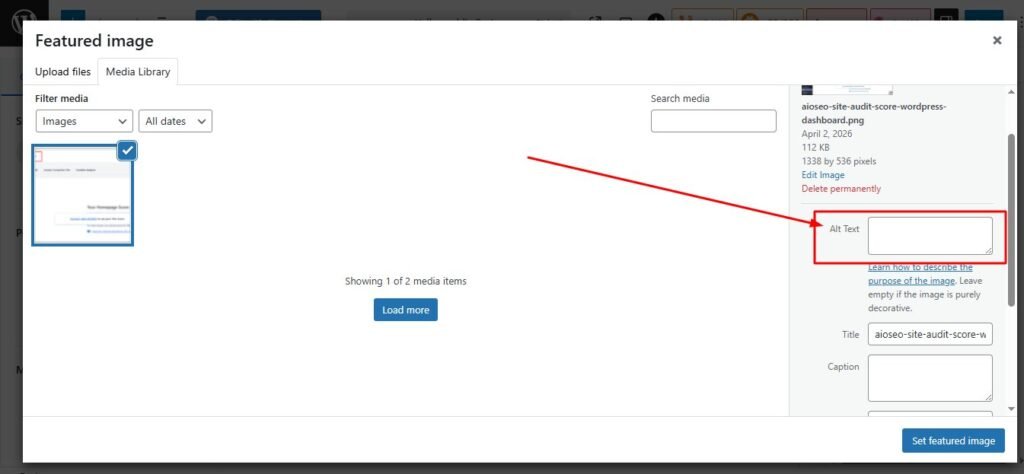
Every image you upload to WordPress should have descriptive alt text. Alt text is a short description of what the image shows. It serves two important purposes — it helps visually impaired users understand the image, and it helps Google understand what the image represents.
To add alt text in WordPress, click on any image in your media library or directly within the post editor. You will see an Alt Text field on the right side panel. Write a natural, descriptive sentence about the image. If your target keyword fits naturally, include it — but never force it.
Images without alt text are a missed SEO opportunity. If you have a large number of images without alt text, start with your most important pages and work your way through systematically.
How to Fix Thin Content and Low Word Count Pages
Thin content refers to pages with very little meaningful information. Google generally sees pages under 300 words as thin content and is less likely to rank them well in competitive searches.
I want to be clear that word count alone does not determine quality. But if a page has only 100 or 150 words, it is usually not providing enough depth to satisfy a user’s search intent.
Go through your shortest pages and ask yourself honestly — does this page fully answer what a reader came here to find? If the answer is no, expand it. Add more context, examples, practical tips, or relevant information that genuinely helps the reader.
Step 4 : Check Your WordPress Site Speed and Core Web Vitals
Website speed is one of the confirmed ranking factors that Google uses when deciding where your pages should appear in search results. A slow WordPress site does not just frustrate visitors — it actively gets pushed down in rankings.
I check speed on every WordPress site I audit because slow loading is far more common than most site owners realize. And the good news is that most speed problems on WordPress are very fixable.
How to Test WordPress Site Speed with PageSpeed Insights
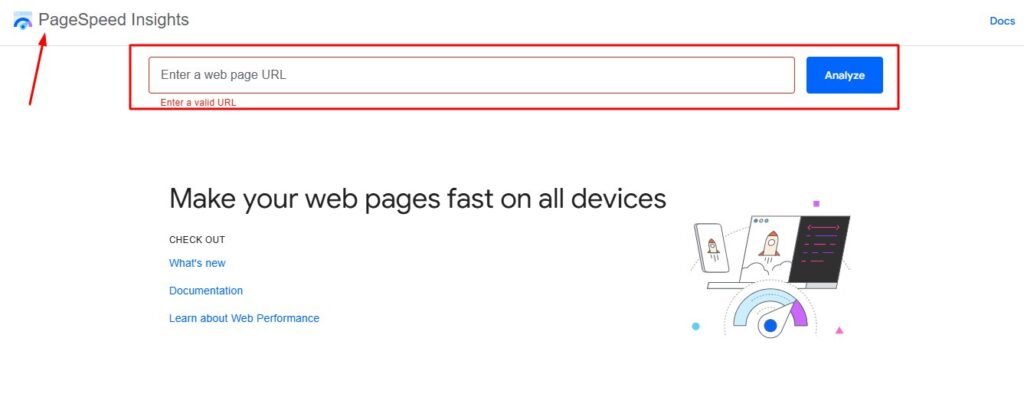
The best free tool for this is Google PageSpeed Insights. Go to pagespeed.web.dev and enter your full website URL. The tool will analyze both your mobile and desktop performance and give you a score from 0 to 100.
Aim for a score of at least 70 on both mobile and desktop. Anything below 50 indicates serious performance issues that are likely already affecting your search rankings.
The results page also shows you exactly which elements are slowing your site down, ranked by the biggest impact. This makes it easy to know where to focus your optimization efforts first.
What Are Core Web Vitals and Why They Affect WordPress Rankings
Core Web Vitals are three specific performance measurements that Google uses as a ranking signal. They measure real user experience rather than just technical speed.
The three measurements are:
Largest Contentful Paint (LCP) — This measures how long it takes for the largest visible element on your page to fully load. Ideally this should happen within 2.5 seconds.
Cumulative Layout Shift (CLS) — This measures whether your page layout jumps around while it is loading. A high CLS score means elements are moving unexpectedly which creates a poor experience for visitors.
Interaction to Next Paint (INP) — This measures how quickly your page responds when a visitor clicks something or interacts with it.
You can check your Core Web Vitals report inside Google Search Console under the Experience section. Pages marked as Poor should be your top priority to fix.
Common Speed Problems on WordPress Sites and How to Fix Them
These are the speed issues I encounter most frequently during WordPress audits:
Large unoptimized images — This is by far the most common cause of slow WordPress sites. Images that have not been compressed can easily be 10 to 20 times larger than they need to be. Use a plugin like Smush or ShortPixel to compress images automatically.
No caching plugin installed — Caching stores a static version of your pages so they load faster for returning visitors. Install a caching plugin like WP Rocket or the free W3 Total Cache.
Too many active plugins — Each plugin adds code that your server has to process. Audit your plugins and deactivate any you are not actively using.
Unminified JavaScript and CSS files — Minification removes unnecessary spaces and characters from code files to make them smaller. Most caching plugins handle this automatically.
Too many page requests — If a single page makes more than 20 requests to load scripts, fonts, and stylesheets, your load time will suffer significantly. Combine files where possible and remove anything unnecessary.
Step 5 : Find and Fix Broken Links on Your WordPress Site
Broken links are one of those problems that sneak up on you over time. As you update content, rename pages, delete posts, or restructure your site, links that used to work start pointing to pages that no longer exist.
Every broken link creates a 404 error page. This tells Google that your site is not properly maintained and wastes the crawl budget that search engine bots use when visiting your site.
Why Broken Links Hurt Your WordPress SEO Rankings
When Google finds a broken link on your site, it stops following that path. Any SEO value that would have flowed through that link to the destination page is lost. Over time, a site with many broken links sends a negative signal about overall content quality.
From a user experience perspective, broken links are even more damaging. A visitor who clicks a link and lands on a 404 error page is very likely to leave your site immediately. High bounce rates from 404 errors can indirectly affect your rankings over time.
How to Find Broken Links in WordPress for Free
AIOSEO includes a built-in broken link checker that scans your entire WordPress site and lists every broken link in one organized dashboard. You can find it under All in One SEO then Link Assistant.
The tool shows you exactly which page has the broken link, what the broken URL is, and gives you options to fix it without opening each post manually. This saves an enormous amount of time on sites with large amounts of content.
If you want a more technical scan, Screaming Frog is a desktop-based crawler with a free version that checks up to 500 URLs. It gives you a detailed breakdown of all 404 errors, redirect chains, and other link issues across your site.
How to Fix 404 Errors in WordPress
The most effective way to fix a 404 error is to set up a 301 redirect from the broken URL to the correct page. A 301 redirect tells Google permanently that the content has moved to a new location and passes the ranking signals along with it.
You can set up 301 redirects directly inside AIOSEO under the Redirects section. Just enter the old broken URL and the correct destination URL and save. The plugin handles everything else automatically.
Step 6 : Audit Your XML Sitemap and Robots.txt File
These two files are among the most important technical elements on your WordPress site. They directly control how Google discovers and crawls your content. Yet many WordPress site owners have never looked at them.
How to Check If Your WordPress Sitemap Is Working
Your XML sitemap is a file that lists every important page on your website. It acts as a roadmap for search engine crawlers, making it easy for Google to find and index all your content quickly.
To check if your sitemap exists, open a new browser tab and go to:
yourwebsite.com/sitemap.xml
If your sitemap is working correctly, you will see a structured list of your pages and posts. If you see an error or a blank page, your sitemap is not set up properly.
AIOSEO generates a sitemap automatically once you install the plugin. You can customize what gets included in the sitemap — for example, excluding tag pages or author archives that you do not want Google indexing.
How to Submit Your Sitemap to Google Search Console
Having a sitemap is not enough on its own. You need to tell Google where to find it.
Log into Google Search Console and click on Indexing then Sitemaps in the left sidebar. Enter your sitemap URL in the field provided and click Submit. Google will then use your sitemap to discover and crawl your pages more efficiently.
After submitting, check back after a few days to confirm Google has processed the sitemap successfully. Search Console will show you how many URLs were submitted and how many were successfully indexed.
How to Check Your Robots.txt for SEO Errors
Your robots.txt file gives instructions to search engine crawlers about which parts of your site they are allowed to access. It is a powerful file and a misconfigured robots.txt can accidentally block Google from crawling important pages.
To view your robots.txt, go to:
yourwebsite.com/robots.txt
Look for any lines that start with Disallow: followed by a slash or an important directory path. A line like Disallow: / blocks your entire site from being crawled. This should only ever appear on development sites, never on a live website.
Also check that your CSS and JavaScript files are not blocked. Google needs to access these files to properly render your pages. If they are disallowed, Google may not be able to understand your page layout correctly.
Step 7 : Check HTTPS Security and URL Canonicalization
Security and URL consistency might not sound exciting but they have a direct impact on your WordPress SEO rankings. Google gives a ranking preference to secure sites and penalizes sites with duplicate URL issues.
How to Make Sure Your WordPress Site Has HTTPS
Open your website in a browser and look at the address bar. You should see a padlock icon before your domain name. This indicates your site is running on HTTPS with a valid SSL certificate.
If you see “Not Secure” or an open padlock, your SSL certificate is either not installed or not configured correctly. Most web hosting providers offer free SSL certificates through Let’s Encrypt. Contact your host and ask them to activate it for your domain.
After activating SSL, update your WordPress URL settings. Go to Settings then General and make sure both your WordPress Address and Site Address begin with https not http. Then use a plugin like Really Simple SSL to handle the full site migration automatically.
How to Fix Duplicate URL Versions in WordPress
One of the most common technical SEO problems I find during WordPress audits is multiple working versions of the same website URL. For example:
- http://yoursite.com
- https://yoursite.com
- http://www.yoursite.com
- https://www.yoursite.com
All four of these might technically load your homepage. But to Google, they look like four separate websites. This splits your ranking power and creates duplicate content issues.
You need to pick one version as your primary URL and redirect all others to it. Most hosting control panels have a redirect tool. If yours does not, you can add redirect rules directly to your .htaccess file or use AIOSEO to handle it automatically.
What Is a Canonical URL and Why WordPress Sites Need It
A canonical URL is a tag that tells Google which version of a page is the official, preferred version. This is especially important for WordPress sites where the same content can often be accessed through multiple URLs — such as a post appearing in a category archive, a tag page, and its own direct URL.
AIOSEO automatically sets canonical tags on all your WordPress pages when you install it. This tells Google exactly which URL to count for ranking purposes and prevents your own pages from competing against each other in search results.
Step 8 : Audit Internal Linking and Fix Orphan Pages
Internal linking is one of the most underrated parts of WordPress SEO. I have seen sites dramatically improve their rankings simply by fixing their internal link structure — without adding a single new piece of content or building a single backlink.
What Are Orphan Pages and Why They Hurt WordPress SEO
An orphan page is a page on your WordPress site that has no other pages linking to it. Google discovers pages mainly by following links from one page to another. If a page has no internal links pointing to it, Google has a very hard time finding and ranking it.
Think of internal links as roads connecting your pages. Orphan pages are like buildings with no roads leading to them. They exist but nobody can find them easily.
Even if you have excellent content on an orphan page, it will likely rank far below its potential simply because Google does not see any of your other pages referencing it as important.
How to Build a Strong Internal Linking Structure in WordPress
The simplest internal linking rule I follow is this: every time I publish a new post, I add links to at least two or three related older posts within the new content. Then I go back to those older posts and add a link to the new one.
This creates a web of connected content that helps Google understand the relationship between your pages and distributes ranking signals across your entire site.
Here are some practical internal linking habits to build:
- Link to your most important pages from multiple other pages
- Use descriptive anchor text that tells the reader and Google what the linked page is about
- Avoid generic anchor text like “click here” or “read more”
- Link to related content naturally within the body of your articles
- Check that your most important posts are no more than two to three clicks away from your homepage
Using AIOSEO Link Assistant to Fix Internal Links
AIOSEO includes a Link Assistant feature that automatically identifies orphan pages on your WordPress site and suggests relevant pages to link to them from. This is incredibly useful on larger sites where manually finding every orphan page would take hours.
Navigate to All in One SEO then Link Assistant in your dashboard. The tool shows you every page that currently has no internal links and recommends other posts on your site from which you could add a link. You can implement the suggested links with just a few clicks without opening each post individually.
Step 9 : Check Mobile Friendliness and WordPress Theme SEO
Since Google switched to mobile-first indexing, your mobile experience is now the primary version Google uses to determine your rankings. If your WordPress site looks or performs poorly on a smartphone, your desktop rankings will suffer regardless of how good your desktop version looks.
How to Test If Your WordPress Site Is Mobile Friendly
The easiest way to check is to use Google’s free Mobile-Friendly Test at search.google.com/test/mobile-friendly. Enter your URL and the tool will show you how Google sees your page on a mobile device and flag any specific issues.
You can also simply open your website on your own smartphone and click through it honestly. Ask yourself: Is the text readable without zooming in? Do buttons have enough space to tap accurately? Do images scale properly to the screen? Does the page load within a few seconds?
If any of those answers are no, you have mobile SEO issues to address.
What to Look for in an SEO Friendly WordPress Theme
Your WordPress theme plays a bigger role in your SEO performance than most people realize. A poorly coded theme can slow your site down, create heading structure problems, and generate unnecessary code that confuses search engines.
When choosing or evaluating your current theme, look for these characteristics:
- Responsive design that adapts cleanly to all screen sizes
- Lightweight code without unnecessary scripts and stylesheets
- Proper heading hierarchy built into the theme structure
- Fast default loading speed with minimal bloat
- Regular updates from the developer showing active maintenance
- Good reviews from other users regarding both performance and support
If your current theme is slow, bloated, or generating SEO issues that are difficult to fix, it may genuinely be worth switching to a more SEO-friendly option.
How to Fix Common Mobile SEO Issues in WordPress
The most common mobile SEO issues I fix during WordPress audits include:
Text that is too small to read — Set your body font size to at least 16px so it is comfortable to read on small screens without zooming.
Buttons and links too close together — Touch targets should be large enough to tap easily. Give buttons enough padding and space them apart.
Images that overflow the screen — Add max-width: 100% to your image CSS so they automatically resize to fit any screen.
Intrusive popups on mobile — Google penalizes pages with popups that cover the main content on mobile devices. If you use popups, make sure they are small and dismissible.
Malware and security vulnerabilities — Scan your WordPress site regularly for malware using a plugin like Wordfence or Sucuri. Google may lower your rankings or flag your site as dangerous if it detects security issues.
Step 10 : Check Duplicate Content and Schema Markup
Duplicate content and schema markup are two advanced audit areas that many WordPress site owners overlook completely. Addressing both can give you a meaningful edge over competitors who are ignoring them.
How to Find Duplicate Content on Your WordPress Site
Duplicate content happens when the same or very similar content appears on multiple URLs within your site. WordPress can create duplicate content situations in several ways — through category pages, tag archives, author pages, and pagination.
The tool I use to detect duplicate content is Siteliner at siteliner.com. Enter your domain and it will crawl your site and show you what percentage of your content is duplicated across different pages. It also shows you exactly which pages are affected.
If Siteliner flags a high percentage of duplicate content, the solution is usually to set canonical tags on the duplicate pages pointing back to the original, or to configure your AIOSEO settings to noindex certain archive page types that are creating the duplication.
How to Add Schema Markup to WordPress for SEO
Schema markup is a type of code that you add to your pages to give Google additional structured information about your content. It helps Google understand not just what your content says, but what type of content it is — an article, a recipe, a product review, a FAQ, and so on.
When schema markup is set up correctly, Google can use it to display rich results in search — enhanced listings that include ratings, prices, FAQ dropdowns, and other visual elements that increase click-through rates significantly.
AIOSEO handles schema markup for you automatically. It detects the content type of each page and adds the appropriate schema code in the background. You can also manually select schema types for specific pages from the AIOSEO settings panel in the post editor.
To verify your schema is working correctly, use the Rich Results Test tool at search.google.com/test/rich-results. Enter your page URL and the tool will show you exactly what structured data Google detects and whether it qualifies for rich result display.
How to Check If Your Open Graph Tags Are Set Up Correctly
Open Graph tags control how your WordPress pages appear when someone shares them on social media platforms. If these tags are missing or incorrect, your shared links will appear without a proper title, image, or description — which significantly reduces clicks from social platforms.
To check your Open Graph tags, open any page on your site, right-click anywhere on the page, and select View Page Source. Then use Ctrl+F or Command+F to search for og:title. You should see a set of tags that look like this in your page source:
<meta property="og:title" content="Your Page Title">
<meta property="og:description" content="Your page description">
<meta property="og:image" content="https://yoursite.com/image.jpg">
If these tags are missing, AIOSEO adds them automatically once you configure your social media settings inside the plugin. Go to All in One SEO then Social Networks and enter your social profile details to activate Open Graph support across your entire site.
Free SEO Audit Tools for WordPress (No Budget Needed)
You do not need to spend any money to run a thorough WordPress SEO audit. Every tool I have mentioned throughout this guide has a free version that is more than capable of identifying your most important issues.
Here are the free tools I recommend and what each one does best:
Google Search Console — The most important free SEO tool available. It shows you exactly how Google sees your site, which pages are indexed, which keywords you rank for, where you have Core Web Vitals issues, and any crawl errors Google has encountered. Connect this first before anything else.
Google PageSpeed Insights — Free speed and performance analysis for both mobile and desktop. Shows your Core Web Vitals scores and gives specific suggestions for improvement with clear priority levels.
All in One SEO (AIOSEO) — The free version of this plugin gives you an automated on-page SEO audit directly inside your WordPress dashboard. It is the most practical audit tool for WordPress specifically because everything is built into the platform you are already using.
Screaming Frog SEO Spider — A desktop-based website crawler with a free version that checks up to 500 URLs. Excellent for finding broken links, duplicate page titles, missing meta descriptions, and redirect issues across your entire site.
Ubersuggest — Offers a free site audit function with keyword tracking and competitor analysis. Good for getting a broader picture of your SEO health including backlink data.
Siteliner — Specializes in duplicate content detection. Free to use and gives you a clear percentage score showing how much of your content is duplicated across different pages.
Schema.org Rich Results Test — Free tool from Google to validate your schema markup and check whether your pages qualify for rich result features in search.
How to Check Your SEO Score in WordPress
Getting a quick snapshot of your overall SEO health is something I do regularly between full audits. It takes less than a minute and gives you a clear sense of whether your optimizations are moving the needle.
The fastest way to check your SEO score inside WordPress is through the AIOSEO plugin. Go to All in One SEO then SEO Analysis in your dashboard. The tool gives you an overall health percentage along with a breakdown of critical errors, warnings, and recommendations.
Use this scoring guide:
- 85% and above — Your site is well optimized. Focus on content quality and ongoing improvements.
- 70% to 84% — Good foundation but with clear issues worth addressing. Work through warnings systematically.
- 50% to 69% — Moderate problems that are affecting your rankings. Prioritize fixing critical errors first.
- Below 50% — Significant SEO problems present. Start with the most critical issues immediately.
For a second opinion from outside your WordPress dashboard, use SEOptimer at seoptimer.com. Enter your domain and it gives you a detailed free audit report covering on-page SEO, performance, social, security, and usability with an overall letter grade.
Track your score over time after each audit. Watching the score improve as you fix issues is a clear sign that your work is having a real impact.
WordPress SEO Audit Checklist (Quick Reference)
Use this checklist every time you run a WordPress SEO audit. Go through each item systematically and tick it off as you complete it.
Indexing and Visibility
- Search engines not blocked in Settings then Reading
- Site visible in Google using site:yourdomain.com search
- Google Search Console connected and verified
- XML sitemap submitted to Google Search Console
Technical SEO
- HTTPS active with valid SSL certificate installed
- All URL versions redirecting to one canonical version
- Robots.txt file not blocking important pages or files
- XML sitemap present and loading correctly at yoursite.com/sitemap.xml
- No crawl errors reported in Google Search Console
- Canonical tags set on all pages
On-Page SEO
- Unique meta title on every post and page (under 60 characters)
- Unique meta description on every post and page (120 to 155 characters)
- Exactly one H1 tag per page
- Logical heading structure using H2 and H3 tags
- Alt text added to all images
- No thin content pages under 300 words
Performance
- PageSpeed Insights score above 70 on mobile and desktop
- Core Web Vitals passing in Google Search Console
- Images compressed and optimized
- Caching plugin installed and active
- Unnecessary plugins deactivated
Links
- No broken links creating 404 errors
- 301 redirects set up for any changed or deleted URLs
- Strong internal linking connecting all important pages
- No orphan pages with zero internal links
Mobile and Security
- Site passes Google Mobile-Friendly Test
- Responsive WordPress theme in use
- Regular malware scans completed
- No Google security warnings active on the domain
Advanced
- Duplicate content percentage checked with Siteliner
- Schema markup validated with Rich Results Test
- Open Graph tags present in page source
- No orphan pages identified in AIOSEO Link Assistant
How Long Does It Take to See Results After a WordPress SEO Audit
This is one of the most common questions I get after walking someone through an SEO audit. And I always give an honest answer rather than promising instant results.
SEO takes time. But the good news is that different types of fixes produce results on different timelines, and some improvements can happen faster than you might expect.
Technical fixes — Changes like unblocking indexing, fixing broken links, setting up redirects, and activating SSL can show results within days to a few weeks. Google recrawls frequently and picks up technical changes relatively quickly.
On-page fixes — Updating meta titles, descriptions, alt text, and heading structure typically takes four to eight weeks to show ranking improvement. Google needs to recrawl, reprocess, and re-evaluate your pages after changes.
Content improvements — Expanding thin content, improving internal linking, and adding schema markup generally takes two to three months before you see meaningful ranking movement. Google evaluates content quality over time.
New site ranking timeline — If your WordPress site is brand new with very little existing authority, expect three to six months of consistent effort before seeing significant organic traffic from Google. This is normal and expected.
The best thing you can do is focus on fixing issues consistently and tracking your progress through Google Search Console. Check your average position for target keywords monthly. Over time the trend should move steadily in the right direction.
Frequently Asked Questions About WordPress SEO Audits
What is the difference between a technical SEO audit and an on-page SEO audit for WordPress?
A technical SEO audit focuses on the behind-the-scenes elements of your WordPress site. This includes things like site speed, crawlability, XML sitemaps, robots.txt, HTTPS security, and URL structure. These are factors that affect how search engines access and index your site.
An on-page SEO audit looks at the content side of things. This covers meta titles, meta descriptions, heading structure, image alt text, internal linking, and content quality on individual pages.
Both audits are equally important. I always recommend running both together as part of a complete WordPress SEO audit rather than treating them as separate tasks.
How often should I run an SEO audit on my WordPress website?
I personally run a light audit every month and a full detailed audit every two to three months. The monthly check involves reviewing Google Search Console for new errors and running a quick AIOSEO analysis. The full audit goes through every step in this guide systematically.
If you just launched your WordPress site, run a full audit immediately before focusing on content creation. If you made major changes to your site such as switching themes, restructuring URLs, or migrating hosting, run a fresh audit right away.
Can I do a WordPress SEO audit without any paid tools?
Yes, absolutely. You can run a thorough WordPress SEO audit using completely free tools. Google Search Console, Google PageSpeed Insights, the free version of AIOSEO, Screaming Frog (up to 500 URLs), Siteliner, and the Rich Results Test from Google are all free and cover every major area of a proper audit.I have done full audits on WordPress sites using nothing but free tools and achieved strong results. Paid tools offer more data and automation but they are not necessary to identify and fix the most impactful SEO issues on your site.
What is the most common SEO mistake I will find on a WordPress site?
In my experience the single most common mistake is the indexing checkbox. Far too many WordPress sites have the “Discourage search engines from indexing this site” option accidentally left checked after the site launches. This blocks Google from seeing the entire website.
After that the most frequent issues I find are missing meta descriptions, images without alt text, no XML sitemap submitted to Google Search Console, and pages with duplicate title tags. These are all easy to fix once you know where to look.
How long does a WordPress SEO audit take to complete?
A basic audit using AIOSEO and Google Search Console takes about 30 to 60 minutes. A thorough manual audit covering all 10 steps in this guide typically takes two to four hours depending on the size of your site and how many issues you find.
For larger WordPress sites with hundreds of pages, a full technical audit using tools like Screaming Frog can take longer. But for most small to medium sized sites, a few focused hours is enough to identify and prioritize every major issue.
Will fixing SEO audit issues guarantee my WordPress site ranks on page one of Google?
No tool or audit process can guarantee page one rankings. What a WordPress SEO audit does is remove the technical and on-page barriers that are preventing your site from ranking as well as it could. Think of it as clearing the path so your content has the best possible chance to rank.
Rankings also depend on your content quality, your backlink profile, your competition level, and how consistently you publish and optimize. A clean technical foundation combined with strong content and patience is what gets WordPress sites to page one over time.
What should I fix first after running a WordPress SEO audit?
Always start with the issues that block Google from accessing your site. Fix the indexing settings, set up Google Search Console, and submit your XML sitemap first. These are foundation issues and nothing else matters until Google can properly crawl and index your pages.
After that prioritize critical errors over warnings. In AIOSEO the issues are color coded by severity. Fix red critical errors first, then orange warnings, then blue notices. This order ensures you get the biggest ranking impact from your effort as quickly as possible.
Does a WordPress SEO audit help with local SEO as well?
Yes it does. Many of the technical and on-page issues that a WordPress SEO audit uncovers affect local search rankings just as much as national or global rankings. Things like HTTPS security, page speed, mobile friendliness, and proper meta tags all matter for local SEO too.
If you are targeting local customers, make sure your audit also includes checking for consistent business name, address, and phone number information across your pages, and verify that your Google Business Profile is connected and properly set up alongside your WordPress SEO audit.
Is AIOSEO the best plugin for running a WordPress SEO audit?
AIOSEO is the plugin I personally use and recommend because it handles the full audit workflow directly inside your WordPress dashboard. It covers on-page analysis, broken link checking, internal link management, schema markup, sitemap generation, and redirect management all in one place.
That said, Yoast SEO and Rank Math are also solid alternatives that many WordPress users prefer. All three have free versions capable of running a basic audit. The best plugin is ultimately the one you will actually use consistently.
What is a good SEO health score for a WordPress website?
Based on my experience using AIOSEO, a score above 85 percent means your site is well optimized and in good technical shape. A score between 70 and 84 percent is decent but has room for improvement. Anything between 50 and 69 percent means there are moderate issues affecting your rankings. Below 50 percent signals serious problems that need urgent attention.
Final Thoughts : Make WordPress SEO Audits a Regular Habit
When I first started doing WordPress SEO audits, I approached them as a one-time task. I would fix everything, feel satisfied, and then forget about it for a year. That approach does not work.
SEO is not a one-time project. It is an ongoing process. New pages get published, old links break, plugins update and change how your site renders, and Google updates its algorithm and expectations over time. All of these things can introduce new SEO issues between your audits.
My recommendation is to run a quick informal audit once a month — just check Google Search Console for any new errors and run a fresh AIOSEO analysis. Then do a thorough full audit every two to three months using all the steps in this guide.
The sites I have seen grow the fastest are the ones where the owner treats SEO as a regular maintenance habit rather than an emergency fix. Small consistent improvements compound over time into significant ranking gains.
If this guide felt like a lot to take in, start with just the first three steps. Get Google able to find your site, run the AIOSEO audit, and fix your most critical on-page issues. That alone puts you ahead of most WordPress site owners who have never audited their site at all.
Bookmark this page, work through the checklist at your own pace, and come back to it each time you run your next audit. Your rankings will thank you for it.